Friday 31 March 2017

Country Livin'

Welcome,

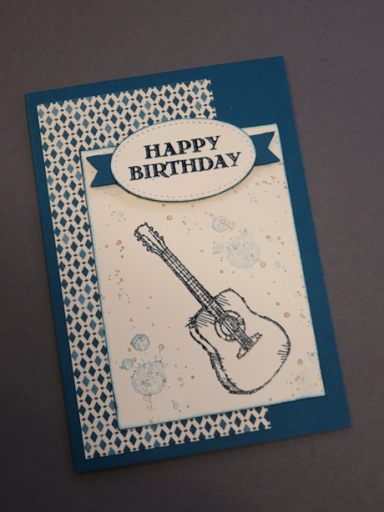
Did you know that you can emboss an image even if you don't have the particular coloured embossing powder? I embossed the sentiment and guitar on this card. This would be a great card for a teenager.


This is how to emboss without coloured embossing powder. Ink your stamp with VersaMark (#102283) as usual, then ink the stamp with the coloured ink then stamp onto the card. Apply Clear Stampin' Emboss powder (#109130) and heat set with the Heat Tool (#129056). So if you have Clear embossing powder you can emboss any colour you require. The guitar is from the Country Livin' stamp set (#c141925, #w141922), the sentiment is from Guy Greetings stamp set (#c138828, #w138825, #p137178) and the splotches are from the Gorgeous Grunge stamp set (#c130517, #w130514). The splotches were stamped with Crumb Cake ink (#121685) and Dapper Denim ink (#141394) using the stamping off method. Dapper Denim ink was also used for the embossing.The cardstock is Dapper Denim (#141419) and Very Vanilla (#106550) with Moroccan Designer Series Paper (#141645). The oval was cut with the Stitched Shapes Framelits Dies (#145372), and the banner was cut using the Bunch of Banners Framelits (#141488). Stampin' Dimesionals (#104430) were used to attach the sentiment to the card.

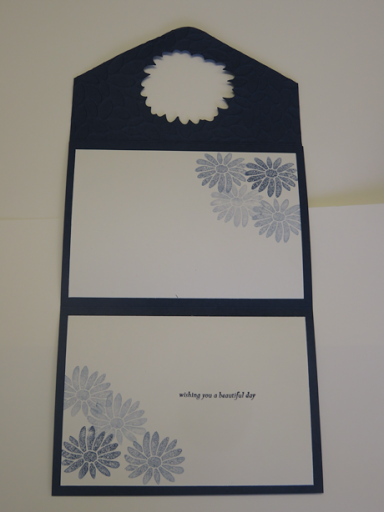
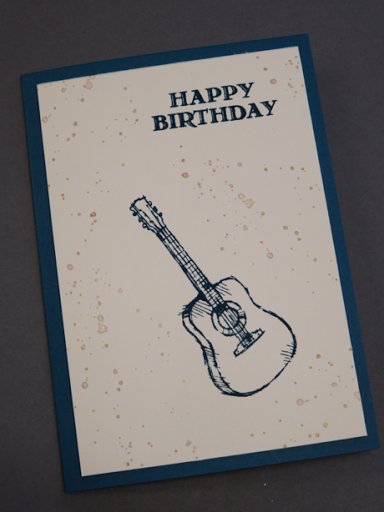
 Now, I wanted to show what a difference just a couple of changes can make to a card. Here is a very basic card using the same stamp sets as above -


Then using framelits and the Dapper Denim splotches-


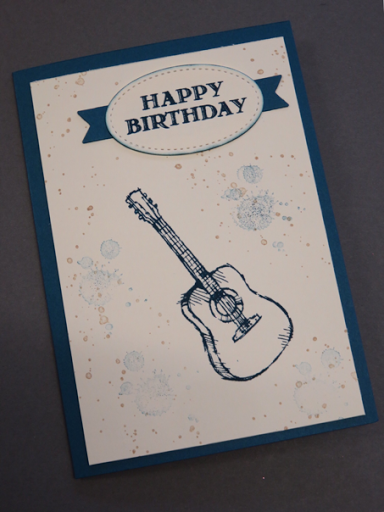
Then adding a piece of DSP,  reducing the size of the Very Vanilla card and embossing the guitar and sentiment as on the first card.


Till next time,

Happy Stamping!


Lesley.


Lesley Jendra,

Independent Stampin' Up! Demonstrator.


www.lesleyjendra.stampinup.net


lesleyjendra@bigpond.com.au

Thursday 30 March 2017

Stylish Stems Framelits Dies Scrapbook Page

Hi to everyone,

What do you do when authorities say to stay indoors because of the bad weather? Scrapbooking of course. I hope everyone is staying safe in these terrible conditions.


This page was inspired from the card I made for yesterday's blog. The Designer Series Paper is from the Falling In Love DSP (#142788) and the Moroccan DSP (#141645). I used the Gold and Very Vanilla ribbon from the 3/8"Metallic Ribbon Combo Pack (#143601) from Sale-a-bration. All the flowers and leaves are cut using the Stylish Stems Framelits Dies (#142750). I used the Sweet Sugarplum and Mint Macaron from the beautiful Glimmer Paper Assortment Pack (#143831), also from SAB. The gold flower was cut from the Gold Glimmer Paper (#133719) and this was glued to Blushing Bride card (#131287). I also used Gold Foil Sheet (#132622) for the base of the small flower. The border pieces are cut with a die from the Flourish Thinlits (#141478). The butterflies are cut with the Bold Butterfly Framelits (#138135) and Butterflies Thinlits (#137360). The Tags & Labels Framelits (#138282) were used for the label and I added the gold heart from the Metallic Enamel Shapes (#141678). The photo was matted with Blushing Bride card (#131287) and Rich Razzleberry (#119981). All the flowers, leaves and borders were attached to the page using the Fine-Tip Glue Pen (#138309). This glue is great for these delicate cutouts.
I love how this page has turned out, especially when the finished results are just how you imagined it at the beginning.

Stay safe.

Till next time,

Happy Stamping!


Lesley.


Lesley Jendra,

Independent Stampin' Up! Demonstrator.


www.lesleyjendra.stampinup.net


lesleyjendra@bigpond.com.au


Wednesday 29 March 2017

Butterflies Thinlits

Hello ladies,

Realising I didn't have a card for todays blog, and needing to clean the desk and not having a lot of time, then 5 minutes later had this card made. Wow. As I looked at the mess on the desk, I found a piece of DSP and gold butterfly and thought I can make a card with that, and this is the end result which I was pretty pleased with.


The base card is Very Vanilla (#106550) and this was embossed with the Petal Burst Textured Impressions Embossing Folder (#141493). The DSP is from the Falling In Love Designer Series Paper (#142788) and the ribbon is from the 3/8" Metallic Ribbon Combo Pack (#143601) from Sale-a-bration. The butterflies are cut with the Bold Butterfly Framelits (#138135) for the small butterfly, and the Butterflies Thinlits (#137360) for the larger one. These were cut from Gold Foil Sheets (#132622) and Blushing Bride card (#131172) and both attached with Stampin' Dimensionals (#104430). I added Pearl Basic Jewels (#119247) to the body of the butterfly. The sentiment is from the Butterfly Basics stamp set (#c138816, #w138813, #p137154). This was stamped with VersaMark (#102283) and Gold Stampin' Emboss Powder (#109129). I used one of the oval framelits from the Stitched Shapes Framelits (#145372) to cut the sentiment and the edge was sponged with Blushing Bride ink (#131172).

Well this was a quick and easy card, so I guess it's now time to clean the desk.


Till next time,

Happy Stamping!


Lesley.


Lesley Jendra,

Independent Stampin' Up! Demonstrator.


www.lesleyjendra.stampinup.net


lesleyjendra@bigpond.com.au


Tuesday 28 March 2017

Birthday Blooms Scrapbook Page

Hello,

After stamping the A4 page as shown in yesterdays blog, I then decided to do a scrapbook page but the black ink wasn't suitable for this page so I stamped with Blushing Bride ink (#131172). I did stamp the whole page which looked great but after adding everything to it, you can't see much of the background.


The base page is Night Of Navy 12x12" card from the Regals Collection (#131188). I stamped the flowers from the Birthday Blooms stamp set (#c140658, #w140655) on 12x12" Whisper White card (#124302). The Designer Series Paper is Pink Pirouette from the Subtles Collection DSP Pack  (#138437). I used the framelit from the Window Box Thinlits Dies to cut the hearts, then cut the squares using the Layering Squares Framelits (#141708). The pink card around the photo and used for the hearts is Pink Pirouette (#116203). The letters are cut with an electronic cutter using Night Of Navy card and glued with the Fine Tip Glue Pen (#138309).


Till next time,

Happy Stamping!


Lesley.


Lesley Jendra,

Independent Stampin' Up! Demonstrator.


www.lesleyjendra.stampinup.net


lesleyjendra@bigpond.com.au


Monday 27 March 2017

Birthday Blooms

Hi again,

This card was inspired by the Inside The Lines DSP from Sale-a-bration. I stamped the beautiful flower from the Birthday Blooms stamp set (#c140658, #w140655) using StazOn Jet Black ink (#101406). This ink is a permanent ink so is suitable to use for watercolouring. However I just wanted this in black and white.


The finished card size is 15x15cm. The Whisper White card (#106549) was cut 14x14cm, 10x10cm and 6x6cm. The Basic Black card was cut 5mm larger than the white card. To stamp on the 2 larger pieces of white card so that the stamping matches when you put the card together, I placed the middle  piece of white card exactly where I wanted it on the larger piece and secured it with post it notes. Then I stamped the images.


You can see that there is a small area around the card that isn't stamped but this is covered when the Basic Black card is attached to the white card. The sentiment is also from the Birthday Blooms stamp set. I added the Rhinestone Basic Jewels (#119246) under the sentiment.

I also stamped this flower on a piece of A4 cardstock, so will use this on another project. It's so easy to make your own DSP.


Till next time,

Happy Stamping!


Lesley.


Lesley Jendra,

Independent Stampin' Up! Demonstrator.


www.lesleyjendra.stampinup.net


lesleyjendra@bigpond.com.au


Sunday 26 March 2017

Stylish Stems Framelits Dies

Hello friends,

I guess I could call this an envelope card, as that's what it looks like.


The Night Of Navy base card (#106577) is a normal size card, then the flap has been added. The flap is cut at 14.9 cm x 9.5cm. I scored at 1cm along the long side. I marked at the halfway point on the opposite side at 7.5cm and on each side at 4.5cm from the scoreline. Then I cut the v shape for the flap. See diagram below , it's probably easier to understand.


I cut the outline of the flower on the flap using the Framelit from the Stylish Stems Framelits Dies (#142750), then embossed the flap with the Petal Burst Textured Impressions Embossing Folder (#141493). Always cut with the framelits first before embossing. If you do it the other way, you will flatten out the embossed pattern. Then using Whisper White card (#106549) I cut another flower using the same framelit. I coloured this with a dauber and Cherry Cobbler ink (#126966) around the outside, then So Saffron (#126957) in the centre of the flower. I cut another flower using the detailed flower framelit using Cherry Cobbler card (#121681). I added glitter to this with the Clear Wink Of Stella Glitter Brush (#141897). I glued this to the base flower that I coloured, using the Fine Tip Glue Pen (#138309). The centre was coloured with the Gold Wink Of Stella Glitter Brush (#141898).
The DSP is from the Floral Boutique Designer Series Paper (#141663). To attach the flap to the card, ensure you have the card so that the opening is at the top and attach the flap to the back top of the card. To attach the flower, close the flap over the front of the card and position the card to line up with the cutout on the flap. I attached the flower with Stampin' Dimensionals (#104430). Congratulations is from the Best Birds stamp set (#p141525), stamped with Cherry Cobbler ink (#126966) and cut with a framelit from the Bunch Of Banners Framelits (#141488). This was also attached with Dimensionals. Ensure the Dimensionals are only on the outer edges of the banner so the flap can tuck under it.
I also decorated inside the card. I should do this more often. I stamped the smaller flowers from the Special Reason stamp set (#142899) using Night of Navy ink (#126970) and using the stamping off method. I actually stamped twice on scrap paper, then stamped 4 times on the Whisper White card without re-inking. The sentiment is also from the Special Reason stamp set and stamped with Night Of Navy ink.


Have a great day.


Till next time,

Happy Stamping!


Lesley.


Lesley Jendra,

Independent Stampin' Up! Demonstrator.


www.lesleyjendra.stampinup.net


lesleyjendra@bigpond.com.au


Saturday 25 March 2017

Tarnished Foil with Butterflies

Hello everyone,

Today I have experimented with the Tarnished Foil technique again, but using it for a feminine card which I love the results.


I have used the Petal Burst Textured Impressions Embossing Folder (#141493) for these cards. The only difference with the backgrounds is that I embossed the first one with the Gold Foil (#132622) so the Petals were debossed and the 2nd card the Petals are raised. To do this just turn one of the pieces of foil upside down in the embossing folder. Once I embossed the Foil Sheet, I rubbed the Jet Black StazOn ink pad (#101406) over the embossed area. Don't cover the area evenly as it looks better this way. I then rubbed the VersaMark pad (#102283) randomly over the area, again its best not to cover the whole area evenly. I sprinkled Gold Stampin' Emboss Powder (#109129) over the Foil, then heat set with the Heat Tool (#129056). I again rubbed the Black ink over the top, and repeated the process with Copper Stampin' Emboss Powder (#141636), black ink, Silver Stampin' Emboss Powder (#109131) and finishing with the black ink. As you can see on the 2 cards, the black ink will colour the raised areas, so the petals are coloured on the second card and the bits between the petals are coloured on the first card.
The cardstock I have used are Crushed Curry (#131288) and Basic Black (#121688). The sentiments are from the Best Birds stamp set (#p141525) and stamped with VersaMark and Gold Stampin' Emboss Powder. This was cut with the Stitched Shapes Framelits Dies (#145372). The butterflies were cut with the Bold Butterfly Framelits (#138135) and Butterflies Thinlits (#137360). One of the Flourish Thinlits (#141478) was used to cut the border piece under the sentiment. I added Rhinestone Basic Jewels (#119246) to the butterflies. Stampin' Dimensionals (#104430) were used to attach the sentiment and butterflies to the card.

Till next time,

Happy Stamping!


Lesley.


Lesley Jendra,

Independent Stampin' Up! Demonstrator.


www.lesleyjendra.stampinup.net


lesleyjendra@bigpond.com.au

Friday 24 March 2017

Nailed It Bundle

Hi,

The love the Tarnished Foil technique I have used on this card and particularly suits a masculine card, although I will also experiment with it for a feminine card.


I used Silver Foil Sheet (#132178), which was embossed with the Hexagons DynamicTextured Impressions Embossing Folder (#143231). Using the Jet Black StazOn ink pad (#101406), I rubbed randomly over the embossed sheet. Then I applied VersaMark (#102283) randomly over the sheet and added Silver Stampin' Emboss Powder (#109131), then heat set with the Heat Tool (#129056). I then added more VersaMark and this time the Copper Stampin' Emboss Powder (#141636). After this was heat set I rubbed this again with StazOn ink. The finished results will be different each time by using different coloured Foil, embossing powders and embossing folders. The tools from the Nailed It stamp set (#c143077, #w143074) were stamped with StazOn ink and cut with the Build It Framelits Dies (#143230). I used Silver Foil, Basic Black card (#121688) and Cajun Craze card (#121683) for the tools. Happy Birthday from Guy Greetings stamp set (#c138828, #w138825, #p137178) was stamped with Jet Black StazOn ink on Cajun Craze card, and cut with one of the Project Life Cards & Labels Framelits, then attached with Stampin' Dimensionals (#104430).

Have a great weekend.

Till next time,

Happy Stamping!


Lesley.


Lesley Jendra,

Independent Stampin' Up! Demonstrator.


www.lesleyjendra.stampinup.net


lesleyjendra@bigpond.com.au


Thursday 23 March 2017

Layered Letters Alphabet

Hello and welcome,

Yes, another scrapbook page. This is a very quick and easy page. I like simple, uncomplicated pages, especially for boys.


I have used Real Red and Pacific Point 12x12" cardstock from the Brights Collection (#131186). The DSP is retired. I find I always have leftover DSP which always comes in handy for a scrapbook page eventually. I stamped the letters from the Layered Letters Alphabet stamp set (#p138692) on Whisper White card (#106549), using Real Red ink (#126949) Pacific Point ink (#126951) and Daffodil Delight ink (#126944). The letters were then cut with the Banners Framelits and I sponged around the banners using the same inks.

Till next time,

Happy Stamping!


Lesley.


Lesley Jendra,

Independent Stampin' Up! Demonstrator.


www.lesleyjendra.stampinup.net


lesleyjendra@bigpond.com.au

Wednesday 22 March 2017

Balloon Scrapbook page

Hello everyone,

I am hoping to get back into scrapbooking a bit more this year, so here is a lovely bright scrapbook page today which would be great for kids birthdays.


I stamped the clouds from the Sprinkles Of Life stamp set (#p139971) on the 12x12" Whisper White base page (#124302), using Tempting Turquoise ink (#126952). The DSP is retired. For the balloons I stamped the card with the same coloured ink - Tangerine Tango card (#116206) and ink (#126946), Pacific Point card (#116202) and ink (#126951), Daffodil Delight card (#121680) and ink (#126944), Real Red card (#106578) and ink (#126949), Perfect Plum card (#108615) and ink (#126963), and Bermuda Bay card (#131286) and ink (#131171). The balloons are punched with the Balloon Bouquet (#140609). This punch punches both the small and large balloons. The card for the rectangles and circles are Tempting Turquoise (#108598) and Daffodil Delight (#121680). The circles are cut using the Layering Circles Framelits (#141705).

Till next time,

Happy Stamping!


Lesley.


Lesley Jendra,

Independent Stampin' Up! Demonstrator.


www.lesleyjendra.stampinup.net


lesleyjendra@bigpond.com.au


Tuesday 21 March 2017

Swirly Scribbles Thinlits

Hi everyone,

My grandson wants a bird for his birthday so this is the card I made for him.


The bird was stamped with VersaMark (#102283) and Gold Stampin' Emboss Powder (#109129) on So Saffron card (#108611). This is of course heat set with the heat Tool (#129056). The co-ordinating framelit to cut the bird is from the Birds & Blooms Thinlits (#141477). The Early Espresso card (#121686) and the Garden Green card (#108605) are cut with the Swirly Scribbles Thinlits (#141497). These were glued to the card with the Multipurpose Liquid Glue (#110755). The base card is Very Vanilla (#106550) and the DSP is from the Moroccan Designer Series Paper (#141645). Happy Birthday which is stamped with Garden green ink (#126973) is from the Birthday Banners stamp set (#p141506), then cut with a Framelit from the Bunch Of Banners Framelits (#141488). The sentiment and bird were both attached with Stampin' Dimensionals (#104430).

Till next time,

Happy Stamping!


Lesley.


Lesley Jendra,

Independent Stampin' Up! Demonstrator.


www.lesleyjendra.stampinup.net


lesleyjendra@bigpond.com.au


Monday 20 March 2017

Rose Wonder

Welcome,


I have been having trouble posting this blog so hopefully it is working now. The photo didn't appear in the previous post so should be right now.


I have done some more watercolouring today. I think I need a bit more practice. I did this one with the Watercolour Pencils (#141709) and Aqua Painter (#103954).  


The cardstock is Real Red (#106578), Basic Black (#121688), Watercolour Paper (#122959) and Whisper White (#106549) for the tag. The flower from Rose Wonder stamp set (#p140697) was stamped with Basic Black Archival ink (#140931). I used Old Olive and Real Red from the Watercolour Pencils, and blended the colour with an Aqua Painter. Thank You from the Circle Of Spring stamp set (#p138964) was stamped with Real Red ink (#126949) and I used the Lots Of Labels Framelits (#138281) to cut this. I cut the end off to give a straight edge. I just realised I also could have used the tag from the Tags & Labels Framelits (#138282) to get the same results. This tag was attached with Stampin' Dimensionals (#104430).


Till next time,

Happy Stamping!


Lesley.


Lesley Jendra,

Independent Stampin' Up! Demonstrator.


www.lesleyjendra.stampinup.net


lesleyjendra@bigpond.com.au

Nailed It Bundle

Hello again,

The Nailed It Bundle (#c144735, w#144734) is great for masculine cards, and particularly suitable for my husband, who had a birthday last week. He is a great handyman and currently renovating our ensuite.


The cardstock is Very Vanilla (#106550), Early Espresso (#121686), Smokey Slate (#131291), So Saffron (#108611) and Silver Foil Sheet (#132178). I stamped all the tools using Smokey Slate ink (#131179) on Smokey Slate card. Then I stamped the hammer and saw on Early Espresso card with Early Espresso ink (#126974) and the screwdriver with So Saffron ink (#126957) on So Saffron card. All the tools were cut with the Build It Up Framelits Dies (#143230). Then I cut the "handles" off and attached them to the smokey slate tools. The screws and ruler are cut from the Silver Foil Sheet. Happy Birthday is from the Big On Birthdays stamp set (#p142877), stamped with Early Espresso ink, and cut with a framelit from the Projects Life Cards & Labels (#135707). The background was stamped with the Hardwood stamp (#c133035, #c133032) using Crumb Cake ink (#126975).

Have a great day.

Till next time,

Happy Stamping!


Lesley.


Lesley Jendra,

Independent Stampin' Up! Demonstrator.


www.lesleyjendra.stampinup.net


lesleyjendra@bigpond.com.au


Wednesday 15 March 2017

Watercolouring with Birthday Blooms

Hi,

Today I have used the small flower from the Birthday Blooms stamp set (#c140658, #w140655) and I have coloured it using the Watercolor Pencils (#141709). 


I stamped the sentiment from Vertical Greetings stamp set (#c141876, #w141873) with Crushed Curry ink (#131173) on the Very Vanilla base card (#106550). The DSP is from the Falling In Love Designer Series Paper (#142788) and this was attached to Early Espresso card (#121686). I stamped the flower on Watercolor Paper (#122959) with Archival Basic Black ink (#140931). This ink is ideal for watercolouring as it won't smudge. I coloured the flower with the Daffodil Delight pencil and blended the colour using the Blender pen (#102845). For the leaves and stem I used the Old Olive pencil. This was then cut with the Stitched Shapes Framelits Dies (#145372). The Crushed Curry card (#131288) was also cut with the Stitched Shapes Framelits, then embossed with the Petal Burst Textured Impressions Embossing Folder (#141493). The dragonflies are cut using the Detailed Dragonfly Thinlits Dies (#142749). These dragonflies are in a group of 5, but I only wanted 2, so cut the others off. They were glued to the card with the Fine -Tip Glue Pen (#138309). Stampin' Dimensionals (#104430) were used to attach the circle to the card.

Till next time,

Happy Stamping!


Lesley.


Lesley Jendra,

Independent Stampin' Up! Demonstrator.


www.lesleyjendra.stampinup.net


lesleyjendra@bigpond.com.au


Tuesday 14 March 2017

Circle Of Spring

Hello,

I made a similar card to this a while back using the dragonfly, so on this one I have used the cute little bee from the Detailed Dragonfly Thinlits Dies (#142749).


The base card is Rose Red (#108613), then I have used Basic Black (#121688) and Whisper White (#106549). The wreath of flowers is from the Circle Of Spring stamp set (#138964), and I stamped this with VersaMark (#102283) and Silver Stampin' Emboss Powder (#109131) which was then heat set with the Heat Tool (#129056). The bee was attached to the card with Stampin' Dimensionals (#104430). Thank You, also from the Circle of Spring stamp set, was stamped with Rose Red ink (#126954).

We had a storm this morning which was a bit wild, and with some trees down, and almost 10 hours later still don't have power. Hope it comes back on soon. Lucky we have a generator to keep the fridge and freezer working.

Till next time,

Happy Stamping!


Lesley.


Lesley Jendra,

Independent Stampin' Up! Demonstrator.


www.lesleyjendra.stampinup.net


lesleyjendra@bigpond.com.au


Monday 13 March 2017

Birthday Blooms

Hi everyone,

I love this simply elegant card, great for any special occasion.


All the cardstock is Whisper White (#106549) except for Gold Foil Sheet (#132622) for the larger oval for the sentiment. I stamped the flower from the Birthday Blooms stamp set (#c140658, #w140655) using VersaMark (#102283) and Gold Stampin' Emboss Powder (#109129) which was heat set with the Heat Tool (#129056). I know we have all been spoiled by all the co-ordinating framelits and punches that match a lot of the stamps, but there are some things we do have to hand cut, and this is one of them. I attached this to the card with Stampin' Dimensionals (#104430). I embossed the card front with the Petal Burst Textured Impressions Embossing Folder (#141493). Not sure why it's taken so long for me to get this folder - I love it. The ribbon is from Sale-a-bration - the 3/8"Metallic Ribbon Combo pack (#143601). This ribbon pack has a roll of silver with white and a roll of gold with vanilla. With Sympathy from Rose Wonder stamp set (#p140697) was also gold embossed, then the ovals were cut with the Layering Ovals Framelits (#141706). This was also attached with dimensionals.

Enjoy your day.

Till next time,

Happy Stamping!


Lesley.


Lesley Jendra,

Independent Stampin' Up! Demonstrator.


www.lesleyjendra.stampinup.net


lesleyjendra@bigpond.com.au


Sunday 12 March 2017

Serene Scenery DSP Stack

Hello friends,

Short of time and need a card. Well, using DSP is a great way to make a quick and easy card. Here I have used the beach scene from the Serene Scenery Designer Series Paper Stack (#141642).


Both the bird images are from the High Tide stamp set (#p143006). The flying birds are stamped with Soft Suede ink (#126978) and the birds on the beach are stamped with Tuxedo Memento ink (#132708). I added the sparkle to the water with the Clear Wink Of Stella Glitter Brush (#141897). The DSP with the dots is also from the Serene Scenery Designer Series Paper Stack. Happy Birthday is from the Circle Of Spring stamp set (#p138964) and stamped with Island Indigo ink (#126986). The circle and square are both cut with the Stitched Shapes Framelits Dies (#145372) and attached to the card with Stampin' Dimensionals (#104430). The cardstock is Whisper White (#106549) and Island Indigo (#124390)

Hope you had a great weekend.

Till next time,

Happy Stamping!


Lesley.


Lesley Jendra,

Independent Stampin' Up! Demonstrator.


www.lesleyjendra.stampinup.net


lesleyjendra@bigpond.com.au


Saturday 11 March 2017

SAB Glimmer Paper Assortment Pack

Welcome,

Have you received the Glimmer Paper Assortment Pack (#143831) as one of your free Sale-a-bration products with a $90 order? If you haven't, time is running out as Sale-a-bration will end on 31st March, so place your order as soon as possible. There are 3 beautiful colours of Glimmer paper in the pack - Bermuda Bay, Mint Macaron and Sweet Sugarplum. These sheets are 6"x6" with 4 of each colour. I have used the Bermuda Bay for the flower and border piece.


The cardstock is Whisper White (#106549) and Bermuda Bay (#131286). The base card was embossed with the Elegant Dots Textured Impressions Embossing Folder (#138287). Enjoy Your Special Day is from the Dragonfly Dreams stamp set (#p142924) and stamped with Bermuda Bay ink (#131171). Happy Birthday and the banner are from the Birthday Banners stamp set (#141506), also stamped with Bermuda Bay ink, then cut with the co-ordinating framelit from the Bunch Of Banners Framelits (#141488). This was attached to the card with Stampin' Dimensionals (#104430). I used the Fine-Tip Glue Pen (#138309) to glue the flower and border. 


Till next time,

Happy Stamping!


Lesley.


Lesley Jendra,

Independent Stampin' Up! Demonstrator.


www.lesleyjendra.stampinup.net


lesleyjendra@bigpond.com.au


Friday 10 March 2017

High Tide

Hello,

I'm not sure when the last time was that I made a card by just stamping, and not using framelits, punches or embossing. However the High Tide stamp set  (#p143006) has a great range of images to stamp a variety of scenes, with the addition of the Kinda Eclectic stamp set (#135347).


The sun and the sentiment are from the Kinda Eclectic stamp set and all other images are from the High Tide set. The water is stamped with Marina Mist ink (#126962) and for the land I have used Crumb Cake (#126975). The 3 birds are stamped with Early Espresso (#126974) and I used Crumb Cake for the flying birds. The sun is So Saffron (#126957) and the sentiment uses Marina Mist ink. I used the masking method to stamp the water. I stamped the land first then the water. The cardstock is Marina Mist (#121682), So Saffron (#108611) and Whisper White (#106549). I did add a bit of sparkle to the water using the Clear Wink Of Stella Glitter Brush (#141897).

Enjoy your day.

Till next time,

Happy Stamping!


Lesley.


Lesley Jendra,

Independent Stampin' Up! Demonstrator.


www.lesleyjendra.stampinup.net


lesleyjendra@bigpond.com.au


Thursday 9 March 2017

Stylish Stems Framelits Dies

Hi and welcome,

The Stylish Stems Framelits Dies are so versatile and I have used them for this flower and labels on today's card for a quick and easy card.


The base card is Whisper White (#106549) and this was embossed with the Softly Falling Textured Impressions Embossing Folder (#139672). The Real Red DSP is from the Brights Designer Series Paper Stack #138434). The flower and larger label have been cut from the Red Glimmer Paper (#121790). "I Love You" is from the Flourishing Phrases stamp set (#c141534, #w141531) and stamped with Real Red ink (#126949). The Fine Tip Glue Pen (#139309) is perfect for glueing the flower to the card with the delicate cutouts. The sentiment was attached with Stampin' Dimensionals (#104430). 

Have a great day.  

Till next time,

Happy Stamping!


Lesley.


Lesley Jendra,

Independent Stampin' Up! Demonstrator.


www.lesleyjendra.stampinup.net


lesleyjendra@bigpond.com.au

Wednesday 8 March 2017

Birds & Blooms Thinlits

Hello everyone,

These 2 birds are both cut using the Birds & Blooms Thinlits (#141477).


I have used Wisteria Wonder card (#124389) for the Base card and the birds. The card front is Whisper White (#106549) and this was embossed with the Softly Falling Textured Impressions Embossing Folder (#139672). The Pink Pirouette card (#116203) was cut with the Swirly Scribbles Thinlits (#141497) and glued to the card with the Multipurpose Liquid Glue (#110755). The flower from Petite Petals stamp set (#c133155, #w133152) is stamped with Wisteria Wonder ink (#126985) and punched with the Petite Petals punch (#133322). I added a White Perfect Accents (#138416) to the flower. The sentiment and banner are both from Birthday Banners stamp set (#p141506), and stamped with Wisteria Wonder ink. The framelit to cut the banner is from the Bunch Of Banners set (#141488). The birds, flower and banner were attached with Stampin' Dimensionals (#104430). 

Have a great day.


Till next time,

Happy Stamping!


Lesley.


Lesley Jendra,

Independent Stampin' Up! Demonstrator.


www.lesleyjendra.stampinup.net


lesleyjendra@bigpond.com.au


Tuesday 7 March 2017

High Tide

Hi ladies & Gents,

The High Tide stamp set (#p143006) which I have used for this card is a great set for masculine cards. There are 16 photopolymer images in this set.


Firstly, I stamped the lighthouse using Cherry Cobbler ink (#126966). Next I stamped the ground with Soft Suede ink (#126978). This stamp fits perfectly around the base of the lighthouse and with the photopolymer stamps, it is easy to stamp. The sea was stamped with Soft Sky ink (#131181) using the masking method, so that you don't stamp over the lighthouse. To do the masking method, stamp the lighthouse on a piece of post it note paper. Cut around the image and place over the lighthouse previously stamped on the card. Then stamp the sea and remove the mask. The birds were stamped with Crumb Cake ink (#126975). Happy Birthday is from the Guy Greetings stamp set (#c138828, #w138825, #p137178) and this was stamped with Cherry Cobbler ink. I used one of the Oval Stitched Shapes Framelits Dies (#145372) to cut the sentiment. This was attached to the card with Stampin' Dimensionals (#104430). The cardstock used is Cherry Cobbler (#121681) and Whisper White (#106549). I embossed the larger piece of White card using the Seaside Textured Impressions Embossing Folder (#141481). I added some sparkle to the water using the Clear Wink Of Stella Glitter Brush (#141897).

Have a great day.

Till next time,

Happy Stamping!


Lesley.


Lesley Jendra,

Independent Stampin' Up! Demonstrator.


www.lesleyjendra.stampinup.net


lesleyjendra@bigpond.com.au


Monday 6 March 2017

Dragonfly Dreams Bundle

Hello everyone,

I have been away on a relaxing holiday for the last 3 weeks, but now back to reality, and pleased to be back to stamping again.

The dragonflies here are from the Dragonfly Dreams Bundle (#p144728).


Firstly I stamped the sentiment from the Dragonfly Dreams stamp set (#p142924) with Bermuda Bay ink (#131171). Then the Whisper White base card (#106549) was embossed with the Elegant Dots Textured Impressions Embossing Folder (#138287). The banners were cut with the Banners Framelits (#132173). For the larger banner I used Bermuda Bay card (#131286). I stamped the dots from the Dragonfly Dreams stamp set using the stamping off method using Bermuda Bay ink. The top dragonfly was stamped on Vellum cardstock (#106584), using Archival Basic Black ink (#140931). This was then cut with Detailed Dragonfly Thinlits Dies (#142749). I then cut another dragonfly using Gold Foil Sheets (#132622). These were attached with a Stampin' Dimensional (#104430).

It's certainly great to be back in the craft room again.

Till next time,

Happy Stamping!


Lesley.


Lesley Jendra,

Independent Stampin' Up! Demonstrator.


www.lesleyjendra.stampinup.net


lesleyjendra@bigpond.com.au