Thursday 30 June 2016

Grateful Bunch

Welcome again,

This flower is from the Grateful Bunch stamp set (#p140691).


This was stamped with Peekaboo Peach ink (#141398) on Peakaboo Peach card (#141422). I hand cut the flower and added glitter using the Clear Wink Of Stella Glitter Brush (#141897). The Pearl Basic Jewels (#119247) were added to the flower. The base card is Peekaboo Peach and I stamped on the Very Vanilla card (#106550) using the Timeless Textures stamp set (#c140517, #w140514) using Crumb Cake ink (#126975) and Peekaboo Peach ink. The greeting is from the Birthday Blossoms stamp set (#c 139471, #w139167). After stamping, I cut the card with the Swirly Scribbles Thinlits (#141497), then joined them together again when I attached them to the card. The flower was attached to the card with Stampin' Dimensionals (#104430).

Have a great day.

Till next time,
Happy Stamping!
Lesley.

Lesley Jendra,
Independent Stampin' Up! Demonstrator.

www.lesleyjendra.stampinup.net
Email: lesleyjendra@bigpond.com.au

Wednesday 29 June 2016

Fabulous Foil Designer Acetate

Hi ladies,

The Fabulous Foil Designer Acetate (#141653) has been used on today's card. These acetate sheets have gold foil on one side, which is what I used. The other side looks silver. There are 3 designs in the pack.


The base card is Very Vanilla (#106550), the flower is Bermuda Bay card (#131286) and the flourish is Gold Foil sheets (#132622). The flourish and flower are cut using the Flourish Thinlits (#141478). I cut 2 of the flourishes and glued them to the card with Multipurpose Liquid Glue (#110755). Congratulations is from the Flourishing Phrases stamp set (#c141534, #w141531) and stamped with Bermuda Bay ink (#131171). I cut this with the Project Life Cards & Labels Framelits (#135707) then sponged the edges also with Bermuda Bay ink. I attached it to the card with Stampin' Dimensionls (#104430). I added a Pearl Basic Jewel (#119247) to the flower centre.

That's all for today.

Till next time,
Happy Stamping!
Lesley.

Lesley Jendra,
Independent Stampin' Up! Demonstrator.

www.lesleyjendra.stampinup.net
Email: lesleyjendra@bigpond.com.au


Tuesday 28 June 2016

Country Livin'

Hi again,

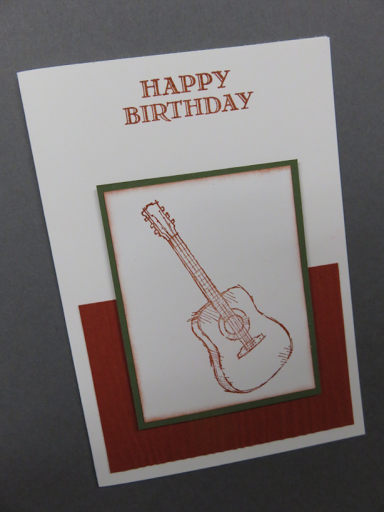
This guitar is the 3rd image on the Country Livin' stamp set (#c141925, #w141922), along with the old truck and boots which I have used on cards in the last week. This is a quick and easy card.


The guitar and sentiment were stamped with Cajun Craze ink (#126965). Happy Birthday is from the Guy Greetings stamp set (#c138828, #w138825, #p137178). The cardstock is Whisper White (#106549), Cajun Craze (#121683) and Always Artichoke (#108610). The Cajun Craze card was embossed with the Woodgrain folder (#127821). I attached the Always Artichoke card to the base card with Stampin' Dimensionals (#104430).

I hope you are all keeping warm. At least winter is finally here.

Till next time,
Happy Stamping!
Lesley.

Lesley Jendra,
Independent Stampin' Up! Demonstrator.

www.lesleyjendra.stampinup.net
Email: lesleyjendra@bigpond.com.au

Monday 27 June 2016

Falling Flowers

Hello,

This fancy fold card is a favourite of mine. I guess it has a name but I don't know what it is.


The Very Vanilla card was cut at 21cm x 10.5 cm and scored and folded at 7.5cm. The Night Of Navy card (#106577) on the inside is cut 12.5cm x 9.5cm. The So Saffron card is 20.5cm x 8.5cm and scored and folded at 11.5cm. I embossed the small fold of the Very Vanilla card with the Elegant Dots folder (#138287). The flourish from the Falling Flowers stamp set (#c139556, #w139553) was stamped with So Saffron ink (#126957) onto the So Saffron card. The flower was cut using the Flourish Thinlits (#141478) and glued with Multipurpose Liquid Glue (#110755) to the scalloped square which was cut with the Layering Squares Framelits (#141708). This was attached to the card with Stampin' Dimensionals (#104430). Ensure when adding the Dimensionals that you only put them on the left side of the square so you can tuck the So Saffron card under the right side. Happy Birthday from the Guy Greetings stamp set (#c138828, #w138825, #p137178) was stamped with Night Of Navy ink (#126970).

This is the opened card.


Have a great day.

Till next time,
Happy Stamping!
Lesley.

Lesley Jendra,
Independent Stampin' Up! Demonstrator.

www.lesleyjendra.stampinup.net
Email: lesleyjendra@bigpond.com.au

Sunday 26 June 2016

Watercolour Wings

Hi,

The stamp for this butterfly is from the Watercolor Wings stamp set (#p139424) which is a 2 step stamp. 


First I stamped the butterfly with Crumb Cake ink (#126975), the next image was stamped with Soft Suede ink (#126978) then I heat embossed with VersaMark (#102283) and Copper Embossing Powder (#141636). The co-ordinating framelit to cut this butterfly is the Bold Butterfly Framelits (#138135). The cardstock is Whisper White (#106549), Blushing Bride (#131287) and Pear Pizzaz (#131290) with Subtles Designer Series Paper Stack (#138437). Happy Birthday is from the Best Birds stamp set (#p141525) and stamped with Pear Pizzaz ink (#131180). This was the cut with the Lots Of Labels Framelits (#138281). The Blushing Bride square was cut with the Layering Squares Framelits (#141708) then embossed with the Seaside folder (#141481). The butterfly and sentiment were attached to the card with Stampin' Dimensionals (#104430).

Till next time,
Happy Stamping!
Lesley.

Lesley Jendra,
Independent Stampin' Up! Demonstrator.

www.lesleyjendra.stampinup.net
Email: lesleyjendra@bigpond.com.au


Saturday 25 June 2016

Butterflies Thinlits

Hello and Welcome,

I have used a lot of my favourites on this card - purple, gold and butterflies.


Another favourite is the Timeless Textures stamp set (#c140517, #w140514) which I used around the border of the Very Vanilla card (#106550). This was stamped with Wisteria Wonder ink (#126985) then I sponged the edges with Elegant Eggplant ink (#126969). The base card is Elegant Eggplant (#108614). The gold butterfly was cut with the Bold Butterfly Framelits (#138135) from the Gold Foil Sheets (#132622). I used Elegant Eggplant card for the  purple butterfly and this was cut with the Butterflies Thinlits (#137360). I glued the 2 butterflies together with Multipurpose Liquid Glue (#110755) and I  attached the butterfly to the card with Sampin' Dimensionals (#104430). Pearl Basic Jewels (#119247) were added the the body of the butterfly. The sentiment is from the Birthday Blossoms stamp set (#c139471, #w139167) and stamped with Elegant Eggplant ink. The fancy gold piece at the bottom of the card was cut with the Flourish Thinlits (#141478).

That's all today.

Till next time,
Happy Stamping!
Lesley.

Lesley Jendra,
Independent Stampin' Up! Demonstrator.

www.lesleyjendra.stampinup.net
Email: lesleyjendra@bigpond.com.au

Friday 24 June 2016

Country Livin'

Hi again,

Yes, another male card today using the Country Livin' stamp set (#c141925, #w141922) but this time using the boots.


The cardstock I have used is Very Vanilla (#106550), Cherry Cobbler (#121681) and Night Of Navy (#126970). The Night of Navy card was embossed with the Seaside embossing folder (#141481). The boots were stamped with Basic Black Archival ink (#140931). I cut the ovals with the Layering Ovals Framelits (#141706) and I sponged the edge of the Very Vanilla oval with Night Of Navy ink (#126970). The banner from the Thoughtful Banners stamp set (#p141614) was stamped with Cherry Cobbler ink (#126966) and Celebrate was stamped with Night Of Navy ink. The banner was punched with the co-ordinating Duet Banner punch (#141483). This was then attached with Stampin' Dimensionals (#104430) as was the ovals.

Have a great weekend.

Till next time,
Happy stamping!
Lesley.

Lesley Jendra,
Independent Stampin' Up! Demonstrator.

www.lesleyjendra.stampinup.net
Email: lesleyjendra@bigpond.com.au

Thursday 23 June 2016

Country Livin'

Hello everyone,

This old truck is from the Country Livin' stamp set (#c141925) and I have heat embossed it with VersaMark (#102283) an Copper Embossing Powder (#141636).


The base card is Very Vanilla (#106550) and the DSP is from the Subtles Designer Series Paper Stack (#138437). The Lots Of Labels Framelits (#138281) was used to cut the truck and Early Espresso card (#121686). This was then attached to the card with Stampin' Dimensionals (#104430). Happy Birthday is from the Birthday Blossoms stamp set (#c139471, #w139167) and stamped with Early Espresso ink (#126974). I always use the Stamp-a-ma-jig (#101049) to get the sentiment straight and in the perfect position.

Well that was a quick and easy card.
So till next time,
Happy Stamping!
Lesley.

Lesley Jendra,
Independent Stampin' Up! Demonstrator.

www.lesleyjendra.stampinup.net
Email: lesleyjendra@bigpond.com.au

Wednesday 22 June 2016

Flourish Thinlits

Welcome,

I am sure you will see a lot of cards from me using the Flourish Thinlits (#141478)  as I love the delicate images contained in this set. I have cut the Gold Foil Sheet (#132622) using one of the Thinlits.


I have used Rich Razzleberry (#119981) for the base card and I stamped into Whisper White card (#106549). I used the Rich Razzleberry Ombre Stampin' Pad to stamp the background. This ink pad is designed with dark ink at one end and fading to a lighter colour. I used the image from the Work Of Art stamp set (#c134114, #w134111). You can see the images are lighter on the left side and gets darker to the right. I then stamped the other 3 images without re-inking the stamp, so each image becomes lighter. I glued the gold flourish using the Multipurpose Liquid Glue (#110755). The butterfly was cut with the Butterfly Thinlits (#137360) and Bold Butterfly Framelits (#138135) using Rich Razzleberry card and Pink Pirouette card (#116203). I added White Perfect Accents (#138416) to the butterfly, then attached the butterfly with Stampin' Dimensionals (#104430). Happy Birthday is from Birthday Blossoms stamp set (#c139471, #w139167) using Rich Razzleberry ink (#126950).

That's all today,

Till next time,
Happy Stamping!
Lesley.

Lesley Jendra,
Independent Stampin' Up! Demonstrator.

www.lesleyjendra.stampinup.net
Email: lesleyjendra@bigpond.com.au

Tuesday 21 June 2016

Touches Of Texture

Hi,

The Touches Of Textures stamp set (#c143251, #w141934) has a variety of images suitable for backgrounds as well as a flower, bee and dragon fly so gives great variety in one set.


The cardstock is Island Indigo (#124390), Cherry Cobbler (#121681) and Very Vanilla (#106550). I stamped on the background with Crumb Cake ink (#126975) and So Saffron (#126957). Happy Birthday is from Butterfly Basics stamp set (#c138816, #w138813, #p137154) and stamped with Island Indigo ink (#126986). The flowers were stamped with VersaMark (#102283) and embossed with Gold Embossing Powder (#109129). These flowers were hand cut and the Cherry Cobbler flower was attached with a Stampin' Dimensional (#104430). The ribbon is the new 1/4" Gold Natural Trim (#141484). The Bee was stamped with Basic Black Archival Ink (#140931) and I added a bit of yellow to its body using Daffodil Delight ink (#126944) and applied with a Blender Pen (#102845). The bee was hand cut and also attached with a dimensional.

Have a great day.

Till next time,
Happy Stamping!
Lesley.

Lesley Jendra,
Independent Stampin' Up! Demonstrator.

www.lesleyjendra.stampinup.net
Email: lesleyjendra@bigpond.com.au


Monday 20 June 2016

Birthday Blossoms

Hello ladies,

All the images on this card are from the Birthday Blossoms stamp set (#c139471, #w139167).


The flowers are stamped with Blushing Bride ink (#131172) on Blushing Bride card (#131287), Marina Mist ink (#126962) on Marina Mist card (#121682) and So Saffron Ink (#126957) on So Saffron card (#108611). These flowers were punched with the co-ordinating Pansy punch (#130698). I added sparkle to the Marina Mist flower using the Clear Wink Of Stella Glitter Brush (#141897). The base card is Whisper White (#106549) and the Soft Sky card (#131292) was cut with the Lots Of Labels Framelits (#138281). This was then embossed with the Elegant Dots folder (#138287). The leaves were stamped with Wild Wasabi ink (#126959) on Wild Wasabi card (#111850) and these were hand cut. The leaves and pink and yellow flowers were taped to the card and the blue flower was attached with Stampin' Dimensionals (#104430). Metal Rimmed Pearls (#138394) were also added to the card. Happy Birthday was stamped with Marina Mist ink.

That's all today.

Happy Stamping!
Lesley.

Lesley Jendra,
Independent Stampin' Up! Demonstrator.

www.lesleyjendra.stampinup.net
Email: lesleyjendra@bigpond.com.au


Wednesday 15 June 2016

Botanical Builder Framelits


Hello and welcome,

I have used some of my favourite products and colours on this beautiful card.


The base card is Elegant Eggplant (#108614) and the other card used is Very Vanilla (#106550), Wisteria Wonder (#124389), Always Artichoke (#108610) and Gold Foil Sheets (#132622). I also used one of the Gold Metallic Foil Doilies (#138392) under the flowers. The Very Vanilla card was stamped around the edges with an image from the Timeless Textures stamp set (#c140517, #w140514) with Wisteria Wonder ink (#126959). The flowers and leaves were cut with the Botanical Builder Framelits (#140625). I stamped the centre of the small flower from the Botanical Blooms stamp set (#p140757) with Elegant Eggplant ink (#126969) then added Pearl Basic Jewels. Happy Birthday is from the Best Birds stamp set (#p141525) and stamped with Elegant Eggplant ink.

Another week is over, so have a great weekend.

Till next time,
Happy Stamping!
Lesley.

Lesley Jendra,
Independent Stampin' Up! Demonstrator.

www.lesleyjendra.stampinup.net
Email: lesleyjendra@bigpond.com.au


Flourish Thinlits

Hello,

Today's card is a quick and easy one.


The cardstock is Whisper White (#106549) and Watermelon Wonder (#138323). The leaves and sentiment are from the Flourishing Phrases stamp set (#c141534, #w141531). The leaves were stamped with Wild Wasabi ink (#126959) and the sentiment with Watermelon Wonder (#138323). I also used Watermelon Wonder ink using the stamping off method to stamp around the 2 edges of the Whisper White card. This stamp is from Timeless Textures stamp set (#c140517, #w140514). The flower was cut using a framelit from the Flourish Thinlits (#141478), then glued to the card with Multipurpose Liquid Glue (#110755).

Enjoy your day.

Happy Stamping!
Lesley.

Lesley Jendra,
Independent Stampin' Up! Demonstrator.

www.lesleyjendra.stampinup.net
Email: lesleyjendra@bigpond.com.au


Birds and Blooms Thinlits

Hi again,

I love this bird which is cut using the Birds & Blooms Thinlits (#141477).


I used the Red Foil Sheets for the bird and behind the White card, and now I have just realised this isn't available in this catalogue. Oops!! The cardstock is Whisper White (#106549), Real Red (#106578) and Brights Designer Series Paper Stack (#138434). The white square card was embossed with the Floral Affection Embossing folder (#141713) and the bird was attached to this with Stampin' Dimensionals. Congratulations is from the Best Birds stamp set (#141525) and stamped with Real Red ink (#126949). When I attached this stamp to the Clear Block, I curved the stamp. This is possible with the Photopolymer stamps, and this then fitted nicely when I punched the sentiment with the Duet Banner Punch (#141483). I taped the Real Red banner that I punched, onto the card, then added the banner with Congratulations on top with Dimensionals but allowing a small amount of red to show.

That's all today.

Till next time,
Happy stamping!
Lesley.

Lesley Jendra,
Independent Stampin' Up! Demonstrator.

www.lesleyjendra.stampinup.net
Email: lesleyjendra@bigpond.com.au

Birthday Blooms

Welcome,

I stamped these flowers and leaves with VersaMark (#102283) and Gold Embossing powder (#109129). Yes, I do love embossing powders!


So I stamped onto Rose Red card (#108613) and again on Garden Green card (#108605) using the Birthday Blooms stamp set (#c140658, #w140655). I cut around the outside of the green card and cut the flowers from the Rose Red card. I attached the larger flower to the green card with Stampin' Dimensionals (#104430) and glued the small flowers with Mulitpurpose Liquid Glue (#110755). The banners were cut with the Banners Framelits (#132173). The base card is Very Vanilla (#106550) as is the smaller banner. The sentiment is also from the Birthday Blooms stamp set and gold embossed. This is an easy card but just takes a bit longer to cut out the flowers and leaves.

That's all for today.

Till next time,
Happy Stamping!
Lesley.

Lesley Jendra,
Independent Stampin' Up! Demonstrator.

www.lesleyjendra.stampinup.net
Email: lesleyjendra@bigpond.com.au


Awesomely Artistic

Hi,

The stamp set I have used for the flowers and dragonfly is Awesomely Artistic (#c139950, #w138694).


The flowers are stamped with Daffodil Delight ink (#126944) onto Very Vanilla card (#106550). I cut this with the largest of the Layering Squares Framelits (#141708). I then attached this to a piece of Basic Black card (#121688). The base card is embossed with the Seaside folder (#141481). The greeting is from the Birthday Blossoms stamp set (#c139471, #w139167). I stamped this with a "shadow" effect. So to do this I stamped firstly with Daffodil Delight ink, then re-stamped using Basic Black Archival ink (#140931) just slightly offset from the first image. Using the Stamp-a-ma-jig (#101049) makes this easy to stamp in the right position. The framelit to cut this is from the Tags & Labels Framelits (#138282). After sponging the edges with Daffodil Delight ink, I then attached it with Stampin' Dimensionals (#104430). The dragonfly was stamped with Basic Black Archival ink, cut by hand and attached to the card also with Dimensionals. I used the Wink Of Stella Glitter Brush (#141897) to add a bit of sparkle to the dragonfly.

Enjoy the rest of your weekend. Hopefully the weather is kind to you.

Till next time,
Happy Stamping!
Lesley.

Lesley Jendra,
Independent Stampin' Up! Demonstrator.

www.lesleyjendra.stampinup.net
Email: lesleyjendra@bigpond.com.au


Tuesday 14 June 2016

Guy Greetings with Lovely As A Tree

Hello,

Today I have used the masking method to stamp the car and trees on this masculine card. This is a square card with the finished size 13 x 13 cm.


Firstly I stamped the car from the Guy Greetings stamp set (#c138828, #w138825, #p137178) onto Very Vanilla card (#106550) using VersaMark (#102283) and Silver Embossing powder (#109131), then heat set with the Heat Tool (#129056). Next I stamped the car on a piece of scrap paper (post-it notes works well) and cut out the car and placed it over the stamped image on the card to form a mask. Then I stamped the trees from Lovely As A Tree stamp set (#c127793, #w128655) with Crumb Cake ink (#126975). By masking the car, the trees look like they are behind the car and you don't get the trees stamped on the car. The swirl at the bottom of the card was cut with the Swirly Scribbles Thinlits (#141497) from Soft Suede card (#126978). The base card is also soft Suede. This swirl was glued to the card with Multipurpose Liquid Glue (#110755). The greeting is from the Guy Greetings stamp set and stamped with Soft Suede ink (#126978). The framelit used for Happy Birthday is from the Project Life Cards & Labels. The framelit was bigger than I wanted so I made it smaller. After the first cut I positioned the framelit as shown and cut again.


The edges of the Very Vanilla card was sponged with Soft Suede ink. Happy Birthday was attached with Stampin' Dimensinals (# 104430).

Have a great day.

Happy Stamping!
Lesley.

Lesley Jendra,
Independent Stampin' Up! demonstrator.

www.lesleyjendra.stampinup.net
Email: lesleyjendra@bigpond.com.au


Monday 13 June 2016

Petite Petals

Welcome ladies,

These flowers are from the Petite Petals stamp set (#c133155, #w133152) and punched with the Petite Petals Punch (#133322).


The flowers were stamped with Cherry Cobbler ink (#126966), Night Of Navy (#126970) and Crushed Curry (#131173). The cardstock is Very Vanilla (#106550), Night Of Navy (#106577) and Garden Green (#108605). The sentiment from Time Of Year stamp set (#p141790) was stamped with Crushed Curry and Night Of Navy inks. The splatters on the background are from the Touches Of Textures stamp set (#c143251, #141934) and stamped with VersaMark (#102283) and Copper Embossing powder (#141636), then heat set with the Heat Tool (#129056). The swirl was cut with the Swirly Scribbles Thinlits (#141497) and the leaves were cut with a framelit from the Flourish Thinlits (#141478). The flowers were attached to the card with Stampin' Dimensionals (#104430) and I used the Multipurpose Liquid Glue (#110755) for the swirl and leaves.

That all today.

Till next time,
Happy Stamping!
Lesley.

Lesley Jendra,
Independent Stampin' Up! Demonstrator.

www.lesleyjendra.stampinup.net
Email: lesleyjendra@bigpond.com.au

Sunday 12 June 2016

Mixed Borders

Hello,

I have just spent 2 hours in the garden, not that I'm a gardener and I would rather be in the craft room, but after last weeks wild weather there was a lot of cleaning up to do. Perhaps being in the garden was what inspired me to make a card with flowers today, although there are so many beautiful flowers in the catalogue, it's not hard to include flowers on a card.


Firstly I stamped the leaves from the Mixed Border stamp set (#p141932) with Wild Wasabi ink (#126959) then the flowers were stamped using Peekaboo Peach ink (#141398). This stamp set has a space to allow you to add the sentiment which I stamped with VersaMark (#102283) and the beautiful new Copper Embossing powder (#141636), which was then heat set with the Heat Tool (#129056). The 2 flowers were cut from Peekaboo Peach card (#141422) using the Flourish Thinlits (#141478). I stamped on the background using the Touches Of Textures stamp set (#c143251, #w141934) and Peakoboo Peach ink, then attached the flowers over the stamped area using the Fine Tip Glue Pen (#138309). I added a White Perfect Accent (#138416) to the centre of the flowers. After sponging the edges of the Whisper White card (#106549) it was attached to the Peekaboo Peach base card.

Have a great week.

Till next time,
Happy Stamping!
Lesley.

Lesley Jendra,
Independent Stampin' Up! demonstrator.

www.lesleyjendra.stampinup.net
Email: lesleyjendra@bigpond.com.au

Saturday 11 June 2016

Birds & Blooms Thinlits

Hello and welcome,

How gorgeous are these birds from the Birds & Blooms Thinlits (#141477). There are 5 different birds in this set, 2 that match with the birds in the co-ordinating Best Birds stamp set (#p141525) and 3 that can be cut without stamping. These birds on the card were cut from Gold Foil Sheets (#132622). 


The stamps used for the background are part of the Touches Of Texture stamp set (#c143251, #141934) and stamped with Soft Suede ink (#126978) along the bottom of the card, and So Saffron ink (#126957) for the plants. The edges of the Very Vanilla card (#106550) were sponged with Soft Suede ink. The sentiment is from the Mixed Borders stamp set (#p141932) using Dapper Denim ink (#141394). The Flourish Thinlits (#141478) is were you will find the little decoration used at the base of the card, cut from Dapper Denim card (#141419). The base card is also Dapper Denim. The smaller bird and the blue decoration were glued to the card with Multipurpose Liquid Glue (#110755) and the larger bird was attached with Stampin' Dimensionals (#104430).

That's all for today,
Till next time,
Happy Stamping!
Lesley.

Lesley Jendra,
Independent Stampin' Up! Demonstrator.

www.lesleyjendra.stampinup.net
Email: lesleyjendra@bigpond.com.au

Friday 10 June 2016

Sweet Cupcake

Hello,

Don't these cupcakes look yummy. They are from the Sweet Cupcake stamp set (#p141498) and the co-ordinating Cupcake Cutouts Framelits (#141474).


The base card is Melon Mambo (#119980) and the DSP is from the Pop Of Pink Specialty Designer Series Paper (#141648). This DSP pack has Black, White and Pink designs plus 2 sheets with Gold Foil and this is one of those gold sheets. The cupcakes, candles and banner are all stamped on Whisper White card (#106549) and "wish" was cut from Gold Foil Sheets (#132622). The base of the cupcakes were stamped with Crumb Cake ink (#126975) and Soft Suede (#126978). The "icing" was stamped with Melon Mambo ink (#126948) and Pink Pirouette (#126956). This stamp set is a 2 step stamp. The stamps are numbered so stamp number1 first, then 2, then 3. The candles were stamped with VersaMark (#102283) and Gold Embossing powder (#109129), then heat set with the Heat Tool (#129056). The cupcake and candle on the left were taped to the card and the other one was attached with Stampin' Dimensionals (#104430). "Wish" was glued with the Fine Tip Glue pen (#138309). This glue is great on fine cutouts as it has a very fine tip. It probably isn't noticeable on the photo but I added glitter to the darker ink on the "icing" using the Clear Wink Of Stella Glitter Brush (#141897).

I can't believe that the weekend is here again. I hope you have a good one.

Till next time,
Happy Stamping!
Lesley.

Lesley Jendra,
Independent Stampin' Up! Demonstrator.

www.lesleyjendra.stampinup.net
Email: lesleyjendra@bigpond.com.au

Thursday 9 June 2016

Best Birds

Hello ladies,

I couldn't resist the Best Birds Bundle (#p142315) when I saw this in the new catalogue. You can buy the Best Birds stamp set (#p141525) and the Birds and Blooms Thinlits (#141477) separately but when you purchase a bundle you save 10%, so why would you buy them separately. Also it makes life so much easier when you have co-ordinating stamps and Framelits.


The base card and bird both use the So Saffron card (#108611). The branches and leaves were stamped with Always Artichoke ink (#126972) on Always Artichoke card (#108610). The flowers were stamped with So Saffron ink (#126957) on Very Vanilla card (#106550). The bird and greeting were stamped with VersaMark (#102283) and I used the beautiful new Copper Stampin' Emboss Powder (#141636), then heat set with the Heat Tool (#129056). The Very Vanilla card for the background was embossed with the new Seaside Textured Impressions Embossing Folder (#141481). The banners for the greeting were cut with the Banner Framelits (#132173) and attached with Stampin' Dimensionals (104430). The branches and flowers were glued with the Multipurpose Liquid Glue (#110755) and I used Stampin' Dimensionals for the bird. To finish the card I added some glitter to the flowers and bird using the Clear Wink Of Stella Glitter Brush (#141897).

Have a great day.

Till next time,
Happy Stamping!
Lesley.

Lesley Jendra,
Independent Stampin' Up! Demonstrator.

www.lesleyjendra.stampinup.net
Email: lesleyjendra@bigpond.com.au


Wednesday 8 June 2016

Time Of Year male card

Hi again,

The greeting on today's card is from the Time Of Year stamp set (#p141790), and stamped with Cherry Cobbler ink (#126966).


This is an easy card using some of the new products. The cardstock is Dapper Denim (#141419), Whisper White (#106549) and Cherry Cobbler (#121681). I cut the Cherry Cobbler card with the Swirley Scribbles Thinlits (#141497) and glued this to the card using Multipurpose Liquid Glue (#110755). The car is from the Guy Greetings stamp set (#c138828, #w138825, #p137178) and stamped with Dapper Denim ink (#141394). I used the stamping off method as this ink is very "juicy" as its new and I got a great image this way. Both the squares were cut using the Layering Squares Framelits (#141708). The White card was taped to the Dapper Denim card, then this was attached to the card with Stampin' Dimensionals (#104430). The edges of the White cards were sponged with Cherry Cobbler ink.
As mentioned in an earlier post, if the stamp has a more solid image like the Birthday Banner, you will generally get a better image if you place your card onto a Stampin' Pierce Mat (#126199) to stamp. This gives you even pressure and ink coverage, especially with photopolymer stamps.

I received some more new products yesterday but still haven't had time to "play" with them. Hopefully tomorrow will get a chance to have some fun with them.

That's all for today.

Till next time,
Happy stamping!
Lesley.

Lesley Jendra,
Independent Stampin' Up! Demonstrator.

www.lesleyjendra.stampinup.net
Email: lesleyjendra@bigpond.com.au


Tuesday 7 June 2016

Layering Square Framelits

Hi,

I love the new Layering Square Framelits (#141708) which I have used again on this card.


As well as Whisper White card (#106549) I have used 3 of the new In-Colours - Dapper Denim (#141419), Flirty Flamingo(#141421) and Emerald Envy (#141420). Basic Black card (#121688) and Gold Glimmer Paper (#133719) were used for the butterfly. After cutting the white squares, I embossed each with the Floral Affection folder (#141713), then attached them to the coloured squares. The butterfly was cut with the Butterflies Thinlits (#137360) and Bold Butterfly Framelits (#138135). I attached some Gold Metallic Thread (#138401) to the card under the butterfly, and attached the butterfly with a Stampin' Dimensional (#104430). It's not very often that I make a card without stamping or a sentiment.

Enjoy your day whatever you are doing.

Till next time,
Happy Stamping!
Lesley.

Lesley Jendra,
Independent Stampin' Up! Demonstrator.

www.lesleyjendra.stampinup.net
Email: lesleyjendra@bigpond.com.au

Monday 6 June 2016

Time of Year

Hello and welcome,

"Thinking of You" is part of the Time of Year stamp set (#p141790) which is one of the Hostess products. If you would like one of these sets just contact me for further details.


I used the Sweet Sugarplum card (#141423) for the base card and the square. The other card is Whisper White (#106549), Mint Macaron (#138344), Basic Black (#121688) and Blushing Bride Glimmer Paper (#140550). The greeting was stamped with Sweet Sugarplum ink (#141395). The squares are cut with the new layering Squares Framelits (#141708). There are 19 Framelits in this set with scalloped and straight sides, so there is great variety. The flower, leaves and stamen are cut with the Botanical Builder Framelits (#140625). I added a White Perfect Accent (#138416) to the flower centre. The leaves were glued with the Multipurpose Liquid Glue (#110755) and the flower was attached with Stampin' Dimensionals (#104430). I used a Mini Glue Dot (#103683) to adhere the stamen to the flower.

Today's tip.
When using the more details Framelits, you will get perfect result when you use the Precision Base Plate (#139684). The Die Brush (#140603) is also great for removing the small pieces. However, when using the Glimmer Paper I find the die brush can sometimes damage the glimmery bits so just be careful. I usually use a Paper Piercing tool instead.

Have a great day,
Happy Stamping!
Lesley.

Lesley Jendra,
Independent Stampin' Up! Demonstrator.

www.lesleyjendra.stampinup.net
Email: lesleyjendra@bigpond.com.au

Sunday 5 June 2016

Flower Shop

Hello ladies,

I made this card before we went away last week and didn't end up getting to use it. All the products are available in the new catalogue.


The cardstock I have used is Elegant Eggplant (#108614), Whisper White (#106549), Garden Green (#108605) and Gold Glimmer Paper (#133719). The splatters on the background were done with the Gold Wink Of Stella Brush (#141898). The flowers from the Flower Shop stamp set (#c130942, #w130939) were stamped with Elegant Eggplant ink (#126969) and punched with the Pansy Punch (#130698). The Gold Glimmer Paper was punched with the smallest flower from the Blossom Bunch Punch (#140612). The flower in the very centre of the flower was punched with the tiny flower from the Tree Builder punch (#138295). The leaves were cut with a framelit from the Rose Garden Thinlits (#140619). These were glued to the card with the Multipurpose Liquid Glue (#110755). One of the flowers was attached with Stampin' Dimensionals. The greeting from Birthday Blooms (#c140658, #140655) was stamped with Elegant Eggplant ink.


I hope you all survived the wild weather that all of the east coast of Australia has experienced over the last couple of days.

Till next time,
Happy Stamping!
Lesley.

Lesley Jendra,
Independent Stampin' Up! Demonstrator.

lesleyjendra.stampinup.net
Email: lesleyjendra@bigpond.com.au


Saturday 4 June 2016

Floral Affection Textured Impressions Embossing Folder

Hi,

On today's card I have used 1 of the two Floral Affection Embossing folders (#141713). I embossed on Whisper White card (#106549) and this was then attached to a piece of Melon Mambo card (#119980).


Happy Birthday, which is from the Rose Wonder stamp set (#p140697), was stamped with Melon Mambo ink(#126948) onto the base card. The DSP is from the Pop Of Pink Specialty Designer Series Paper (#141648) and this was attached to Basic Black card (#121688). The flower is from the Love and Affection stamp set (#p141545) and stamped with Melon Mambo ink with Basic Black Archival ink (#140931) for the centre of the flower then I added a White Perfect Accent (#138416). The flower was attached with Stampin' Dimensionals (#104430). I used the Clear Wink Of Stella brush (#141897) on the flower for that little bit of sparkle. Not sure how well it shows up on the photo.

Well that's all today,
Till next time,
Happy Stamping!
Lesley.

Lesley Jendra,
Independent Stampin' Up! Demonstrator.

www.lesleyjendra.stampinup.net.au
Email: lesleyjendra@bigpond.com.au


Friday 3 June 2016

Gift of Love

Welcome everyone,

The first time I saw a Stampin' Up! demonstration was with a 2 step stamp set and I couldn't believe it was so easy to get such great results. This stamp set is a Two- Step set and love it just as much. The Gift Of Love stamp set (#p141796) is one of the new hostess products.


The base card is Flirty Flamingo (#141421) and I embossed this with the Brick Wall folder (#138288). I stamped the outline image for the flowers onto Whisper White card (#106549) using Basic Black Archival ink (#140931). The flowers were stamped with the Flirty Flamingo ink (#141397) using the "stamping off" method to give a lighter colour. The leaves were stamped with Emerald Envy ink (#141396) also using the "stamping off" method. After stamping these I cut the Whisper White card with the Lots Of Labels Framelits (#138281) and sponged the edges with Flirty Flamingo ink. This was then attached to the card with Stampin' Dimensional (#104430). Thank You is one of the sentiments from the Gift Of Love set, stamped with Flirty Flamingo ink and cut with the Lots Of Labels Framelits.

Have a great weekend.

Till next time,
Happy Staming!
Lesley.

Lesley Jendra,
Independent Stampin' Up! Demonstrator.

www.lesleyjendra.stampinup.net
Email: lesleyjendra@bigpond.com.au

Thursday 2 June 2016

New In Colours

Hello Ladies,

Sorry I haven't posted a blog for a few days but have been away. I did have cards ready but then I bought a new iPad and with transferring everything over I lost the cards I had ready to go. Anyway here is a card I made for my granddaughters birthday showing the new In Colours from the new catalogue.


I love these new colours. I stamped the co-ordinating coloured ink onto the card for each of the "scoops of ice cream". The cardstock from top to bottom of the ice cream are Peakaboo Peach (#141422), Emerald Envy (#141420), Flirty Flamingo (#141421), Dapper Denim (#141419) and Sweet Sugarplum (#141423). The inks are Peakaboo Peach (#141398), Emerald Envy (#141396), Flirty Flamingo (#141397), Dapper Denim (#141394) and Sweet Sugarplum (#141395). After stamping the ice cream scoops from the Sprinkles Of Life stamp set (#p139971), I punched with the co-ordinatingTree Builder Punch (#138295). The ice cream cone was stamped with Crumb Cake ink (#126975) on Whisper White card (#106549). The embossed image at the base of the card is from the new Floral Affection embossing folder (#141713). I used the Flirty Flamingo card between the 2 pieces of whisper white. Happy Birthday is also from the Sprinkles of Life stamp set. One advantage of the photopolymer stamps is that they are flexible, so I bent the Happy Birthday as I placed it onto the acrylic block before stamping.

There are so many new and exciting products in this new catalogue, so I will be back tomorrow with more cards to show you.

Till next time,
Happy Stamping!
Lesley.

Lesley Jendra,
Independent Stampin' Up! Demonstrator.

www.lesleyjendra.stampinup.net
Email: lesleyjendra@bigpond.com.au