Wednesday 30 September 2020

Joyful Holly

Hello again friends,

The Joyful Holly stamp set (#153440) which I have used on this card is a Two-Step stamp set, which means you can create a layered image. Here I have stamped the outline with a darker colour and then stamped the inside colour with a lighter ink.


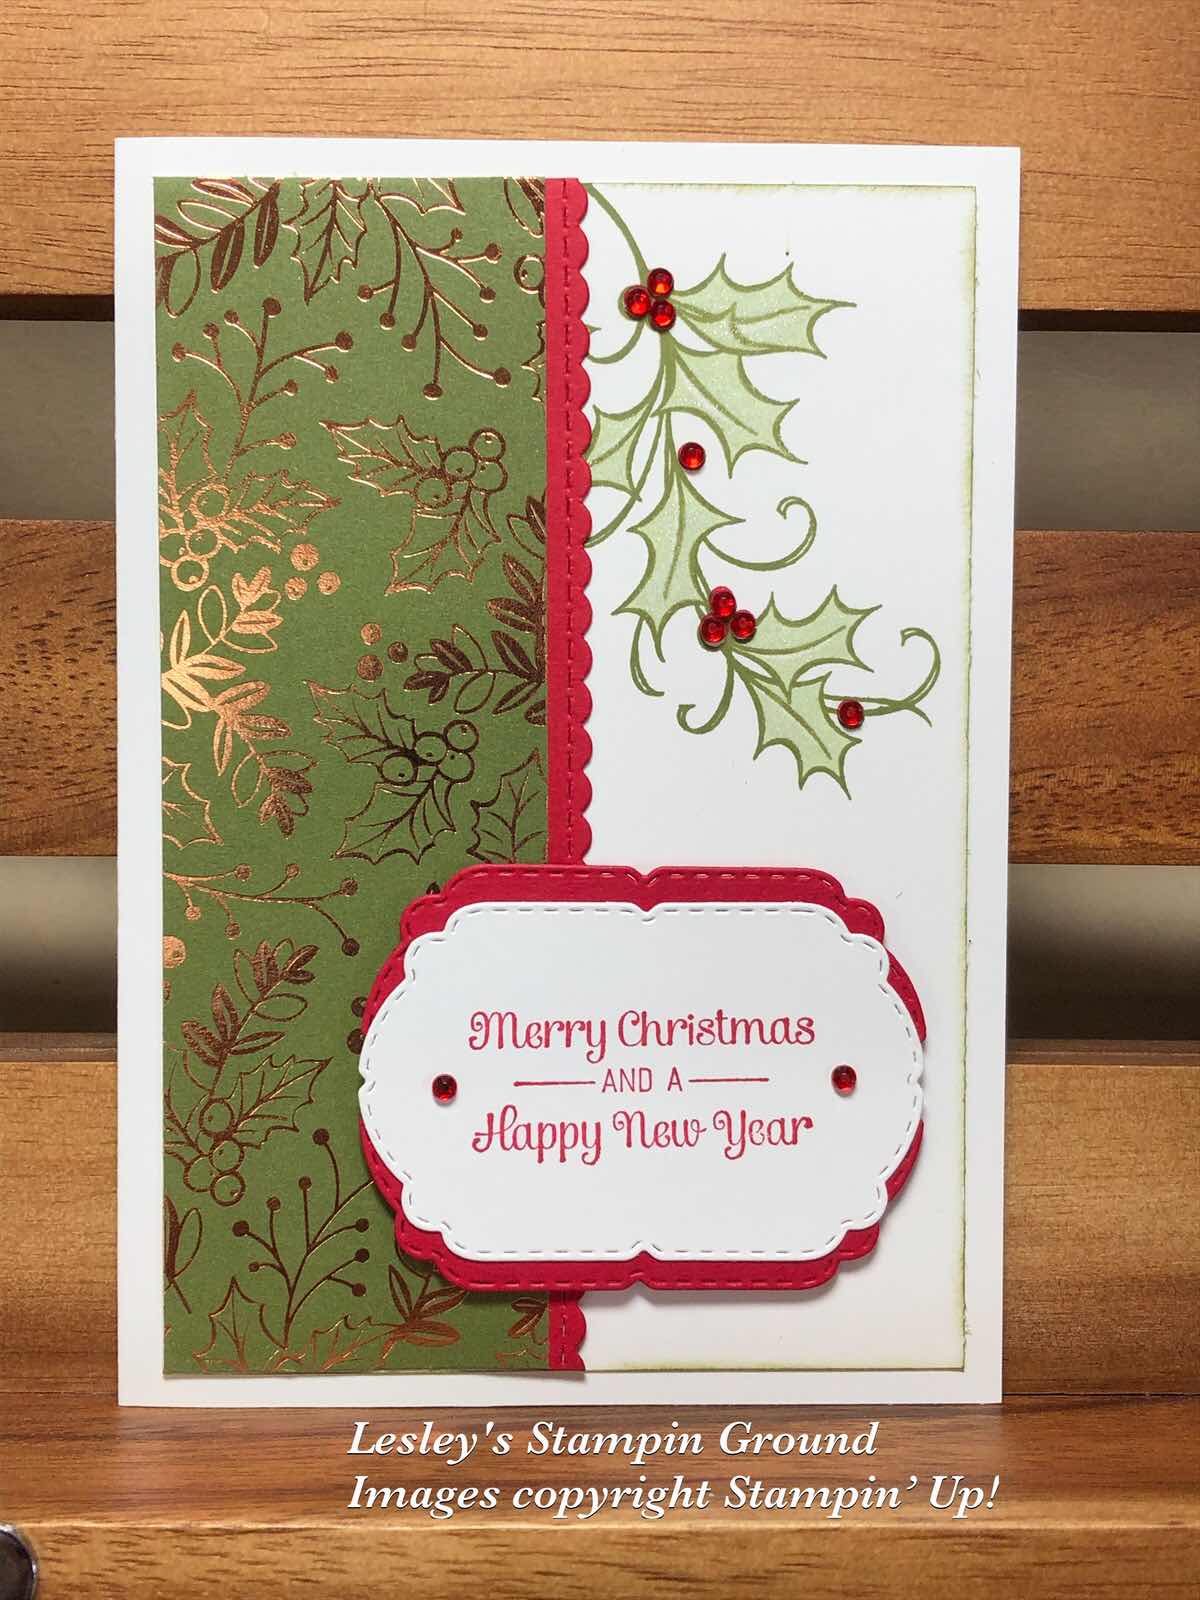
I stamped the outline of the holly leaves with Old Olive ink (#147090), then stamped the inside of the leaves with Soft Sea Foam ink (#147102). There is also an image to stamp the berries but I chose to use the Red Rhinestone Basic Jewels (#146924) instead. I sponged the edges of this Whisper White card front (#106549) with Old Olive ink and attached it to the Whisper White base card. 
The scalloped edge cut from a piece of Real Red card (#106578) uses a die from the Stitched Be Mine dies (#151814) and I attached this to the Brightly Gleaming Specialty Designer Series Paper (#150429), then this was attached to the card front. The greeting from the Itty Bitty Christmas stamp set (#150513) was stamped with Real Red ink (#147084) and this was cut with a Celebration Labels Die (#153570). I cut a piece of Real Red card with the same die, cut it in half and attached it to the sentiment. This was then attached to the card with Stampin’ Dimensionals (#104430). I added 2 more of the Red Rhinestones to the greeting.

For the month of October Stampin’ Up have 15% of a variety of Designer Series Papers so check them out here and save.

Have a fantastic day.


Tuesday 29 September 2020

Daisy Lane

Hi & welcome,

These daisies are from the Daisy Lane stamp set (#149325).


I stamped 2 of the larger daisies and 2 of the smaller daisies, and when assembling them I offset each to make the daisy. The larger daisy was stamped with So Saffron ink (#147109) onto So Saffron card (#108611). I stamped the smaller daisy with So Saffron ink onto Whisper White card (#106549). They were punched with the Daisy Punch (#143713) and Medium Daisy Punch (#149517). I used Mini Glue Dots (#103683) to assemble the flower. The flower centre was cut with a die from the Poinsettia Dies (#153522). The flower centre and sentiment were cut from the Rainbow Glimmer Paper (#153056) which had Adhesive Sheets (#152334) adhered to the back. The Whisper White card front was dry embossed with the Dainty Diamonds 3D Embossing Folder (#152702), then attached to the So Saffron card (#108611). The Square Vellum Doily (# 152484) was attached to the card front then the daisy was attached on top with a Stampin’ Dimensional (#104430). The leaves from the Forever Fern stamp set (#152559) were stamped with attached and cut with Forever Flourishing Dies (#154094). Happy & Birthday are cut with the Well Written Dies (#151816). The embellishments are from the Sequins For Everything (#153556) and attached with the Fine Tip Glue Pen (#138309). I added glimmer to the petals using the Clear Wink Of Stella Brush (#141897).

Have a fantastic day.


Monday 28 September 2020

Forever Fern Bundle

Hi friends,

It is very frustrating when you have an idea for a card and it just doesn’t work the way you imagined it. However when you change your ideas and get a lovely result it is all worth the effort. That’s what happened with this card and I love the lovely subtle colours.


The leaves and “berries” are from the Forever Ferns stamp set (#152559) and stamped with Highland Heather ink (#147103) and Pool Party ink (#147107). These were cut with the co-ordinating dies from the Forever Flourishing Dies (#152714). I stamped the background with the splotches from the Forever Fern stamp set, using VersaMark (#102283) and heat embossed with Gold Stampin’ Emboss Powder (#109129) which was set with the Heat Tool (#129056). The Whisper White card (#106549) was attached to the Highland Heather card (#147010). The Snowflake Splendor 1/4” Ribbon (#153548) was wrapped around this card, before attaching it to the Whisper White base card. “Thanks” is from the Ornate Thanks stamp set (#149471) and stamped with Highland Heather ink and cut with a Celebration Labels Die (#153570). The Gold Hoop (#152474) was attached to the card front with Mini Glue Dots (#103683). Stampin’ Dimensionals (#104430) and Mini Stampin’ Dimensionals (#144108) were used to attach the leaves, berries and sentiment. The bow was attached with a Mini Glue Dot and the Gilded Gems (#152478) were attached to the base of the card.

Have a great day.


Sunday 27 September 2020

Sweetest Time Bundle

Hi Ladies & guys,

The Sweetest Borders Dies (#153559) were used to cut these cute candy canes on the Real Red card (#106578).


After cutting the candy cane border, I dry embossed the card with one of the Wrapped In Texture Embossing Folders (#153574). I wrapped the Gold Trim from the Forever Greenery Trim Combo Pack (#152475) around the card, then attached it to the Whisper White base card (#106549). I cut 2  candy canes from Gold Foil Sheets (#132622) also with dies from the Sweetest Borders Dies. The sentiment from the Sweetest Time stamp set (#153436) was stamped with VersaMark (#102283) and heat embossed with Gold Stampin’ Emboss Powder (#109129), then set with the Heat Tool (#129056). This was cut with Stitched Rectangles Die (#151820) and attached to the card with Stampin’ Dimensionals (#104430). A Wonderful Gem (#153536) was added to the sentiment.

Have a great day.

Saturday 26 September 2020

Graces Garden

Welcome everyone,

The beautiful Grace’s Garden stamp set (#c151513) has been used to stamp the images on today’s card.


I stamped the fence 3 times using the Soft Suede ink (#147115), then cut each fence with the co-ordinating die from the Garden Gateway dies (#151512). The 2 different floral images were stamped onto the Very Vanilla card front (#106550) using Tuxedo Black Memento ink (#132708). The following Stampin’ Blends were used to colour the fence and flowers - Crumb Cake (#154882), Soft Suede (#154906), Ivory (#154922), Mango Melody (#154888), Real Red (#154899), Purple Posy (#154896), Highland Heather (#154887), Old Olive (#154892) and Granny Apple Green (#154885).
I cut the larger posts from one of the fences, attached it to the centre of the card front, then added the other die cut fences and cut them level with the sides of the card so it looks like a continual fence. The little birds were stamped with Cherry Cobbler ink (#121681) and attached to the card with Mini Stampin’ Dimensionals (#144108). The cats were stamped with VersaMark (#102283) and heat embossed with Gold Stampin’ Emboss Powder (#109129) and set with the Heat Tool (#129056). These were cut with the a die also from the Garden Gateway Dies. 
Using the Friendly Silhouettes Dies (#149546) I cut the Rainbow Glimmer Paper (#153056) and attached this in front of the fence. “Have a Beautiful Day” is from the Very Versailles stamp set (#c149275) and also Gold Embossed. I cut this with a die from the Ornate Frames Dies (#150664). The edges of the cardfront and sentiment were sponged with Crumb Cake ink (#147116). Gems from the Flowers For Every Season Gems (#153645) were attached to the card using the Fine-Tip Glue Pen (#138309).

Enjoy your day!!

Friday 25 September 2020

Forever Gold Laser-Cut Specialty Paper

Hello,

The Forever Gold Laser-Cut Specialty Paper (#152493) consists of a variety of beautiful pre-cut card fronts and accents. One side is gold and the other is white.


The card base and card front are Very Vanilla 106550). I dry embossed the card front with the Scripty 3D Embossing Folder (#149634) and attached this to the Highland Heather card (#147010). The Gold Trim from the Forever Greenery Trim Combo Pack (#152475) and the pre-cut Gold Laser-Cut accent was attached to the card. The sentiment from the Positive Thoughts stamp set (#c151490) was stamped with Highland Heather ink (#147103) and cut with a Stitched Rectangles Die (#151820).
The floral image from the Last A Lifetime stamp set (#c151479) was stamped with Tuxedo Black Memento ink (#132708) and cut with a co-ordinating die from the Lasting Elegance dies (#151475). This was coloured with the following Stampin’ Blends - Highland Heather (#154887), Purple Posy (#154896), Mango Melody (#154888) and Granny Apple Green (#154885). I used Stampin’ Dimensionals (#104430) to attach this to the card. A clear embellishment from the Flowers For Every Season Gems (#153645) was added to the gold accent.

Have a great weekend!!


Thursday 24 September 2020

Borders Abound

Hello friends,

I have stamped the Whisper White card (#106549) using the Borders Abound stamp set (#152627) which have 4 different borders, representing each season. I have used the winter border for this Christmas card, even though we don't have winter at Christmas time in Australia.


I stamped these borders using the Stamparatus (#148187) by moving the plate one hinge at a time to stamp. I used Seaside Spray ink (#150085). This was attached to the Pacific Point card (#116202). I dry embossed another piece of Whisper White card with the Winter Snow Embossing Folder (#153577), then attached the triangular piece of Snowflake Splendor Designer Series Paper (#153512). I wrapped the Seaside Spray 1/4” Metallic Ribbon (#150446) around the card front, then attached this to the Whisper White base card. The sentiment is from the Gift Wrapped stamp set (#153432) and stamped with Pacific Point ink (#147098). The sentiment and the Pacific Point card were cut with Tasteful Labels Dies (#152886) and then attached to the card with Stampin’ Dimensionals (#104430). To finish the card I added the sequins from the Woven Threads Sequin Assortment (#149498) using the Fine Tip Glue Pen (#138309). 

Have a great day!!


lesleyjendra.stampinup.net


lesleyjendra@bigpond.com.au

Wednesday 23 September 2020

Dandelion Wishes

Hello friends,


A simple get well card using the Dandelion Wishes stamp set (#151345).


I stamped the dandelion image and the sentiment from Dandelion Wishes stamp set using Misty Moonlight ink (#153118). I also re-stamped both with VersaMark (#102283) and embossed with Clear Stampin’ Emboss Powder (#109130) and set with the Heat Tool (#129056). Of course I used the Stamparatus (#148187) to be able to line up the image when re-stamping. The sentiment was cut with a Stitched Shapes Die (#152323). I embossed the Whisper White card (#106549), after I stamped the image, using the Subtles 3D Embossing Folder (#151775). The Misty Moonlight card (#153086) was dry embossed with the Brick & Mortar 3D Embossing Folder (#149643) and attached to the Whisper White base card. I cut a piece of Silver Foil Sheet (#132178), backed with Adhesive Sheets (#152334), using a Many Medallions Die (#153584) and attached this to the card. The sentiment was attached with Stampin’ Dimensionals (#104430). I added Shimmery Crystal Effects (#150892) to the centre of the dandelions. This does take a little while to set, so ensure this is the last thing you do on the card so it doesn’t get spoiled before it sets.

Enjoy whatever you are doing today and stay safe!!


Tuesday 22 September 2020

Foil Sheets with Tree Angle

Hi friends,

This card is similar to one I made earlier this month, but I have used Foil sheets for a lovely shine.


I embossed the Whisper White card front (#106549) using the Evergreen Forest 3D Embossing Folder (#153576). The sentiment from the Itty Bitty Christmas stamp set (#150513) was stamped with Real Red ink (#147084). I added glitter to the embossed trees using the Clear Wink Of Stella Glitter Brush (#141897). The base card is Real Red (#106578). The images for the trees from the Tree Angles stamp set (#153442) were stamped with Shaded Spruce ink (#147088), Bumble Bee ink (#153116) and Real Red ink. The foil sheets are Red & Green Foil Sheets (#153510) and Brass Foil Sheets (#153057). The stamped images and the foil sheets were cut with the Stitched Triangles Dies (#152710). The tree trunks were stamped with Crumb Cake ink (#147116) and fussy cut. The red and green trees were attached using Stampin’ Dimensionals (#104430). The embellishments are from the Woven Threads Sequin Assortment (#149498).


For one day only, on 23rd September there is a 24 hour only sale for selected stamp sets. Each stamp set is 15% off so check out the sets here.

Don’t delay as this is only available on 23rd September 2020.

If you live in Australia, you can contact me via email lesleyjendra@bigpond.com.au or order via my online store lesleyjendra.stampinup.net

Have a fantastic day.


Monday 21 September 2020

Poinsettia Petals

Hi & welcome,

I love the simplicity and elegance of Gold & white or Silver & white. I have used the Gold Stampin’ Emboss Powder (#109129) on the stamped images on this card.


I cut the detailed Whisper White (#106549) background using the Many Medallions Dies (#153584). Then I cut the frame using 2 of the Stitched Rectangles Dies (#151820). I cut the Medallion cutout slightly to fit the frame and attached the frame to this. I wrapped the Gold ribbon around the framed piece, then attached this to the Whisper White base card with Stampin’ Dimensionals (#104430). I stamped the poinsettia flowers from the Poinsettia Petals stamp set (#153475) using VersaMark (#102283) and Gold Stampin’ Emboss Powder and set it with the Heat Tool (#129056). The smallest petals were cut from the Gold Foil Sheets (#132622) and all the layers of the poinsettia are cut with the Poinsettia Dies (#153522). The flower was assembled using Mini Glue Dots (#152334) and then attached to the card with Stampin’ Dimensionals. The sentiment from the Joyful Holly stamp set (#153440) was also gold embossed. I used the Layering Ovals Dies (#151771) to cut the sentiment and also attached this with Stampin’ Dimensionals. A Gilded Gem (#152478) was added to the centre of the poinsettia.


Have a great day.


Sunday 20 September 2020

Sweetest Time

Hi everyone,

The Sweetest Time Bundle (#155169) used on this card consists of the Sweetest Time stamp set (#153436) and the Sweetest Borders Dies (#153559).


The candles were stamped with Real Red ink (#147084) onto the Whisper White card (#106549). The flames were stamped with Crushed Curry ink (#147087). This card was matted onto the Red Foil from the Red & Green Foil Sheets (#153510). The green foil also from this pack was used for the holly leaves using dies from the Sweetest Border Dies. The Brass Foil Sheets (#153057) were used for the fine leaves and the border pieces. These border pieces were cut with a die from the Many Medallions Dies (#153584). The berries were stamped with Real Red ink and cut with a co-ordinating die. These were attached to the card with Mini Stampin’ Dimensionals (#144108). I added Shimmery Crystal Effects (#150892) to the berries giving a subtle shimmer and some dimension to the berries. The sentiment is also from the Sweetest Time stamp set and I used Real Red ink. This was cut with a Stitched Rectangles Die (#151820). The Plush Poinsettia Specialty Paper (#153524) was attached to the Whisper White base card after all the elements were attached to it, making sure to only use adhesive where it can’t be seen through the vellum.


Have a great day!!


Saturday 19 September 2020

Friendly Silhouettes Dies

Hello,

Here’s another card using the gorgeous Rainbow Glimmer Paper (#153056). 


Using Adhesive Sheets (#152334) on the back of the Glimmer Paper, makes it so easy to adhere these more detailed die cuts. The die is from the Friendly Silhouettes Dies (#149546). The cardfront and base are Whisper White card (#106549). I daubered the edge of the cardfront with Highland Heather ink (#147103). The butterfly from the Positive Thoughts stamp set (#151490) and the sentiment from Peaceful Moments stamp set (#151595) were both heat embossed using VersaMark (#102283) and Gold Stampin’ Emboss Powder (#109129). This was set with the Heat Tool (#129056). The sentiment was cut with a Stitched So Sweetly Die (#151690) and the butterfly with a die from the Nature’s Thoughts Dies (#153586). I coloured the butterfly with Purple Posy Stampin’ Blends (#154896). 
I wrapped the Gold Trim from the Forever Greenery Trim Combo Pack (#152475) around the cardfront, then attached the butterfly and sentiment to the card with Stampin’ Dimensionals (#104430). The embellishments are the Flowers For Every Season Gems (#153645). I used the Clear Wink Of Stella Glitter Brush (#141897) on the butterfly for an extra sparkle.

I hope your weekend is a crafty one.


Friday 18 September 2020

Ornate Borders

Hi and welcome again,


How gorgeous is the Rainbow Glimmer Paper (#153056) which I have used for these flowers cut with the Ornate Borders Dies (#152724). I love the ombré effect.


I dry embossed a piece of Very Vanilla card (#106550) with the Ornate Floral 3D Embossing Folder (#152725). I cut another piece of Very Vanilla card with the Ornate borders dies, but I only wanted to use the blank piece of that card. I will use these flowers on another project. This card was attached to the embossed card. Then I cut the flowers from the Rainbow Glimmer Paper and this was attached to to the card, replacing the cut out flowers from the Very Vanilla card. I used Adhesive Sheets (#152334) on the back of the glimmer paper to make it easy to attach this to the card.
“Congratulations” from the Peaceful Moments stamp set (#151595) was stamped with VersaMark (#102283) and heat embossed with Gold Stampin’ Emboss Powder (#109129) and set with the Heat Tool (#129056). An Ornate Frames Die (#150664) was used to cut the sentiment. The edges were daubered with Crumb Cake ink (#121685) and this was attached to the card with Stampin’ Dimensionals (#104430).

The weekend is upon us again, so enjoy it.


Thursday 17 September 2020

Many Layered Blossoms

Hello,

I was asked to make a birthday card for a lady turning 100, so I hope she likes it.


I used the Shimmery White card (#121717), using the whole sheet and folding in half for the base card. I adhered the Adhesive Sheets (#152334) to the back of the Rainbow Glimmer Paper (#153056) and Brass Foil Sheets (#153057) before cutting the flowers using the Many Layered Blossoms Dies (#153582). The sentiment from the Peaceful Moments stamp set (#151595) was stamped with Magenta Madness ink (#153117), then re-stamped with VersaMark (#102283) and Heat embossed with Clear Stampin’ Emboss Powder (#109130) and set with the Heat Tool (#129056). The Stamparatus (#148187) is the perfect tool to be able to heat emboss in any colour like this. The cardfront was attached to a piece of the Brass Foil. Sequins from The Woven Threads Sequin Assortment (#149498) were attached to the card using the Fine-Tip Glue Pen (#138309).

Enjoy your day!!


Wednesday 16 September 2020

Garden Shed Thank You

Hello all,

I have used the Garden Shed stamp set (#c149247) again today but have used the 2 smaller images.


The sentiment from the Ornate Thanks stamp set (#p149471) was stamped with Tuxedo Black Memento ink (#132708). The corners of the card front were punched with the Detailed Trio Punch (#146320).
I stamped one image on the Whisper White card front (#106549) and stamped again on an extra piece as well as the 2nd image. These were stamped with Tuxedo Black Memento ink.
I fussy cut the 2 extra images after colouring them with Stampin’ Blends. The colours I used are Purple Posy (#154896), Highland Heather (#154887), Smokey Slate (#154904), Ivory (#154922), Daffodil Delight (#154883), Real Red (#154899), Granny Apple Green (#154885), Pumpkin Pie (#154897), Soft Suede (#154906) and Soft Sea Foam (#154902). The 2 fussy cut pieces were attached to the card front with Stampin’ Dimensionals (#104430).
The card front was attached to a piece of Basic Black card (#121688), then attached to the Whisper White base card.


Have a great day.

Tuesday 15 September 2020

Garden Shed

Welcome again friends,

I had fun colouring this image with a variety of Stampin’ Blends.


The image is from the Garden Shed stamp set (#149247) and I stamped it using the Tuxedo Black Memento ink (#132708) on Whisper White card (#106549). The Stampin’ Blends used are Granny Apple Green (#154885), Just Jade (#153107), Old Olive (#154892), Bronze & Ivory (#154922), Pumpkin Pie (#154897), Poppy Parade (#154958), Daffodil Delight (#154883), Flirty Flamingo (#154884), Smokey Slate (#154904), Soft Suede (#154906) and Balmy Blue (#154830).
“Happy Birthday” from the Many Mates stamp set (#152633) was stamped with Balmy Blue ink (#147105), then I coloured each letter with the Light Balmy Blue Stampin’ Blends and added glitter using the Clear Wink Of Stella Brush (#141897). I also added glitter to the glass in the door. The sentiment was cut with a Stitched So Sweetly Die (#151690).
The Balmy Blue paper from the Subtles 6”x6” Designer Series Paper (#153072) was attached to the Whisper White base card. The shed and the sentiment were attached to the card with Stampin’ Dimensionals (#104430).


Have a crafty day!!


Sunday 13 September 2020

Daisy Lane

Hi,

I love the simplicity of the silver and white on this card.


The cardstock I have used is Whisper White (#106549) and Silver Foil Sheets (#132178). I dry embossed the Whisper White cardfront with one of the Wrapped In Texture Embossing Folders (#153574). This was attached to a piece of Silver Foil Sheet. I attached a smaller piece of Silver Foil to the cardfront, then wrapped the 1/2” Metallic Mesh Ribbon (#153550) around this, then attached the whole piece to the Whisper White base card.
I stamped 2 of each of the large and small daisies from the Daisy Lane stamp set (#c149325). These were stamped with VersaMark (#102283) and heat embossed with Silver Stampin’ Emboss Powder (#109131) and set with the Heat Tool (#129056). The large daisies were punched with the Daisy Punch (#143713) and the smaller daisies with the Medium Daisy Punch (#149517). These were all assembled using Mini Glue Dots (#103683) then attached to the card with Stampin’ Dimensionals (#104430). 
I adhered the Adhesive Sheets (#152334) to the back of the Silver Foil Sheet and cut the leaves and flourishes with dies from the Butterfly Beauty Dies (#151819) and adhered these to the card. “Happy Anniversary” from the Many Mates stamp set (#c152633) was also silver embossed and was cut with a Stitched So Sweetly Die (#151690) and attached with Stampin’ Dimensionals. The Clear embellishments from the Frosted & Clear Epoxy Droplets (#147801) were added to the flower, sentiment and card to finish the card.

Have a great day, hopefully with some crafting time.


Saturday 12 September 2020

Tree Angle stamp set

Hi everyone,

I have used the small poinsettias from the Tree Angle stamp set (#153442) to make the wreath for this card.


I used a piece of  9.5 x 9.5cm Whisper White card (#106549) to stamp the wreath, using the Stamparatus (#148187). I have a piece of grid paper marked with a 9.5 x 9.5cm square and diamond as shown below.


I then placed the stamp on the White card on the square and stamped the image with Real Red Ink (#147084).


Next, I turned the White card as shown below and re-stamped it. I continued till the card was stamped all around.


I dry embossed another piece of Whisper White card (which will be attached to the base card) using one of the Meadow Moments Embossing Folders (#153126). These are the smaller embossing folders so I embossed each end of the card separately. I wrapped the Shaded Spruce Ribbon from the Wonder Of The Season Ribbon Combo Pack (#153537) around the card, then attached the square card.
The sentiment from the Wrapped In Christmas stamp set (#153481) was stamped with VersaMark (#102283) and heat embossed with Gold Stampin’ Emboss Powder (#109129) and set with the Heat Tool (#129056). I used a Layering Circles Die (#151770) to cut the sentiment and a die from the Warm Wraps Dies (#153521) to cut the Gold Foil Sheet (#132622). This was attached to the card with Stampin’ Dimensionals (#104430).
I adhered Adhesive Sheet (#152334) to the Shaded Spruce card (#147006) before cutting the leaves from the Celebration Labels Dies (#153570), then attached these to the card.

There are a variety of stamps that you can use this technique with, so why not try it with some stamps you have. You will need to use smaller images.

Enjoy your day.


Friday 11 September 2020

So Much Love

Hi and welcome to another weekend,

As well as butterflies being a favourite (as I said yesterday), purple/mauve is my favourite colour, here I have used my favourite colours.


The Whisper White card front (#106549) was dry embossed with the Ornate Floral 3D Embossing Folder (#152725). I daubered the edges with Gorgeous Grape ink (#147099), then attached it to the Whisper White base card. The Gorgeous Grape paper from the Brights 6”x6” Designer Series Paper (#152487) was cut with a Celebration Labels Die (#153570). The floral image from So Much Love stamp set (#c152667) was stamped with Tuxedo Black Memento Ink (#132708). This was coloured with the following Stampin’ Blends - Purple Posy (#154896), Highland Heather (#154887) and Granny Apple Green (#154885), then fussy cut. The Vellum (#106584) leaves were cut with a Forever Flourishing Die (#152714), the Purple Posy “berries” were cut with a Poinsettia Die (#153522) and the Granny Apple Green “leaves” were cut with dies from the Celebration Labels Dies. I had adhered the Adhesive Sheet (#152334) on the back of the Purple Posy card (#150887) and Granny Apple Green card (#147014) before cutting with the dies. The floral image was attached with Stampin’ Dimensionals (#104430). “Celebrate” is from the Many Mates stamp set (#c152633) and I used Gorgeous Grape ink. I cut this with a Stitched Shapes Die (#152323) and it was attached with Mini Stampin’ Dimensionals (#144108). I coloured the Pearl Basic Jewels (#144219) with the Dark Highland Heather Stampin Blends and attached them to the flower and sentiment.

Have a great weekend.


Thursday 10 September 2020

Butterfly Gala

Hi & welcome everyone,

Most people know that I love butterflies, so thought I would use some on todays card.


The Whisper White cardfront (#106549) was dry embossed with the beautiful Dainty Diamonds 3D Embossing Folder (#152702), then attached to Gold Foil Sheet (#132622). To conserve specialty papers like this Gold Foil you can cut a piece from the middle for later use, as you are only needing to see the outside part once the cardfront is attached. This was then attached to the Whisper White base card. Using the Rectangular Postage Stamp Punch (#152709), I punched the Crushed Curry card (#131288), Calypso Coral card (#124392), Coastal Cabana card (#131302) and Purple Posy card (#150887). I stamped 3 Butterflies from the Butterfly Gala stamp set (#148580). The large and small butterflies are stamped as1 image but when punched with the Butterfly Duet Punch (#148523) the 2 different shapes punch separately. The butterflies were stamped with VersaMark (#102283) and heat embossed with Gold Stampin’ Emboss Powder (#109129) and set with the Heat Tool (#129056). “Happy Birthday” is from the Many Mates stamp set (#152633) and also gold embossed. I cut this with one of the Stitched Rectangles dies (#151820). The die was too long so after cutting once, I re-positioned the die to cut it for a shorter length. The butterflies and sentiment were attached with Stampin’ Dimensionals (#104430). The small butterflies were coloured with So Saffron Stampin Blends (#154905), Calypso Coral Stampin’ Blends (#154881) and Mint Macaron Stampin’ Blends (#154889), and these were attached with Mini Glue Dots (#103683). A small Gilded Gem (#152478) was attached to each butterfly.

Hope you can have a crafty day.


Wednesday 9 September 2020

Wedding card

Hello,

A simple but elegant wedding card, just in white and gold.


The card is Whisper White (#106549) and Gold Foil Sheet (#132622). I dry embossed the cardfront with the Ornate Floral 3D Embossing Folder (#152725). I heat embossed the bow and sentiment with VersaMark (#102283) and Gold Stampin’ Embossing Powder (#109129), then set it with the Heat Tool (#129056). The bow is from the Gift Wrapped stamp set (#153432) and the sentiment is from the Last A Lifetime stamp set (#151479).
 I then cut the sentiment with a Layering Ovals Die (#151771) and the bow was punched with the Gift Bow Builder Punch (#153606). A Detailed Bands Die (#149549) was cut from the Gold Foil Sheet and attached to the cardfront. The sentiment and bow were both attached with Stampin’ Dimensionals (#104430).

Have a great day and stay safe!!

Sunday 6 September 2020

Ornate Style

Welcome,

This beautiful floral image is from the Ornate Style stamp set (#c152572).


I stamped the image with Tuxedo Black Memento ink (#132708) on Whisper White card (#106549), then fussy cut the image. I coloured the leaves and flowers with Granny Apple Green Stampin Blends (#154885), Daffodil Delight Stampin’ Blends (#154883), Highland Heather Stampin’ Blends (#154887), Purple Posy Stampin’ Blends (#154896) and Pumpkin Pie Stampin’ Blends (#154897). I used the Clear Wink Of Stella Glitter Brush (#141897) to add some glimmer to the larger flowers.
I coloured the Square Vellum Doillies (#152484) with Highland Heather ink (#147103) using a Sponge Brayer (#141714). These were then glued to the Whisper White card with the Fine-Tip Glue Pen (#138309). The Gorgeous Grape card (#147011) was dry embossed with one of the Meadow Moments Embossing Folders (#153126). The white card with the doillies and the Gorgeous Grape card were taped together, then I wrapped the 3/8” Tricolor Ribbon (#149708) around the cardfront. This was then attached to the Highland Heather base card (#147010).
The floral image was attached to the card with Stampin’ Dimensionals (#104430). “Congrats” is from the Many Mates stamp set (#152633) and stamped with Gorgeous Grape ink (#147099). This was cut with a Stitched So Sweetly Die (#151690) and attached with Mini Stampin’ Dimensionals (#144108).

Have a fantastic day.


Saturday 5 September 2020

Stitched Triangles Dies

Hi and welcome friends,

I have used the Stitched Triangles Dies (#152710) to cut all the triangles on this card. An easy card when you have the right tools.


Firstly I dry embossed the Whisper White card (#106549) with the Dainty Diamonds 3D Embossing Folder (#152702), then attached this to the Calypso Coral card (#124392), which was attached to the Whisper White base card. I cut 3 different size triangles from Whisper White card and 2 sizes from the Playing With Patterns 6”x6” Designer Series Paper (#152490). I glued the DSP to the white triangles with Multipurpose Liquid Glue (#110755) and these triangles were attached to the card with Mini Stampin’ Dimensionals (#144108). The small white triangles were glued to the card. The sentiment is from the Comfort & Hope stamp set (#152509) and stamped with Calypso Coral ink (#147101).


Enjoy your day.