Saturday 30 January 2021

Berry Blessings Bundle from Sale-a-bration

Hello & Welcome,

We all love free products and Sale-a-bration is a great way to get free products (with a qualifying order.) Sale-a-bration continues till the end of February. The Berry Blessings stamp set and Berry Delightful Designer Series Paper (#157613) are free with a $180 order (in Australia). I have used these on this card.


I attached the bottom layer of DSP to the Pacific Point card (#116202).  I cut the Red & White DSP and the Pacific Point card with a die from the Curvy Dies (#154319). These were attached to the card front, then the cardfront was attached to the Basic White card (#159228).
The outline for the leaves from the Berry Blessings stamp set were stamped with Granny Apple Green ink (#147095). Then I stamped the “inside” colour also with Granny Apple Green ink but “stamped off” before stamping on the leaves, to give a lighter colour. The leaves were then fussy cut and attached to the card.
“Happy Birthday” from the Many Mates stamp set (#152633) was stamped with Pacific Point ink (#147098) and cut with a Potted Succulents Die (#154330), then attached with Stampin’ Dimensionals (#104430).

Have a great day!!


“Love what you do and share what you love.”


Friday 29 January 2021

Simply Succulents Bundle

Welcome,

The weekend is here again and almost the end of January. Where has this month gone?

I have used the beautiful Simply Succulents Bundle (#156264) here today.


I have used Basic White Card (#159228) for the base card, card front and to stamp the succulents and sentiment on. I stamped the succulents from Simply Succulents stamp set (#154480) with Tuxedo Black Memento ink (#132708). I coloured these with Pool Party Stampin’ Blends (#154894) and Flirty Flamingo Stampin’ Blends (#154884). The Potted Succulent dies (#154330) were used to cut the detailed cardfront, the succulents, the sentiment and the label under the sentiment.
The sentiment is from the Simply Succulents stamp set and I stamped this with Flirty Flamingo ink (#147052).
The coloured cardstock used is Flirty Flamingo (#141421) and Pool Party (#124391). I adhered Adhesive Sheets (#152334) to the back of the Flirty Flamingo card before cutting the detailed succulents. I used Stampin’ Dimensionals (#104430) to attach the coloured succulents and the Pool Party label
I coloured the Pearl Basic Jewels (#144219) using the Flirty Flamingo Stampin’ Blends.

Enjoy your weekend!!

“Love what you do and share what you love.”


Thursday 28 January 2021

A Touch Of Ink

Hi again everyone,

I often see simple stamping cards but I find it difficult to just stamp. So today I just stamped the first card, then stepped it up just a bit with colouring, embellishments, ribbon and dies.


I stamped the flourish from the Beauty Abounds Stamp set (#148726) using Granny Apple Green ink (#147095). The hummingbird from A Touch Of Ink stamp set (#155233) was stamped with Tuxedo Black Memento ink (#132708). This stamp set is from Sale-a-bration with a $180 order. “Best Wishes” is also from this set and stamped with Granny Apple Green ink.
On the 2nd card I coloured the images with the following Stampin’ Blends - Granny Apple Green (#154885), Soft Sea Foam (#154902), Daffodil Delight (#154883), Poppy Parade (#154958), Mint Macaron (#154889), Crumb Cake (#154882), Flirty Flamingo (#154884), Balmy Blue (#154830).
The Silver Metallic-Edge Ribbon (#144213) was wrapped around the card. A die from the Stitched So Sweetly dies (#151690) was used to cut the sentiment and then attached using Stampin’ Dimensionals (#104430). 
The edges of the card front and sentiment were sponged with Granny Apple Green ink and I used the Clear Wink Of Stella Glitter Brush (#141897) to add glitter to the bird. Rhinestone Basic Jewels (#144220) were added to finish the card.

Have a great day!!

“Love what you do and share what you love.”


Wednesday 27 January 2021

True Love Designer Series Paper & Stampin’ Blends

Hello,

I have used a variety of Stampin’ Blends to colour the True Love Designer Series Paper (#154281). There is a lovely variety of designs in this pack suitable for colouring or you can just use the Black & White images. Either looks great.


The Stampin’ Blends used are Purple Posy (#154896), Highland Heather (#154887), Rococo Rose (#154900), Blackberry Bliss (#154877), Rich Razzleberry (#154898), Petal Pink (#154893), So Saffron (#154905), Flirty Flamingo (#154884), Crumb Cake (#154882) and Granny Apple Green (#154885). This was attached to the Basic White card (#159228) which I had dry embossed with a Meadow Moments Embossing Folder (#153126).
The edges of the card front was sponged with Rich Razzleberry ink (#147091) and then attached to the Basic White base card.
“Happy Birthday” from the Happy Thoughts stamp set (#154507) was stamped with Rich Razzleberry ink. I used the Hippo & Friends Dies (#153585) to cut the sentiment and the Rich Razzleberry card under the sentiment. The Gold Trim from the Forever Greenery Trim Combo pack (#152475) was attached under the sentiment, and the sentiment was attached with Stampin’ Dimensionals (#104430).

Enjoy your day!

“Love what you do and share what you love.”


Tuesday 26 January 2021

Lacy Petals Dies

Hi,

I have been playing with the Delicate Petals Bundle (#156258) again.


I stamped the detailed circle on the Basic White card (#159228) using Crumb Cake ink (#147116). To stamped this I cut the white card 9.5cm x 9.5cm and placed it on the Stamparatus (#148187) as shown below. I have a piece of the grid paper marked with a square and diamond the same size as the card.


Place the card on the square then place the stamp in position as shown.


Stamp the image, then turn the card and stamp again. Do this on all 4 sides.


To complete the circle I then moved the card to the “diamond” shape. As the image is larger than the gap in between the stamped image, I used the masking method. To do this I stamped a post-it-note and cut this around the edge of the image and cut this in half. I placed the stamped post-it-note over 2 of the stamped images, then stamped again on the card. The post-it-note stops the image being stamped over and only stamps the unmasked area. 


The petals and flowers were cut with Pretty Peacock card (#150886) and Gold Foil Sheet (#132622). I attached the Gold Trim from the Forever Greenery Trim Combo Pack (#152475) before attaching the petals to the card. The Pretty Peacock petals were attached with Mini Glue Dots (#103683) and the Gold Foil flower was attached with Mini Stampin’ Dimensionals (#144108).
“Happy” is from the Well Said stamp set (#148796) and stamped with Pretty Peacock ink (#150083). I attached a piece of Pretty Peacock card to the Foam Adhesive Sheets (#152815). This is double sided adhesive foam which you can cut with open dies and so I cut “birthday” using a die from the Well Written Dies (#151816). This has adhesive on the back so makes it easy to attach to the card.
I coloured 3 Rhinestone Basic Jewels (#144220) using the Pretty Peacock Stampin Blends (#154895) before adding to the card. Remember you can colour your embellishments with Stampin’ Blends to co-ordinate with the colours on your card.

Have a great day!!


“Love what you do and share what you love.”


Monday 25 January 2021

Delicate Petals Bundle

Hello & welcome again,

If you love pretty & lacy things I am sure you will love the Lacey Petals Dies (#154328) which I have highlighted on todays card. These are part of the Delicate Petals Bundle (#156258) which also includes the Delicate Petals stamp set (#154475) 


I have also used the beautiful Love You Always Foil Sheets (#154286). There are 3 colours in this pack. The larger petals and the top layer were cut from the Rococo Rose Foil, the next layer of petals are the Blushing Bride Foil and the next layer is the Sahara Sand Foil. The largest petals and the next layer are individual petals.
The leaves were cut from the Pearlescent Specialty Paper (#154291), then I sponged the leaves with Coastal Cabana ink (#147097).
I dry embossed the Pearlescent Specialty Paper for the card front using the Dainty Diamonds 3D Embossing Folder (#152702). The edges were sponged with Coastal Cabana ink. The sentiment is from the Delicate Petals stamp set and also stamped with Coastal Cabana ink, then cut with a die from the Tasteful Labels Dies (#152886). This was attached to the card with Stampin’ Dimensionals (#104430). 
The leaves, first 2 layers of petals and top layer of the flowers were attached to the card with Mini Glue Dots (#103683), the 3rd layer was attached with Mini Stampin’ Dimensionals (#144108).
A Pastel Pearl (#154571) was attached to the centre of the flower. The base card is Very Vanilla (#106550) and the sentiment was also stamped on Very Vanilla card.

Have a great day!!

“Love what you do and share what you love.”


Friday 22 January 2021

True Love Designer Series Paper

Hi Ladies & Guys,

The True Love Designer Series Paper (#154281) has beautiful floral & geometric designs in black & white but you can add your own colour which I have done with Stampin’ Blends.


The base card is Basic White (#159228). The background and the flowers are from the True Love DSP. I fussy cut the flowers and coloured them with the following Stampin’ Blends - Poppy Parade (#154958), Mango Melody (#154888), Highland Heather (#154887), Flirty Flamingo (#154884) and Granny Apple Green (#154885).
I stamped the sentiment from the Dandelion Wishes stamp set (#151345) using Tuxedo Black Memento ink (#132708) onto Basic White card. I did this using the Stamparatus (#148187) as I wanted to clear emboss the sentiment. Once I stamped the black ink, I cleaned the stamp then re-stamped with VersaMark (#102283), then added the Clear Stampin’ Emboss Powder (#109130) and set it with the Heat Tool (#129056). This gives a shine to the ink, and can be done in any colour ink to co-ordinate with your card.
I then cut this with a Stitched So Sweetly Die (#151690) and attached it to the DSP. The flowers were attached with Stampin’ Dimensionals (#104430) and the trio of Matt Black Dots (#154284) were attached to the card.

Enjoy your weekend!!

“Love what you do and share what you love.”


Thursday 21 January 2021

Kangaroo & Company

Hi & Welcome,

These cute kangaroos are from the Kangaroo & Company stamp set (#p154502). They are available as the Kangaroo & Company Bundle (#156269) which includes the stamp set and Kangaroo dies (#154502).


I stamped the kangaroos and flowers with Tuxedo Black Memento Ink (#132708) onto Basic White card (#159228). The kangaroos were coloured with Crumb Cake Stampin’ Blends (#154882), Ivory Stampin’ Blends (#154922), Flirty Flamingo (#154884) and Soft Suede154906). The flowers were coloured with Magenta Madness (#153106), Highland Heather (#154887), Just Jade (#153107), Daffodil Delight (#154883) and Flirty Flamingo. These were cut with the Kangaroo dies. There is a slot for the kangaroos pouch to insert the flowers or other images in the set.
The base card is Basic White, then the next layer is Just Jade card (#153084) followed by In Good Taste Designer Series Paper (#152494). The next 2 layers - Just Jade card and Mint Macaron card (#138344) - were cut with the Stitched So Sweetly Dies (#151690). I dry embossed the Mint Macaron card with the (retired) Wrapped In Texture embossing folder. I used Stampin’ Dimensionals (#104430) to attach the Just Jade card to the DSP. The kangaroos were attached to the card with Mini Glue Dots (#103683).
The sentiment is from the Kangaroo & Company stamp set and stamped with Just Jade ink (#153115) and cut with a die from the Tasteful Labels (#152886).


Have a great day!!

“Love what you do and share what you love.”


Wednesday 20 January 2021

Stitched With Whimsy Dies

Hi,

The stitching on the Basic White card (#159228) and the Bermuda Bay card (#131286) is achieved with the Stitched With Whimsy Dies (#155314).


However these dies don’t actually cut, they only do the stitching. As I wanted to cut the card parallel to the stitching, rather than just a rectangular card, I lightly marked around the outside of die onto the card with a pencil, then cut the pieces, then used the die to do the stitching. 
I stamped the butterflies from the Floating & Fluttering stamp set (#154424) onto the White “stitched” card, using the Tuxedo Black Memento ink (#132708). I coloured the images with a variety of Stampin’ Blends - Calypso Coral (#154881), Daffodil Delight (#154883), Mango Melody (#154888), Bermuda Bay (#154878), Pool Party (#154894), Night Of Navy (#154891) and Granny Apple Green (#154885).
After colouring, I cut the butterfly image with a Fluttering Die (#154318). These are cut in one piece with the one die. I attached the Bermuda Bay card & Basic White card to the Basic White base card, then attached the cut out butterflies with Stampin’ Dimensionals (#104430) above where I had cut them out.
“Birthday Wishes” is from the Butterfly Wishes stamp set (#149346) and stamped with Bermuda Bay ink (#147096). I used the Messages Die (#154422) to cut the sentiment and this was also attached with Stampin’ Dimensionals. Lastly I added the Flowers For Every Season Gems (#153645) to the body of one butterfly and to the card.


Enjoy your day, whatever you are doing.

“Love what you do and share what you love.”


Tuesday 19 January 2021

Hey Girlfriend

Hello friends,

The girls from the Hey Girlfriend stamp set (#154516) are so cute and I have used one of them on this card.


I stamped the girl and cute little cat with Tuxedo Black Memento ink (#132708) onto Basic White card (#159228). These were then coloured with the Stampin’ Blends with the following colours - Flirty Flamingo (#154884), Ivory & Bronze (#154922), Crumb Cake (#154882), Seaside Spray (#154901) and Smokey Slate (#154904). I also used the Clear Wink Of Stella Glitter Brush (#141897) on the dress, headband, lips and shoes. I used the Stitched Rectangles Dies (#151820) to cut this White card. This was attached to the Flirty Flamingo card (#141421) which I cut with the Ornate Layers Dies (#152726). Stampin’ Dimensionals (104430) were used to attach the Flirty Flamingo card to the DSP.
I cut the triangles using the Stitched Triangles Dies (#152710) and attached these to the corners of the Sand & Sea Designer Series Paper (#154288) then attached this to the Basic White base card.
“Happy Birthday” is from the Itty Bitty Greetings Stamp Set (#151331) and stamped with Flirty Flamingo ink (#147052). This was punched with the Classic Label punch (#141491). The Woven Threads Sequin Assortment embellishments (#149498) were glued to the card using the Fine-Tip Glue Pen (#138309).

Have a great day!!

“Love what you do and share what you love.”


Monday 18 January 2021

Seashells 3D Embossing Folder

Hi everyone,

You can make a very easy card with the beautiful Seashells 3D Embossing Folder (#154309).


I dry embossed the Champagne Foil Sheet (#144748) with the Seashells 3D Embossing Folder. This was attached to Cherry Cobbler card (#121681), then onto the Very Vanilla card (#106550).
I stamped the sentiment from the Many Messages stamp set (#154510) with Cherry Cobbler ink (#147083). The “Happy Birthday” and “congratulations  are positioned together on the stamp, so instead of cutting them separately with the co-ordinating Messages Die #(#154422), I cut them with the Stitched Nested Labels dies (#149638). The smaller banners are also cut with the Nested Labels dies. The sentiment was then attached to the card with Stampin’ Dimensionals (#104430).
I coloured the Pearl Basic Jewels (#144219) with Cherry Cobbler Stampin’ Blends (#154880) before attaching them to the card.

Enjoy your day!!

“Love what you do and share what you love.”


Saturday 16 January 2021

Baby card

Hello everyone,

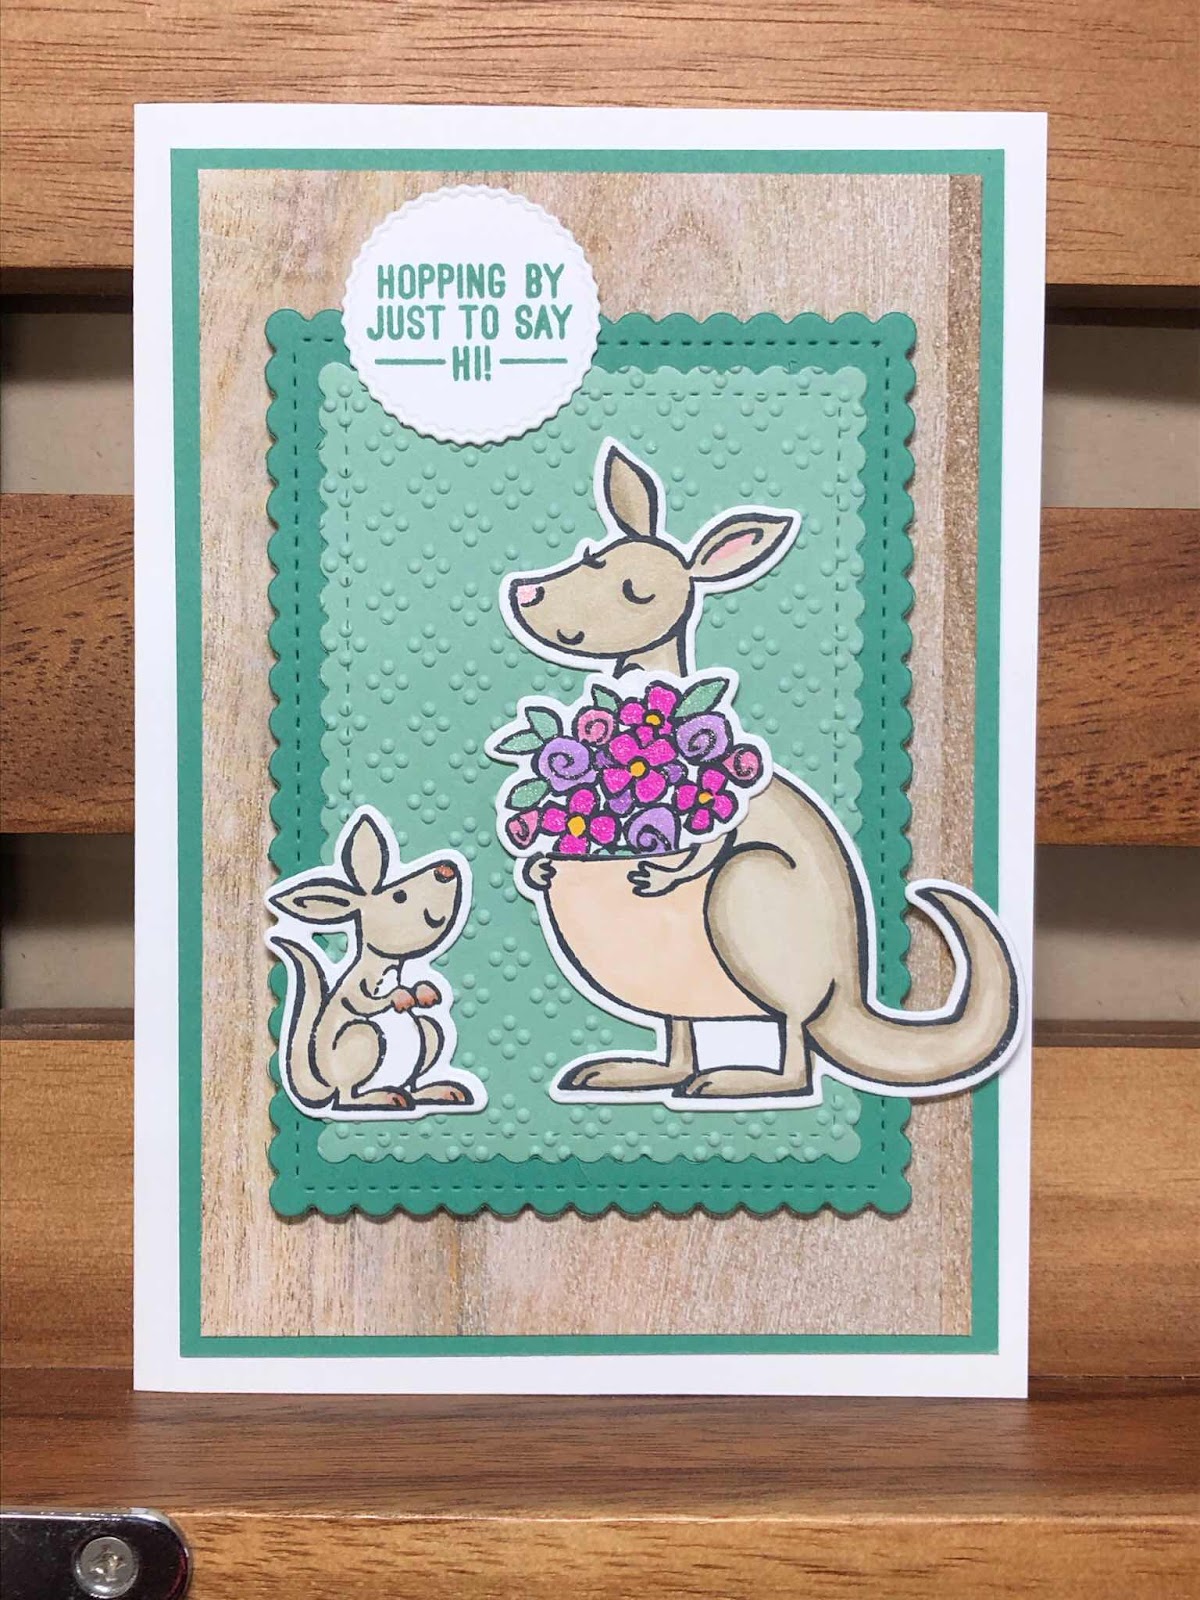
I needed a baby card, so thought animals would be cute for a baby boy. Some time ago I saw a “balcony card” with 2 levels and decided to make a larger one with 3 levels and have since made many variations of this card for different occasions. It’s always a hit.


The Whisper White base card is the normal card size - 21cm x 14.9 cm and scored at 10.5cm.
The White card at the front is 23cm x 4cm and scored at 11.5cm as well as 1cm at each end.
The middle white layer is 18cm x 7cm and scored at 9cm and 1 cm at each end.
The back white layer is 12cm x 12cm, scored at 6cm and 1cm at each end.
The 1cm flaps on each end is where each piece attaches to the card.

The Granny Apple Green card (#147014) is cut as follows and you require 2 of each size.
The front layer is 10cm x 3.5cm
The middle layer is 6.5 x 7.5 cm
The back layer is 11.5cm x 4.5cm
The base is 13.9cm x 9.5 cm.

The DSP is from the Oh So Ombre Designer Series Paper (#155225) from Sale-a-bration. Again you need 2 of each and are cut the following sizes-
Middle layer - 11cm x 4cm
Back Layer - 11cm x 4cm
Base - 13.4cm x 9cm.
I dry embossed the DSP with the retired Layered Leaves Embossing folder.

I stamped the sentiments onto Whisper White card then cut with the Stitched Rectangles Dies (#151820). “Sweetest Baby” is from the Wildly Happy Stamp set (#149408). The elephant and foxes are from the same set. “Congratulations” is from the Peaceful Moments stamp set (#151595). The sentiments were stamped with Granny Apple Green ink (#147095).

The Zebra is from the Zany Zebras stamp set (#152536) and the giraffes, rhino and kangaroo are from the retired Animal Outing stamp set. All the animals were stamped with Tuxedo Black Memento ink (#132708). I have coloured the animals with the following Stampin’ Blends - Smokey Slate (#154904), Crumb Cake (#154882), Pumpkin Pie (#154897) and Ivory (#154922). I used the Clear Wink Of Stella Glitter Brush (#141897) on parts of the animals.
 The rhino, giraffes and kangaroo were cut with the co-ordinating Animal Friends dies (retired) and the others were fussy cut.

The leaves are cut with dies from the Forever Flourishing dies (#152714) and dies from the Boho Indigo Product Medley (#153132).

When attaching each layer onto the card I find the easiest way is to lay the card flat. Have all the pieces assembled for the layers. Use a bone folder on all the scored lines and attach the 1cm flaps to the card using Tear & Tape Adhesive (#138995). The animals and leaves were attached after the rest of the card was assembled. I have used Stampin’ Dimensionals (#104430) and Mini Glue Dots (#103683) to attach the animals, leaves and sentiments to the card.
The card will lay flat when completed.

Have a great day!!

“Love what you do and share what you love.”


Friday 15 January 2021

Flowering Vine Dies

Hi,

I have used the Rectangular die from the Flowering Vine Dies (#154332) on this card. 


The base card is Whisper White, the next layer is Blackberry Bliss card (#133682), followed by the Dandy Garden 6”x6” Designer Series Paper (#154297). I adhered the Adhesive Sheets (#152334) to the Gold Foil Sheet (#132622) before cutting with the Flowering Vine Dies, then this was attached to the DSP.
The dragonfly from the Dandy Garden stamp set (#154411) was stamped with Blackberry Bliss ink (#147092), then punched with the Dragonflies Punch (#154240). I added the glitter from the Clear Wink Of Stella Glitter Brush (#141897) to the wings of the dragonfly. This did cause some bleeding of the ink but I liked how it gave a subtle colour to the wings. The dragonfly was attached to the card with Stampin’ Dimensionals (#104430).
The sentiment is from the Many Mates stamp set (#c152633), stamped with Blackberry Bliss ink , then cut with a Hippo & Friends die (#153585). The Blackberry Bliss banner under the sentiment was cut with a die from Flowering Vine Dies and the Gold Foil sheet was cut with the Messages die (#154422). Stampin’ Dimensionals were also used to attach these and the sentiment to the card.

Have a great weekend!!

“Love what you do and share what you love.”


Thursday 14 January 2021

Art Gallery Bundle

Hello again friends,

I have used the Art Gallery Bundle (#156227) for today’s card. This includes the Art Gallery stamp set (#p154421) and the Floral Gallery Dies (#154316).


The dies include the words - “just want to say”. You can use either the negative and positive then use the other for another card. I have cut the words from Whisper White card and then matted this with the Bermuda Bay card (#131268). The flowers and sentiment are images from the stamp set. The flowers are 2-step stamping, so I have stamped the background of the flowers with Coastal Cabana ink (#147097), then stamped the smaller image of the flowers with Bermuda Bay ink (#147096). The sentiment is also stamped with Bermuda Bay ink. The flowers and sentiment were cut with dies from the Floral Gallery dies. The sentiment was matted with Bermuda Bay card. The flowers and sentiment were attached to the card with Stampin’ Dimensionals (#104430).
The Designer Series Paper is the Oh So Ombre DSP (#155225) from Sale-a-bration.The base card is Whisper White. Before attaching the Wonderful Gems to the card I coloured them using the Bermuda Bay Stampin’ Blends (#154878). For a bit of glimmer I used The Clear Wink Of Stella Glitter Brush (#141897) on the words and parts of the flowers.


Hope your day is a relaxing one.

“Love what you do and share what you love.”


Wednesday 13 January 2021

Hydrangea Hill Mercury Glass Designer Acetate

Hello,

For all the purple lovers out there ( and yes I am one!!) you can’t go past the Hydrangea Hill papers and accessories.


I have used the Hydrangea Hill Mercury Glass Designer Acetate (#154574) for the cardfront.  I attached it to a piece of Whisper White card, then attached this to Gorgeous Grape card (#147011). The reason I attached it to the white card first was so you could see the white “splotches” as this is actually clear on the acetate. The base card is also Whisper White, which is being replaced by the Basic White card (#159228), and now available for purchase.
The flowers from the Hyrdangea Hill Designer Series Paper (#154570) were cut with a Layering Circles Die (#151770), as was the Gorgeous Grape card underneath.
The ribbon is the Silver/White 3/8” Metallic-edged Ribbon (#144213) which I lightly sponged with the Gorgeous Grape ink (#147099) before attaching the the card. The sentiment is from the Many Messages stamp set (#154510) and cut with the co-ordinating Messages Die (#154422). This stamp set has a great range of sentiments, so you can stamp them all, cut them and put them aside for later use, or you can just stamp and cut just the one you need. I stamped the sentiment with Gorgeous Grape ink.
The sentiment and flowers were attached to the card with Stamping Dimensionals (#104430) then the Pastel Pearls (#154571) were added to complete the card.

Have a great day!!

“Love what you do and share what you love.”


Monday 11 January 2021

Fine Art Floral Designer Series Paper

Hello and welcome,

I love the bright colours on the Fine Art Floral Designer Series Paper (#154558). As usual there are more subtle colours and designs on the reverse but I have chosen to use the beautiful red design for this card.


This designer paper co-ordinates with the Art Gallery stamp set (#154421), so I have added some gold to 2 of the flowers using the Gilded Leafing (#154560). I stamped the part flower image from the Art Gallery Stamp set onto the flowers and some circles from the Comfort & Hope Stamp set (#152509) randomly on the DSP. These were stamped with VersaMark (#102283), then the Heat and Stick Powder (#156110) is sprinkled over the stamped images. Remove the excess powder, then heat with the Heat Tool (#129056). This doesn’t take long. Once it becomes shiny it is ready and it will stay sticky. Gently place the Gilded Leafing over the top and press firmly. Using a firm brush or sponge remove the excess gilded leaf and this can be returned to the remainder of the leaf so it’s not wasted.
I cut “happy birthday” using the Well Written Dies (#151816). These were cut from the Foam Adhesive Sheets (#152815). As these have adhesive on both sides. I attached the words to the card, then after removing the release paper from the top I added the Gilded Leafing on top. I pressed the gilded leafing firmly onto the foam adhesive then using a firm brush removed the excess.
The DSP was attached to the Poppy Parade card (#121694), then to the Whisper White Base card.

Stay safe, stay home & keep crafting!!

“Love what you do and share what you love.”


Sunday 10 January 2021

Flowering Vine Dies

Welcome friends,

Have you seen the beautiful Flowering Vine Dies (#154332) in the current mini catalogue. I love the 3 detailed flowering designs - one rectangular, one circle and one oval.


The designer series paper is the Oh So Ombre DSP (#155225) from Sale-a-bration. I have used 2 different sheets - the plain Ombre look and the patterned piece. The DSP was attached to the Rococo Rose card (#150888) then I wrapped the Blushing Bride 3/8” Metallic Ribbon (#154284) around the card front. This was attached to the Whisper White card base (#106549).
I cut the Champagne Foil Sheet (#144748) with the die. I had the Foil Sheet backed with the Adhesive Sheets (#152334) as this makes attaching the more detailed cut outs to the card so much easier.
I stamped the butterflies from Floating & Fluttering stamp set (#154424) using VersaMark (#102283) and added the Gold Stampin’ Emboss Powder (#109129), which was set with the Heat Tool (#129056). These butterflies were cut with the Fluttering Dies (#154318). There are dies in this set to cut the butterflies separately or as a group. I have used the individual dies. I coloured the butterflies with Rococo Rose Stampin’ Blends (#154900), then used the Clear Wink Of Stella Glitter Brush (#141897) for the sparkle. The butterflies were attached with Stampin’ Dimensionals (#104430).
The sentiment from the Friends Are Like Seashells stamp set (#154368) was stamped with Rococo Rose ink (#150080), then cut with a Stitched Rectangles Die (#151820) and also attached with Dimensionals.

Don’t forget about Sale-a-bration, where you get free products with each $90 purchase of Stampin’ Up! products from the current catalogues. If you want more information contact me or go to- lesleyjendra.stampinup.net

Stay Safe, stay home and keep crafting!!


“Love what you do and share what you love.”


Saturday 9 January 2021

Gilded Leafing Embellishment

Hi Ladies & guys,

I have had fun playing with the new Gilded Leafing Embellishment (#154560) on these seashells from the Friends Are Like Seashells stamp set (#154368) and I love the finished product.


To use the Gilded Leafing, stamp the images of the shells with VersaMark (#102283) then add Heat & Stick powder (#156110) and set with the Heat Tool (#129056). The powder becomes sticky once heated. Then carefully add the Gold Gilded Leafing over the stamped images, press the gilded leaf firmly onto the image then using a firm brush, wipe the excess away. The excess can be added back into the rest of the leafing so it’s not wasted. The cardstock I used for the shells was Very Vanilla (#106550), Blushing Bride (#131287) and So Saffron (#108611). Next I cut the shells with the die from the Seaside Seashells Dies (#156095) and dry embossed with the Seashells 3D Embossing Folder (#154309). Dry embossing these shells made a huge difference to the look of the shells.
The card front is Seaside Spray (#150889) and dry embossed with the Seabed 3D Embossing Folder (#152700). I lightly daubered over the embossed areas with Seaside Spray ink (#150085), then the cardfront was attached to the Very Vanilla base card. 
The sentiment is from the Friends Are Like Seashells stamp set. I stamped this using the Stamparatus (#148187) with Seaside Spray ink. Then I re-inked it with VersaMark and added Clear Stampin’ Emboss Powder (#109130) and set with the Heat Tool. This gives a shine to the coloured ink. The sentiment was then cut with an Ornate Frames Die (#150664).
I cut pieces of the seaweed using the Seaside Seashells Dies from Soft Sea Foam card (#147012) and used the Clear Wink Of Stella Glitter Brush (#141897) to add some glitter to the seaweed. These were attached to the card with Mini Glue Dots (#103683). The shells and sentiment were attached with Stampin’ Dimensionals (#104430).

Stay safe, stay home & keep crafting!!

“Love what you do and share what you love”


Friday 8 January 2021

Vine Design Bundle

Hi again everyone,

With the sudden lockdown around Brisbane, I have had to cancel everything over the next 4 days, so I have had a bit of extra time in my craft room today which is a positive. 
I have made this card using new products from the Mini catalogue and Sale-a-bration.


I stamped the leaves from the Vine Design stamp set (#154488) using Granny Apple Green ink (#147095) onto the Oh So Ombre Designer Series Paper (#155225). This DSP is free from Sale-a-bration with a $90 order. After stamping, I dry embossed the DSP with the Sublte 3D Embossing Folder (#151775). The die cut piece was cut with a Flowering Vine Die (#154332) from Pearlescent Specialty Paper (#154291). I attached this to the DSP with Mini Glue Dots (#103683).
The flowers and sentiment are from the Vine Design stamp set (#154488) and were stamped with Flirty Flamingo ink (#147052), Blushing Bride ink (#147100) and Granny Apple Green ink (#147095). The sentiment was cut with a die from the Flowering Vine Dies and attached to the card with Stampin’ Dimensionals (#104430). The stamped flowers were also cut with the Flowering Vine Dies and also attached with Dimensionals. Rhinestone Basic Jewels (#144220) were added to the flowers and sentiment.
The base card is Whisper White. Don’t forget Basic White card (#159228) is now replacing Whisper White card and is available to purchase.

Stay safe, stay home and keep crafting!!

“Love what you do and share what you love”


Thursday 7 January 2021

Flower & Field Designer Series paper

Hi again everyone,

As you probably realise, Sale-a-bration has started, which means you get free products with each $90 you spend on Stampin’ Up! products from either of the current catalogues. The Flower & Field Designer Series Paper (#155223) is a Sale-a-bration product.


The base card is Whisper White. This is being replaced with Basic White card (#159228) which is now available to order. I dry embossed the White cardfront with the Painted Texture 3D Embossing Folder (#154317) and daubered the edges with Poppy Parade ink (#147050). The Poppy  Parade card (#121694) was cut with a die from the Ornate Borders Dies (#152724). The Flower & Field Designer Series Paper was attached to the card.
The sentiment from Peaceful Moments stamp set (#151595) was stamped with Poppy Parade ink. The sentiment and the Gold Foil Sheet (#132622) were cut with Stitched Nested Labels Dies (#149638) and attached to the card with Stampin’ Dimensionals (#104430). The butterfly, also from the Gold Foil Sheet, was cut with a die from the Fluttering Dies (#156239). I used Mini Stampin’ Dimensionals (#144108) to attach the butterfly to the card, then added the Red Rhinestone Basic Jewels (#146924) to the body of the butterfly.

Enjoy your day!!

“Love what you do and share what you love.”


Wednesday 6 January 2021

True Love Designer Series Paper

Welcome,

The True Love Designer Series Paper (#154281) consists of a beautiful range of Black & White floral & geometric images. They can be used as is, or you can add colour as I have done for todays card.

The new Mini catalogue is now available along with sale-a-bration. This Designer Series Paper if from the Mini catalogue.

Before colouring -


After colouring-


I coloured the floral paper with the following Stampin’ Blends - Granny Apple Green (#154885), Mango Melody (#154888), Highland Heather (#154887), Real Red (#154899), Poppy Parade (#154958), Flirty Flamingo (#154884), Old Olive (#154892), Pumpkin Pie (#154897), Rococo Rose (#154900) and Calypso Coral (#154881).
I coloured the geometric pattern paper (which is the reverse side of the floral) using Daffodil Delight ink (#147094) with a Blending Brush (#153611). The strip of card between the 2 pieces of designer paper is Mango Melody (#147013). The base card is Whisper White (#106549).
The sentiment from the Happy Thoughts stamp set (#154507) was stamped with Mango Melody ink (#147093), then cut with a die from the Hippo & Friends Dies (#153585). After sponging the edges with Mango Melody ink, the sentiment was attached to the card with Stampin’ Dimensionals (#104430) and a Champagne Rhinestone Basic Jewel (#151193) was added.


Have a great day!!

“Love what you do and share what you love!”


Monday 4 January 2021

Berry Blessings Stamp Set from Saleabration

Hi everyone,

Sale-a-bration is here again, which means we get free products with each $90 of products purchased. There is a range of products to choose from including stamps, designer papers and a punch. I have used the Berry Blessings stamp set and Berry Delightful Designer Series Paper (#157613) which are available as a bundle with a $180 order.


The leaves, berries and sentiment are all from the Berry Blessings stamp set. The inks are Granny Apple Green (#147095) and Poppy Parade (#147050). I coloured the leaves using Light Granny Apple Green Stampin’ Blends (#154885). The berries were coloured by stamping using the stamping off method with Poppy Parade ink.
The Whisper White card with the sentiment and the Poppy Parade card (#121694) under the sentiment were both cut with Layering Square Dies (#151772). These were attached to the card with Stampin’ Dimensionals (#104430). The stamped white card was attached to the Granny Apple Green card (#147014) and then the next layer is Berry Delight Designer Series Paper. The base card is also Whisper White.
The finished card size is 13cm x 13cm.

Sale-a-bration will continue till 28th February so you have lots of opportunities to get free products.

“Love what you do and share what you love”