Saturday 31 October 2020

Stitched Stars Dies

Hello again,

The Stitched Stars Dies (#150653) have been used to cut these detailed stars.


These stars were cut from Copper Foil Sheets (#142020) which were backed with Adhesive Sheets (#152334) before cutting. They were adhered to the Seaside Spray card (#150889) as well as the triangle of the Brightly Gleaming Specialty Designer Series Paper (#150429). The card front was attached to the Night Of Navy card (#106577), then this card was attached to the Whisper White base card (#106549).
The sentiment is from the Joyful Holly stamp set (#p153440) and stamped with Night Of Navy ink (#147110). This was then cut with a die from the Tasteful Labels Dies (#152886). I used Stampin’ Dimensionals (#104430) to attach the sentiment to the card.

I hope you are enjoying your weekend.


Friday 30 October 2020

Evergreen Forest 3D Embossing Folder

Hello and welcome,

On today’s card I have used the Shimmery White Embossing Paste (#145645) on the embossed trees, giving a lovely glitter to the trees.


I dry embossed the Whisper White card front (#106549) using the Evergreen Forest 3D Embossing Folder (#153576). Then I lightly applied the Shimmery White Embossing Paste over the embossed trees. I daubered the edges of the card front with Shaded Spruce ink (#147088). I attached the Classic Christmas 6”x6” Designer Series Paper (#155969) to the card. “Peace Joy Love” is from the Dove Of Hope stamp set (#c153406) and stamped with Shaded Spruce ink. “Merry Christmas” from the Perfectly Plaid stamp set (#p149418) was stamped with Real Red ink (#147084). Both these sentiments are cut with the Stitched Rectangles Dies (#151820) and attached with Stampin’ Dimensionals(#104430). The swirl is Red Foil from the Red & Green Foil Sheets (#153510) and cut with a Stitched Stars Die (#150653) and glued to the card using the Fine-Tip Glue Pen (#138309). I added the Red Rhinestone Basic Jewel (#146924) to the sentiment.

“Love what you do & share what you love”.

Have a fantastic day.


Thursday 29 October 2020

Flowers for Every Season Designer Series Paper

Hello friends,

Don’t forget the Designer Series Paper Sale is almost at an end, so if you would still like to take advantage of 15% off selected DSP click here  Only available till 31 October so don’t delay.

I have used the Flowers For Every Season 6”x6” Designer Series Paper (#152486) on today’s card. This isn’t included in the sale but you could easily substitute many of the designer papers of your choice.


The cardstock is Whisper White (#106549). I dry embossed the card front with the Seabed 3D embossing folder (#152700). The edges were daubered with Misty Moonlight ink (#153118), then I wrapped the Misty Moonlight 2020-2022 In Colour 1/4” Ribbon (#153624) around the cardfront. The Designer Series Paper and Whisper White card were cut with Stitched So Sweetly Dies (#151690). The bottom layer was attached to the card with Stampin’ Dimensionals (#104430). The butterfly from Positive Thoughts stamp set (#151490) and the greeting from Many Mates stamp set (#152633) were stamped with Misty Moonlight ink. I stamped 2 butterflies and attached one on top of the other using a Mini Stampin’ Dimensional (#144108). The butterflies were cut with a co-ordinating die from the Nature’s Thoughts Dies (#153586). “Celebrate” was cut with a Layering Ovals Dies (#151771) and also attached to the card with Stampin’ Dimensionals. The Rhinestone Basic Jewels (#144220) were added to the sentiment and butterfly. 

“Love what you do and share what you love.”

Have a great day. 


Wednesday 28 October 2020

Poinsettia Dies

Hi everyone,

I love the Poinsettias from the Poinsettia Place Suite and was wanting to make a Christmas Frame so I have finally had a chance to make one and this was quite easy to make.


The background paper is from the Plush Poinsettia Specialty Paper (#153486) and I attached this to a piece of 12”x12” Whisper White cardstock (#124302).
The flowers and berries were all cut from the Poinsettia Dies (#153522).  I used the Green Foil from the Red & Green Foil Sheets (#153510) for the base of the flowers. The red layers were cut from the Red Velvet Paper Pack (#153490). I used Gold Foil Sheets (#132622) for the top layer of the flowers and for the berries. The flowers were assembled using Mini Glue Dots (#103683) and attached to the base with Stampin’ Dimensionals (#104430). The berries were attached with Mini Glue dots.
I used a retired die for Merry Christmas and this was also cut with the Red Velvet and glued using the Fine-Tip Glue Pen (#138309).
The greeting from Wrapped In Christmas stamp set (#153481) was stamped with VersaMark (#102283) and heat embossed with Gold Stampin’ Emboss Powder (#109129), then set with the Heat Tool (#129056). This was cut with a Stitched Rectangle die (#151820), then attached to a piece of Red Velvet. 
The red gems from the Wonderful Gems (#153536) were attached to the centre of the poinsettias.

Have a great day.

Tuesday 27 October 2020

Feels Like Frost Specialty Designer Series Paper

Hi everyone,

This beautiful Designer Series Paper is part of the Feels Like Frost 6”x6” Specialty Designer Series Paper (#150444). There are photographic images on one side and lovely white and silver foil designs on the reverse.


The designer paper was attached to Melon Mambo card (#119980) and this was attached to the Whisper White base card (#106549).
I thought the Rainbow Glimmer Paper (#153056) worked perfectly with the colours in this DSP, so I used this for the tree which I cut with one of the Pine Woods Dies (#153563). This was attached to the card with Stampin’ Dimensionals (#104430). “Season’s Greetings” from the In The Pines stamp set (#153448) was stamped with Melon Mambo ink (#147051) and cut with a Stitched Rectangles Die (#151820) and attached with Mini Stampin’ Dimensionals (#144108). The snowflakes from the Snowflake Sequins (#150443) were attached to the card with the Fine-Tip Glue Pen (#138309).
This is a very easy card to make especially when you have lots of Christmas cards to make.

Don’t forget the Designer Series Paper sale which ends on 31st October. For all details click here.

Have a fantastic day.


Monday 26 October 2020

Curvy Dies

Hello friends,

I am loving these Curvy Dies (#154319) which will be available from 3rd November, along with the Quite Curvy stamp set (#154430) and Curvy Christmas stamp set (#155364)


The Designer Series Paper is from the Flowers For Every Season 6”x6” DSP (#152486) and the pink card is Magenta Madness (#152085). Each of these papers were cut with the Curvy Dies. The base card is Whisper White (#106549).
The sentiment is from the Good Morning Magnolia stamp set (#c149298) and stamped with Magenta Madness ink (#153117). I used a Tasteful Labels Die (#152886) to cut the sentiment. The banner under the sentiment was punched with the Banners Pick A Punch (#153608).
The Woven Threads Sequins (#149498) were attached to the card with the Fine-Tip Glue Pen (#138309).

How quick and easy is that!!

Have a great day.


Sunday 25 October 2020

In The Pines Bundle

Hi everyone,

The In The Pines Bundle (#155182) consists of the In The Pines stamp set (#p153448) and the Pine Wood Dies (#153563) and have a great variety of pine trees, some of which I have used on this card. All the trees are cut with the dies.


Firstly, I dry embossed the Whisper White card front (#106549) with the Evergreen Forest 3D Embossing Folder (#153576) and lightly daubered the trees with the Soft Sea Foam ink (#147102). The card front was attached to Shaded Spruce card (#147006), then to the Whisper White base card. 
I cut a piece of the Soft Sea Foam from the Subtles 6”x6” Designer Series Paper (#153072) using a die from the Pine Wood Dies for the “hills”. “Season’s Greetings” also from the In The Pines stamp set was stamped with VersaMark (#102283) and heat embossed with Gold Stampin’ Emboss Powder (#109129) and I used the Heat Tool (#129056) to set this.
The tree on the left was cut from Soft Sea Foam card (#147012) and I lightly daubered the edges with Soft Sea Foam ink. The tree on the right was cut from Shaded Spruce card (#147006) and Gold Foil Sheets (#132622). I had used the Adhesive Sheets (#152334) on the back of the gold foil for ease of attaching this to the solid tree. The smaller trees were stamped with Shaded Spruce ink (#147088) for the outline and Soft Sea Foam ink to 
“colour” the trees using the 2 step stamping technique. These were attached to the card with Mini Stampin’ Dimensionals (#144108). 
The embellishments are from the Flowers For Every Season Gems (#153645). Glitter was added to the trees using the Clear Wink Of Stella Glitter Brush (#141897).

Don’t forget the Designer Series Paper sale will end on 31st October. Check out the details here for some great savings.

Have a great day!!


Saturday 24 October 2020

Gold Cards & Envelopes

Hello & welcome friends,


When you want a card for a special occasion look no further than these beautiful Gold Cards & Envelopes (#153532). These Very Vanilla cards have a beautiful gold border so you can decorate it as you wish. They come with metallic gold envelopes.


I cut the Soft Sea Foam card (#147012) with a die from the Nature’s Thoughts Dies (#153586). I wrapped the Snowflake Splendor 1/4” Ribbon (#153548) around the Soft Sea Foam card. “Celebrate” from the Many Mates stamp set (#c152633) was stamped with VersaMark (#102283) and heat embossed with Gold Stampin’ Emboss Powder (#109129), then set with the Heat Tool (#129056). This was then cut with an Ornate Frames Die (#150664) and attached to the card with Stampin’ Dimensionals (#104430)
I attached the Gold Hoop Embellishment (#152474) using Mini Glue Dots (#103683) where they will be covered with the flower. I also added a couple of dots of the Fine-Tip Glue Pen (#138309) under the hoop at the top. The leaves are from the Forever Gold Laser-Cut Specialty Paper (#152493) and attached to the card with Mini Glue Dots.
The Daisy from Daisy Lane stamp set (#c149325) was also Gold heat embossed. I stamped 2 flowers and when assembling I offset the petals. These were attached with Mini Glue Dots, then attached to the card with Stampin’ Dimensionals (#104430). 
The gold Wonderful Gems (#153536) were added to the card and flower centre.

I hope you are having a great weekend.


Friday 23 October 2020

Graces Garden

Welcome friends,

Another challenge for myself today. I chose a stamp and a die which I haven’t used for some time, so my challenge was to use these on a card. The stamp is the All Wired Up background stamp (#149262) and a die from the Beautiful Boughs (#150661).


The cardstock is Very Vanilla (#106650) and Real Red (#106578). I stamped the background with the All Wired Up stamp using Smokey Slate ink (#147113). The Real Red card was cut with a Stitched Rectangles Die (#151820) and dry embossed with one of the Wrapped In Texture Embossing Folder (#153574).
The sentiment, flowers, cat and bird are all images from Graces Garden stamp set (#p151513). I used Tuxedo Black Memento ink (#132708) to stamp the flowers, cat and sentiment. The bird was stamped with Real Red ink (#147084). The sentiment was cut with a die from the Beautiful Boughs dies and the other stamped images were cut with dies from the Garden Gateway Dies (#151512).
The Stampin’ Blends used to colour the images are Real Red (#154899), Mango Melody (#154888), Granny Apple Green (#154885) and Smokey Slate (#154904).
The flowers, bird and cat are attached to the card with Mini Stampin’ Dimensionals (#144108). A red Wonderful Gem (#153536) was added to the sentiment and I added glimmer to the flowers, bird & cat using the Clear Wink Of Stella Glitter Brush (#141897).

I hope your are having a crafty day!!


Thursday 22 October 2020

Rectangular Postage Stamp Punch

Hello again,

Today I was challenging myself again, this time to use colours I don't use very much, but when I do use them I wonder why I don’t use them more often. The colours are Sahara Sand and Blushing Bride.


The base card and card front are Very Vanilla (#106550). I stamped the image from the Woven Heirlooms stamp set (#c149306) on the top and bottom of the card front with Sahara Sand ink (#147117). I also sponged the edges with Sahara Sand ink.
I punched 3 Rectangular Postage Stamps (#152709) from Champagne Foil Sheet (#144748), then embossed these with the Tin Tile 3D Embossing Folder (#151801). I attached these to Sahara Sand card (#121695) cut slightly bigger than the punched rectangles. The Very Vanilla 3/8” Scalloped Lace Trim (#149593) was wrapped around the card front. I stamped 3 butterflies from the Positive Thoughts stamp set (#151490) with Sahara Sand ink and another 3 with Blushing Bride ink (#147100). The Sahara Sand butterflies were attached to the Foil Sheet, then the Blushing Bride butterflies were added on top with Mini Stampin’ Dimensionals (#1144108).
I attached a piece of Blushing Bride card (#131287) to the Foam Adhesive Sheets (#152815), then cut “birthday wishes” using dies from the Well Written Dies (#151816). The Foam Adhesive Sheets are double sided adhesive foam sheets and great for adding depth and dimension to your project. The little hearts are also cut with a die from the Well Written Dies, using Blushing Bride card and glued to the card with the Fine-Tip Glue Pen (#138309). 
I coloured the Pearl Basic Jewels (#144219) with Soft Suede Stampin’ Blends (#154906) and attached them to the butterflies.

Have a great day!!


Wednesday 21 October 2020

Very Versailles

Hello friends,

I thought I would challenge myself today and make a card with just stamping. As you would know, I love to use embossing powders, dry embossing, dies, embellishments and anything with a bit of sparkle, so I find it very difficult to just stamp. Here is my card.


The card stock is Whisper White (#106549). All the images are from the Very Versailles stamp set (#c149275). The inks I used are Bumble Bee (#153116) for the leaves, sentiment and border,  Just Jade (#153115) for the fancy frame with the sentiment and the border, and Soft Sea Foam (#147102) for the script background.
The edges of the card front were sponged with Bumble Bee ink before attaching it to the base card.

So yes, a very quick and simple stamping card.


Have a fabulous day!!


Tuesday 20 October 2020

Zany Zebras

Hi everyone,

How cute are these adorable little zebras from the Zany Zebras stamp set (#152536).


I stamped the zebras with Tuxedo Black Memento Ink (#132708) onto Whisper White card (#106549). The sentiment was stamped with VersaMark (#102283) and heat embossed with Gold Stampin’ Emboss Powder (#109129) and set with the Heat Tool (#129056). I added some extra colour to the zebras with Smokey Slate Stampin’ Blends (#154904), then added the Clear Wink Of Stella (#141897) over the Smokey Slate colouring. This white card was attached to Real Red card (#106578), then attached to the World Of Good Specialty Designer Series Paper (#152491). The base card is also Whisper White
I finished this simple but cute card by adding the Wonderful Gems (#153536). 

Have a great day!!


Monday 19 October 2020

Ornate Layers Dies

Hi & welcome,


The Ornate Layers Dies (#152726) have been used for these beautiful ornate die cuts on this card.


The cut out on the Very Vanilla card (#106550) was done twice along the bottom of the card front. I attached a piece of the  Red Foil from the Red & Green Foil Sheets (#153510) to the Very Vanilla base card, then attached the card front on top. The Brushed Metallic 12”x12” cardstock was cut with another die from the Ornate Layers.
“Merry Christmas” from the Poinsettia Petals stamp set (#p153475) was stamped with Real Red ink (#147084) and cut with another die from the Ornate Layers dies. The sentiment was attached to the Brushed Metallic card, then attached to the card with Stampin’ Dimensionals (#104430). The poinsettia from the Poinsettia Petals Designer Series Paper (#153487) was cut with a co-ordinating die from the Poinsettia Dies (#153522) and also attached with Dimensionals. Isn’t it great when there are co-ordinating dies to cut images from Designer Paper. I coloured some Pearl Basic Jewels (#144219) using a Dark Daffodil Delight Stampin’ Blend (#154883) and attached them to the flower. 
As usual I couldn’t resist adding some sparkle on the poinsettia using the Clear Wink Of Stella Brush (#141897). 

Enjoy your day!!


Sunday 18 October 2020

Quite Curvy Bundle

Hello,

Here’s another seek peak of the Quite Curvy Bundle (#156228) which will be available for purchase from November 3rd.


I cut the Whisper White card front (#106549) with one of the Curvy Dies (#154319), then dry embossed this with the Ornate Floral 3D Embossing Folder (#152725). This was then attached to a piece of the Brass Foil Sheet (#153057) and attached to the Whisper White base card.
I stamped the floral image from the Quite Curvy stamp set (#p154430) twice, using Tuxedo Black Memento Ink (#132708). These were then coloured with Stampin’ Blends - Real Red (#154899), Daffodil Delight (#154883)and Granny Apple Green (#154885). These were cut with a Curvy Die and attached to the card with Stampin’ Dimensionals (#104430).
I attached a piece of the Brass Foil to a Foam Adhesive Sheet (#152815), then cut “Thank You” using the Well Written Dies (#151816). This was then attached to the label cut with the smallest of the Celebration Labels Dies (#153570). The edges were daubered with Daffodil Delight ink (#147094), then the label was attached to the cardfront. The Red Rhinestone Basic Jewels (#146924) were added to finish the card.

Hope you have had a great weekend!!


Friday 16 October 2020

Designer Series Paper

Welcome friends,

We all love our designer series paper, so till the end of October there are a variety of designer papers on sale so a great opportunity to stock up. Check them out here.

One of the packs is the Artistry Blooms Designer Series Paper (#152495) which I have used on the background of this card. I love the vibrant colours on one side and the softer colours on the reverse of this pack.


The DSP was attached to the Whisper White base card (#106549). I attached the beautiful gold foil pre-cut card front from the Forever Gold Laser-Cut Specialty Paper (#152493) to the DSP. I find the easiest way to attach this gold foil is to add tape where it will be hidden under the sentiment and stamped image. 
The elephants are from the Wildly Happy stamp set (#149408) and I stamped these with the Gray Granite ink (#147118). I added some extra colour to the elephants with the Light Crumb Cake Stampin’ Blends (#154882) and Light Granny Apple Green (#154885) for the grass. A die from the Tasteful Labels Dies (#152886) was used to cut the stamped image. “Happy Birthday” from the Itty Bitty Greetings stamp set (#146667) was stamped with Granny Apple Green ink (#147095) and punched with the Classic Label punch (#141491). The sentiment and elephants were attached to the card with Stampin’ Dimensionals (#104430) and Mini Stampin’ Dimensionals (#144108).

The weekend is here once again, so hope you can have a crafty one!!


Thursday 15 October 2020

Curvy Dies

Hi everyone,

There is such a large variety of Stampin’ Up! dies which co-ordinate with stamp sets or just cut a beautiful image. There’s no stamping on this card, just some beautiful die cut images.


Firstly, I attached the pre-cut card front from the Forever Gold Laser-Cut Specialty Paper (#152493) to the Whisper White card (#106549). The base card is Bermuda Bay (#131286). The curvy white piece was cut with 3 of the Curvy Dies (#154319) and attached on top of the card using Mini Glue Dots (#103683). The leaves were also cut from Gold Foil Sheets (#132622) which had Adhesive Sheets (#152334) adhered to the back. I then attached each gold leaf to the card in the matching cut outs.
I attached Bermuda Bay card to Foam Adhesive Sheets (#152815), then cut the “Birthday Wishes” using the Well Written Dies (#151816). These Foam Adhesive Sheets are adhesive on both sides and are great to add dimension to more fiddly die cuts, although are best with more open dies rather than more detailed dies.
The embellishments are Flowers For Every Occasion (#153645) and adhered using the Fine-Tip Glue pen (3138309).

Have a great day!!


Wednesday 14 October 2020

Forever Fern Scrapbook page

Hello,

After making the Butterfly sampler recently, I wanted to do a similar scrapbook page, so here it is.


The grey background is from the In Good Taste Designer Series Paper (#152494), then this was trimmed slightly and attached to the 12”x12” Real Red card from the Regals Assortment (#147002). The 5 Real Red (#106578) and Whisper White (#106549) rectangles were cut with the Stitched Rectangles Dies (#151820). The leaves were stamped with the Forever Ferns stamp set (#c152559) using Granny Apple Green ink (#147095), Real Red ink (#147084) and Mossy Meadow ink (#147111). These were cut with the Forever Flourishing dies (#152714). I used Granny Apple Green card (#147014), Real Red card and Gold Foil Sheet (#132622) to cut some of the die cut pieces that weren’t stamped. The butterfly is from the Positive Thoughts stamp set (#c151490) and this as well as the gold feather was cut with Natures Thoughts Dies (#153586). The birds are cut with the Birds and More Dies (#152721). The photos were also attached to Real Red card.
I will add journaling to the blank white card.

Have a fantastic day!!


Monday 12 October 2020

Curvy Christmas

Hi everyone,

Here is a super easy Christmas card and would be a great one if you are short on time and want to make multiples.


Using the Stamparatus (#148187) would be ideal for making multiples of this card. The sentiment, trees and stars are all images from the Curvy Christmas stamp set (#155364). The trees were stamped with Shaded Spruce ink (#147088). Cherry Cobbler ink (#147083) was used to stamp the sentiment and Bumble Bee ink (#153116) for the stars. The curved border was cut with one of the Curvy Dies (#154319). The stamped Whisper White card (#106549) was attached to the Classic Christmas 6”x6” Designer Series Paper (#155969), which was then attached to the Whisper White base card.

This stamp set and dies as well as the Quite Curvy stamp set (#154430) will be available from the 3rd November.


Have a great day!!


Sunday 11 October 2020

Balmy Blue Glimmer Paper

Hi Ladies & Guys,

I love the Balmy Blue Glimmer Paper (#153513) and very easy to cut with dies which I have done on this sparkly card.


I cut the Balmy Blue Glimmer Paper with a Stitched Rectangles Die (#151820), then attached these to the Snowflake Splendor Designer Series Paper (#153512). This was attached to the Whisper White base card (#106549). I stamped the snowflakes from the Snowflake Wishes stamp set (#153444) using VersaMark (#102283) and heat embossed with Silver Stampin’ Emboss Powder (#109131) and set with the Heat Tool (#129056). I stamped 2 of these snowflakes and cut them with a So Many Snowflakes Die (#153560). I assembled these 2 snowflakes with Mini Glue Dots (#103683) then attached them to the card with a Stampin’ Dimensional (#104430). The sentiment was stamped with Seaside Spray ink (#150889) then cut with another die from the Stitched Rectangles. To cut the “V” I placed the same die as shown below so you still get the stitched effect.


The sentiment was also attached with Stampin’ Dimensionals and the card was finished by adding the Blue Adhesive- Backed Gems (#153547).

Have a fabulous day.


Saturday 10 October 2020

Butterfly Beauty Sampler

Welcome friends,


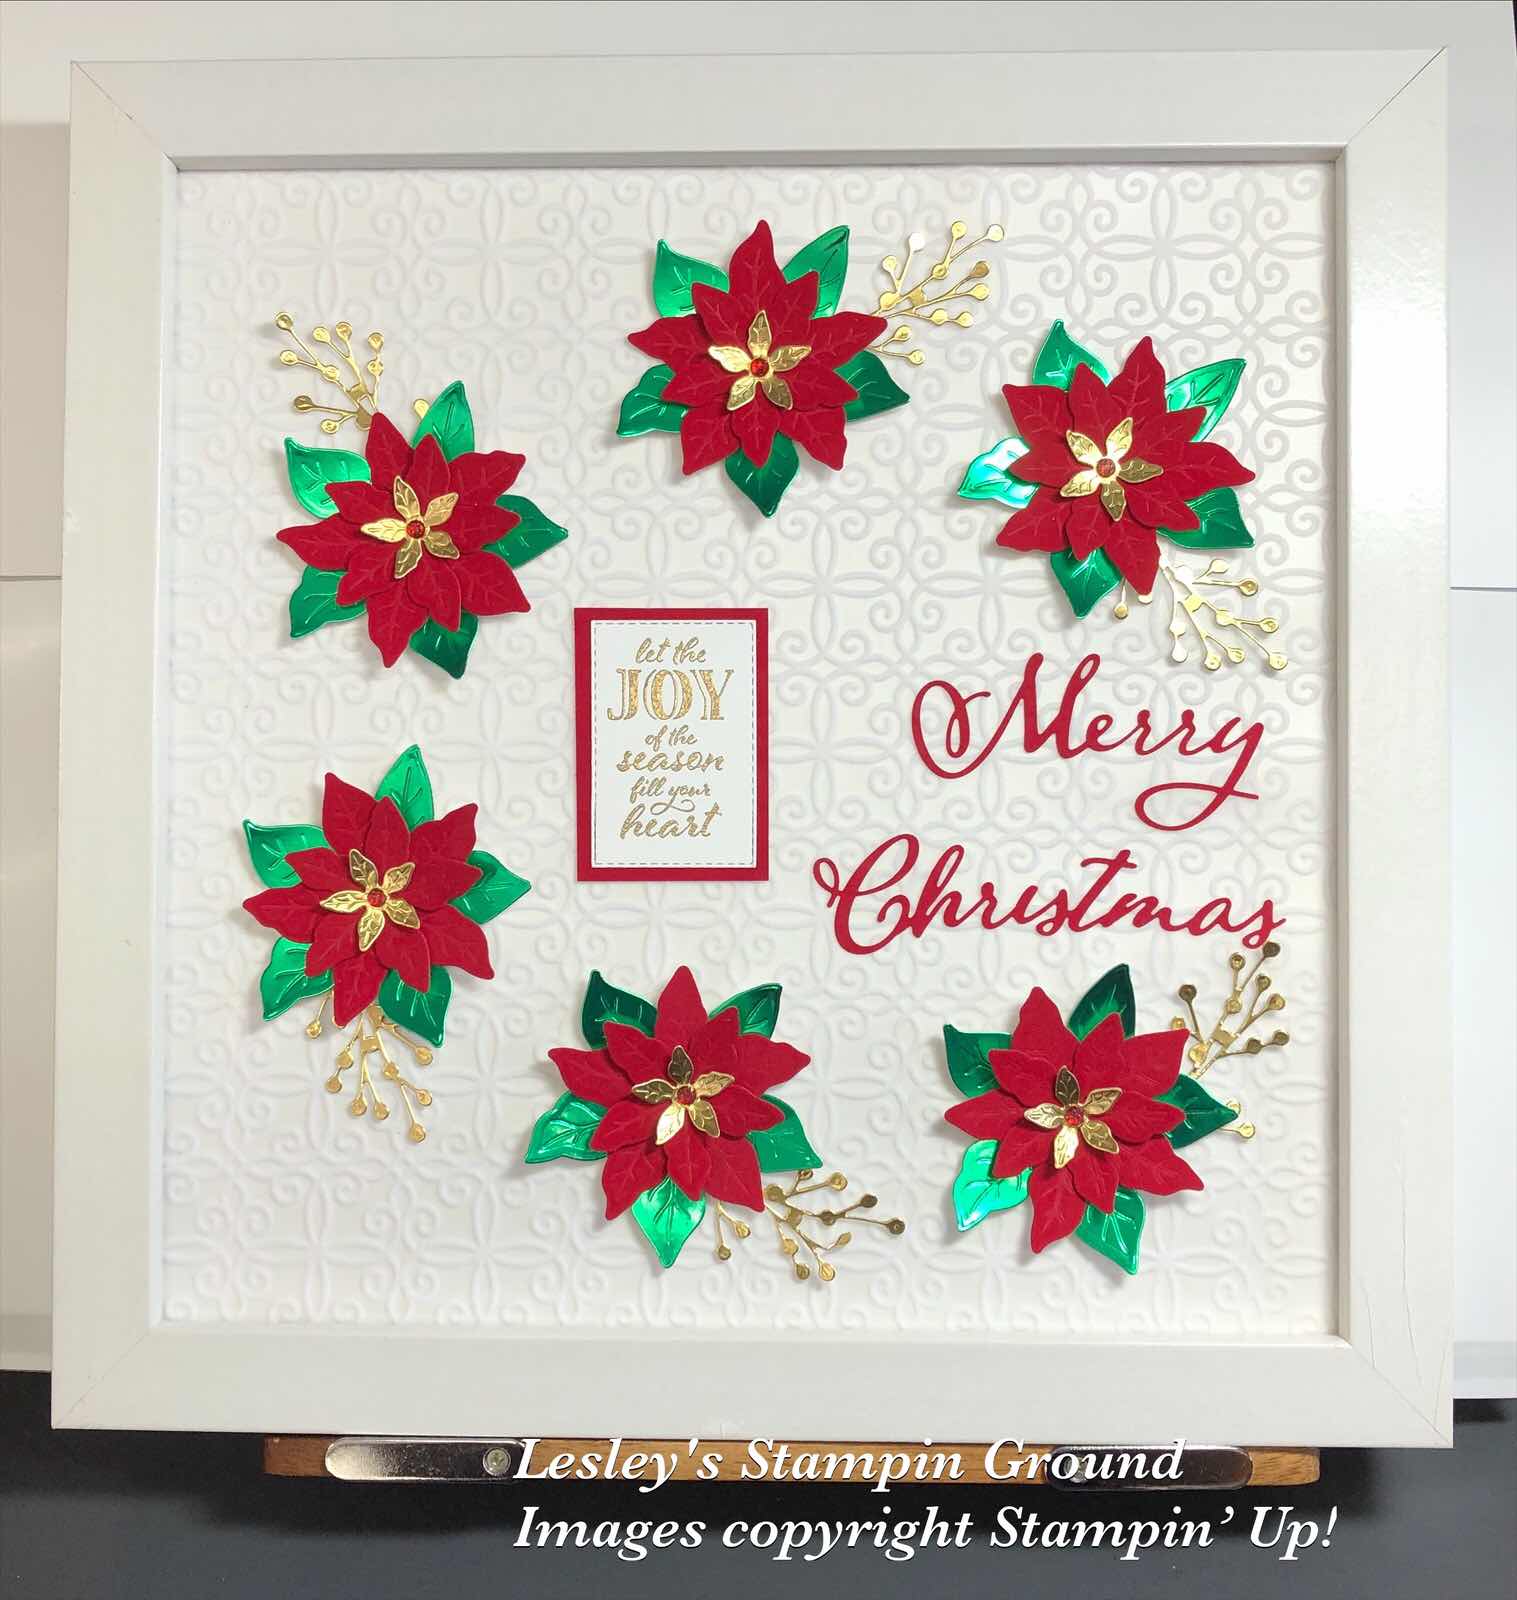
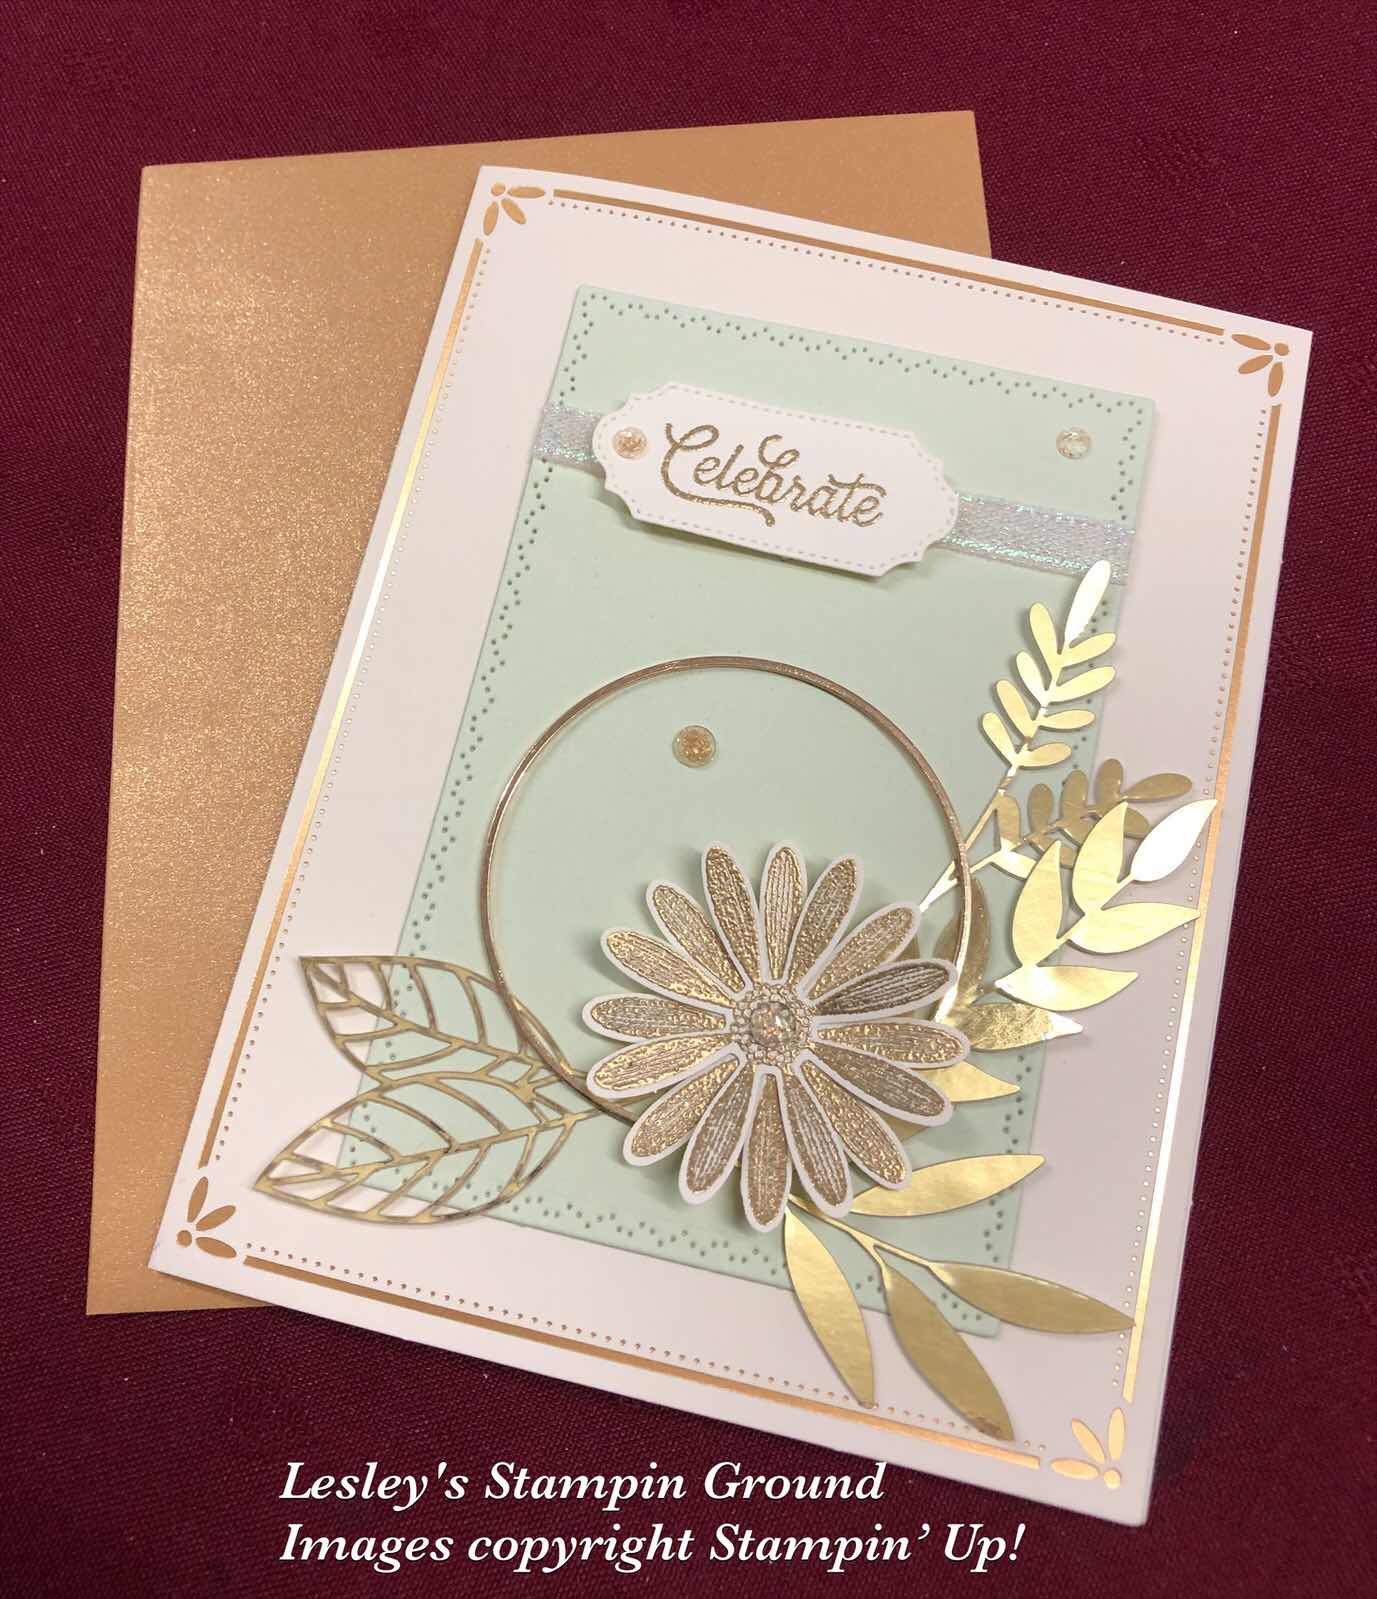
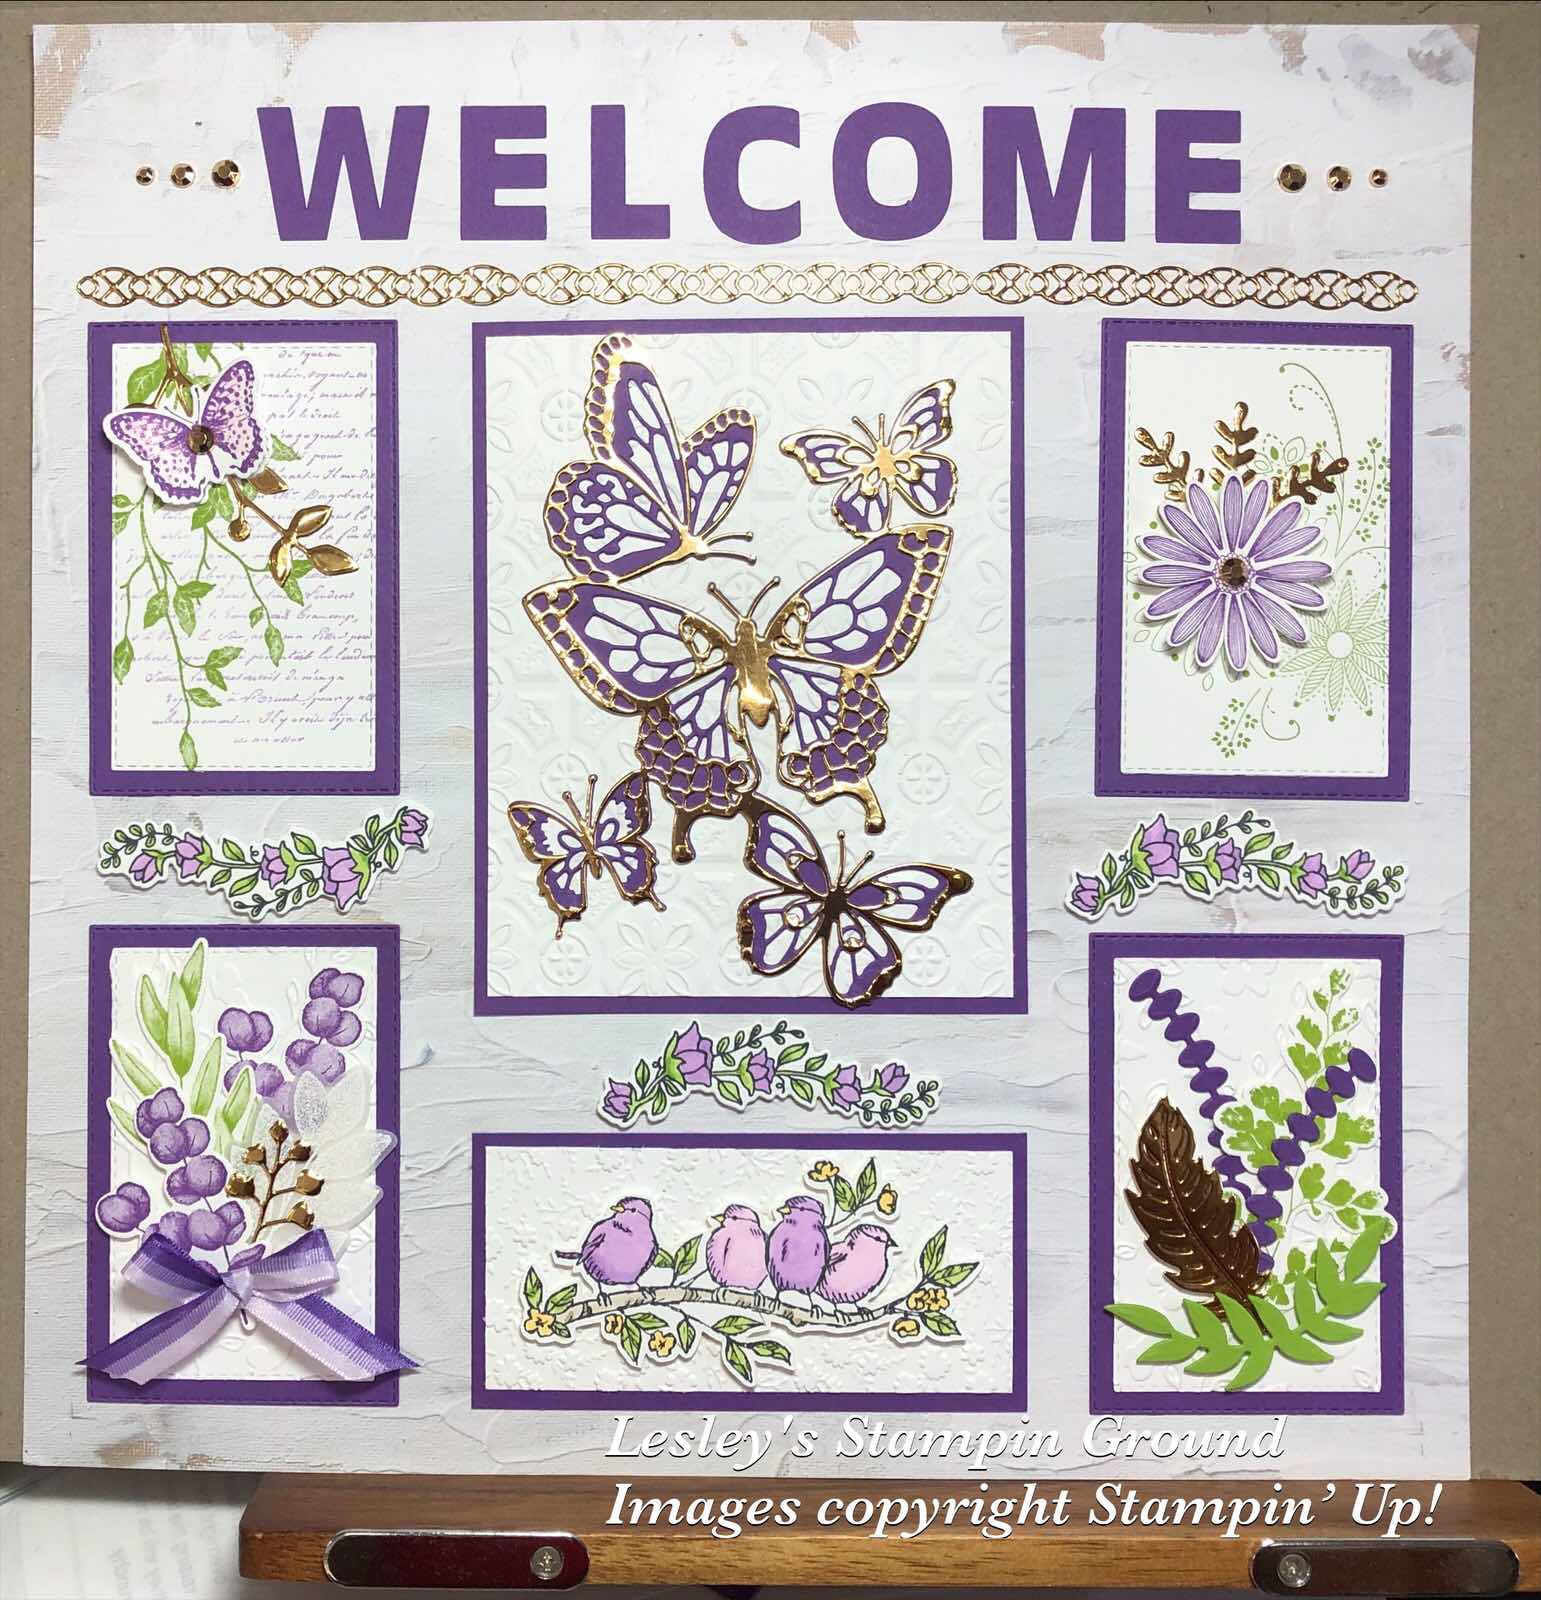
I have used so many of my favourite products and colours in this sampler that I have made for a friend who has just moved into her new home. I think I will have to make another one for myself. I just need to put this into a frame.


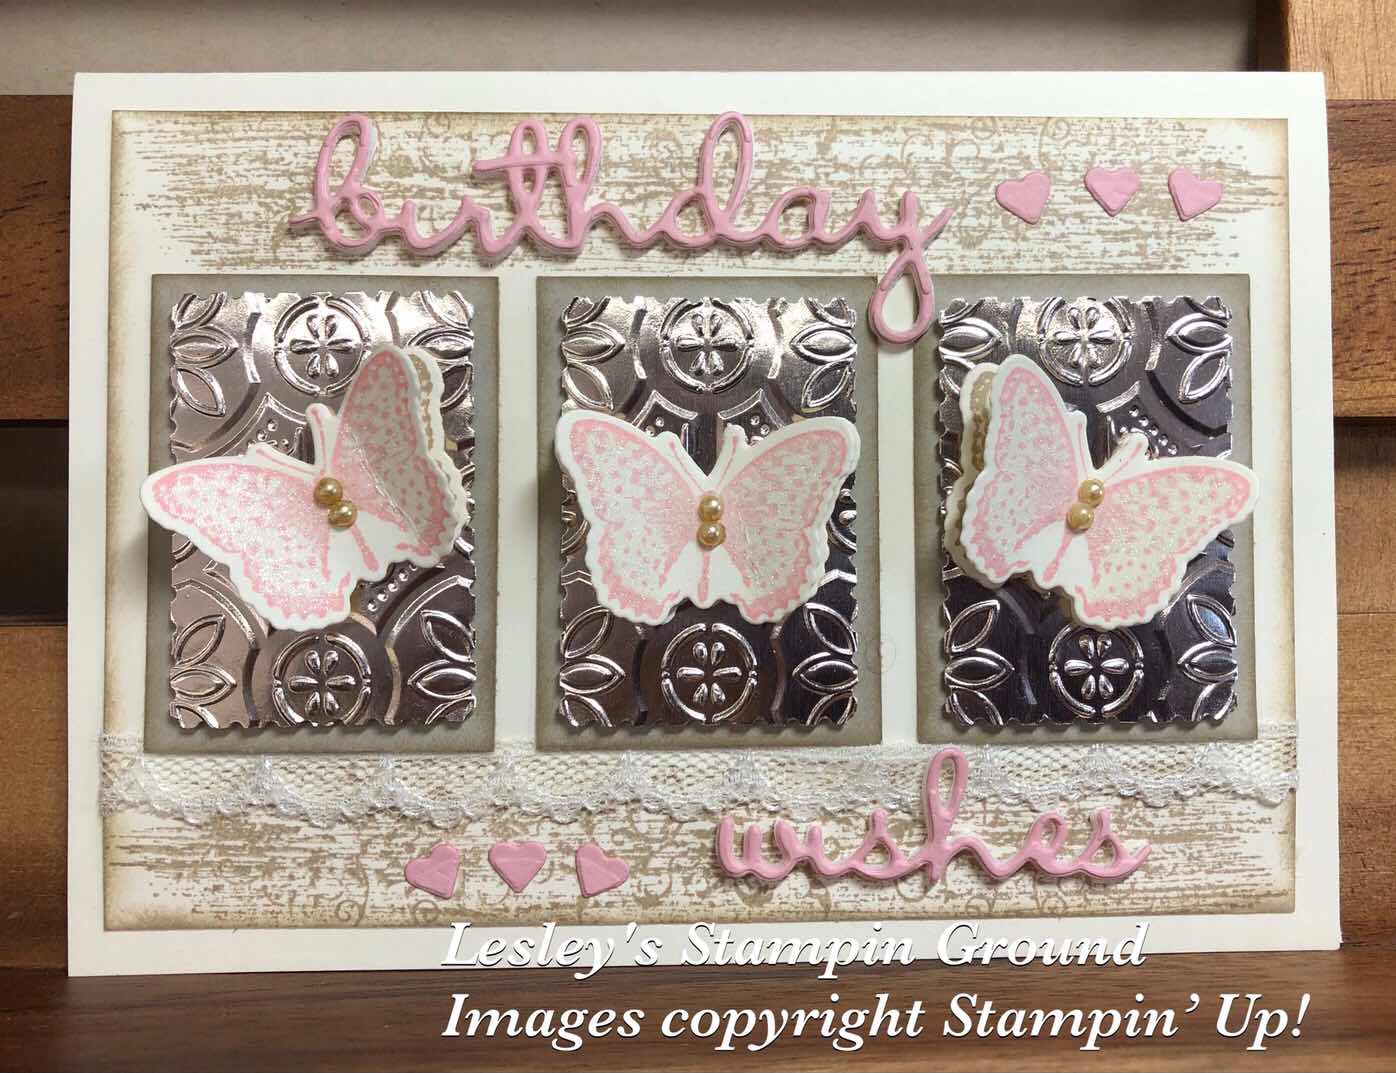
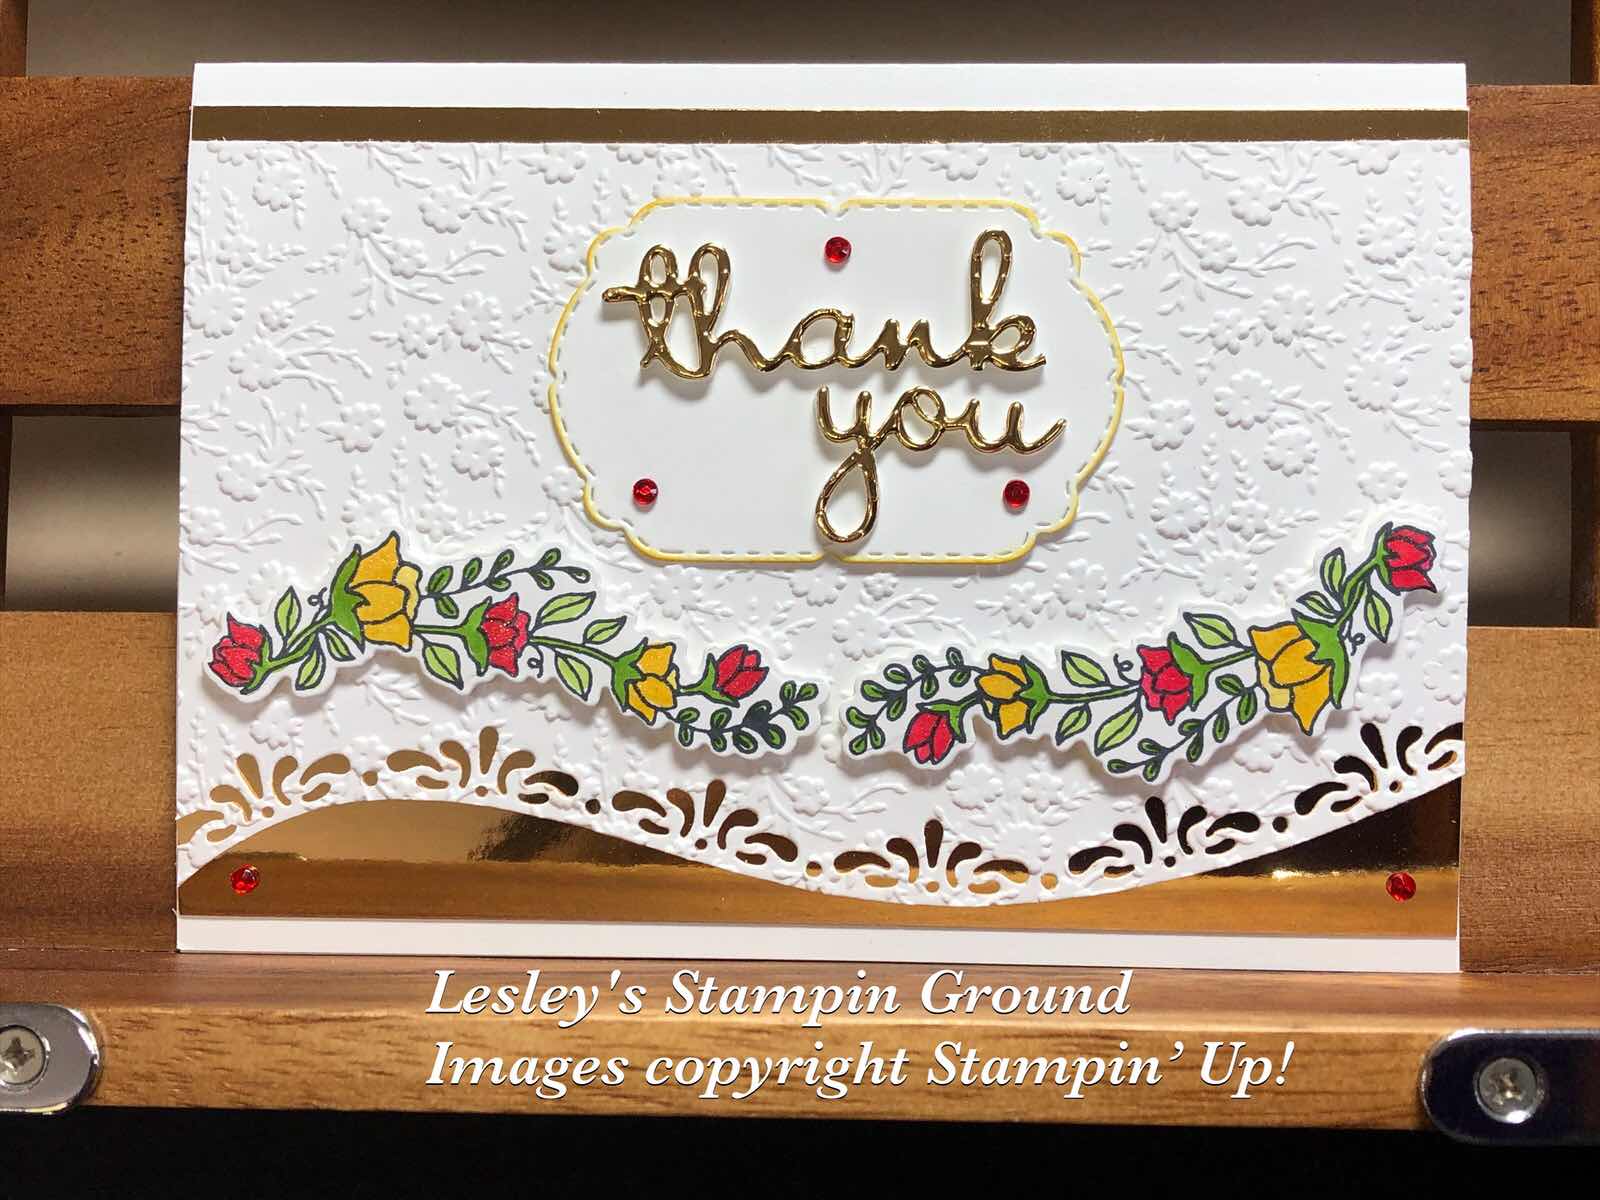
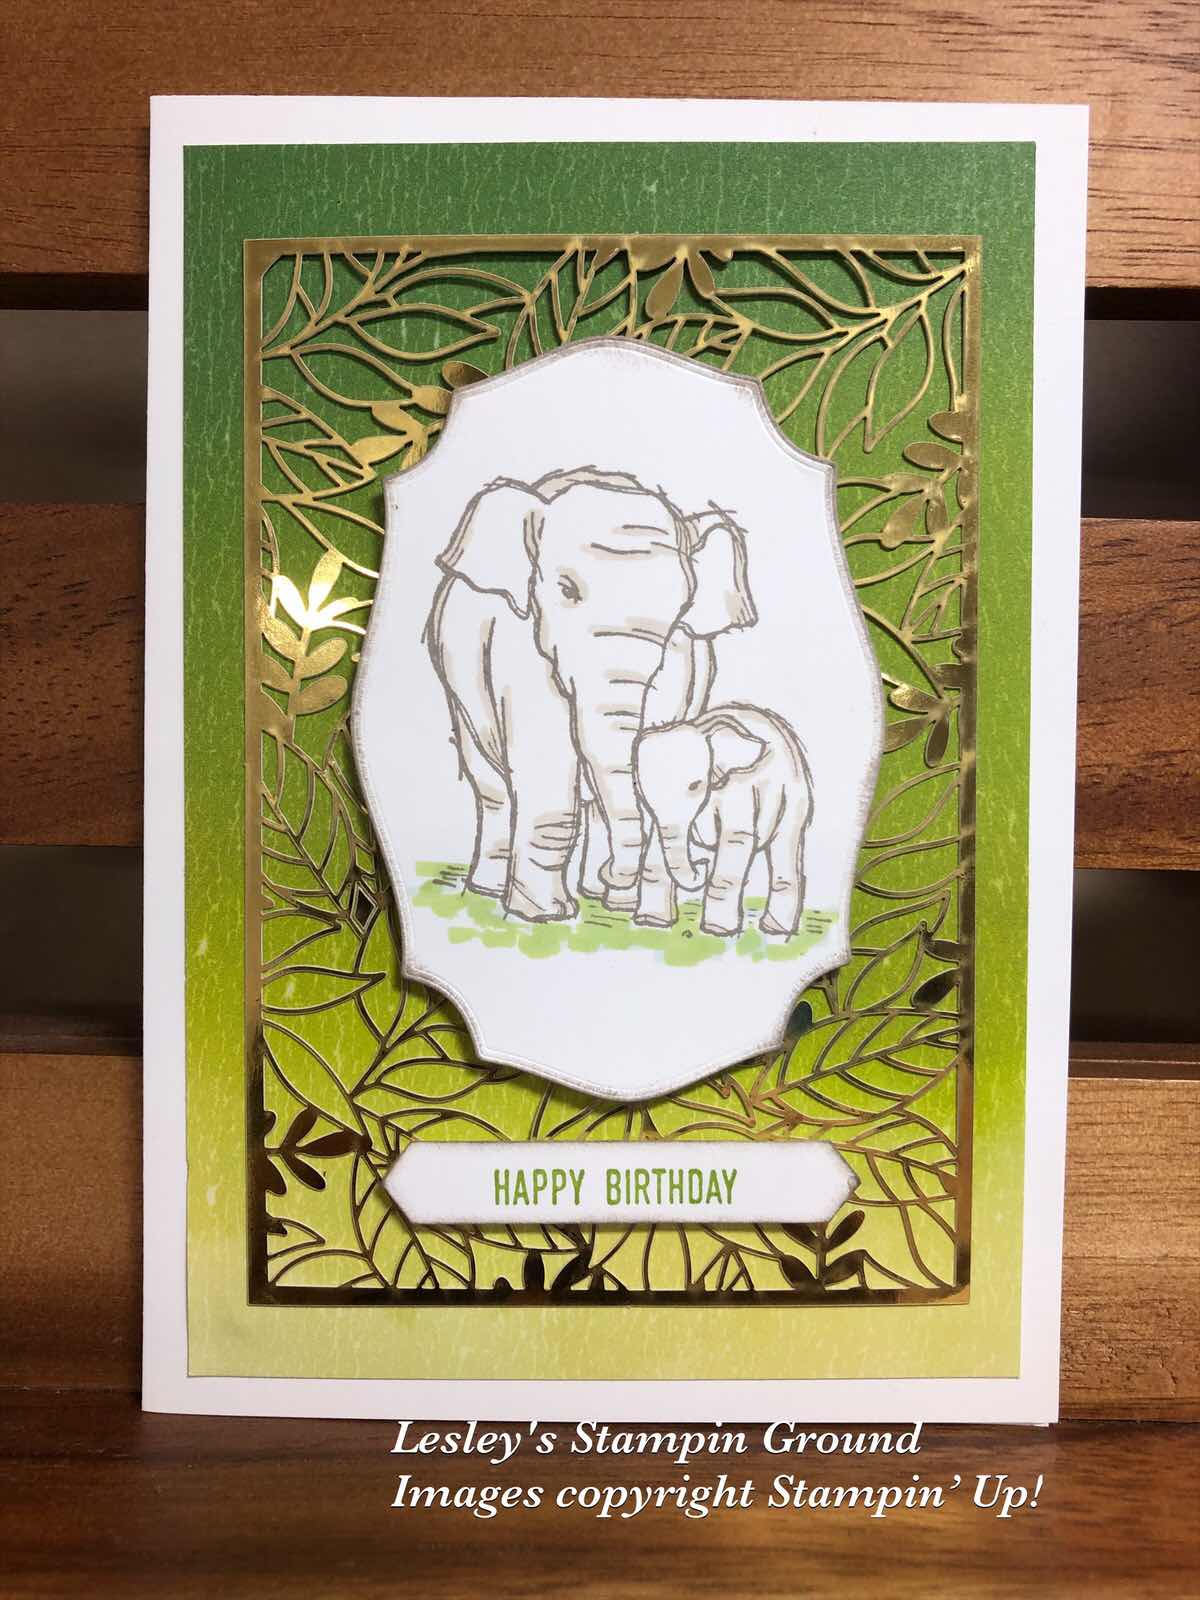
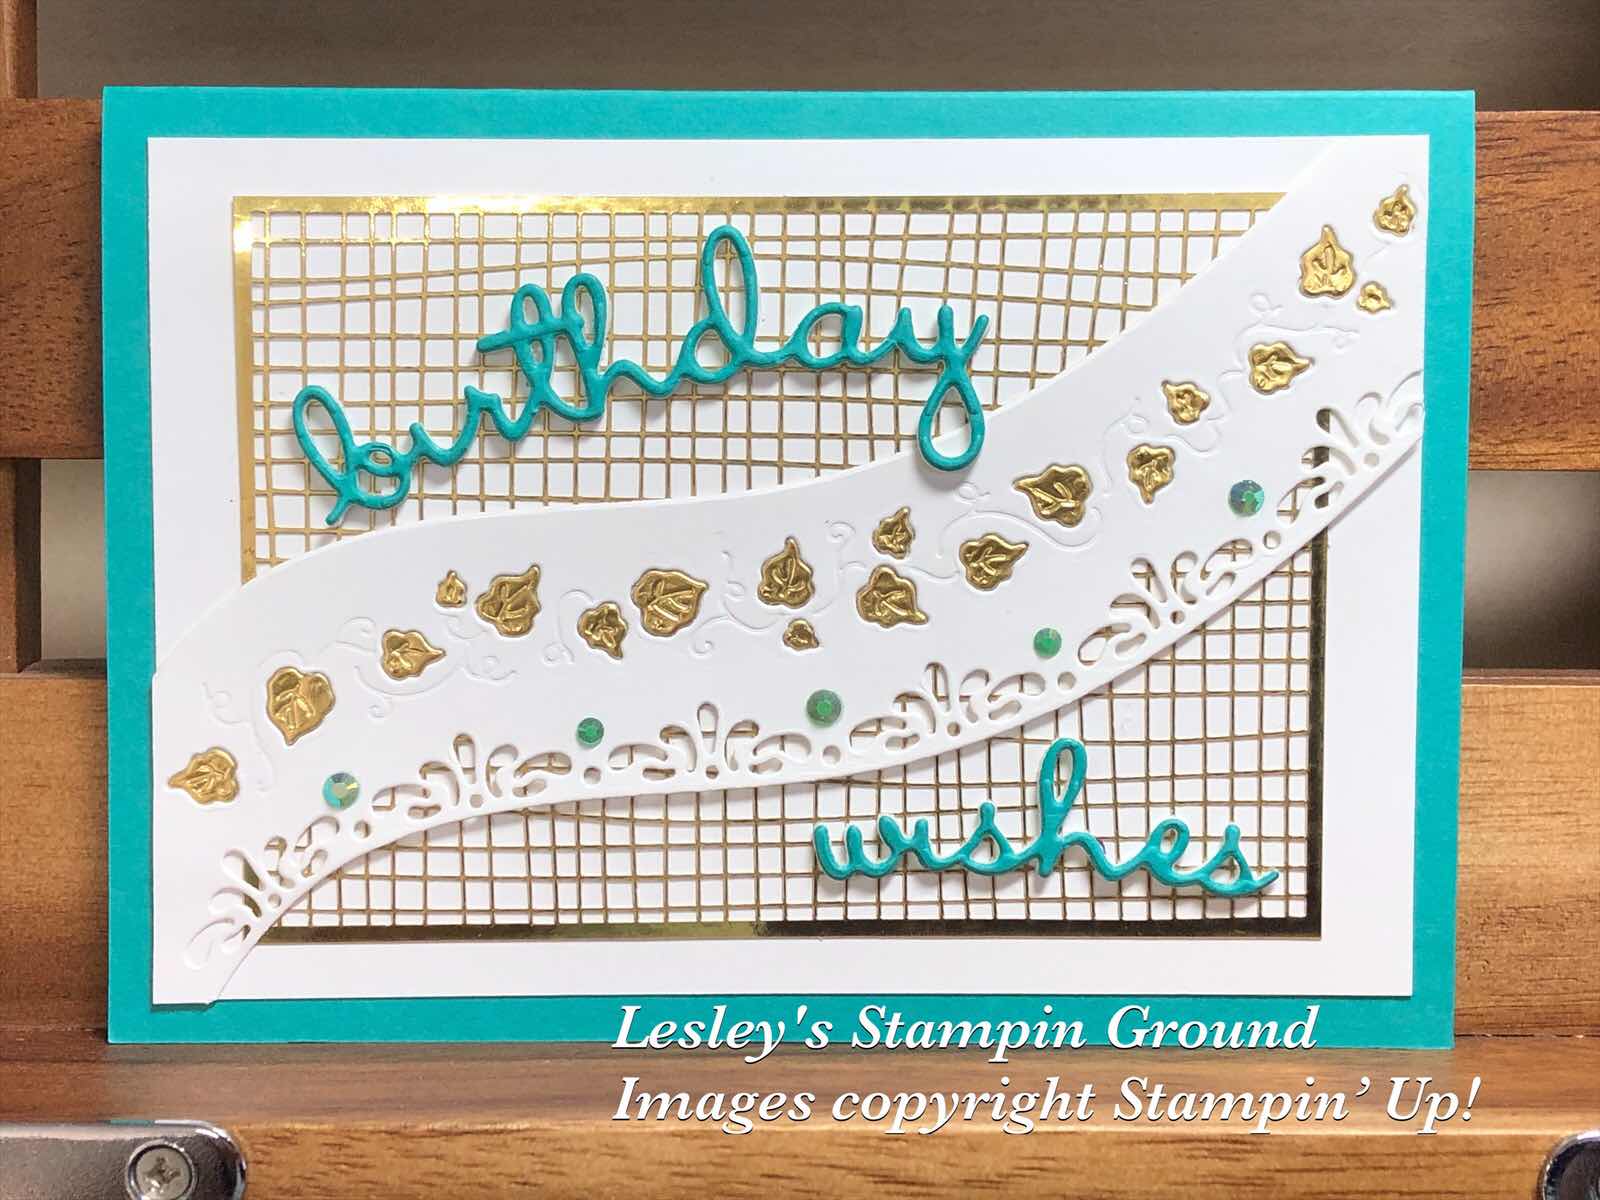
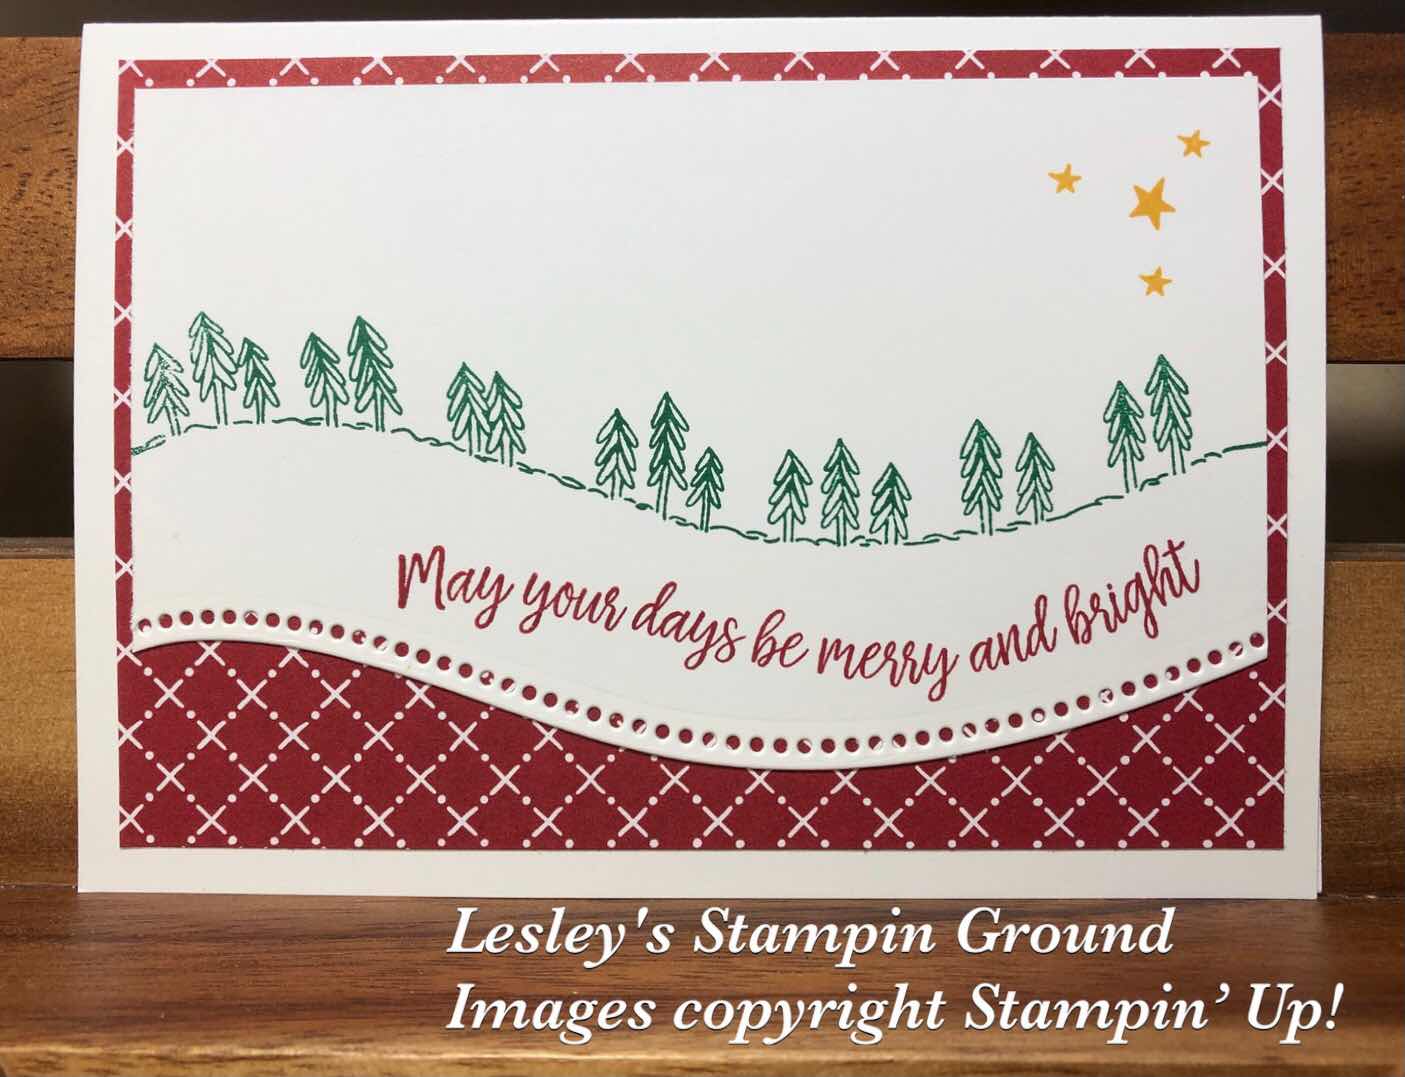
The base is from the In Good Taste Designer Series Paper (#152494). The other cardstock I have used is Whisper White (#106549), Gorgeous Grape (#147011), Granny Apple Green (#147014), Vellum (#106584) and Brass Foil Sheets (#153057).
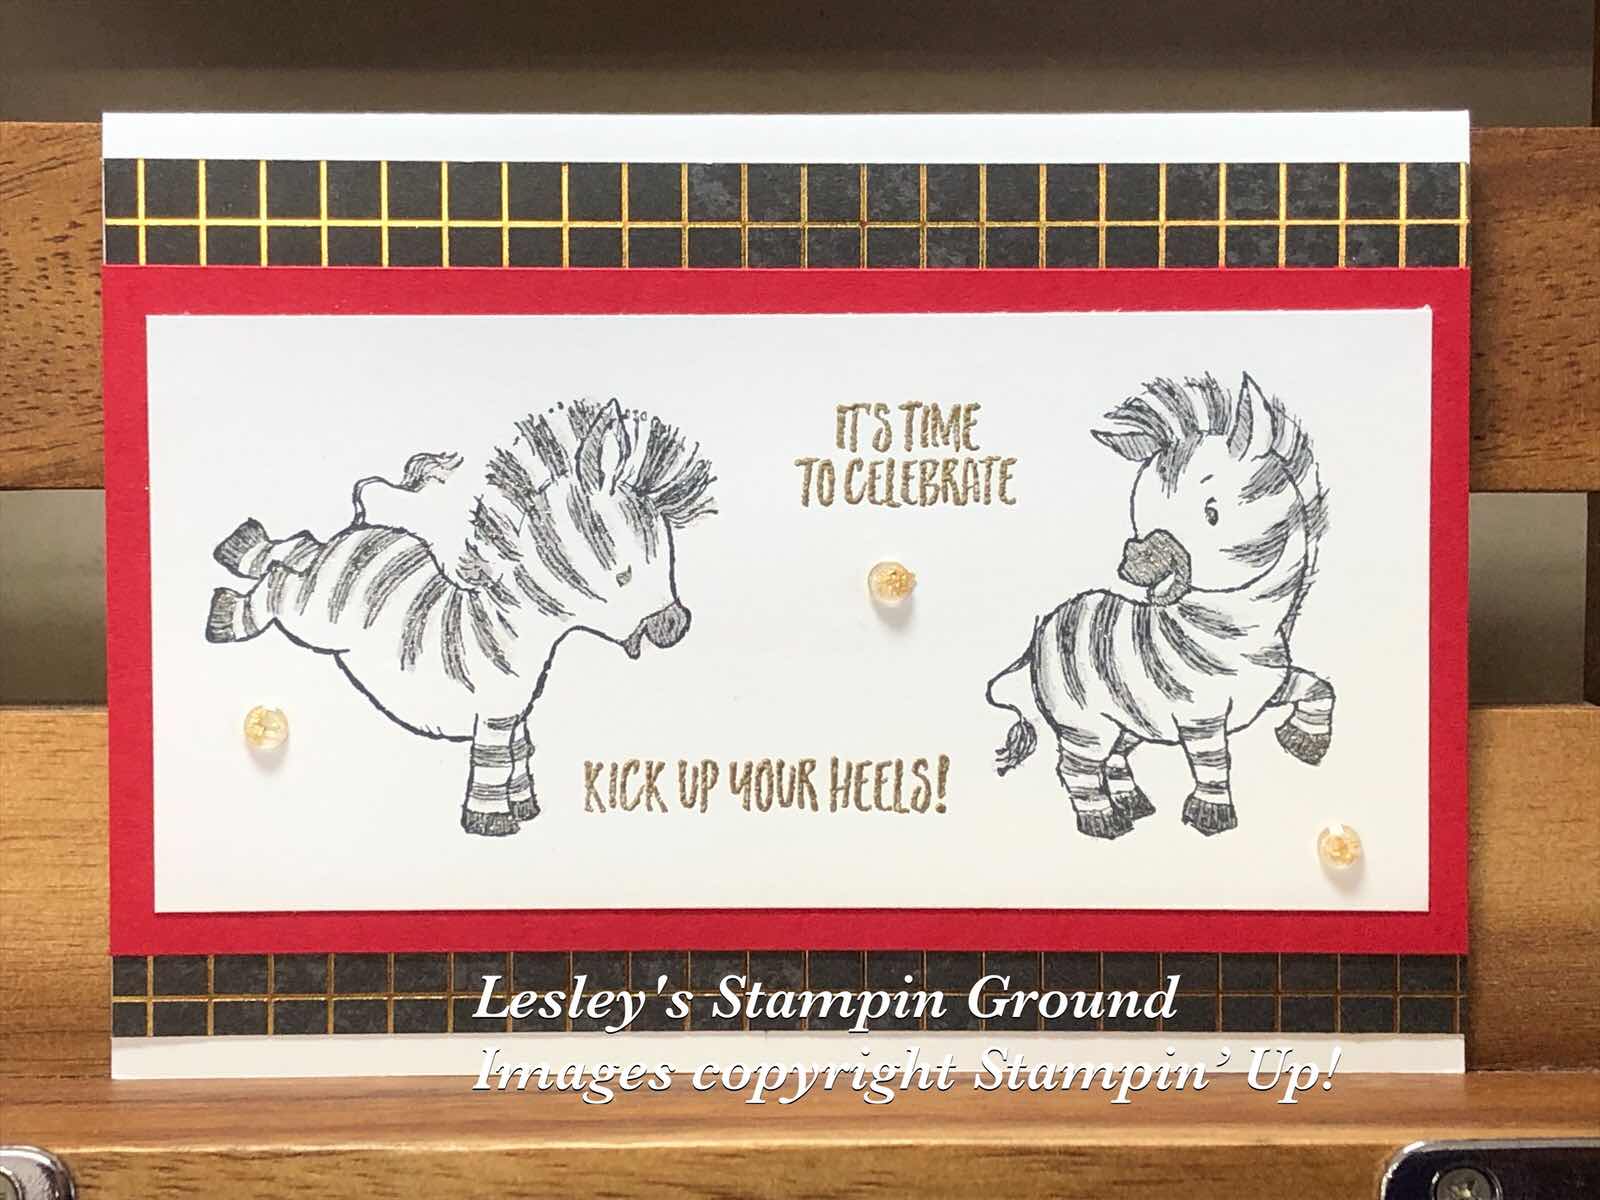
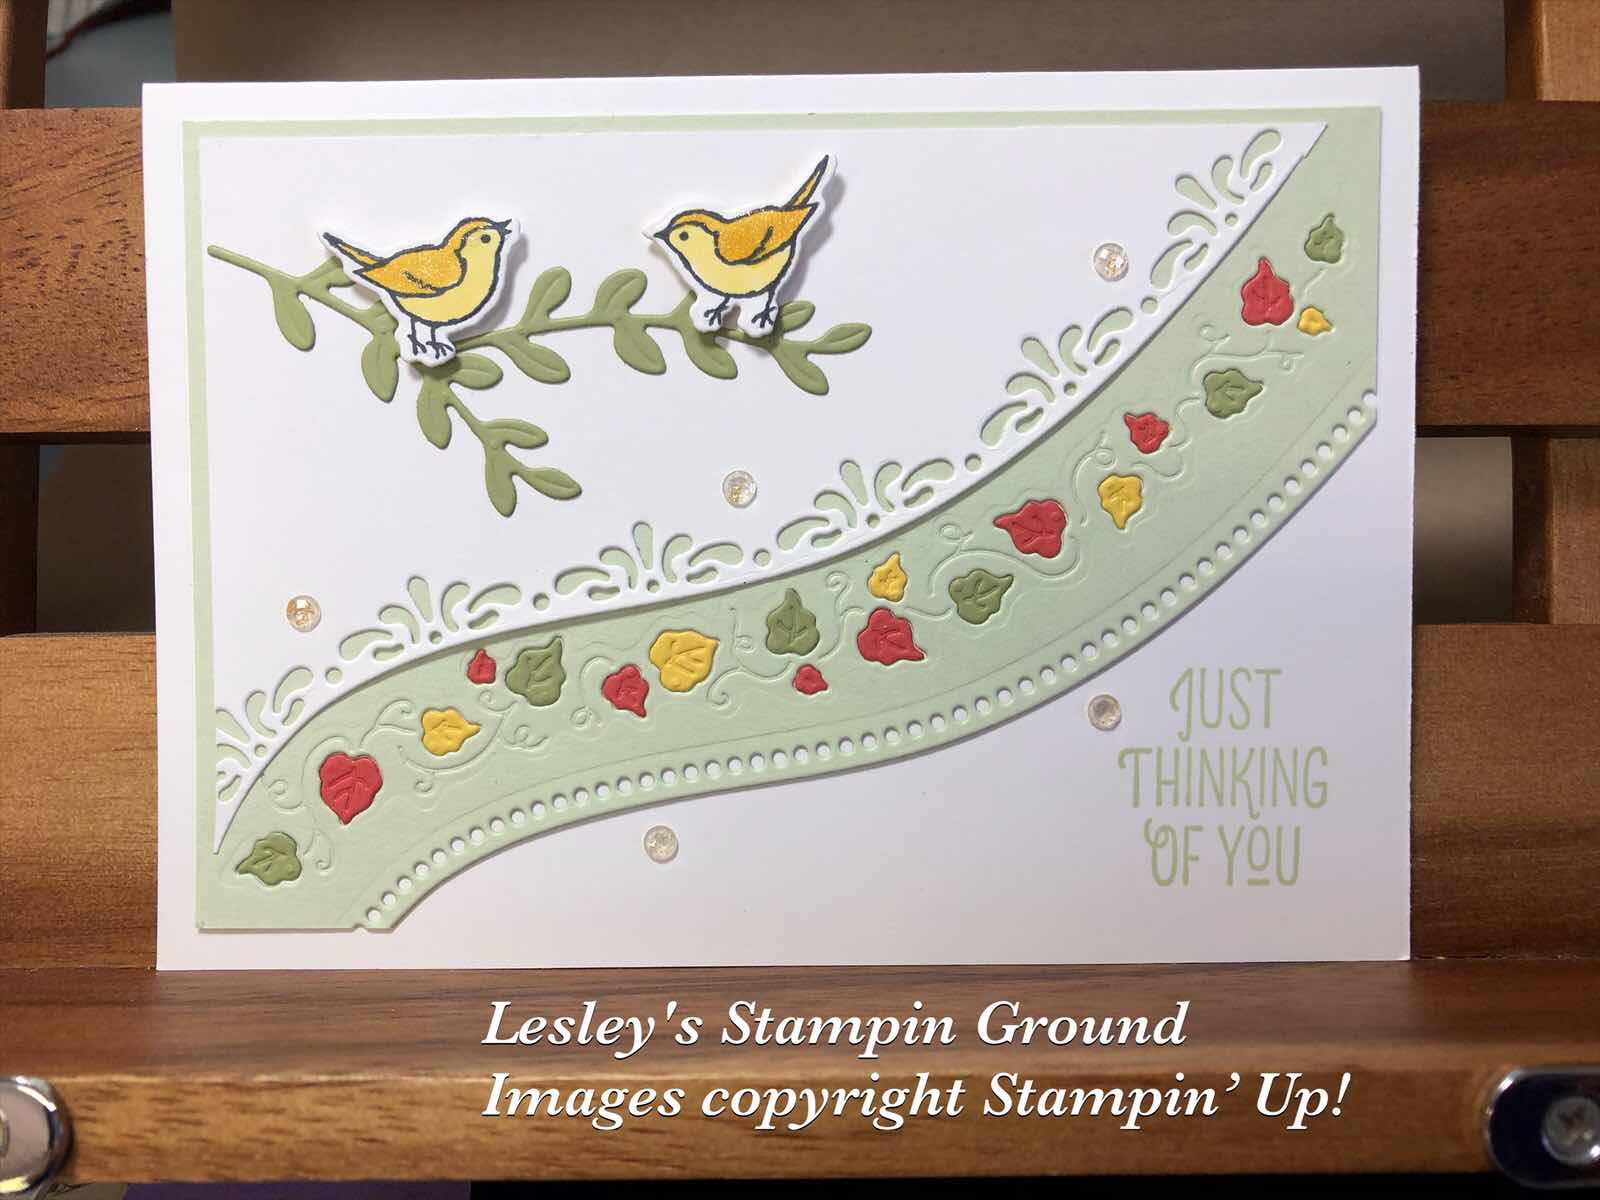
The stamp sets are Very Versailles (#c149275), A Little Lace (#c149364), Forever Fern (#152559), Free As A Bird (#c149468), Daisy Lane (#c149325), Positive Thoughts (#c151490) and Quite Curvy (#154430).
The inks used are Granny Apple Green (#147095), Gorgeous Grape (#147011), Tuxedo Black Memento Ink (#132708) and VersaMark (#102283) with White Stampin’ Emboss Powder (#109132).
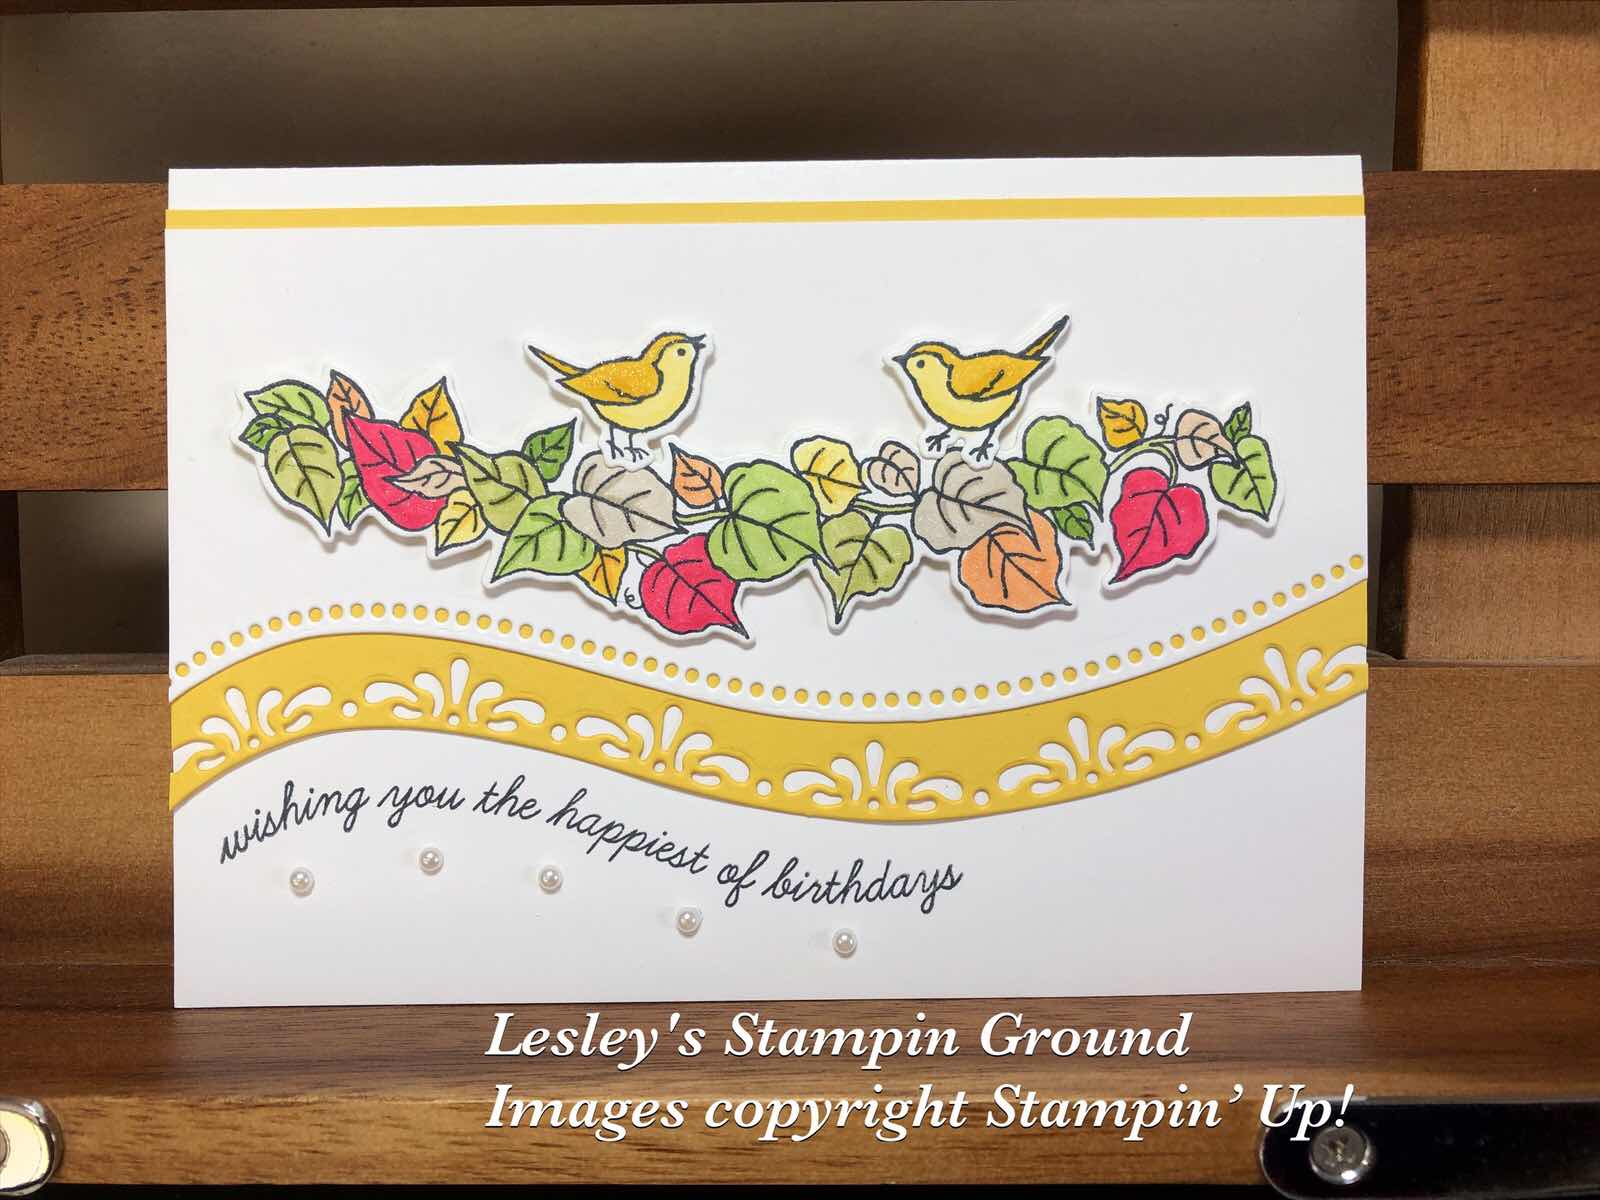
The birds and floral images were coloured with Stampin’ Blends - Highland Heather (#154887), Purple Posy (#154896), Granny Apple Green (#154885), Crumb Cake (#154882) and Mango Melody (#154888).
The dies used were  Butterfly Beauty (#151819), Natures Thoughts (#153586), Forever Flourishing (#152714), Stitched Rectangles (#151820)  and Curvy Dies (#154319.
The punch for the Daisies is the Medium Daisy punch (#149517).
I used the Tin Tile 3D Embossing Folder (#151801) under the butterflies and the Ornate Floral 3D Embossing Folder (#152725) under the birds. I used one of the Meadow Moments Embossing Folders (#153126) on the bottom left and right rectangles under the leaves.
I made the bow with the 3/8” Tricolor Ribbon (#149708) and the embellishments are the Gilded Gems (#152478). I added some sparkle using the Clear Wink Of Stella Glitter Brush (#141897) to the birds and flowers.
The adhesives used were the Adhesive Sheets (#152334), Mini Glue Dots (#103683), Stampin’ Dimensionals (#104430) and Mini Stampin’ Dimensionals (#144108).

I am having a crafty weekend and I hope you are too!!


Friday 9 October 2020

Snowflake Wishes Bundle

Hello again,

There is a huge variety of snowflakes in the Snowflake Wishes stamp set (#p153444) and the co-ordinating So Many Snowflakes Dies (#153560). These are available in a bundle - the Snowflake Wishes Bundle (#p155172) which gives you a 10% saving.


I dry embossed the Whisper White card front (#106549) with the Winter Snow Embossing Folder (#153577) and sponged the edges with Balmy Blue ink (#147105). I also stamped the sentiment with Balmy Blue ink.  The Balmy Blue card (#147007) and the sentiment were both cut with the Stitched So Sweetly Dies (#151690). I attached the Balmy Blue rectangle to the card front then wrapped the Silver 3/8”Metallic-Edge Ribbon (#144213) around the card front then with Stampin’ Dimensionals (#104430) attached the sentiment on top.
The snowflakes were cut from the beautiful Balmy Blue Glimmer Paper 153513) and I attached these to the card with Mini Glue Dots (#103683). A Blue Adhesive-Backed Gem (#153547) was attached to the corner of the sentiment.

I hope your day has been enjoyable!!


Thursday 8 October 2020

Curvy Dies sneak peek

Hi everyone,

Here’s another sneak peek of a new set which will be available to customers in November.


The Quite Curvy Bundle (#156228) consists of the Quite Curvy stamp set (#p154430) and the Curvy Dies (#154319).

The Whisper White card (#106549) and the Soft Sea Foam card (#147012) were cut with the curved dies. There is also another die to cut all the little leaves and also emboss the card at the same time. I used this die on the Soft Sea Foam card, and also cut Daffodil Delight card (#121680), Pear Pizzaz card (#131290) and Terracotta Tile card (#150890) using the same die. 

I attached the curved cards to the base card. I removed the Soft Sea Foam leaves and replaced the leaves using the other coloured leaves. I had Adhesive Sheets (#152334) on the back of each of the coloured card to cut the extra leaves to make it easy to adhere these to the card. Alternatively you could use the Fine-Tip Glue Pen (#138309) to adhere each leaf.

The 2 little branches were cut from Pear Pizzaz card and attached to the card. I stamped the birds with Tuxedo Black Memento ink (#132708) and coloured them with Daffodil Delight Stampin’ Blends (#154883). These were also cut with dies from the Curvy Dies, then attached with Mini Stampin’ Dimensionals (#104430).

“Just Thinking Of You” is from the Many Mates stamp set (#152633) and stamped with Soft Sea Foam ink (#147102). The embellishments are from the Wonderful Gems (#153536).

Have a great day!!


Wednesday 7 October 2020

Quite Curvy Variety Bundle

Hello,

 One big advantage of being a Stampin’ Up! Demonstrator is early access to new products. I have just received the new Quite Curvy Variety Bundle (#158396) which will be available to customers from 3rd November, so couldn’t resist playing with it immediately. It’s always exciting when there’s new products to play with. This bundle includes 2 stamp sets, dies and designer series paper.


I stamped the leaves and the birds from the Quite Curvy stamp set (#154430) using Tuxedo Black Memento ink (#132708) onto the Whisper White base card (#106549), then cut them with dies from the Curvy Dies (#154319). These were coloured with Stampin’ Blends - Daffodil Delight (#154883), Real Red (#154899), Granny Apple Green (#154885), Crumb Cake (#154882), Pumpkin Pie (#154897), Ivory (#154922) and Old Olive (#154892).
I cut the Daffodil Delight card (#121680) and the Whisper White card with the Curvy Dies (#154319). The sentiment was also stamped with Tuxedo Black Memento ink onto the Whisper White base card, then the die cut Daffodil Delight card and Whisper White card were attached to the base. The coloured leaves and birds were attached to the card with Stampin’ Dimensionals (#104430). I added glimmer to the leaves and birds with the Clear Wink Of Stella Glitter Brush (#141897) and finished the card by adding the Pearl Basic Jewels (#144219) under the sentiment.

This is what’s available in the variety bundle -

Tuesday 6 October 2020

Positive Thoughts

Hello,

These 2 colours - Rich Razzleberry and Granny Apple Green compliment each other to make a beautiful card.


The Whisper White card front (#106549) was dry embossed with the Scripty 3D Embossing Folder (#149634) and matted with the Rich Razzleberry card (#119981), then attached to the Whisper White base card. A piece of the Granny Apple Green from the Brights 6”x6” Designer Series Paper (#152487) was attached to the bottom of the card. I stamped the sentiment and the butterfly from the Positive Thoughts stamp set (#c151490) using Rich Razzleberry ink (#147091). The leaves from the same stamp set were stamped with Granny Apple Green ink (#147095). The lighter leaves were stamped using the stamping off method. The butterfly and leaves were cut with the Natures Thoughts Dies (#153586). I sprayed the leaves and butterfly with the Frost White Shimmer Paint (#147046). 
The wreath was cut with a Birds & More Die (#152721) and a Layering Circles Die (#151770) from Granny Apple Green card (#147014), which had the Adhesive Sheet (#152334) adhered to the back. The sentiment was also cut with the same Layering Circle Die. The wreath was attached to the white circle, then this was attached to the card with Stampin’ Dimensionals (#104430). The embellishments are retired but were perfect for this card.

Have a great day!!