Friday 31 December 2021

Dahlia Days Bundle

Hello & welcome again my friends,

I trust you all had a relaxing Christmas and wishing you a very happy and safe New Year. The new year means a new Stampin’ Up! catalogue and free Sale-a-bration products which commence on 4th January. With every $90 order from the annual and /or Mini catalogue you can choose a free product from the Sale-a-bration brochure and there are some fantastic products to choose from. Please contact me if you would like any further information.

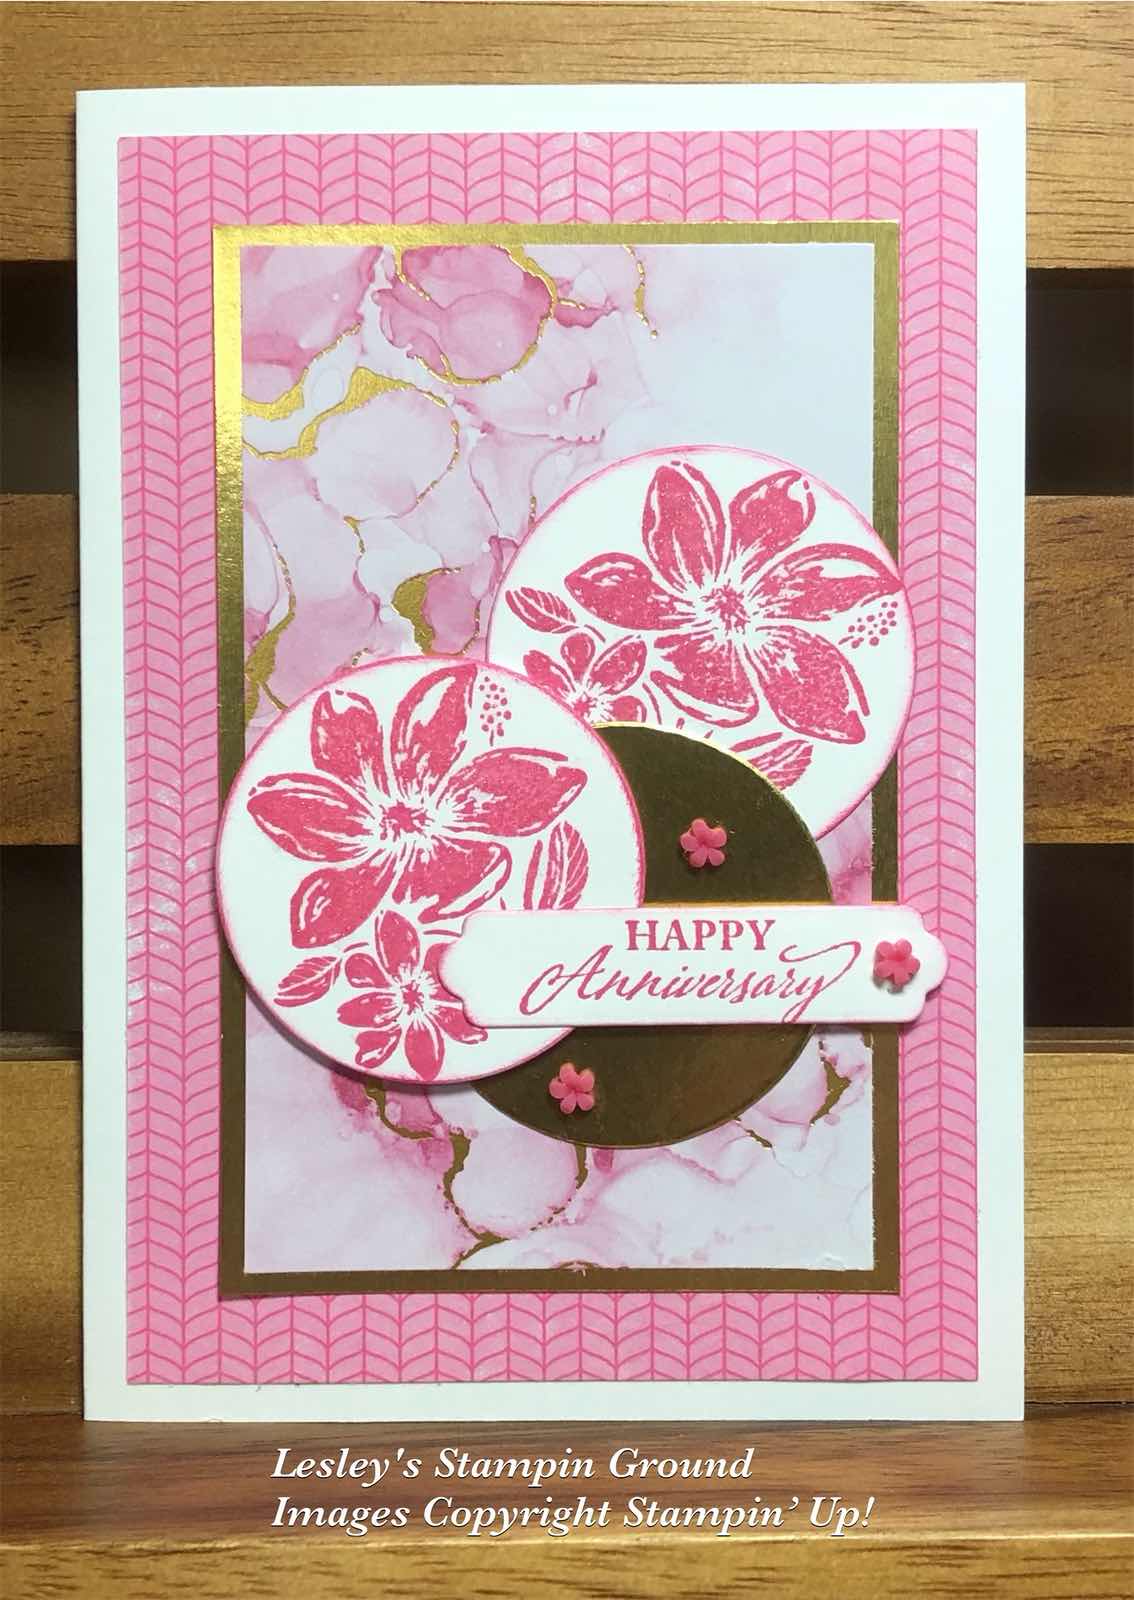
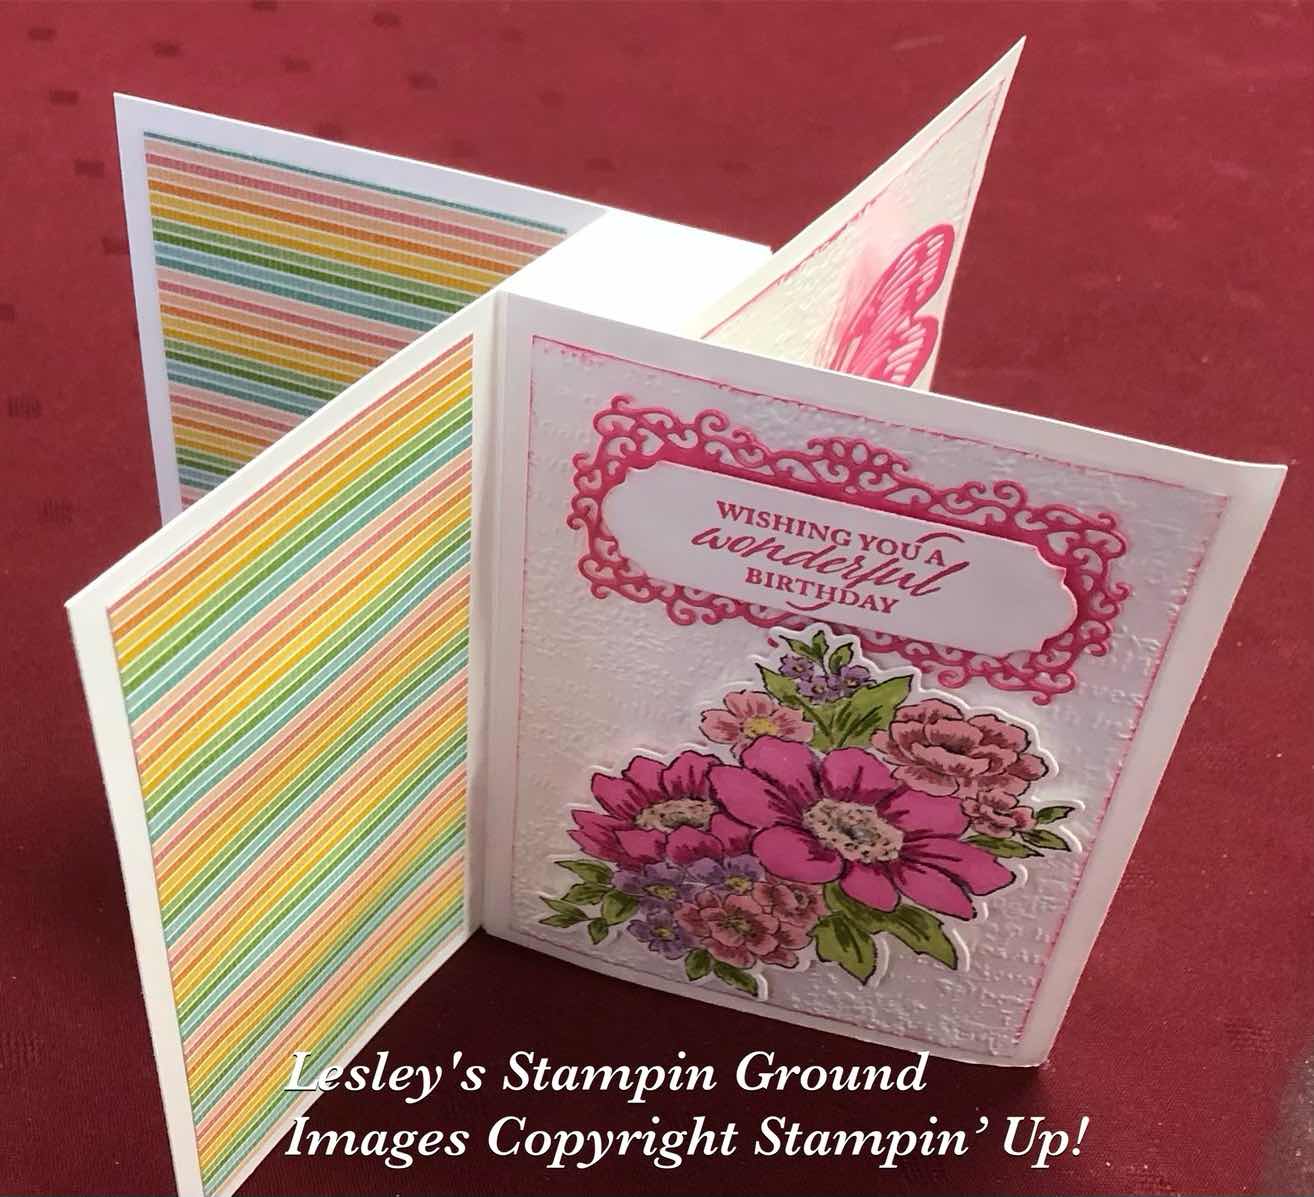
This pretty card uses the Dahlia Days Bundle (#157802) which consists of the Dahlia Days stamp set (#157799) and the Detailed Dahlias Dies (#157801).


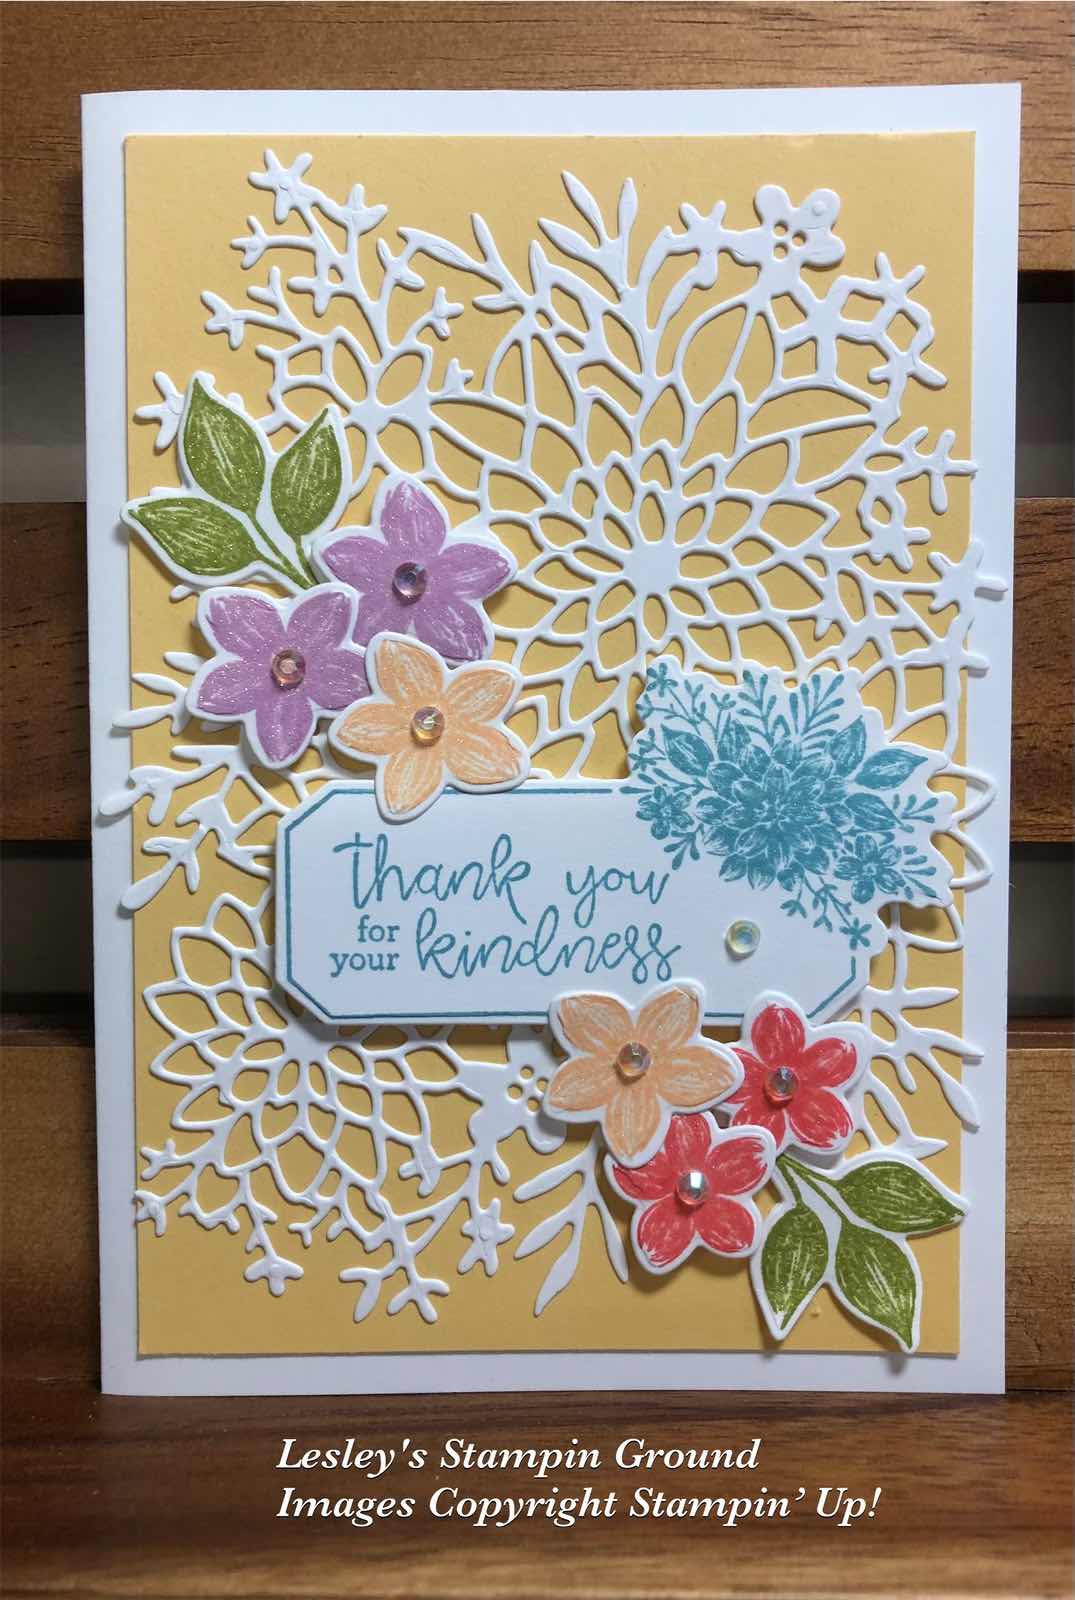
I adhered the Adhesive Sheets (#152334) to the back of the Basic White card stock (#159228), then cut this with the larger detailed die from the Detailed Dahlias Dies. This was adhered to the So Saffron card (#108611) which was attached to the Basic White base card.

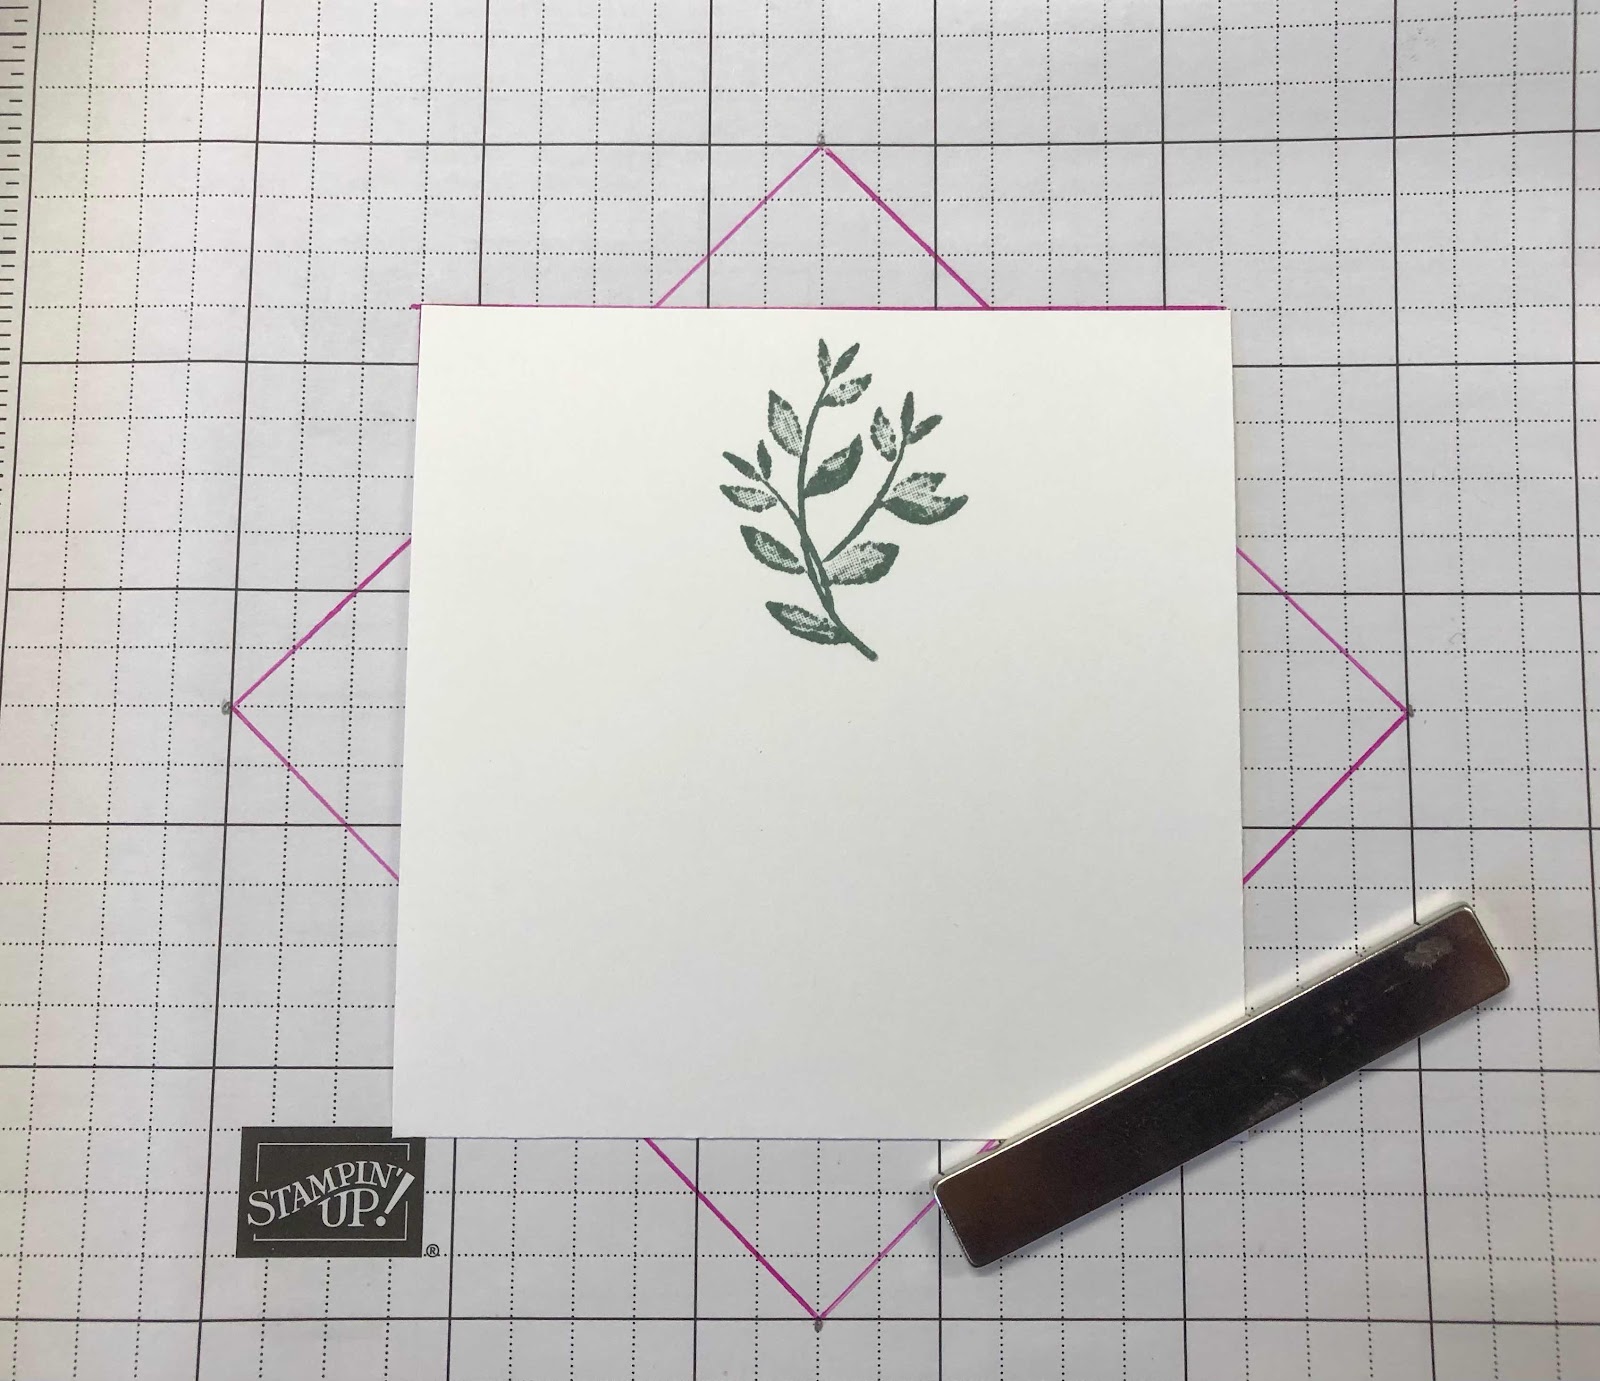
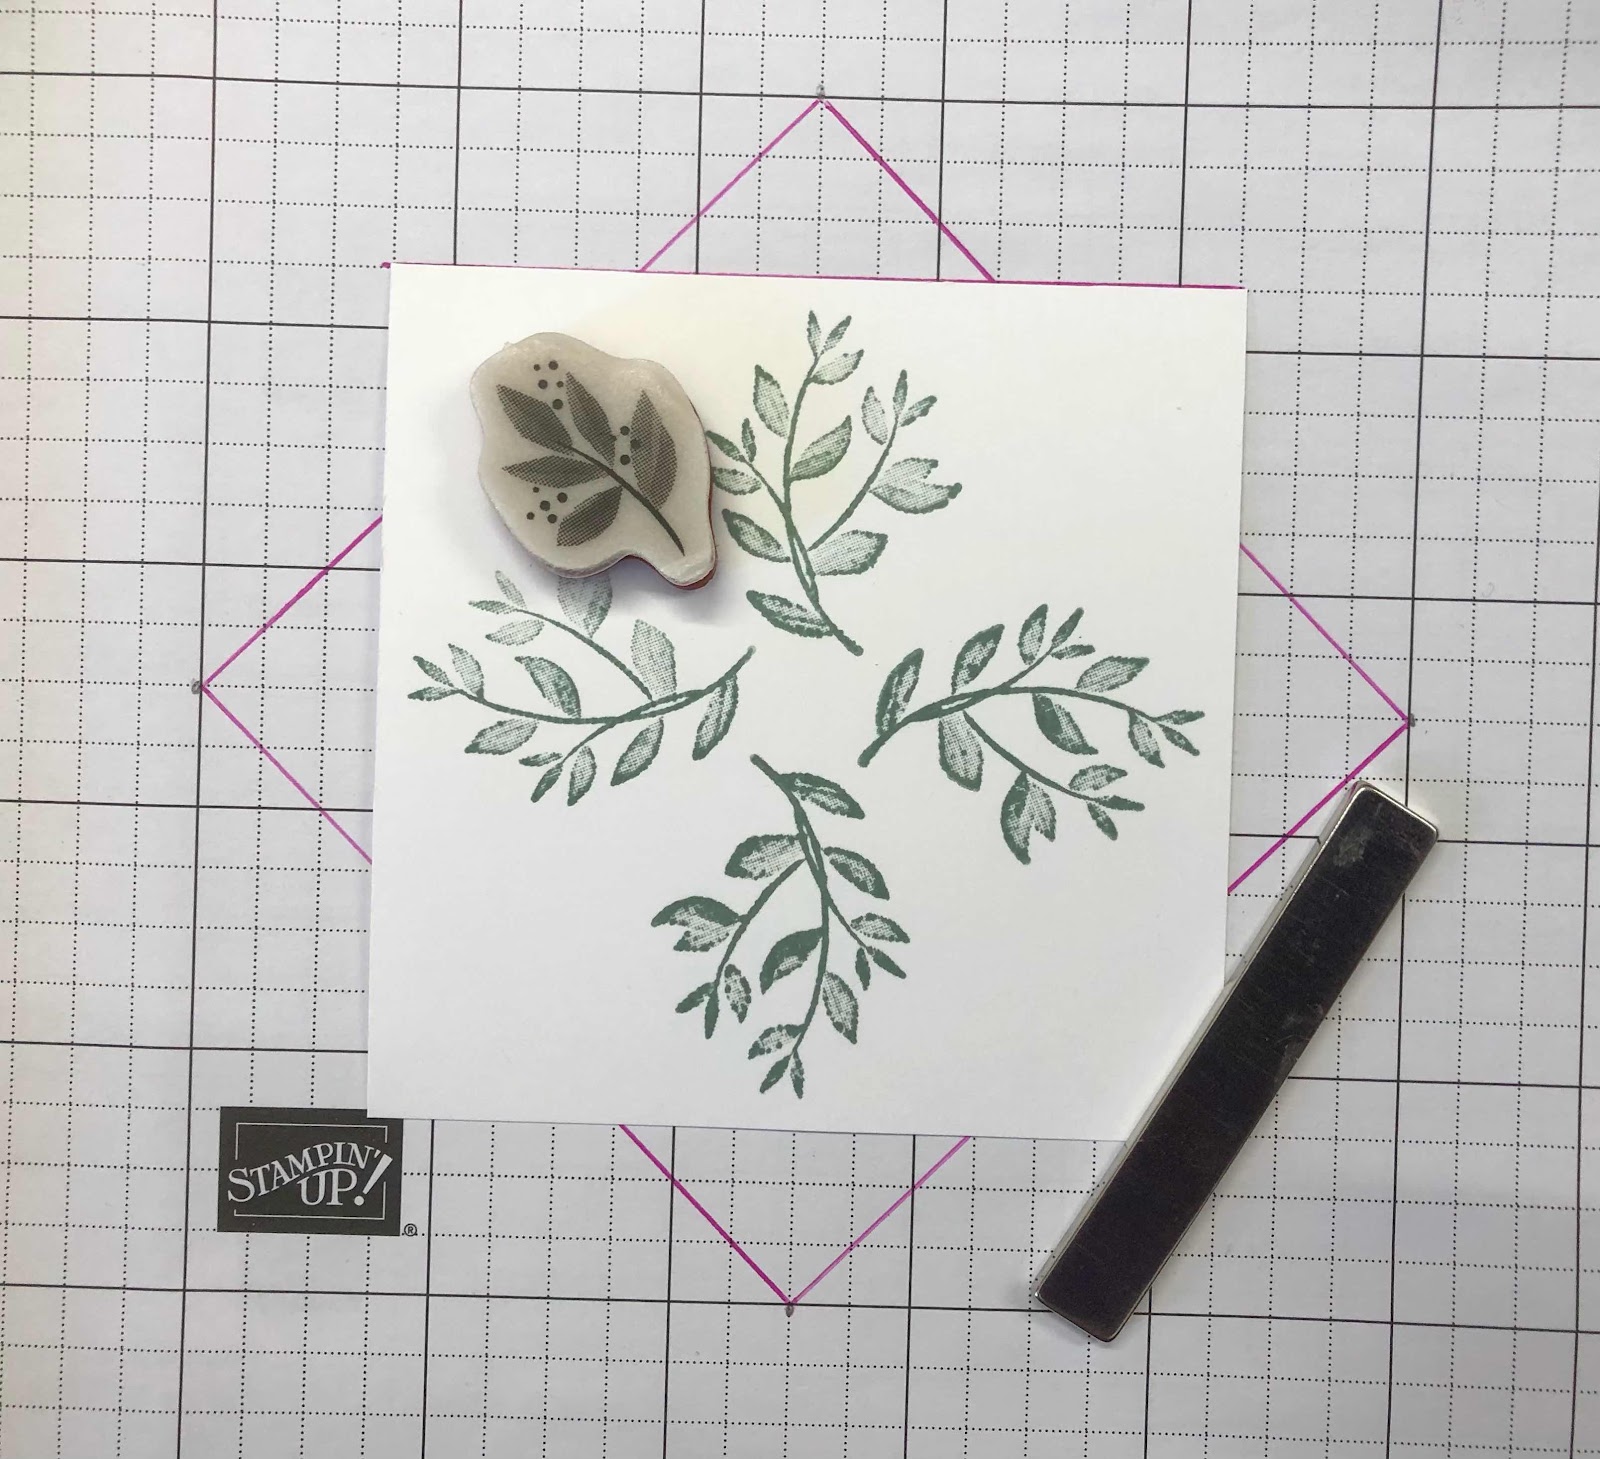
All the stamped images are from the Dahlia Days stamp set. The inks used are Balmy Blue (#147105), Flirty Flamingo (#147052), Fresh Freesia (#155611), Pale Papaya (#155670) and Pear Pizzaz (#147104). The flowers, leaves and label were also cut with Dahlia Days Dies.

The leaves were attached to the card with Mini Glue Dots (#103683) and the flowers and the label were attached using Stampin’ Dimensionals (#104430). The pretty Iridescent Rhinestone Basic Jewels (#158130) were added to the centre of the flowers and the label. I added shimmer to the stamped images with the Clear Wink Of Stella Glitter Brush (#141897).

Tip: Adhesive sheets are great for detailed die cuts. Just adhere the Adhesive sheets to the back of the card before cutting and it makes it so easy to attach the die cut to the card.


“Love what you do and share what you love.”


Thursday 16 December 2021

Eden’s Garden stamp set

Hello everyone,

All the stamped images here are from the Eden’s Garden stamp set (#157823).


I stamped the leaves on the Vellum cardstock (#106584) using VersaMark (#102283), then used the White Stampin’ Emboss Powder (#155554) and set it with the Heat Tool (#129056). I attached the Ever Eden 12”x12” Specialty Designer Series Paper (#159996) to the vellum and then attached the vellum to a piece of Basic White card (#159228) of the same size. I wrapped the Soft Succulent Open Weave Ribbon (#155780) around the card front.

The leafy image and sentiment were stamped with Soft Succulent ink (#155778). The circles were cut with the Layering Circles dies (#151770) and I used Soft Succulent card (#155777) under the stamped images. The larger circles were attached to the card with Stampin’ Dimensionals (#104430). The card front was attached to the Basic White base card. 

The Garden Gems (#159277) were added to finish the card.

The Ever Eden DSP and the Garden Gems are available till 3rd January or while stocks last.


I am taking a couple of weeks off so I will be back with my blog after Christmas. I would like to wish you all a very Merry Christmas and all the best for the New Year.

“Love what you do and share what you love.”


Wednesday 15 December 2021

So Many Snowflakes dies

Hi friends,


I don’t think I will ever see a white Christmas but it’s nice to dream of one. I have used some of the beautiful snowflakes on this card.


I cut the Balmy Blue card (#147007) with a So Many Snowflakes die (#153560) then dry embossed with one of the Wintry 3D Embossing Folders (#155433) which has the snowflakes. I then stamped “Season’s Greetings” from the Merry Snowflakes stamp set (#156419) with Night Of Navy ink (#147110) on Basic White card (#159228). I attached the Balmy Blue card to the Basic White card, then attached this to the Basic White base card.

I cut 2 of the snowflakes from the So Many Snowflakes dies from Silver Foil Specialty Pack (#156457). The Silver Foil was backed with Adhesive Sheet (#152334) before cutting the snowflakes. I use this adhesive sheet any time I have detailed cutouts to make it easy to adhere to the card.

I added the Rhinestone Basic Jewels (#144220) to add some bling to the card.

“Love what you do and share what you love.”

Don’t forget to check out the retiring products from the current Mini catalogue. They are available till 3rd January or while stocks lasts. You will find them here lesleyjendra.stampinup.net


Tuesday 14 December 2021

Shaded Summer

Hello crafty friends,


The White Stampin’ Emboss Powder (#155554) works well on darker coloured card like I have done here.


The floral image from Shaded Summer stamp set (#155783) was stamped with VersaMark (#102283) onto the Night Of Navy card (#106577), then sprinkled with the White Embossing Powder. This was set with the Heat Tool (#129056). I then dry embossed this card with the Timber 3D Embossing Folder (#156406). The Harvest Meadow Designer Series Paper (#156494) was attached to the card front.

“Happy Birthday” is also from the Shaded Summer stamp set and stamped with Real Red ink (#147084). This Basic White card (#159228) and the Real Red card (#106578) under the sentiment were cut with Stitched So Sweetly dies (#151690). I used Stampin’ Dimensionals (#104430) to attach the sentiment to the card. The white leaves under the sentiment were cut with the Summer Shadows Dies (which were from the last Sale-a-bration). These were glued to the card with the Fine-Tip Glue Pen (#138309). I added the Red Rhinestone Basic Jewels (#146924) to the flower centre and sentiment.

“Love what you do and share what you love.”


Monday 13 December 2021

Blackberry Beauty Designer Series Paper

Hello again,

The Blackberry Beauty 12”x12” Specialty Designer Series Paper (#156471) and the Gold 12”x12” Shimmer Vellum (#156471) are two of many of the products retiring from the current Mini catalogue.


I attached Adhesive Sheet (#152334) to the Gold Shimmer Vellum and Rich Razzleberry card (#119981). Then I dry embossed the gold vellum with the Timeworn Type 3D Embossing Folder (#156505) and attached this to a piece of Gold Foil Sheet (#132622). I cut the tree from the Rich Razzleberry card with the Beautiful Trees Dies (#155840) and attached this to the Gold Shimmer Vellum. The birds are from the same die set and I used Gold Foil sheet for these cute birds.

The DSP was attached to the Basic White base card (#159228) and the gold foil was attached with Stampin’ Dimensionals (#104430). “Thinking Of You” is from the Beauty Of Friendship stamp set (#154983) and I stamped this with Rich Razzleberry ink (#147091). A Seasonal Labels Die (#156299) was used to cut the sentiment. The birds and sentiment were attached to the card with Mini Stampin’ Dimensionals (#144108). The Genial Gems (#155500) were added to finish the card.


“Love what you do and share what you love.”


Friday 10 December 2021

Beauty Of Tomorrow

Hello again,

The Beauty Of Tomorrow Bundle (#156819) consists of the Beauty Of Tomorrow stamp set (#156459) and the Beautiful Leaves Dies (#156468).


I used one of the Basic Patterns Decorative Masks (#150697) and the Shimmery White Embossing Paste (#145645) on the Basic White card front (#159228). This adds a beautiful sparkle and texture. This doesn’t take long to dry, but you can use the Heat Tool (#129056) if desired. I find doing this first, it is dry by the time you stamp and cut everything.

The leaves and the birds are all from the Beauty Of Tomorrow stamp set. The inks used are Bumble Bee (#153116), Soft Succulent (#155778) and Calypso Coral (#147101). These were cut with the Beautiful Leaves dies.

I attached the green leaves with Mini Glue Dots (#103683) and the yellow leaves and birds with Stampin’ Dimensionals (#104430).

The sentiment from Shaded Summer stamp set (#155783) was stamped with Calypso Coral ink and I used the Hippo & Friends Dies (#153585) to cut the Basic White label & Calypso Coral (#124392) label. The card front was attached to the Calypso Coral card, then I wrapped the White Glittered Organdy Ribbon (#156408) around the card. The silver circles from the Silver & Clear Epoxy Essentials (#155567) were added to the sentiment.

Don’t forget to check out the retiring products here - lesleyjendra.stampinup.net and includes this bundle. There are some great bargains and who doesn’t love a bargain.

“Love what you do and share what you love.”


Thursday 9 December 2021

Blessings Of Home

Hi my friends,

Here’s a simple but elegant card using just white & gold and would be great for any special occasion.


I stamped the image from Blessings Of Home stamp set (#157930) with VersaMark (#102283) and heat embossed with Gold Stampin’ Emboss Powder (#155555). This was set with the Heat Tool (#129056). The sentiment is from Forever Blossoms stamp set (#151457) and also gold embossed.

After setting the floral image on the Basic White card (#159228) I dry embossed this with the Timber 3D Embossing Folder (#156406). I attached the card front to the piece of Gold Foil sheet (#132622) then this was attached to the Basic White base card.

I cut the sentiment and the gold foil under the sentiment with dies from the Ornate Frames dies (#150664) and this was attached to the card with Stampin’ Dimensionals (#104430).

Yes, a simply elegant card!!

The Blessings Of Home stamp set will be available from 4th January in the next Mini catalogue.

“Love what you do and share what you love.”


Tuesday 7 December 2021

Peaceful Deer

Hi again friends,

The Peaceful Deer Bundle (#156391) consists of the Peaceful Deer stamp set (#156891) and the Deer Builder Punch (#156390).


It is very hard to photograph this card with the silver & white DSP from the Whimsy & Wonder 12”x12” Specialty Designer Series Paper (#156329). It doesn’t actually have all these colours, it is only silver & white.

The DSP with the trees is from the Penguin Playmates which was a previous Sale-a-bration product. This was attached to the Poppy Parade card (#121694), then attached to the Silver & White DSP. I wrapped the Metallic Mesh Ribbon (#153550) around the card front and attached this to the Basic White base card (#159228). 

The tree from the Whimsical Trees stamp set (#156330) was stamped with Mint Macaron ink (#147106) and cut with a Christmas Tree Die (#156339). Merry Christmas is from the Perfectly Plaid stamp set (#158335) and cut with an Ornate Frames die (#150664).  The deer was stamped with Soft Suede ink (#147115) on Crumb Cake card (#121685) and punched with the Deer Builder punch. The deer and sentiment where attached to the card with Stampin’ Dimensionals (#104430). Some glitter was added to the deer and tree using the Clear Wink Of Stella Brush (#141897). A Holiday Rhinestone Basic Jewel (#150457) was added to the top corner of the card.

“Love what you do and share what you love.”


Monday 6 December 2021

Elegantly Said

Hello my friends,

I have used the Elegantly Said stamp set (#155095) for the flowers and sentiment on this card today.


The flowers and sentiment were stamped with Polished Pink ink (#155712) on Basic White card (#159228). The flowers and Gold Foil Sheet (#132622) were cut with one of the Layering Circles Dies (#151770) and the sentiment was cut with a Seasonal Labels Die (#156299).

I attached the DSP from the Whimsy & Wonder 12”x12” Specialty Designer Series Paper (#156329) to the Basic White base card. I matted the DSP from the Expressions In Ink Specialty Designer Series Paper (#155464) onto Gold Foil Sheet, then attached this to the card. The flowers, Gold circle and sentiment were attached with tape & Stampin’ Dimensionals (#104430). The small Polished Pink flowers from the Loose Flower Flourishes (#155808) were attached with the Fine-Tip Glue Pen (#138309).

Clear Wink Of Stella (#141897) was used on the flowers to add some sparkle.


“Love what you do and share what you love.”


Saturday 4 December 2021

Happy Holly-Days

Hi crafty friends,

I love when you can use a stamp set for more than one occasion. The Happy Holly-Days stamp set (156342) is actually a Christmas set but I have used the bird from this set for a range of occasions.


I punched the corners of the Harvest Meadow 12”x12” Designer Series Paper (#156494) with the Detailed Trio Punch (#146320). I added small pieces of  Gold Foil (#132622) behind these cut outs, then I attached the card front to the Basic White base card (#159228).

I used a Seasonal Labels Die (#156299) to cut the Gold Foil label. “Hugs, Prayers & Love” from the Positive Thoughts stamp set (#151490) was stamped with Soft Succulent ink (#155778). The Hippo & Friends Dies (#153585) were used to cut the sentiment and the piece under the sentiment. I dry embossed the larger piece with the Gingham Embossing Folder (157627) - a sneak peek from the next mini catalogue.

The bird was stamped with VersaMark (#102283) and heat embossed with Gold Stampin’ Emboss Powder (#155555). After heat setting this with the Heat Tool (#129056),  I fussy cut the bird and attached it to the card with Stampin’ Dimensionals (#104430).

“Love what you do and share what you love.”


Friday 3 December 2021

Eden’s Garden

Hi friends,

I am using the Eden’s Garden stamp set #157823) and the Ever Eden Designer Series Paper (#159996) again today. I love this set.


I stamped the leaves using the Stamparatus (#148187) so the images are stamped around the card perfectly. I stamped one image with VersaMark (#102283) and heat embossed with Gold Stampin’ Emboss Powder (#155555) and set with the Heat Tool (#129056). The photos below are stamped with ink instead of VersaMark so it is easier for you to see how it is done.


This is the template I used to stamp these images. I used a 9cmx9cm Basic White card (#159228) and placed it on the square.


I placed the stamp on the card as shown.


After stamping the first image, I turned the card and re-stamped and repeated till all 4 images were stamped. 


I then positioned the next stamp in between the stamped leaves and using the same method, stamped these with Soft Succulent ink (#155778).


“Sending Hugs” was also stamped with Soft Succulent ink and this was cut with a Tasteful Labels die (#152886) then attached in the centre of the stamped images with Stampin’ Dimensionals (#104430). This square card was matted with Gold Foil from the Brushed Metallic 12”x12” cardstock (#153524). 

I cut the gold foil border with one of the Eden Dies (#157831) and attached this to the Ever Eden DSP. This was attached to the Basic White base card. The square card was attached on top. The Garden Gems (#159277) were added to the card. There are 2 different shapes and colours in this pack.

Don’t forget that this designer paper & the gems are only available for a limited time (till 3rd January or while stocks last).


“Love what you do and share what you love.”


Thursday 2 December 2021

Ever Eden Specialty Designer Series Paper

Hi friends,

The Eden’s Garden Bundle (#157832) will be available in the next Mini catalogue from 4th January. The gorgeous Ever Eden Specialty Designer Series Paper (#159996) and the Garden Gems (#159277) work beautifully with this set, however the DSP & gems are only available till 3rd January, so won’t be in the catalogue. I am sure you won’t want to miss out on these.


I attached one piece of the Designer Series Paper to the Gold foil from the Brushed Metallic 12”x12”cardstock (#153524), then attached this to another piece of DSP. The base card is Basic White (#159228).

I stamped the leafy image from the Eden’s Garden stamp set (#157823) with Soft Succulent ink (#155778). I used a Hippo & Friends Die (#153585) to cut this then dry embossed with the Timeworn Type 3D Embossing Folder (#156505). Stampin’ Dimensionals (#104430) were used to attach this to the card.

The sentiment from Eden’s Garden stamp set was also stamped with Soft Succulent ink and I cut this with a Stitched Rectangles Die (#151820). I cut the gold foil leaves and the label under the sentiment with Eden dies. I had Adhesive sheets (#152334) attached to the back of the foil before cutting the leaves.

The Garden Gems were added to the card.


Wednesday 1 December 2021

What’s Cookin’ Bundle

Welcome,

The What’s Cookin’ Bundle (#155845) used on this card consists of the What’s Cookin’ stamp set (#154491) and the Cookin’ Dies (#154333) and includes a great range of kitchen utensils.


The Basic White card front (#159228) was embossed with one of the Checks & Dots Embossing Folder (#155432). The black & white check paper is from the Pattern Party Designer Series Paper (#155426). 

I cut the Silver Foil from the Silver Foil 12”x12” Specialty pack (#156457) with the scalloped die from the Penned Flowers (#155557). I attached this to the card front, then using the Take Your Pick Tool (144107), made holes to be able to insert the brads from the Round & Square Brads (#155570) to “hang” the utensils on.

I used Crumb Cake card (#121685) for the cutting board, Silver Foil for the whisk and Basic Black card (#121688) for the lifter. The spoon was stamped with Crumb Cake ink (#147116) and the sentiment was stamped with Tuxedo Black Memento ink (#132708). All the utensils were cut with the Cookin’ Dies.

Mini Glue Dots (#103683) were used to attach the hanging utensils and Stampin’ Dimensionals (#104430) for the spoon & rolling pin.


“Love what you do and share what you love.”


Tuesday 30 November 2021

Blessings Of Home Pinwheel Tower card

Hello again,

Recently I made a small pinwheel tower card so this one today is a larger one with the finished size approximately 21cm x 15cm when flattened out. I am using the Blessings Of Home Bundle (#157939) which is a sneak peek from the upcoming Mini catalogue available from 4th January 2022.


The Basic White card (#159228) measurements for the basic card shape are as follows-
1 piece - 20.5 x 14.9cm and scored at 2.5cm, 5cm,7.5cm and 10cm along the long side.
3pieces - 14.9 x 10.5 cm
The other measurements are-
3 pieces Basic White - 13.9 x 9.5cm. These were embossed with the Timeworn Type 3D Embossing Folder (#156505).
4 pieces of Pattern Party Designer Series Paper (#155426) - 7cm x 13.9cm and 1 piece - 5cm x 13.9cm
1 piece of Basic White card 6cm x 13.9 cm


Fold each of the scored lines, to form a square. Apply glue or tape to the end of the “square” as shown below. Fold the left side over to the piece on the right.


You will continue adding glue or tape to one side of the “square”, and place a piece of the 14.9cm x 10.5cm on the right side and fold the left side onto this. (This is very hard to describe so I hope you can understand what to do).


The final base card looks like this from above-


I stamped the larger floral image and I stamped 2 of the smaller floral images from the Blessings Of Home stamp set (#157930) using Tuxedo Black Memento ink (#132708). These were coloured with Stampin’ Blends - Polished Pink (#155520), Flirty Flamingo (#154884), Fresh Freesia (#155518), Granny Apple Green (#154885) & So Saffron (#154905). These were cut with the Flowers Of Home Dies (#157938).


“Wishing You a Wonderful Birthday” from Elegantly Said stamp set (#155095) was stamped with Polished Pink ink (#155712). I used Ornate Frames Dies (#150664) to cut the sentiment and the Polished Pink card (#155711) under the sentiment. This and the larger floral image were attached to one of the dry embossed cards.


Next I cut the butterflies with the Brilliant Wings Dies (#155523) from Polished Pink card and Fresh Freesia card (#155614). The detailed border under the sentiment is cut with a Nature’s Thoughts die (#153586). The Fresh Freesia card was backed with Adhesive Sheet (#152334) before cutting this border. The sentiment on this opening is from the Pansy Patch stamp set (#154999) and also stamped with Polished Pink ink. The butterflies and sentiment were added to another of the dry embossed cards with Stampin’ Dimensionals (#104430).


On the next side I attached a larger piece of Designer Series Paper on the left side and the smaller piece on the right side. The smaller Basic White card (6cm x13.9cm) was attached and this is where you will write your personal greeting. I attached 2 more butterflies cut from Polished Pink card. These were attached to the card with Mini Glue Dots (#103683).


On this side I added the 2 smaller floral images to another of the dry embossed cards. Using Adhesive Sheet on the back of the Granny Apple Green card (#147014), I cut the leaves with a Flowers Of Home die. “Sending Hugs” is from the Eden’s Garden stamp set (#157823), stamped with Polished Pink ink and cut with a Stitched So Sweetly die (#151690).

I attached the DSP to each of the left sides of each “opening”.
 

“Love what you do and share what you love.”


lesleyjendra.stampinup.net


lesley.j.jendra@gmail.com


Monday 29 November 2021

Penguin Playmates Designer Series Paper

Hello dear friends,

I was asked to make a kids Christmas card so thought these cute little characters from the Penguin Playmates Designer Series Paper were just perfect. This pack of DSP was from the recent Sale-a-bration but it also matches with the Penguin Place stamp set (#156410) in the Mini catalogue.


The spotted DSP is also from the same pack. I cut this with the Picture This Dies (#155559). This was attached to the Basic White base card (#159228). I then cut the Just Jade card (#153084), Fresh Freesia card (#155614) and Misty Moonlight card (#153086) with this die and attached these over the corresponding cut-outs of the DSP. I used Stampin’ Dimensionals (#104430) and Mini Stampin’ Dimensionals (#144108) to attach these rectangles to the card.

I fussy cut the cute little animals and attached these to the card. “Merry Christmas” from the Peaceful Deer stamp set (#156891) was stamped with Misty Moonlight ink (#153118) and cut with a Stitched Rectangles Die (#151820) and also attached with Mini Stampin’ Dimensionals. The Elegant Faceted Gems (#152464) were added to the card and I used the Clear Wink Of Stella (#141897) to add glimmer to the characters.

The current Christmas mini catalogue is coming to an end on 3rd January. There is a sale on many of the retiring products so if you would like to take advantage of this sale please click here

There is also some products which will carry over so click here to view those products.

Contact me at  lesley.j.jendra@gmail.com if you would like to place an order or you can order here- lesleyjendra.stampinup.net

“Love what you do and share what you love.”


Saturday 27 November 2021

Encircled In Beauty Dies

Hello my friends,

I have cut the Shaded Spruce card (#147006) with the Encircled In Beauty Dies (#155546) to get this beautiful detailed “doilie”.


The Very Vanilla card front (#106550) was dry embossed with the Timber 3D Embossing Folder (#156406). I attached a piece of the Expressions In Ink 12”x12” Specialty Designer Series Paper (#155464) to the card front, then wrapped the Old Olive/Pretty Peacock Reversible Ribbon (#149496) around. This was attached to the Very Vanilla Base card.

I adhered Adhesive Sheets (#152334) to the back of the Shaded Spruce card before cutting with the detailed die and the outline die to cut the outside. The inside circle cuts at the same time and I cut a small amount from the circle with a Layering Circles Die (#151770) as I wanted it a bit smaller. I find the adhesive sheets so convenient and easy for adhering any detailed cuts outs like this one.

The butterfly was cut with one of the Brilliant Wings Dies (#155523) from Gold Foil Sheet (#132622). I used Mini Stampin’ Dimensionals (#144108) to attach this to the card. The sentiment is from the Art Gallery Stamp Set (#158201) and stamped with Shaded Spruce ink (#147088). A Seasonal Labels Die (#156299) was used to cut the sentiment and it was also attached with Mini Stampin’ Dimensionals. The Genial Gems (#155500) were added to the card, butterfly & sentiment.

“Love what you do and share what you love.”


Thursday 25 November 2021

Adorning Designs Decorative Masks

Hi lovely friends,

Every time I make a Christmas card I think I have probably made enough but then decide I need to use another product, so here is yet another Christmas card. It’s a very easy one to make with lots of sparkle and as usual looks much nicer in reality.


I used the snowflakes mask from the Adorning Designs Decorative Masks (#156328) along with the Shimmery White Embossing Paste (#145645). Using one of Palette Knives (#142808), I wiped the embossing paste over the mask and onto the Balmy Blue card (#147007). This paste dries quickly so ensure you wash the mask & palette knife as soon as possible to remove all paste from the utensils.

After the Embossing Paste dried on the card I wrapped the White Glittered Organdy Ribbon (#156408) around the card front, then attached this to the Basic White base card (#159228).

The sentiment from the Peaceful Deer stamp set (#156891) was stamped with Balmy Blue ink (#147105) and I used a die from the Ornate Frames (#150664) to cut the sentiment. 

The Wonderful Snowflake (#156340) and the sentiment were attached to the card with Stampin’ Dimensionals (#104430) and the embellishments are the Elegant Faceted Gems (#152464).

“Love what you do and share what you love.”


Wednesday 24 November 2021

Blackberry Beauty

Hi again friends,

Another beautiful Designer Series Paper from Stampin’ Up! is the Blackberry Beauty 12”x12” Specialty DSP (#156458) and this sheet has the rich colours of gold & Blackberry Bliss.


I dry embossed the Basic White card front (#159228) with the Star-Crossed Embossing Folder (#156567). I attached the Designer Paper to the card front and the card front was attached to the Basic White base card. 

The sentiment from the Peaceful Moments stamp set (#151595) was stamped with Blackberry Bliss ink (#147092). I used the Stitched Rectangles Dies (#151820) to cut the Blackberry Bliss card (#133682), the Gold Foil (#132622) and the sentiment.

The flowers are pre-cut pieces from the Blackberry Beauty Ephemera Pack (#156469) and attached to the card with Mini Glue Dots (#103683) and I used Stampin’ Dimensionals (#104430) to attach the sentiment. The gold Genial Gems (#155500) were added to the card.

“Love what you do and share what you love.”


Tuesday 23 November 2021

Whimsical Trees Bundle

Hello crafty friends,

The Whimsical Trees Bundle (#156810) consists of the Whimsical Trees stamp set (#156330) and the co-ordinating Christmas Trees Dies (#156339).


I stamped the 3 larger trees with Mossy Meadow ink (#147111), Pear Pizzaz ink (#147104) and Soft Sea Foam ink (#147102). I used Soft Succulent ink (#155778) and Just Jade ink (#153115) for the smaller trees. All the trees are cut with the Christmas Trees Dies.

The Silver Foil from the Silver Foil 12”x12” Specialty Pack (#156457) was dry embossed with the Star-Crossed Embossing Folder (#156567), then attached to the Mossy Meadow card (#133683). I wrapped the Metallic Mesh Ribbon (#153550) around the bottom of the card front, then attached this to the Basic White base card (#159228). 

The sentiment from the Whimsical Trees stamp set was stamped with Mossy Meadow ink then cut with a Scalloped Contours Die (#155560). The trees and sentiment were attached to the card using tape & Stampin’ Dimensionals (#104430). Rhinestone Basic Jewels (#144220) were added to the card. Again I added shimmer to the trees with the Clear Wink Of Stella (#141897), but I don’t think it shows on the photo (as usual). Always look much better in reality.


“Love what you do and share what you love.”


Monday 22 November 2021

Strong Of Heart stamp set

Hi friends,

In the August -December Stampin’ Up! Mini catalogue is the Strong Of Heart stamp set (#156376), which I have used on todays card. For each of these sets sold Stampin’ Up! donates $4.25 to support heart health which is a fantastic cause. So if you want to help “make a difference”, please consider ordering this set.


I stamped the heart & flower image with Real Red ink (#147084) onto Basic White card (#159228). I stamped the sentiment from the Positive Thoughts stamp set (#151490) with VersaMark (#102283) and heat embossed with Gold Stampin’ Emboss Powder (#155555). This was set with the Heat Tool (#129056).

The base card is Real Red (#106578) and the 2 pieces of Designer Series Paper is from the beautiful Simply Elegant Specialty pack (#155761). The strip of gold is from the Brushed Metallic 12”x12” cardstock (#153524).

The stamped card was attached to the card with Stampin’ Dimensionals (#104430) and the trio of Red Rhinestone Basic Jewels (#146924) were attached to the card.

We all have some bits & pieces of DSP & specialty papers, so this is an easy way to use them.

“Love what you do and share what you love.”