Tuesday, 31 December 2024

Perpetual Beauty Calendar Kit

 Hello & Happy New Year,

Thought I would start the new year with a new Perpetual calendar. The Perpetual Beauty Calendar Kit (#164975) is an all inclusive kit and very easy to put together with the instructions included. This is also a great gift. You could either put it together for the recipient or leave it for them to put together.


The first photo is the front cover. The other 2 are just 2 of the months which I added the pre-cut pieces. Stamps for each month are also included with a Pretty Peacock ink spot and clear stamp block. There are white labels for stamping the months on and coloured strips to place under the labels. All the die cut leaves and labels are adhesive backed, so very easy to put everything in place.

Now I can start filling in all the birthdays, anniversaries etc.


“Love what you do and share what you love.”

INSPIRE. CREATE. SHARE. 


https://www.stampinup.com.au


Monday, 30 December 2024

Spring Corners dies

 Hi & welcome,

I have used the Spring Corners dies (#164742) for the detailed die cuts on today’s card.


There are two identical dies so you can cut 2 at a time which I did to cut the 4 corners of the Basic White card (#159228). I then cut the Berry Burst for the tiny flowers from the Berry Burst, Old Olive & White 12”x12” Glimmer Specialty Paper (#163769) using another die. I had this backed with Adhesive Sheet (#152334) making it easy to attach to the card.

The card front was matted with Shaded Spruce card (#147006), then attached it to the Basic White base card.

“Happy Birthday” from the Translucent Florals stamp set (#162243) was stamped with Berry Burst ink (#147143). I cut the 2 squares using the Stylish Shapes Dies (#159183) from Basic White card. I taped the larger one to the card front and the one with the sentiment with Mini Stampin’ Dimensionals (#144108). The die cut flowers were attached to the card.

I coloured the Clear Dots from the Pecan Pie & Clear Ribboned Adhesive-Backed Dots (#164204) with Berry Burst Stampin’ Blends (#161681) before attaching to the centre of the flowers.


“Love what you do and share what you love.”

INSPIRE. CREATE. SHARE. 


https://www.stampinup.com.au


lesley.j.jendra@gmail.com


http://lesleysstampinground.blogspot.com


Sunday, 29 December 2024

To The Point Label Punch

 Hello again everyone,

The To The Point Label Punch (#164568) co-ordinates with 2 stamp sets in the upcoming Mini Catalogue, including the Bright Borders stamp set (#164753), and I have used this stamp set & punch on this card.


The Shades & Hues 6”x6” Designer Series Paper (#166260) has been matted with Gorgeous Grape card (#147011), then attached to the Basic White Base card (#159228).

An image from the Bright Borders stamp set (#164753) was stamped with Gorgeous Grape ink (#147099), then punched with the To The Point Label Punch.

“Happy Birthday” from the Translucent Florals stamp set (#162243) was also stamped with Gorgeous Grape ink. This was cut with a Mixed Labels die (#164652) and taped to the punched piece.

I used the Silver from the Silver & Gold 12”x12” Adhesive Backed Glimmer Paper (#162288) to cut the detailed leaf from the Thoughtful Wishes dies (#163313). This was attached to the card front. The sentiment was attached with Stampin’ Dimensionals (#104430). The embellishments are from the Adhesive-Backed Sparkle gems (#161288).


“Love what you do and share what you love.”

INSPIRE. CREATE. SHARE. 


https://www.stampinup.com.au


lesley.j.jendra@gmail.com


http://lesleysstampinground.blogspot.com


Saturday, 28 December 2024

Scrapbooking with Season Of Elegance DSP

 Hi friends,

A double scrapbooking layout today using the beautiful Season Of Elegance Specialty Designer Series Paper (#164144).


I used the Real Red Two-Tone 12”x12” cardstock (#166696) for the base pages. Then I cut a piece of the Old Olive & Gold and Crumb Cake & Gold (from the DSP) diagonally in strips, then alternated them on the 2 pages. As I couldn't get the edges perfect and wanted a red edge, I cut a frame from more of the Real Red cardstock and taped it on top. The photos were matted with the Real Red cardstock from the middle that was cut out.

I cut the letters with the Mini Alphabet dies (#162934) and the numbers with retired Number dies. I had the Real Red card backed with Adhesive Sheet (#152334) making these easy to attach to the page.

The hearts and flowers are from the Celebrate Love Mix & Match Ephemera Pack (#164857) and Merry Christmas is from the Greetings For All Mix & Match Ephemera Pack (#164862). Both these packs will be available from the Mini Catalogue from 7th January. These very versatile packs are great for both Scrapbooking and cards.

For all the scrapbooker, there will be more Scrapbooking products available from 7th February.


“Love what you do and share what you love.”

INSPIRE. CREATE. SHARE. 

Friday, 27 December 2024

Linked Together Dies

 Hello again friends,

I hope you all had a lovely Christmas. I enjoyed this very special time with family.

I’m back after a very busy week leading up to Christmas and all the Christmas festivities. I have almost completed my craft room, just waiting on some more shelving to have everything organised. It is looking great. I was really eager to get back to crafting so here is my card today using the Linked Together dies (#164808). These will be available in the new Mini Catalogue from the 7th January 2025.


The lattice, leaves, flowers & oval are all cut from these dies. The small diamonds are pieces that came out of the lattice. I used Pretty Peacock card (#150886) backed with Adhesive Sheet (#152334) to cut the lattice. The lattice & diamonds was attached to the Very Vanilla card (#106550) which was dry embossed with the Birch Wood 3D Embossing Folder (#164069). I matted this with Pretty Peacock card and attached it to the Very Vanilla base card.

“Happy Birthday” from Unbounded Love stamp set (#163378) was stamped with Pretty Peacock ink (#150083) and cut with the oval die. The leaves were cut from Lost Lagoon card (#133686) also backed with Adhesive Sheet. I used Peach Pie card (#163800) for the flowers. I attached 2 flowers together with Multipurpose Liquid Glue (#110755). 

The sentiment was attached to the card with Stampin’ Dimensionals (#104430). The flowers were attached  with Mini Stampin’ Dimensionals (#144108) and Mini Glue Dots (#103683). The Low Profile Dots (#164658) were added to the centre of the flowers.

“Love what you do and share what you love.”

INSPIRE. CREATE. SHARE. 


Wednesday, 18 December 2024

Otterly Adorable Designer Series Paper

 Hi friends,

A super easy & super cute card today. I have just finished my last class for the year and I’m in the middle of packing up my craft room so I don't have all my supplies available. I am getting new carpet and a bit of a revamp of the craft room. So this will be the last post for the next week or so. I hope you all have a Merry Christmas and I will be back very soon.


I cut 3 images from the Otterly Adorable Designer Series Paper (#164936) using the Labelled With Love dies (#163570).

I attached another piece of the DSP to the Pecan Pie card (#161726). I dry embossed these together with the Soft Waves Embossing Folder (#164695), and attached the card front to the Basic White base card (#159228).

The 3 die cut otters were attached to the card with Stampin’ Dimensionals (#104430). I haven't added a sentiment yet (my inks & stamps are packed) but may just stamp the sentiment inside at a later time.

Merry Christmas and thanks for your continued support.


“Love what you do and share what you love.”

INSPIRE. CREATE. SHARE. 


Tuesday, 17 December 2024

Adventurous Sky

 Hi everyone,

Here is a masculine card using the Adventurous Sky Bundle (#163447) and the Take To The Sky Designer Series Paper (#163436).


The DSP was matted with Copper Clay card (#161730) and attached to the Basic White base card (#159228).

The plane from the Adventurous Sky stamp set (#163439) was stamped with VersaMark (#102283) and I used Copper embossing powder from the Metallics Wow! Embossing Powders (#165678). This was set with the Heat Tool (#129056). The sentiment from With You In Mind (#164747) was also Copper Embossed.

 I used the Nested Essentials dies (#161597) to cut the sentiment and the Copper Clay card. These were attached to the card with Stampin’ Dimensionals (#104430). The stamped plane was attached with Mini Stampin’ Dimensionals (#144108).


“Love what you do and share what you love.”

INSPIRE. CREATE. SHARE. 


Monday, 16 December 2024

Spotlight On Nature

 Hello,

The Spotlight On Nature Bundle (#163581) consists of the Spotlight On Nature stamp set (#163579) and Spotlight On Nature dies (#163580). The dies consist of 12 circular dies with various designs around the outside. These dies are so versatile as they don't co-ordinate with the images in the stamp set but can be used for a large range of images, designer papers etc.


I stamped the floral image and the butterfly with Smoky Slate ink (#147113). I usually use black ink but I wanted a more subtle colour for this card. I coloured the images with Fresh Freesia Stampin’ Blends (#155518) and Lemon Lime Twist Stampin’ Blends (#161682). The butterfly was fussy cut and I used the Spotlight On Nature dies to cut the flowers and the Fresh Freesia card (#155614).

The base card is from the Brushed Gold Cards & Envelopes (#162177). I attached the Fresh Freesia circle with Stampin’ Dimensionals (#104430) and taped the flowers on top. The butterfly was attached with a Stampin’ Dimensional.

I used Clear Wink Of Stella (#141897) on the flowers, leaves & butterfly for some glimmer. I then flicked the Clear Wink of Stella over the whole card for extra sparkle. The embellishments are from the Purple Adhesive-Backed Sequins (#164970) which is one of the free Sale-a-bration products available from 7th January with a qualifying order ($100 in Australia).

I chose not to add a sentiment on this card. I will do it when I decide what I want the card for.


“Love what you do and share what you love.”

INSPIRE. CREATE. SHARE


Sunday, 15 December 2024

Take A Bow die

 Hello friends,

A quick and easy card today, using a spare stamped & coloured image from a previous project. These leftover pieces are great when time is short (like today).


I stamped the image from the Winterly Tree Tops stamp set (#164184) with Tuxedo Black Memento ink (#132708). I coloured it with Stampin’ Blends - Balmy Blue (#154830), Daffodil Delight (#154883), Cherry Cobbler (#154880), Pumpkin Pie (#154897) and Pecan Pie (#161674). The co-ordinating die from the Winterly Tree Tops die (#164065) was used to cut the image. 

I cut the pieces of Beautiful Bokeh 6”x6” Designer Series Paper (#164607) with the Take A Bow die (#164102) and attached them to the Basic White base card (#159228). I matted this with Blueberry Bushel card (#146991) and attached it to the Basic White base card.

“Best Wishes” from the Layering Leaves stamp set (#161277) was stamped with Blueberry Bushel ink (#147138) and I used a Nested Essentials Die (#161597) to cut it.

The birds & sentiment were attached with Stampin’ Dimensionals (#104430) and Mini Stampin’ Dimensionals (#144108). The embellishments are from the Tinsel Gems Four-Pack (#161623). Wink Of Stella (#141897) was used to add glimmer to the bird.


“Love what you do and share what you love.”

INSPIRE. CREATE.  SHARE.


https://www.stampinup.com.au


Saturday, 14 December 2024

Umbrella Days bundle

 Welcome friends,

There is a large range of products available from the Online Exclusives and there will more products released early January. Many of the products on today’s card are from the Online Exclusives. Go to https://www.stampinup.com.au and click on the Online Exclusives to see all the products available.


The DSP is from the Marbled Elegance 12”x12” Specialty Designer Series Paper (#164919) and this was matted with Bubble Bath card (#161727). I wrapped the retired Bubble Bath Ribbon around the card front, then attached the card front to the Basic White base card (#159228).

I stamped the girl with the umbrella from the Umbrella Days stamp set (#164891). I used Bubble Bath Stampin’ Blends (#161675) and 900 from the Light Combo Pack Stampin’ Blends (#159465) to colour this. A co-ordinating Umbrella Days die (#164894) cut the image. The boots and umbrella were cut with dies from the same set using Melon Mambo card (#119980) backed with Adhesive Sheet (#152334). These were attached to the image.

I stamped the text from the Element Of Text stamp set (#164774) with Bubble Bath ink (#161664). This was cut with a Radiating Stitches die (#161595) and attached to the card front.

“Happy Birthday” from the Loveliest Tree stamp set (#163714) was stamped with Melon Mambo ink (#147051)and cut with a Happy Hibiscus die (#164879). The sentiment and girl were attached to the card with Stampin’ Dimensionals (#104430). The embellishments are the Regal Foiled Adhesive-Backed Dots (#164038).

“Love what you do and share what you love.”

INSPIRE. CREATE. SHARE.


Friday, 13 December 2024

Winterly Tree Tops

 Hello again friends,

These birds are from the Winterly Tree Tops Bundle (#164066) which consists of the Winterly Tree Tops stamp set (#164184) and Winterly Tree Tops dies (#164065).


I stamped the image with Tuxedo Black Memento ink (#132708). I coloured it with Stampin’ Blends - Balmy Blue (#154830), Daffodil Delight (#154883), Cherry Cobbler (#154880), Pumpkin Pie (#154897) and Pecan Pie (#161674). The co-ordinating die was used to cut the image. The Nests Of Winter Designer Series Paper (#164183) also has images which match with the dies.

“Sending love your way” from the Regal Flora stamp set (#164157) was stamped with Cherry Cobbler ink (#147083) and cut with a Changing Leaves die (#164138).

I cut the Gold Mercury Vellum Specialty Designer Series Paper (#164142) with a Radiating Stitches die (#161595) and attached this to the Soft Sea Foam card (#147012). I cut a piece of Hello, Irresistable Designer Series Paper (#161139) with another smaller die from the Radiating Stitches dies & taped this to the card front.

I cut a leaf using a Golden Greenery die (#164116) from Soft Shimmer Specialty Paper (#161750). I attached this with Mini Glue Dots (#103683) and the birds were attached with Mini Stampin’ Dimensionals (#144108). The sentiment was attached with Stampin’ Dimensionals (#104430). The embellishments are the Regal Foiled Adhesive-backed Dots (#164038).

The Last Chance products used are Regal flora stamp set, Hello, Irresistible DSP and the Radiating Stitches dies.


Love what you do and share what you love.”

INSPIRE. CREATE.  SHARE.


https://www.stampinup.com.au


Wednesday, 11 December 2024

Sentimental Wishes

 Hello friends,

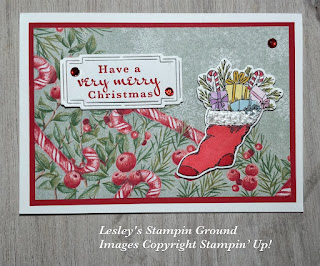
The sentiment and stocking are from the Sentimental Wishes stamp set (#164210), another of the Last Chance Products.


The sentiment was stamped with Poppy Parade ink (#147050) and the stocking with Tuxedo Black Memento ink (#132708). I used Stampin’ Blends to colour the stocking image - Poppy Parade (#154958), Daffodil Delight (#154883), Bubble Bath (#161675), Fresh Freesia (#155518), Balmy Blue (#154830) and Old Olive (#154892). On the top of the stocking I added White Pearlised Enamel Effects Basics (#156310). This does take a little while to set, so best to do after the card is assembled.

The sentiment was cut with a Christmas Labels die (#164100).

The Sentimental Christmas Designer Series Paper (#164209) was used for the card front and matted with Poppy Parade card (#121694), then attached to the Basic White base card (#159228).

The sentiment & stocking was attached with Mini Stampin’ Dimensionals (#144108). The embellishments are from the already retired Loose Holly Gems & Sequins.

The Last Chance Products are the Sentimental Wishes Bundle, stamp set & dies, Christmas Labels dies, and  Sentimental Christmas Designer Series Paper.


“Love what you do and share what you love.”

INSPIRE. CREATE. SHARE. 


https://www.stampinup.com.au


lesley.j.jendra@gmail.com


http://lesleysstampinground.blogspot.com


Tuesday, 10 December 2024

Peaceful Season

 Hi friends, 

I have used the Peaceful Seasons Bundle (#164021) today for this Christmas card.


The 3 sentiments are from the Peaceful Season stamp set (#164145) and I used Mossy Meadow ink (#147111) to stamp them. The 4 “diamonds” are cut with the Peaceful Season dies (#164024). The red & green DSP is from the Season Of Elegance Specialty Designer Series Paper (#164144).

I matted the green DSP with Cherry Cobbler card (#121681), then this was attached to the Basic White base card (#159228).

I threaded the Gold Trim from the Gold & Silver Trim Combo pack (#161633) through the stamped sentiments and wrapped it around the card front. The red DSP was taped to the card. The middle sentiment was cut with a Changing Leaves die (#164138). All the sentiments were attached with Mini Stampin’ Dimensionals (#144108).

The Last Chance Products used on this card are the Peaceful Season bundle, stamp set & dies.


“Love what you do and share what you love.”

INSPIRE. CREATE. SHARE.


https://www.stampinup.com.au


lesley.j.jendra@gmail.com


http://lesleysstampinground.blogspot.com


Monday, 9 December 2024

Peaceful Season

 Hi friends,

The Peaceful Season Bundle (#164021) is another of the Last Chance Products.


“Merry” is from the Peaceful Season stamp set (#164145) and I stamped this with Real Red ink (#147084). I cut “Merry” & “Christmas” with the Peaceful Season dies (#164020). I used Real Red card (#106578) backed with Adhesive Sheet (#152334) for “Christmas”.

The card front was stamped with the woodgrain image from the Textured Timber stamp set (#163656). I stamped this 4 times with Crumb Cake ink (#147116) on the Very Vanilla card (#106550), then I dry embossed it with the Timber Embossing Folder (#156406). This was matted with Real Red card and attached to the Basic White base card (#159228).

The Christmas stockings are from A Little Bit Festive Specialty Designer Series Paper (#164107). These are already die cut ready to assemble. “Merry” & the stockings were attached with Stampin’ Dimensionals (#104430).

The Last Chance Products used on todays card are the Peaceful Season Bundle, stamp set & dies, the Textured Timber stamp set and A Little Bit Festive Specialty Designer Series Paper.

You will find all the Last Chance products here - https://www.stampinup.com.au

“Love what you do and share what you love.”

INSPIRE. CREATE. SHARE. 


Sunday, 8 December 2024

Magnolia Mood

 Hi again everyone,

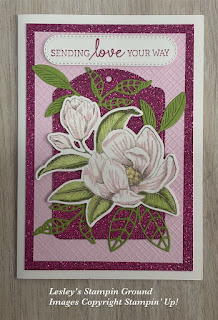
Another of the Last Chance Products is the Magnolia Mood Bundle (#163507) which consists of the Magnolia Mood stamp set (#163502) and Magnolia Mood dies (#163506).


I stamped the floral image with Gray Granite ink (#147118) onto Basic White card (#159228). I coloured this with Bubble Bath Stampin’ Blends (#161675), Granny Apple Green Stampin’ Blends (#154885) and Daffodil Delight Stampin’ Blends (#154883). I cut this image and the leaves with the co-ordinating dies. I used Granny Apple Green card (#147014) backed with Adhesive sheet (#152334) for the leaves.

I cut the Berry Burst glimmer paper tag from the Berry Burst, Old Olive & White Glimmer Specialty Paper (#163769) using a Greetings Of The Season die (#164112).

I dry embossed the Bubble Bath card (#161727) with one of the Basics Embossing Folders (#161598) then matted this with the Berry Burst glimmer paper.

The sentiment from the Regal Flora stamp set (#164157) was stamped with Berry Burst ink (#147143) and cut with a Changing Leaves die (#164138).

I taped the tag to the card front. The flowers and sentiment were attached with Stampin’ Dimensionals (#104430). The detailed leaves were attached to the card. The Clear Wink Of Stella (#141897) added glimmer to the flowers.

The Last Chance Products used on this card are the Magnolia Mood Bundle, stamp set & dies, the Basics Embossing folders and the Regals Flora stamp set.

“Love what you do and share what you love.”

INSPIRE. CREATE. SHARE. 


https://www.stampinup.com.au


lesley.j.jendra@gmail.com


http://lesleysstampinground.blogspot.com