Showing posts with label #butterflies&flowerslayeringdecorativemasks. Show all posts

Friday, 15 April 2022

Hello Ladybug Bundle

Hi friends,


When I colour the Shimmery White Embossing Paste (#145645), I always have extra card ready so as not to waste the embossing paste. This card front was left over from a previous card so was perfect for using for this card. 


I used the Butterflies & Flowers Layering Mask (#158142) with the Shimmery White Embossing Paste. I had cut a circle in a piece of scrap card to create the circle with the paste. The Detailed Trio Punch (#146320) was used to punch the corner. The Basic White card front (#159228) was matted with Real Red card (#106578) and then attached to the Basic White base card.

The leaf from the Hello Ladybug stamp set (#157693) was stamped with Granny Apple Green ink (#147095). This was fussy cut and attached to the card. The Basic Black card (#121688) was punched with the Ladybug Builder Punch (#157698). I then VersaMarked (#102283) this and added Clear Stampin’ Emboss Powder (#155554) and set it with the Heat Tool (#129056) to give a shine to the ladybug. The wings were stamped with Real Red ink (#147084) and the spots with Tuxedo Black Memento ink (#132708). The wings were also cut with the Ladybug Builder Punch. The wings were attached to the body of the ladybug. The ladybug was attached to the card with Stampin’ Dimensionals (#104430).

The flowers from the same stamp set were stamped with Daffodil Delight ink (#147094). I stamped another set of flowers and fussy cut one and attached it on top the the base flower with a Stampin’ Dimensional.

“Happy Birthday” is from the Expressions Of Friendship stamp set (#158460) and “My Friend” is from the Hello Ladybug stamp set. These were stamped with Real Red ink and cut with the Messages Die (#154422). The edges were daubered with Real Red ink and attached with Mini Stampin’ Dimensionals (#144108). Red Rhinestone Basic Jewels (#146924) were added to the card.

The Messages Die and the Detailed Trio punch are on the retiring list.

“Love what you do and share what you love.”


Wednesday, 9 March 2022

Hand-Penned Petals

Hi crafty friends,

Here is a variation of yesterdays card. I had extra Shimmery White Embossing Paste (#145645) which I had coloured with Fresh Freesia ink refill (#155612), so did a second card front for another card, so here it is.


Check yesterdays post as to how I did the embossing with the Mask from the Butterflies & Flowers Layering Decorative Masks (#158142).

I stamped the floral image from the Hand-Penned stamp set (#155070) with Tuxedo Black Memento ink (#132708). This was coloured with the following  Stampin’ Blends - Granny Apple ren (#154885), Flirty Flamingo (#154884), Fresh Freesia (#155518) and Daffodil Delight (#154883). The coloured image & leaves were cut with dies from the Penned Flowers Dies (#155557). I adhered Adhesive Sheet (#152334) to the Granny Apple Green card (#147014) before cutting the leaves. The flowers were attached to the card with Stampin’ Dimensionals (#104330).

The shimmery card is from the Supple Shimmer 12”x12” Specialty Paper (#158068). This was attached to the Basic White base card (#159228).

The sentiment is from the Home & Garden stamp set (#157910) and stamped with Flirty Flamingo ink (#147052). This was cut with a Waves Die (#158840). The White Glittered Organdy Ribbon (#156408) was threaded through the label and wrapped around the cardfront. I used Stampin’ Dimensionals under the sentiment.

“Love what you do and share what you love.”

Tuesday, 8 March 2022

Butterflies & Flowers Layering Decorative Masks

Hi friends,

I hope that everyone in the flood areas around Sydney are safe . I can’t believe how much these floods have affected so many areas on the East coast of Australia. So devastating for so many. Take care and stay safe everyone.

I am lucky enough not to be in any of the affected flood areas in Brisbane so I can still enjoy my time in the craft room. Here is my latest card.


I cut a circle from a piece of scrap card using the largest die from the Layering Circles Dies (#151770). Then I positioned this on the Basic White card front (#159228) then placed one of the masks from the Butterflies & Flowers Layering Decorative Masks (#158142) on top. I found that using the Stamparatus (#148187) makes it easy to keep these in place with the magnet.

I added a drop of the Fresh Freesia ink (#155612) to a small amount of Shimmery White Embossing Paste (#145645) and mixed this together. I did this on a Silicon Craft Sheet (#127853). Then using a Palette Knife (#142808) I applied the coloured embossing paste over the mask. After removing the mask I was left with a circular image. This doesn’t take long to dry so put the card aside while you do the rest of the elements. However ensure you wash as soon as possible the mask, palette knives and silicon mat.

The flowers from the Honeybee Home stamp set (#157943) were stamped with Tuxedo Black Memento ink (#132708). The flowers were coloured with Stampin’ Blends - Daffodil Delight (#154883), Pale Papaya (#155519), Flirty Flamingo (#154884) & Fresh Freesia (#155518) and Granny Apple Green (#154885) for the leaves. The flowers and the foliage were cut with the Honey Blooms Dies (#157951). I used Granny Apple Green card (#147014) for the foliage. Adhesive Sheets (#152334) were adhered to the Granny Apple Green card before cutting with the dies. The flowers were attached to the card with Stampin’ Dimensionals (#104430). 

I punched the corner of the card front with the Detailed Trio punch (#146320), then matted the card front with Fresh Freesia card (#155614). The sentiment is from the Home & Garden stamp set (#157910) and stamped with Fresh Freesia ink (#155611). I cut this with a die from the Waves Dies (#158840). The White Glittered Organdy Ribbon (#156408) was threaded through the label and wrapped around the cardfront. The base card is Basic White. 

The purple Playing With Patterns Resin Dots (#152467) were attached to the card.


TIP: When colouring the embossing paste I always mix more paste than I probably need as I want enough without having to mix more colour. I then always have an extra piece of card ready so if I do have extra, I can use the excess paste so it doesn’t go to waste. I then have another piece of card for another project.


“Love what you do and share what you love.”


Saturday, 8 January 2022

Butterflies & Flowers Layering Decorative Masks

Hi my friends,

Todays card is very easy, using the Butterflies & Flowers Layering Decorative Masks (#158142).


I applied the Pale Papaya ink (#155670) with a Blending Brush (#153611) and using the flower mask with the less detail. Then using the other co-ordinating layer I applied the Pumpkin Pie ink (#147086). There is another mask with the leaves which I coloured with Soft Sea Foam ink (#147102). I then used the Stitched Greenery die (#155451) to achieve the stitching on the Basic White card front (#159228).

The sentiment is from the Friends Are Like Seashells stamp set (#158203) and stamped with Pumpkin Pie ink. I used the Messages Die (#154422) to cut this. The sentiment was attached to the card with Stampin’ Dimensionals (#104430).

The edges of the card front was daubered with Pumpkin Pie ink, then attached to the Basic White base card.

As I said, a very easy card. 


“Love what you do and share what you love.”


Friday, 7 January 2022

Butterflies & Flowers Layering Decorative Masks

Hello & welcome,

I am loving the new products in the Mini Catalogue and one of my favourite products (although there are many!) is the  Butterflies & Flowers Layering Decorative Masks (#158142).


I cut a piece of Basic White card (#159228) with a Scalloped Contours Die (#155560).

The Layering masks, as suggested, have 2 masks which allow layering. I used the “background” to colour the flowers. I used 4 colours for these flowers - Polished Pink (#155712), Highland Heather (#147103), Pale Papaya (#155670) and Daffodil Delight (#147094). Each of these colours were applied using the Blending Brushes (#153611). For the smaller flowers you may find it easier to use Sponge Daubers (#133773).

Then I placed the next mask on top and applied the Shimmery White Embossing Paste (#145645) using a Palette Knife (#142808). What a great effect.

The card front is from the Abstract Beauty Specialty Designer Series Paper (#158039). I wrapped the 2 pieces of the Polished Pink Open Weave Ribbon (#155714) around the corner of the card. The scalloped rectangle was attached to the card with Stampin’ Dimensionals (#104430).

“Happy Birthday” from the Art Gallery stamp set (#158201) was stamped with Magenta Madness ink (#153117) and cut with a Seasonal Labels die (#156299). This was also attached with Dimensionals. The trio of Iridescent Rhinestone Basic Jewels (#158130) was added for some extra sparkle.


TIP: Wash your mask and palette knife as soon as you finish using the embossing paste as this dries very quickly and will be difficult to remove once dried.


“Love what you do and share what you love.”


Sunday, 2 January 2022

Butterflies & Flowers Layering Decorative Masks

Hi & welcome again,

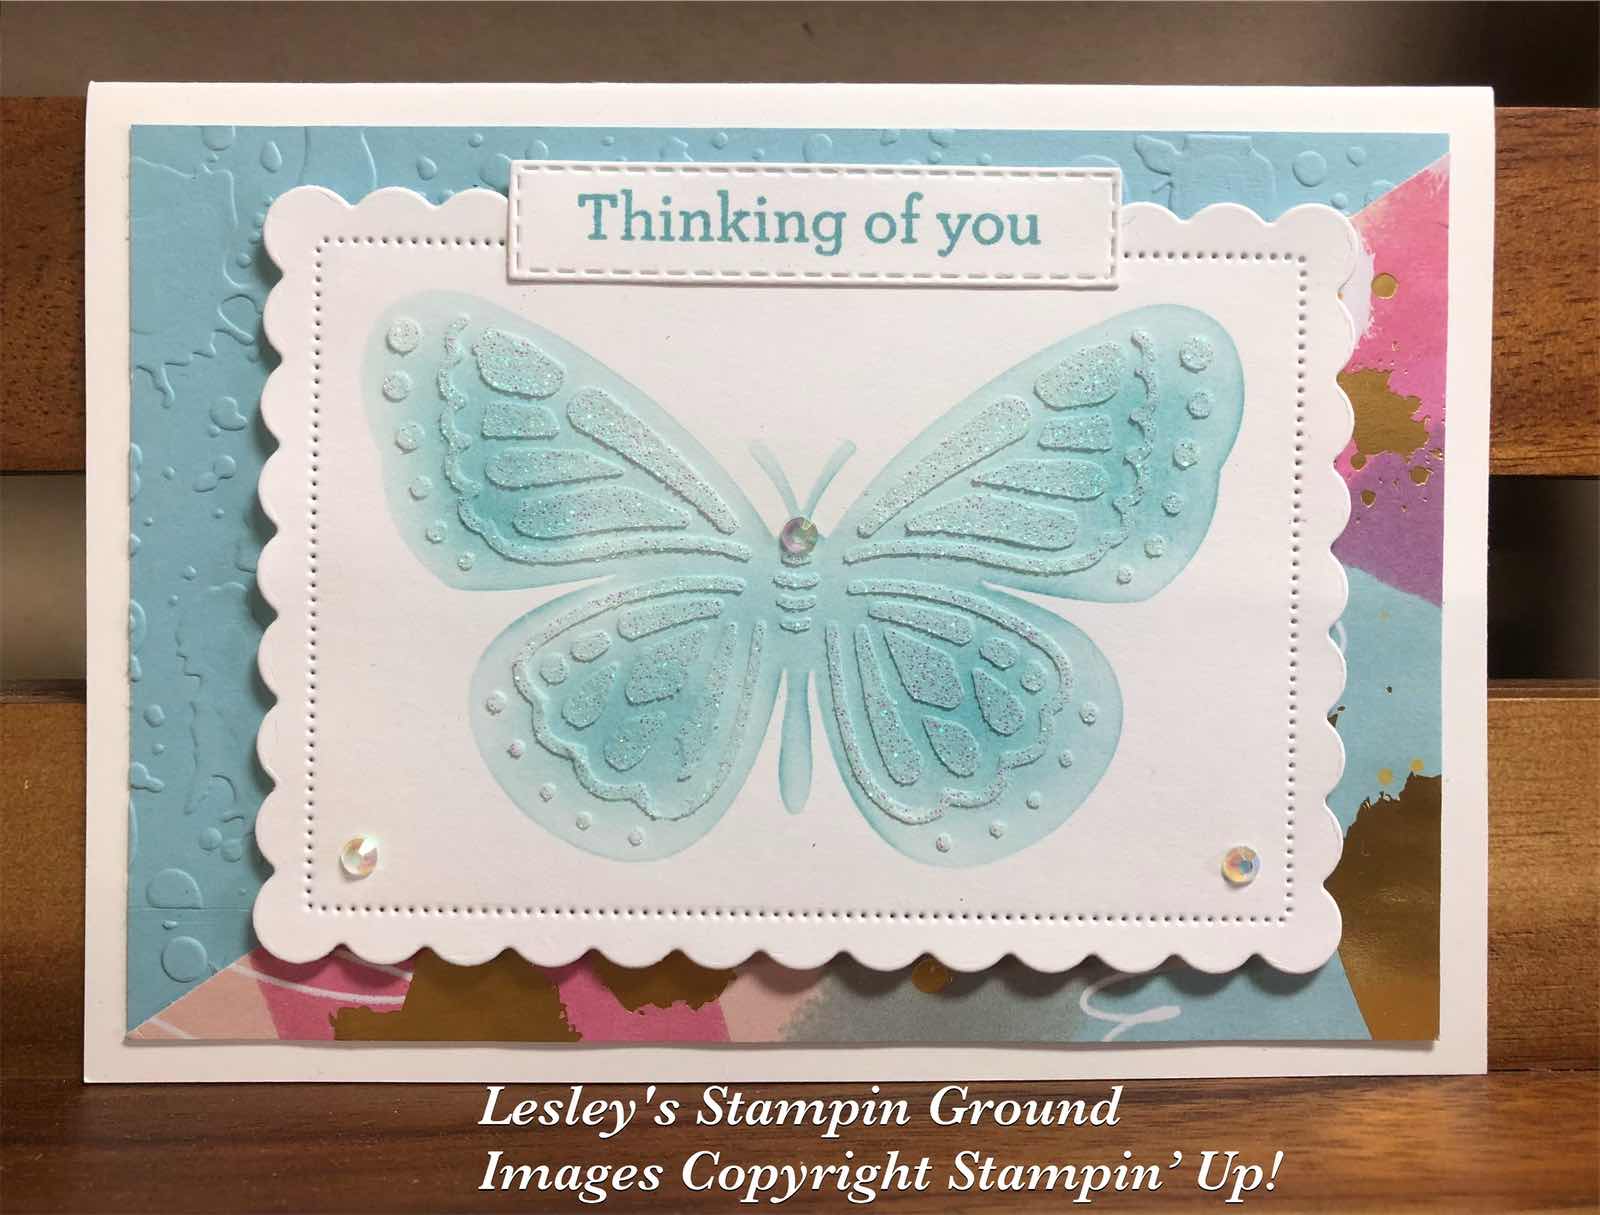
When we look through a new catalogue and there is so much to take in, it is easy to miss some great products. I hope you don't miss the Butterflies & Flowers Layering Decorative Masks (#158142). I love the layering of the butterfly.


Firstly I cut the Basic White card (#159228) using a Scalloped Contours Die (#155560). There are 2 butterfly masks so I used the solid one first. I positioned this on the die cut white card and using a Blending Brush (#153611) with Balmy Blue ink (#147105), I coloured the background of the butterfly. I then positioned the detailed mask of the butterfly over the coloured image. I used a Palette Knife (#142808) to apply the Shimmery White Embossing Paste (#145645). I love the effect which is always better in real life. This doesn’t take long to dry so ensure you wash the palette knife & mask immediately to remove the excess paste.

I cut a piece of the Abstract Beauty Specialty Designer Series Paper (#158039) and attached this to the Balmy Blue card (#147007) which was dry embossed with the Splatters from the Stripes & Splatters 3D Embossing Folders (#157980). The scalloped rectangle was attached to the card front with Stampin’ Dimensionals (#104430).

“Thinking Of You” is from the Beauty Of Friendship stamp set (#154983) and stamped with Balmy Blue ink then cut with a Stitched Rectangles Die (#151820). I added the Iridescent Rhinestone Basic Jewels (#158130) to the card.

Tip: When using the embossing paste, apply the paste then wipe the knife over the whole image to remove any excess and return to the jar. No need to wast any. Also make sure you close the jar tight to stop it drying out. I also put the jar into a small plastic bag and keep it well sealed. This will ensure it will last longer and not dry out.

“Love what you do and share what you love.”