Showing posts with label #greetingsoftheseasondies. Show all posts

Sunday, 8 December 2024

Magnolia Mood

 Hi again everyone,

Another of the Last Chance Products is the Magnolia Mood Bundle (#163507) which consists of the Magnolia Mood stamp set (#163502) and Magnolia Mood dies (#163506).


I stamped the floral image with Gray Granite ink (#147118) onto Basic White card (#159228). I coloured this with Bubble Bath Stampin’ Blends (#161675), Granny Apple Green Stampin’ Blends (#154885) and Daffodil Delight Stampin’ Blends (#154883). I cut this image and the leaves with the co-ordinating dies. I used Granny Apple Green card (#147014) backed with Adhesive sheet (#152334) for the leaves.

I cut the Berry Burst glimmer paper tag from the Berry Burst, Old Olive & White Glimmer Specialty Paper (#163769) using a Greetings Of The Season die (#164112).

I dry embossed the Bubble Bath card (#161727) with one of the Basics Embossing Folders (#161598) then matted this with the Berry Burst glimmer paper.

The sentiment from the Regal Flora stamp set (#164157) was stamped with Berry Burst ink (#147143) and cut with a Changing Leaves die (#164138).

I taped the tag to the card front. The flowers and sentiment were attached with Stampin’ Dimensionals (#104430). The detailed leaves were attached to the card. The Clear Wink Of Stella (#141897) added glimmer to the flowers.

The Last Chance Products used on this card are the Magnolia Mood Bundle, stamp set & dies, the Basics Embossing folders and the Regals Flora stamp set.

“Love what you do and share what you love.”

INSPIRE. CREATE. SHARE. 


https://www.stampinup.com.au


lesley.j.jendra@gmail.com


http://lesleysstampinground.blogspot.com


Thursday, 31 October 2024

Pretty Petals Bundle

 Hi & welcome friends,

The Pretty Petals Bundle (#164869) will be one of the many new products available from 5th November from the Online Exclusives. Here is a sneak peek of this bundle.


The Pretty Petals stamp set (#164866) is a 2 step stamping set. I stamped the leaves with Granny Apple Green ink (#147095), then stamped the flowers with Highland Heather ink (#147103). I then stamped the flowers separately on another piece of Basic White card (#159228) using Gorgeous Grape ink (#147099). 

The image with the leaves & flowers were cut with a die from the Pretty Petals dies (#164868). There is another die to cut the flowers separately which I used for the Gorgeous Grape flowers. I used the 4 larger flowers & attached them on top of the co-ordinating Highland Heather flowers with Mini Stampin’ Dimensionals (#144108).

The 2 pieces of DSP are from the Splendid Autumn 6”x6” Designer Series Paper (#164173). The smaller piece was matted with Silver Foil (#163387) then attached to the larger piece of DSP. This was then taped to the Basic White base card.

“Happy Birthday” from the Loveliest Tree stamp set (#163714) was stamped with Gorgeous Grape ink and cut with a die from the Greetings Of The Season (#164112). The Silver from the Gold & Silver Trim Combo Pack (#161633) was threaded through the sentiment.

I used Stampin’ Dimensionals (#104430) to attach the floral image & sentiment to the card. Clear Wink Of Stella (#141897) was used to add glimmer to the leaves & flowers.

“Love what you do and share what you love.”

INSPIRE. CREATE. SHARE. 


Tuesday, 3 September 2024

Designer Series Paper

 Hello,

I love designer and specialty papers and they make it easy for a quick & easy card like this one.


The 2 background papers are from the beautiful Regal Distressed Patterns 12”x12” Specialty Designer Series Paper (#164037). I matted the smaller piece with the Textured Metallic 12”x12” Specialty Paper (#163772).

The sentiment is from Winterly Tree Tops stamp set (#164184) and stamped with Pretty Peacock ink (#150083). I used a Greetings Of The Season die (#164112) to cut the sentiment. As I wanted to thread the ribbon through this, I re-positioned the die to cut the hole on the other end. The Gold ribbon from the Gold & Silver Trim Combo pack (#161633) was wrapped around the card front. The base card is Basic White (#159228).

I cut the birds from the Nests Of Winter 12”x12” Designer Series Paper (#164183) with a Winterly Tree Tops die (#164064). These dies also co-ordinate with the same image in the Winterly Tree Tops stamp set.

The birds were attached with Mini Stampin’ Dimensionals (#144108). I added the Blooming Pearls (#162238) to finish the card.

“Love what you do and share what you love.”

INSPIRE. CREATE. SHARE. 


Friday, 2 August 2024

Changing Leaves

 Welcome friends,

All these leaves are from the Changing Leaves Bundle (#164139) which consists of the Changing Leaves stamp set (#164351) and the Changing Leaves Hybrid Embossing Folder (#164138). The Hybrid Embossing folder includes the dies (they aren’t sold separately). The dies can be inserted into the folder which cuts and embosses at the same time. The dies and embossing folder can also be used separately as usual, so there are many possibilities.


I dry embossed the Very Vanilla card front (#106550) with the embossing folder and matted this with Peach Pie card (#163800). The base card is also Very Vanilla.

I cut and embossed the Peach Pie leaf with the Hybrid folder & die. I then stamped it with Peach Pie ink (#163810). 

The detailed die cut leaves are also cut from the same die set. I used Pecan Pie card (#161726) and Wild Wheat card (#161734), both backed with Adhesive Sheet (#152334). I find I usually use this adhesive sheet for any detailed die cuts to make it easier to attach to the card.

The sentiment is from the Layering Leaves stamp set (#161277). I stamped this with Peach Pie ink using the Stamparatus. After cleaning the stamp and without moving it, I restamped with VersaMark (#102283), then added Clear from the Basics Wow! Embossing Powder (#165679) which was set with the Heat Tool (#129056). I used a die from the Greetings Of The Season dies (#164112) to cut the sentiment.

The sentiment and Peach Pie leaf were attached to the card with Stampin’ Dimensionals (#104430) and Mini Stampin’ Dimensionals (#144108).

I coloured the embellishments from the Rainbow Adhesive-Backed Dots (#162758) with Peach Pie Stampin’ Blends (#163827). This is an easy way to have co-ordinating coloured gems if you don't have the colour you want on hand.

“Love what you do and share what you love.”

INSPIRE. CREATE. SHARE. 


Friday, 26 July 2024

Paper Weaving

 Hello & welcome,

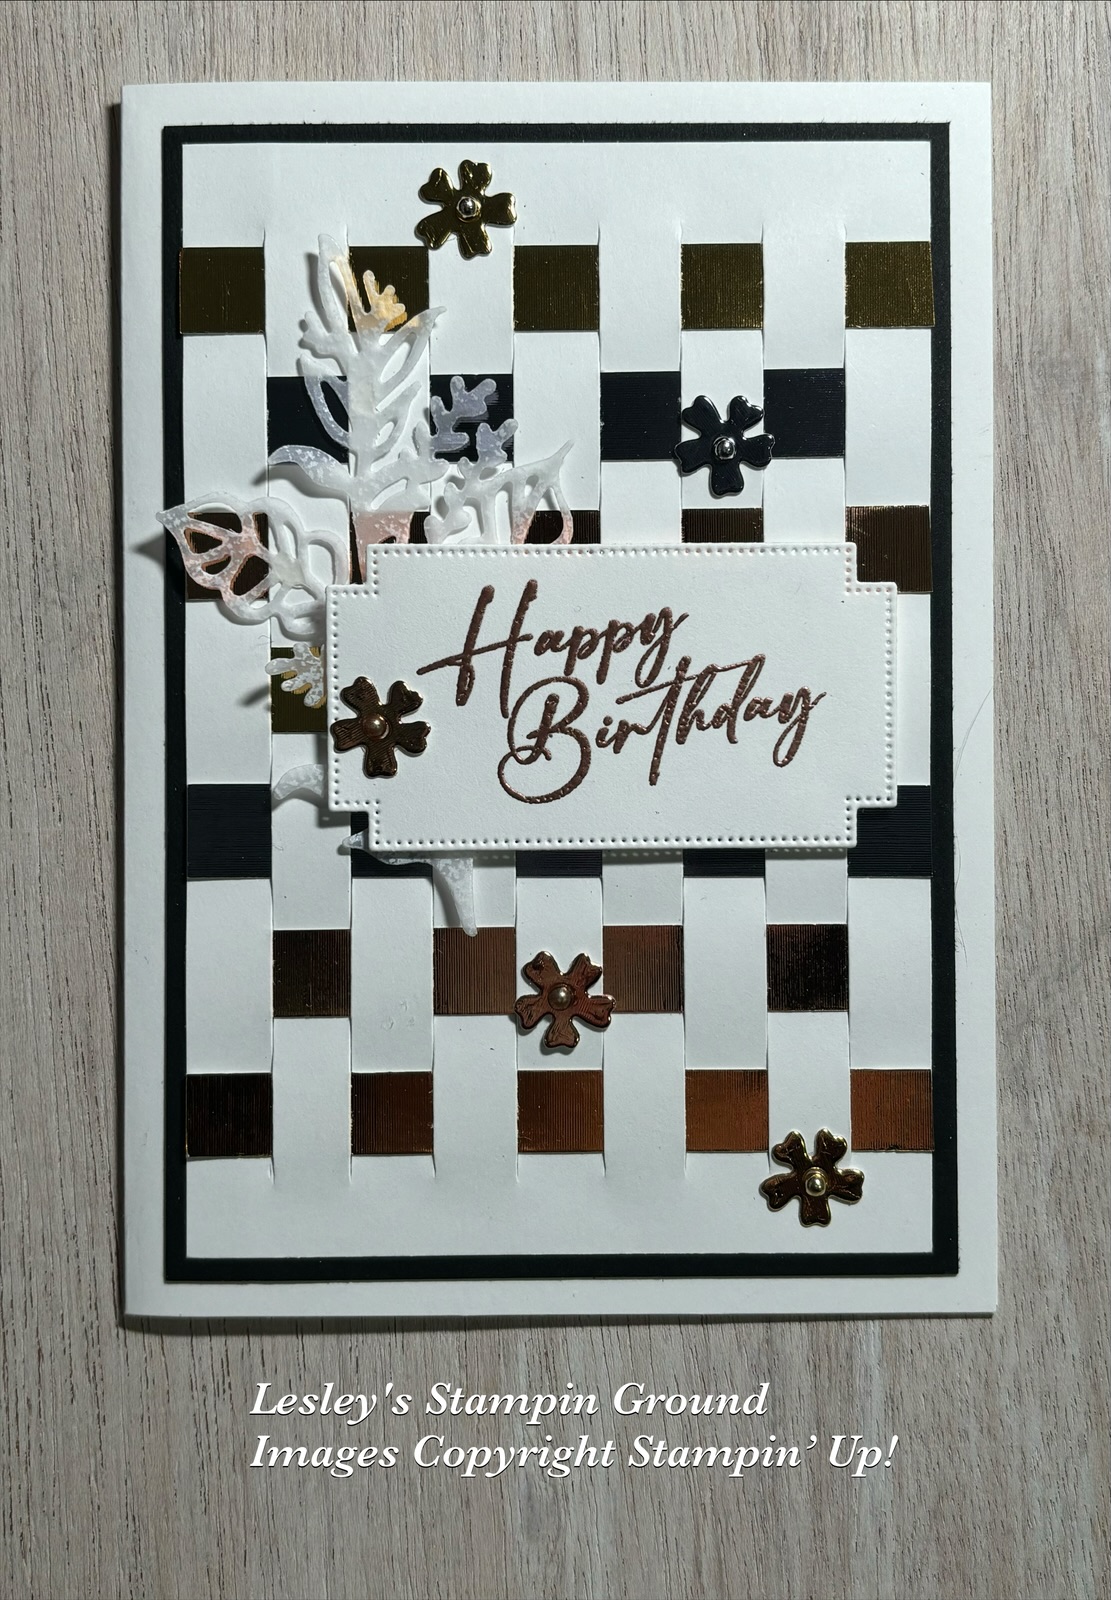
Today’s inspiration was from page 110 in the Annual Catalogue using the paper weaving technique. It’s an easy but effective technique.


I made cuts in the Basic White card front (#159228) 1cm apart and 1cm from the top & bottom of the card. I cut 1cm pieces from the 3 colours from the Textured Metallic 12”x12” Specialty Paper (#163772). These strips were woven through the card front, then this was matted with the Basic Black card (#121688). The base card is Basic White.

I cut the leaf with the Flowers Of Beauty dies (#163375) from the white patterned vellum from the Graceful Greenery Vellum Specialty Designer Series Paper (#164118). I used Mini Glue Dots (#103683) to attach this to the card.

The sentiment is from the Unbounded Love stamp set (#163378). This was stamped with VersaMark (#102283) and I used the Copper from the Metallic Wow! Embossing Powder (#165678) and this was set with the Heat Tool (#129056). A Greetings Of The Season Die (#164112) was used to cut the sentiment. The sentiment was attached to the card with Stampin’ Dimensionals (#104430).

The small flowers were cut with a die from the Flowers Of Beauty dies also using the Textured Metallic Paper and attached them to the card with Mini Glue Dots. The retired Festive Pearls were added to the centre of the flowers.

“Love what you do and share what you love.”

INSPIRE. CREATE. SHARE. 


Thursday, 25 July 2024

Loveliest Tree

 Hi friends,

The Loveliest Tree Bundle (#163716) used here for the tree, consists of the Loveliest Tree stamp set (#163714) and the Loveliest Tree dies (#163715).


The tree was stamped with Pretty Peacock ink (#150083) and cut with the Loveliest tree die. The Basic White card (#159228) for the card front was coloured with Blending Brushes (#153611) with Daffodil Delight ink (#147094), Peach Pie ink (#163810) and Balmy Blue ink (#147105). I then dry embossed this card with the So Swirly Embossing Folder (#163791). The DSP from the Frames & Flowers 12”x12” Specialty Designer Series Paper (#163765) was attached to the card front. This was then matted with Pretty Peacock card (#150886) and attached to the Basic White base card.

I cut another piece of Pretty Peacock card with a die from the Greetings Of The Season dies (#164112) for the banner. “Happy Birthday” from the Magnolia Mood stamp set (#163502) was stamped with Pretty Peacock ink and cut with a Delicate Forest die (#162679).

The tree, banner and sentiment were all attached with Mini Stampin’ Dimensionals (#144108). The birds are from the Adhesive-Backed Dragonflies & Birds (#162743).

“Love what you do and share what you love.”

INSPIRE. CREATE. SHARE. 


Wednesday, 24 July 2024

Thoughtful Journey Memories & More Card Pack

 Welcome my friends,

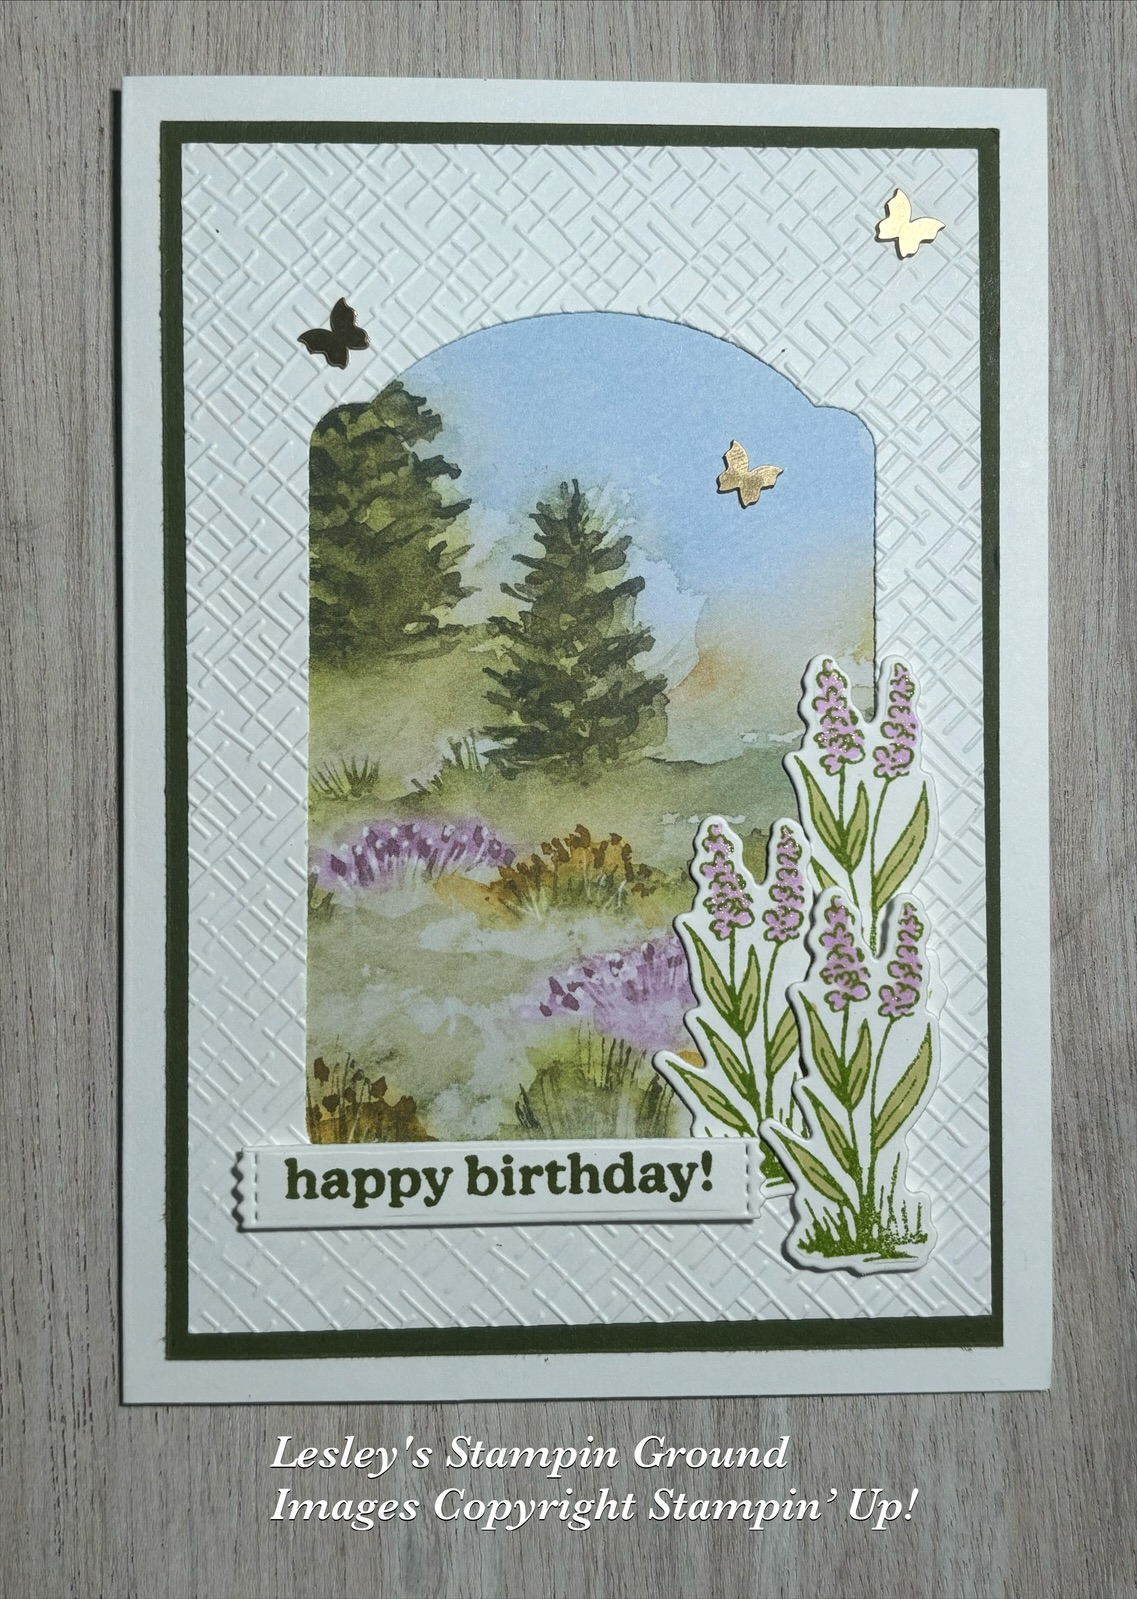
The cards from the Thoughtful Journey Memories & More Card Pack (#163318) are great for both cards & scrapbooking. I have used one of the designs from the smaller cards for this card. There are 2 sizes of cards in the pack.


I cut the “window” from the Basic White card front (#159228) with a die from the Greetings Of The Season dies (#164112). The piece I cut out will be used for another card. This was then dry embossed with one of the Basics 3D Embossing Folders (#161598).

The memories & more card was attached to the back of the card front, then matted with Mossy Meadow card (#133683) and attached to the Basic White base card.

I stamped the floral images from the Garden Meadow stamp set (#162736) with Granny Apple Green ink (#147095). I coloured these with Highland Heather Stampin’ Blends (#154887) and Old Olive Stampin’ Blends (#154892). These were cut with a Garden Meadow die (#162740) and attached to the card with Mini Glue Dots (#103683) and Mini Stampin’ Dimensionals (#144108).

“Happy Birthday” from the Garden Meadow stamp set was stamped with Mossy Meadow ink (#147111), then cut with a Happy Little Things die (#163709). I attached this to the card with Mini Stampin’ Dimensionals.

The Brushed Brass Butterflies (#158136) were attached to the card.


“Love what you do and share what you love.”

INSPIRE. CREATE. SHARE. 


Saturday, 20 July 2024

Greetings Of The Season Dies

 Hello friends,

The Greetings Of The Season Dies (#164112) has a variety of shapes & sizes so will be very versatile. I have used 3 of the dies for this card.


I used the dies to cut the sentiment, the strip under the sentiment and the large “label” cut out.

I dry embossed the Basic White card front (#159228) with the Cute Crochet 3D Embossing Folder (#163792). I added the strip of Unbounded Beauty Designer Series Paper (#163372) to the card front. The edges were daubered with Petunia Pop ink (#163811), then attached to the Basic White base card.

The large die cut “label” was attached to the card with Stampin’ Dimensionals (#104430). I threaded the Gold trim from the Gold & Silver 1/8” Trim Combo Pack (#161633) through the hole of the label. The sentiment from So Sincere stamp set (#162283) was stamped with Petunia Pop ink. The Petunia Pop card (#163802) and the sentiment were cut with the dies and attached to the card.

The floral image from Thoughtful Wishes stamp set (#162815) was stamped with Tuxedo Black Memento ink (#132708). I used Stampin’ Blends to colour this - Petunia Pop (#163828), Summer Splash (#163826), Shy Shamrock (#163825) and Peach Pie (#163827). I cut this with the now retired Thoughtful Expressions dies.

The Iridescent Faceted Gems (#163368) were added to finish the card.

“Love what you do and share what you love.”

INSPIRE. CREATE. SHARE. 


Friday, 19 July 2024

Nature’s Sweetness Specialty Designer Series Paper

 Hi friends,

I love when the dies co-ordinate with Designer Series Paper as well as the stamped images.


The DSP here is the Nature’s Sweetness Specialty Designer Series Paper (#162616) and the dies are Lovely & Sweet (#162626). I cut 2 images from the DSP.

The DSP for the card front is from the same pack and this was matted with Basic Black card (#12688) and attached to the Basic White base card (#159228).

I dry embossed a piece of Basic White card with the So Swirly Embossing Powder (#163791) and also matted this with Basic Black card.

The die cut pieces were attached to the card with Stampin’ Dimensionals (#104430). “Congratulations” from the Everyday Greetings stamp set (#165084) was Gold embossed using VersaMark (#102283) and Gold from the Metallic Wow! Embossing Powder (#165678). The Heat Tool (#129056) was used to set this. A Greetings Of The Season die (#164112) was used to cut the sentiment.

The Adhesive-Backed Sparkle Gems (#161288) were added to the card.

“Love what you do and share what you love.”

INSPIRE. CREATE. SHARE. 


Wednesday, 17 July 2024

Labelled With Love Dies

 Hi Stamping friends,

I have used the Labelled with Love dies (#163570) for the cutouts on the card front.


After cutting the Soft Sea Foam card front (#147012) with the dies, I dry embossed it with the Timber 3D Embossing Folder (#156406). This was attached with Mini Stampin’ Dimensionals (#144108) to a piece of the Season Of Green & Gold 12”x12” Specialty Designer Series Paper (#164324). I matted this with Gold Foil Sheets (#132622) and attached it to the Very Vanilla card base (#106550).

The flower is from the Spotlight On Nature stamp set (#163579). I stamped this with VersaMark (#102283) and added the Gold from the Metallics Wow! Embossing Powder (#165678), then set it with the Heat Tool (#129056). I fussy cut the floral image.

The sentiment was also Gold heat embossed. I used a die from the Greetings Of The Season die (#164112). The floral image and sentiment were attached to the card with Mini Stampin’ Dimensionals.

I threaded the Gold from the Gold & Silver 1/8” Trim Combo Pack (#161633) through the label for the sentiment. The Brushed Brass Butterflies (#158136) were added to the card.

“Love what you do and share what you love.”

INSPIRE. CREATE. SHARE.