Showing posts with label #texturedmetallicspecialtypaper. Show all posts

Thursday, 2 April 2026

Lifetime Of Love dies

 Hi & welcome,

With a new catalogue coming soon, that means that there are a lot of retiring or Last Chance Products which will be available while stocks last. Some are at discounted prices. I have used some Last Chance Products on today’s card.


I have used the Lifetime Of Love dies (#162583) to cut the floral image from Gold Textured Metallic Specialty Paper (#163772). I then coloured the flowers with Cherry Cobbler Stampin’ Blends (#154880) and the leaves with Shaded Spruce Stampin’ Blends (#154903).

The Very Vanilla card front (#166785) was dry embossed with the Beautiful Pattern Embossing Folder (#167097) and matted with the gold from the Textured Metallic Specialty Paper. This was attached to the Very Vanilla base card.

“Best Wishes” is from the With You In Mind stamp set (#164747). This was stamped with VersaMark (#102283) and I used the Gold from the Metallics Wow! Embossing Powders (#165678) and set it with the Heat Tool (#129056). This was cut with a Stylish Shapes die (#159183). The edge was daubered with Real Red ink (#147084).

I glued the die cut floral image with Multipurpose Liquid Glue (#110755) and the sentiment was attached with Stampin’ Dimensionals (#104430).

The Brushed Brass Butterflies (#158136) were attached to the card.

The Last Chance Products used here are the Lifetime Of Love dies, Beautiful Pattern Embossing Folder, Textured Metallic Specialty paper, Brush Brass Butterflies and With You In Mind stamp set.


“Love what you do and share what you love.”

Tuesday, 10 March 2026

Fragrant Layers Bundle

 Hi crafty friends,

The Fragrant Layers Bundle (#167155) has been used for this card today. The bundle consists of the Fragrant Layers stamp set (#167150) and the Fragrant Layers dies (#167154).

(This was a bit hard to photograph with the shiny specialty paper, but looks lovely in real life.)


I stamped the floral image with Secret Sea ink (#165285) onto Basic White card (#166781). This stamp set is a Two-Step set which allows you to stamp the outline and the solid inside images separately. For the flowers I used Strawberry Slush ink (#165286), Summer Splash ink (#163808) for the leaves and Darling Duckling ink (#165277) for the flower centres.

The Tungsten Textured Metallic Specialty Paper (#163772) was cut with a Fragrant Layers die, then I dry embossed this with the Exposed Brick 3D Embossing Powder (#161600). This was placed over the stamped floral image, then matted with Strawberry Slush card (#165297). The base card is Basic White.

“Just A Note” is from the same stamp set and stamped with Strawberry Slush ink. The die to cut the sentiment is also from the Fragrant Layers dies. I attached this to the card with Stampin’ Dimensionals (#104430).

The embellishments are from the retired Two-Tone Sparkle Gems.


“Love what you do and share what you love.”

INSPIRE. CREATE. SHARE.


https://www.stampinup.com.au


lesley.j.jendra@gmail.com


http://lesleysstampinground.blogspot.com


Friday, 27 February 2026

Splash Of Sparkles Specialty Designer Series Paper

 Welcome,

A pretty card using the gorgeous Splash Of Sparkles Specialty Designer Series Paper (#167200). This pack has gold or silver foil on each of the designs along with a mix of beautiful colours.


I cut 5 pieces of the DSP - 2cm x 8.5cm and attached these to the Basic White card (#166781). This was matted with the Gold from the Textured Metallic Specialty Paper (#163772). If you are wanting to save some of this specialty paper, cut a piece from the middle to use on another project, leaving a border for the matting.

“Thinking Of You” is from the Friendly Foliage stamp set (#167021). This was stamped with VersaMark (#102283) and heat embossed with Gold Powder from the Metallic Wow! Embossing Powders (#165678). The Heat Tool (#129056) was used to set the powder. I cut the sentiment with a die from the Fragrant Layers dies (#167155). This die cuts a fancy fine border plus the inner piece. This was taped to the card.

The flowers are from the Extraordinary Flora Washi Tape (#165269) which was adhered to a piece of Basic White card, then cut with the co-ordinating Extraordinary Flora die (#165244). These were attached to the card with Stampin’ Dimensionals (#104430).

The Flower Accents (#165171) were added to finish the card.


“Love what you do and share what you love.”

INSPIRE. CREATE. SHARE.


https://www.stampinup.com.au


lesley.j.jendra@gmail.com


http://lesleysstampinground.blogspot.com


Wednesday, 25 February 2026

Nature’s Symphony Dies

 HI again friends,

I am trying to increase my supply of masculine cards, so here is one using the Nature’s Symphony dies (#166925).


For the card front I used 3 of the designs from the Country Woods Designer Series Paper (#163393) and attached them to the Tungsten Paper from the Textured Metallic Specialty Paper (#163772). This was attached to the Basic White base card (#166781).

The leaf was cut with a die from the Nature’s Symphony dies using Mossy Meadow card (#133683) which was backed with Adhesive Sheet (#152334), making it very easy to attach to the card.

The “wood grain” piece was also cut with a Nature’s Symphony dies using from the Textured Metallic Specialty Paper. This was attached with Stampin’ Dimensioanls (#104430).

“Happy Birthday” from the Simply Said stamp set (#163756) was stamped with VersaMark (#102283) and I used Silver powder from the Metallics Wow! Embossing Powders (#165678). The Heat Tool (#129056) was used to set the powder. A die from Fragrant Layers (#167154) was used to cut the sentiment.

The Natural Matte Dots (#167510) were added to the card.


“Love what you do and share what you love.”

INSPIRE. CREATE. SHARE.


https://www.stampinup.com.au


lesley.j.jendra@gmail.com


http://lesleysstampinground.blogspot.com


Tuesday, 3 February 2026

Gears & Textures Bundle

 Hi guys,

I’m always in need of masculine cards so the Gears & Textures Bundle (#166854) is perfect. This bundle consists of the Gears & Textures stamp set (#166851) and Gears & Textures dies (#166853).


I stamped images from the stamp set onto the Natures Walk Designer Series Paper (#166912) using Early Espresso ink (#147114) - stamped off, Crumb Cake ink (#147116) and Smoky Slate ink (#147113). This DSP was matted with Early Espresso card (#121686), then attached to the Basic White base card (#166781).

The gears were cut from the 3 colours of Textured Metallic Specialty Paper (#163772) and Earthen Toned Metallic Specialty Paper (#165901).

The “chain” and “Thank You” were stamped with VersaMark (#102283) onto Crumb Cake card (#121685). I added the Copper Powder from the Metallics Wow! Embossing Powders (#165678) and set it with the Heat Tool (#129056).  This was cut with a die from the set. The sentiment from the Fabulous Sayings stamp set (#167972) was cut with a Stylish Shapes die (#159183).

I attached all the pieces with Mini Stampin’ Dimensionals (#144108), Mini Glue Dots (#103683) and Multipurpose Liquid Glue (#110755).

“Love what you do and share what you love.”

INSPIRE. CREATE. SHARE. 


https://www.stampinup.com.au


lesley.j.jendra@gmail.com


http://lesleysstampinground.blogspot.com


Wednesday, 3 December 2025

Friendly Foliage Bundle

 Hello fellow crafters,

I love the simplicity of the foliage in the Friendly Foliage stamp set (#167021), then when cut with the dies takes it to the next level. There are 2 dies to cut the foliage. You can just cut the outline image, or you can use a second die to cut the pieces around the leaves inside the frame, which is what I have done on this image.


I stamped the image and sentiment with VersaMark (#102283) and added the Copper powder from the Metallics Wow! Embossing Powders (#165678), then set it with the Heat Tool (#129056). The foliage was then cut with the Friendly Foliage dies (#167023) and the sentiment was punched with the Three Banner Punch (#167050).

I cut the Brushed With Beauty Designer Series Paper (#167082) and the Copper from the Textured Metallic Specialty Paper (#163772) with the Branching Out dies (#165775). I also matted another piece of DSP with the Copper Paper and attached it to the Basic White base card (#166781).

I used Mini Stampin’ Dimensionals (#144108) to attach the foliage and the sentiment to the card. The Low Profile Dots (#164658) were added to the card.


“Love what you do and share what you love.”

INSPIRE. CREATE. SHARE. 


https://www.stampinup.com.au


lesley.j.jendra@gmail.com


http://lesleysstampinground.blogspot.com


Wednesday, 10 September 2025

Elegant Pines Snowflakes Designer Series Paper

 Hi again,

The Elegant Pine Snowflakes 12”x12” Designer Series Paper (#166066) is another DSP which has matching dies to cut some of the images. These are the Delicate Pines dies (#166073) which also co-ordinate with the Delicate Pines stamp set (#166067). I have used the DSP & dies for these pine snowflakes images.


I also cut the fine pine leaves with the dies using Shaded Spruce card (#147006) which was backed with Adhesive Sheet (#152334).

The circle was cut with a Spotlight On Nature die (#163580) using the Bright Copper from the Textured Metallic Specialty Paper (#163772). I also used this metallic paper for the sentiment which were cut with the Words For The Season Dies (#165797).

The Traditional Wreath Embossing Folder (#165874) was used to dry embossed with the Basic White card front (#166781), then this was matted with Shaded Spruce card.

The circle was taped to the card and I used Stampin’ Dimensionals (#104430) to attach the larger snowflake. Mini Glue Dots (#103683) were used to attach the 2 smaller die cut pieces to the centre of the snowflake. The small pine leaves were attached - these are backed with Adhesive Sheet.

The embellishments are from the retired Earth Tones Shimmer Gems.


“Love what you do and share what you love.”

INSPIRE. CREATE. SHARE. 


Saturday, 6 September 2025

Joyful Tidings stamp set

 Hi everyone,

The Joyful Tidings stamp set (#165944) was used for the stamping on this card.


I stamped the wreath with VersaMark (#102283) and added Gold Powder from the Metallics Wow! Embossing Powder (#165678), then set it with the Heat Tool (#129056). The sentiment was stamped with Real Red ink (#147084).

The 3 circles were cut with the Spotlight On Nature dies (#163580). The larger circle was cut from the Gold from the Textured Metallic Specialty Paper (#163772). I also used this gold paper to matt the Gathering Together Specialty Designer Series Paper (#165969). To use this gold specialty paper very efficiently, I cut the circle from the centre of the square piece of gold. Of course this piece cut out is covered by the DSP.

The circles were taped together, then attached to the card with Stampin’ Dimensionals (#104430). A Traditional Sparkling Sequin (#165875) was attached to the sentiment. The base card is Basic White (#166781).


“Love what you do and share what you love.”

INSPIRE.  CREATE.  SHARE.


https://www.stampinup.com.au


lesley.j.jendra@gmail.com


http://lesleysstampinground.blogspot.com


Saturday, 15 February 2025

Inspirational Sketches

 Hello stamping friends,

Toadstools seem to be very popular at the moment, and these ones are from the Inspirational Sketches stamp set (#162684).


I stamped the toadstools using the masking and stampin off techniques. To do this I stamped the image onto a post it note and cut around the image. It is best to cut on the lines rather than leaving a slight border when cutting. I then stamped the image onto Basic White card (#159228). I place the “mask” from the post it note over the stamped image and stamped again, overlapping the images slightly. I did this without re-inking for a lighter image. Remove the mask and you can see that the first stamped image looks like it is in front of the other image, and you haven’t stamped on top of the first image.

I used a die from the Everyday Arches dies (#164629) to cut the stamped card and the gold from the Textured Metallic Specialty Paper (#163772). I dry embossed the gold with the Exposed Brick Embossing Folder (#161600).

The Season Of Elegance Specialty Designer Series Paper (#164144) was matted with Pecan Pie card (#161726) then attached to the Basic White base card.

“Celebrate” from the Unbounded Love stamp set (163378) was stamped with Pecan Pie ink (#161665). This was cut with the smallest die from the Everyday Arches dies.

The gold arch was taped to the card and the toadstools & sentiment were attached with Stampin’ Dimensionals (#104430). The Earth Tones Shimmer Gems (#164070) were added to the card.

“Love what you do and share what you love.”

INSPIRE. CREATE.  SHARE. 


Friday, 20 September 2024

Changing Leaves

 Welcome again,

I have used the Changing Leaves stamp set (#164351) to emboss the leaves on this card.


I stamped the 3 leaves onto the Meandering Meadows Designer Series Paper (#162735) with VersaMark (#102283) and added the Copper from the Metallics Wow! Embossing Powder (#165678). This was set with the Heat Tool (#129056). I matted the DSP with Copper Clay card (#161730) and attached it to the Very Vanilla base card (#106550).

I cut the detailed leaves using the dies which are part of the Changing Leaves Hybrid Embossing Folder (#164138). For these leaves I used the Textured Metallic Specialty Paper (#163772). I attached these to the card with Mini Glue Dots (#103683).

The sentiment from the So Sincere stamp set (#162283) was also Copper embossed, then cut with a die from the Changing Leaves. I attached the sentiment to the card with Mini Stampin’ Dimensionals (#144108).

“Love what you do and share what you love.”

INSPIRE. CREATE SHARE. 


Friday, 26 July 2024

Paper Weaving

 Hello & welcome,

Today’s inspiration was from page 110 in the Annual Catalogue using the paper weaving technique. It’s an easy but effective technique.


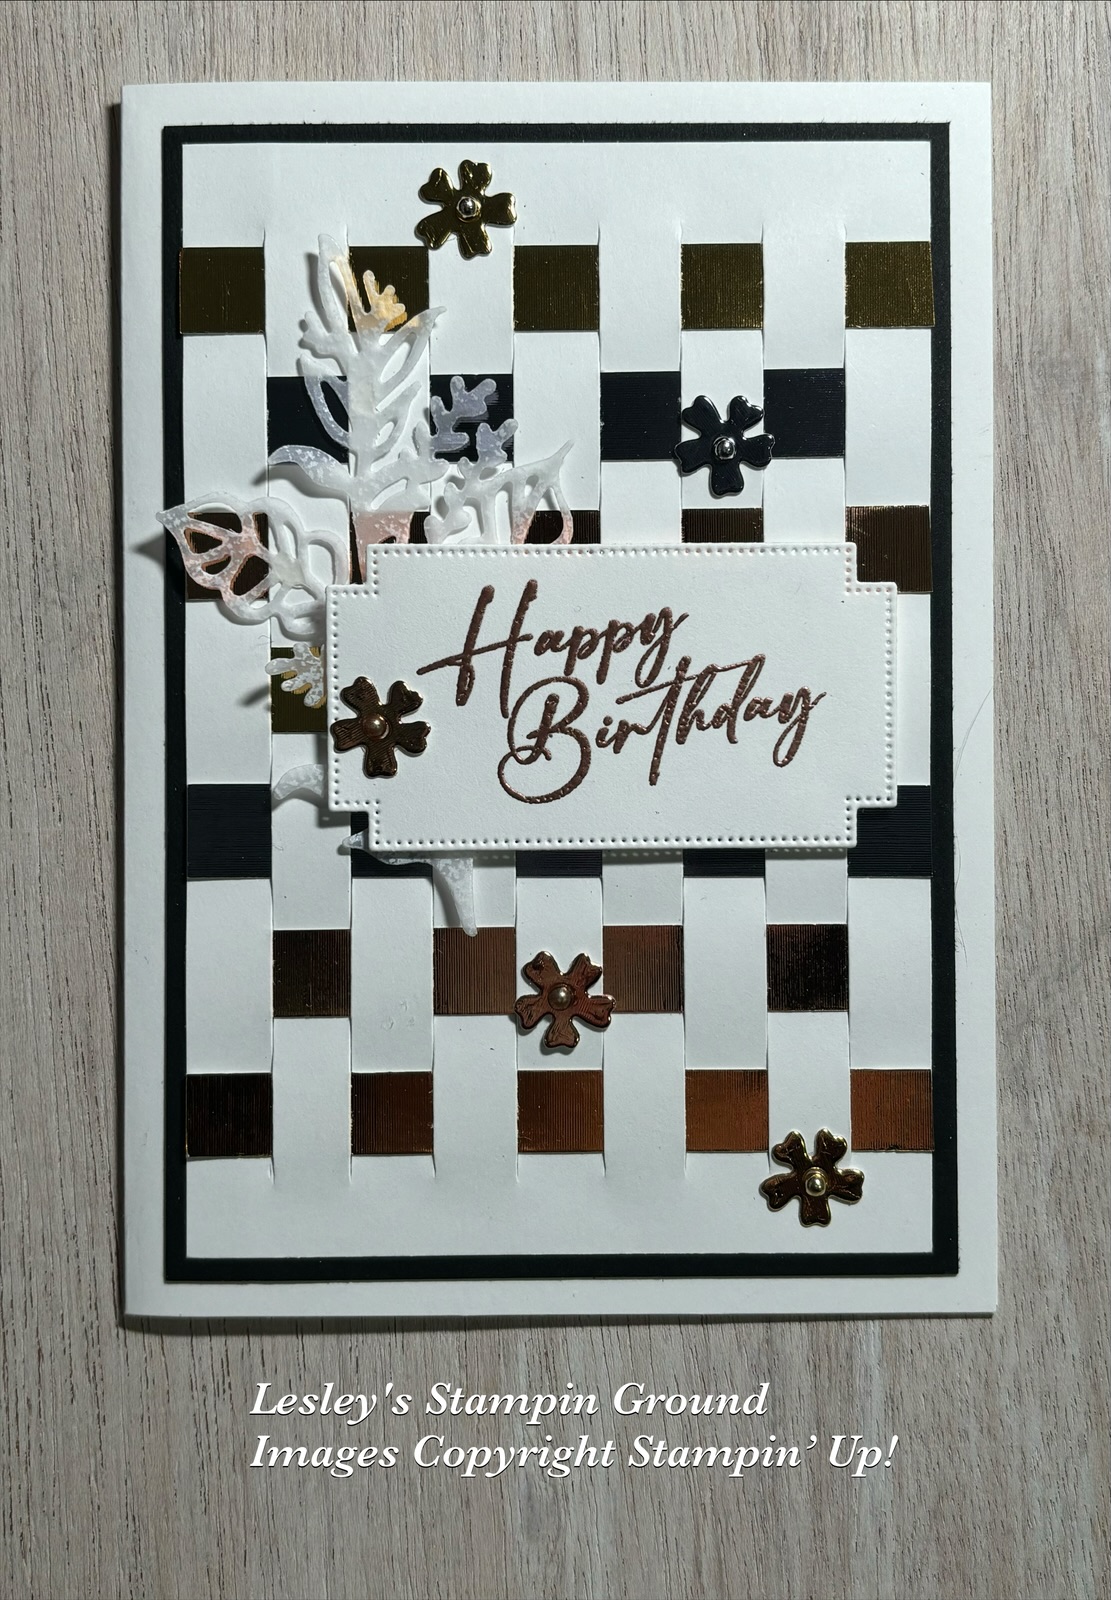
I made cuts in the Basic White card front (#159228) 1cm apart and 1cm from the top & bottom of the card. I cut 1cm pieces from the 3 colours from the Textured Metallic 12”x12” Specialty Paper (#163772). These strips were woven through the card front, then this was matted with the Basic Black card (#121688). The base card is Basic White.

I cut the leaf with the Flowers Of Beauty dies (#163375) from the white patterned vellum from the Graceful Greenery Vellum Specialty Designer Series Paper (#164118). I used Mini Glue Dots (#103683) to attach this to the card.

The sentiment is from the Unbounded Love stamp set (#163378). This was stamped with VersaMark (#102283) and I used the Copper from the Metallic Wow! Embossing Powder (#165678) and this was set with the Heat Tool (#129056). A Greetings Of The Season Die (#164112) was used to cut the sentiment. The sentiment was attached to the card with Stampin’ Dimensionals (#104430).

The small flowers were cut with a die from the Flowers Of Beauty dies also using the Textured Metallic Paper and attached them to the card with Mini Glue Dots. The retired Festive Pearls were added to the centre of the flowers.

“Love what you do and share what you love.”

INSPIRE. CREATE. SHARE. 


Thursday, 27 June 2024

Scrapbooking pages

 Hello & welcome my friends,

I am back after a fabulous holiday to Broome, Western Australia, so had to start with a scrapbook page, with us on the camel ride at Cable Beach. What a great experience and a beautiful part of the world.


The base pages are from the Oxidised Copper 12”x12” Specialty Series Paper (#162190). I matted the photos with Real Red card (#106578), Crushed Curry card (#131288) and Basic Black card (#121688).

I used the Mini Alphabet dies (#162934) to cut the letters for the titles. These were attached to the page using Multipurpose Liquid Glue (#110755). I cut the shells from the Textured Metallic Specialty Paper (#163772) using the retired Seaside Bay dies. These were attached with Mini Glue Dots (#103683). I coloured the Basic White card (#159228) with the journaling, using Blending Brushes (#153611) with Crushed Curry ink (#147087), Pumpkin Pie ink (#147086) and Cherry Cobbler ink (#147083).

“Love what you do and share what you love.”

INSPIRE. CREATE. SHARE.