Showing posts with label #labelsaglowdies. Show all posts

Saturday, 6 April 2024

Petal Park

 Hi again,

I am continuing to use some of the retiring products, including the Petal Park stamp set (#160571).


I stamped the outline of the leaves with Granny Apple Green ink (#147095) and the inside with Parakeet Party ink (#159208). For the flowers I used Gorgeous Grape ink (#147099), Poppy Parade ink (#147050) and Azure Afternoon ink (#161663). I stamped the inside of the flowers using the Stamping off method to achieve a lighter colour. The flowers were then punched with the Petal Park Builder Punch (#160576).

I punched the corners of the Basic White card (#159228) with the Very Best Trio Punch (#159878). The card front is from the Bright & Beautiful 6”x6” Designer Series Paper (#161449) and I dry embossed this with the Timber 3D Embossing Folder (#156406). This was attached to the Basic White base card.

I attached the flowers with Stampin’ Dimensionals (#104430) and Mini Glue Dots (#103683). The sentiment from the Artistically Inked stamp set (#154542) was stamped with Poppy Parade ink then cut with a Labels Aglow die (#159551). Stampin’ Dimensionals were also used to attach this to the card.

The dragonflies are from Adhesive-Backed Dragonflies & Birds (#162743).


The retiring product used on this card are the Petal Park stamp set, Labels Aglow dies, Very Best Trio Punch and the Artistically Inked stamp set.

“Love what you do and share what you love.”

INSPIRE. CREATE. SHARE. 


Tuesday, 12 March 2024

Inspirational Sketches

 Hi again,

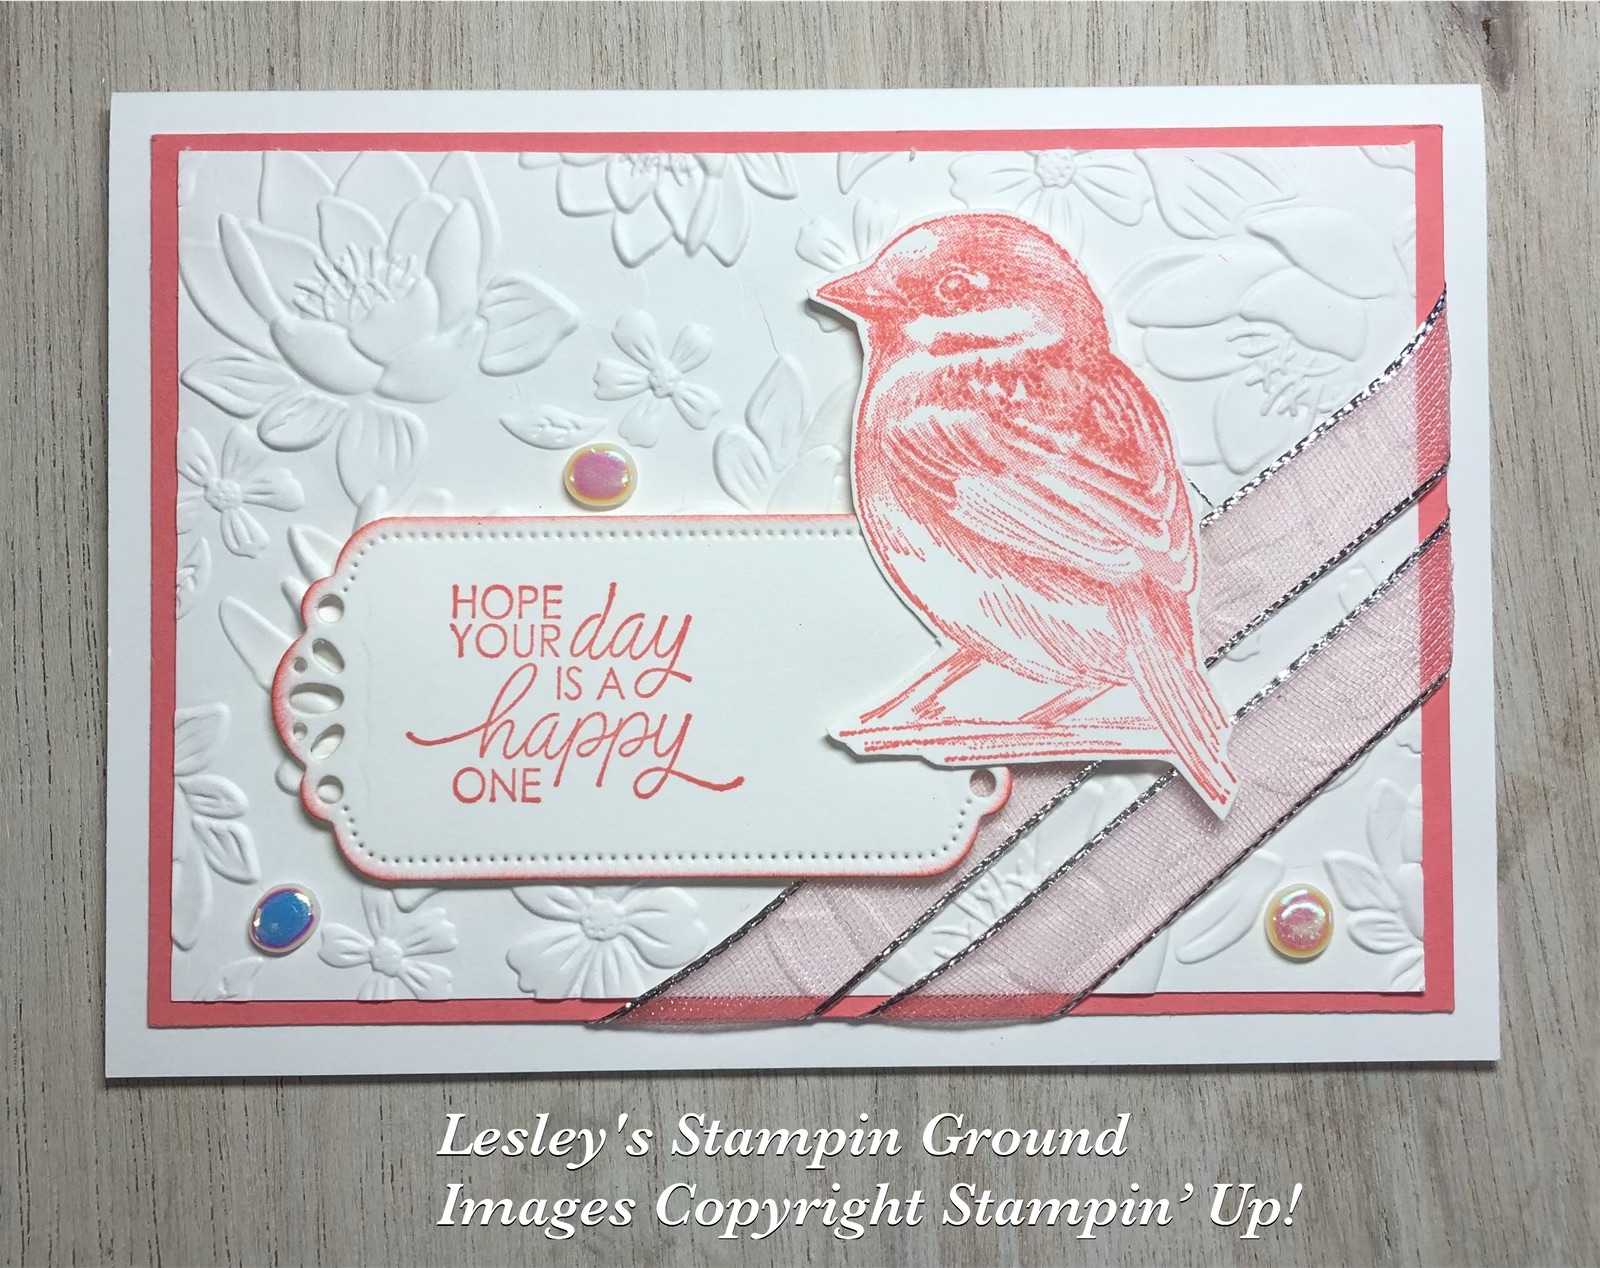
This gorgeous bird is from the Inspirational Sketches stamp set (#162684).


I stamped the bird with Flirty Flamingo ink (#147052), then fussy cut it. The Basic White card front (#159228) was dry embossed with the Layered Florals 3D Embossing Folder (#162935) then matted it with Flirty Flamingo card (#141421).

The ribbon is Silver & White 1/2” Sheer Ribbon (#162149) and I coloured it with Flirty Flamingo ink using a Blending Brush (#153611). This was wrapped around the corner of the card. The base card is Basic White.

The sentiment from So Sincere stamp set (#162283) was stamped with Flirty Flamingo ink and cut with a Labels Aglow die (#159551). The bird & sentiment were attached with Stampin’ Dimensionals (#104430). The Flat Adhesive Backed Pearls (#160449) were the embellishments attached to the card. Clear Wink Of Stella (#141897) was used to add glimmer to the bird.

“Love what you do and share what you love.”

INSPIRE. CREATE. SHARE. 


Sunday, 29 October 2023

Magical Meadow Bundle

Hi again,

Here is another Christmas card which was included in my full day Christmas card classes and using the Magical Meadow Bundle (#162144)


I stamped the leaves with Garden Green ink (#147089) and the berries with Cherry Cobbler ink (#147083). These images are from the Magical Meadow stamp set (#162134). These stamped images as well as the other die cut leaves are all cut with the Magical Meadows dies (#162143). I used Daffodil Delight card (#121680), Garden Green card (#108605) and Pecan Pie card (#161726) for the die cut leaves.

I cut the circle of dots on the Basic White card front (#159228) with a Labels Aglow die (#159551). The corners of this and the Crushed Curry card (#131288) were punched with the Very Best Trio punch (#159878) and attached to the Basic White base card.

The Daffodil Delight card and Pecan Pie card were backed with Adhesive Sheet (#152334) making them easy to attach to the card. I used Mini Glue Dots (#103683) for the Green leaves and Mini Stampin’ Dimensionals (#144108) for the stamped images. The sentiment from the Merriest Trees stamp set (#162043) was stamped with Cherry Cobbler ink, then cut with a die from Labels Aglow.

I used the Real Red from the Pearlized Enamel Effects (#156310) for the small berries on the stamped green leaf. This does take some time to dry so best to do this last and put the card aside to allow it to dry.

“Love what you do and share what you love.”

INSPIRE. CREATE. SHARE. 


Thursday, 26 October 2023

Joy Of Noel bundle

Hi again my friends,

Another Christmas card today using Joy Of Noel Bundle (#161967). I have now finished all my full day Christmas card classes and this is one of the cards that we made.


I stamped the leaves and berries from the Joy Of Noel stamp set (#161959) with Tuxedo Black Memento ink (#132708). The Stampin’ Blends used to colour these are Shaded Spruce (#154903), Lost Lagoon (#161680), Crumb Cake (#154882) and Real Red (#154899). These were cut with the Joy Of Noel dies (#161965).

I used a Labels Aglow die (#159551) to cut the dots in the Very Vanilla card front (#106550). This card was matted with Shaded Spruce card (#147006). I wrapped the ribbon from the Real Red & Burlap Ribbon Combo Pack (#160386) around the card front, then attached this to the Very Vanilla base card.

The leaves were attached with Mini Stampin’ Dimensionals (#144108) and the berries with Mini Glue Dots (#103683). I stamped the sentiment from the Joy To You stamp set (#162090) with Shaded Spruce ink (#147088). I didn't want to include “and yours” which is part of the sentiment but when I used the die I was able to remove it. The die is from the Stylish Shapes Dies (#159183). This was attached with Stampin’ Dimensionals (#104430). The embellishments are from the  Faceted Gems Trio Pack (#162148).

“Love what you do and share what you love.”

INSPIRE. CREATE. SHARE. 


Friday, 6 October 2023

Christmas Classics

Hello friends,

I love the variety of beautiful products in this mini catalogue. For todays Christmas card I have used the Christmas Classics Bundle (#161977) which consists of the Christmas Classics stamp set (#161970) and Christmas Classics dies (#161976).


I used a die from the Labels Aglow dies (#159551) for the circle of dots on the Joyful Specialty Designer Series Paper (#161980). This was then matted with the Real Red card (#106578) and attached to the Basic White base card (#159228).

I cut the circle from Real Red card with 2 of the circles from the Deckled Circles dies (#162286) and glued this to the card with Multipurpose Liquid Glue (#110755).

“Seasons Greetings” from the stamp set was stamped with VersaMark (#102283), I added Gold Stampin’ Emboss Powder (#155555) and set it with the Heat Tool (#129056). The sentiment, the Garden Green card (#108605) and the gold leaves were all cut with the Christmas Classics dies.

The sentiment was attached to the Garden Green die cut, then this was attached to the card with Stampin’ Dimensionals (#104430). The gold foil leaves were backed with Adhesive Sheet (#152334).

“Love what you do and share what you love.”

INSPIRE. CREATE. SHARE.


Thursday, 20 July 2023

Horse & Sleigh stamp set

Hi my stamping friends,

I have used the Horse & Sleigh stamp set (#162119) for todays card. I have chosen not to colour this image but just Gold emboss it.


I stamped the image on Very Vanilla card (#106550) with VersaMark (#102283) and used the Gold Stampin’ Emboss Powder (#155555) and this was set with the Heat Tool (#129056). I matted this with a Gold Foil Sheet (#132622).

I stamped the sentiment from the Brightest Glow stamp set (#159542) with Real Red ink (#147084). I stamped using the Stamparatus so I could re-stamp it with VersaMark, then added Clear Stampin’ Emboss Powder (#155554) and set this with the Heat Tool. A Labels Aglow die (#159551) was used to cut the sentiment. I threaded the Gold Simply Elegant Trim (#155766) through the holes of the sentiment and wrapped it around the card front. I also attached the sentiment with Mini Stampin’ Dimensionals (#144108). The base card is Very Vanilla.

A very easy Christmas card!!


“Love what you do and share what you love.”

INSPIRE. CREATE. SHARE.


Wednesday, 14 June 2023

Darling Details

Hi again,

I am using the beautiful Darling Details dies (#161370) again on this card. White & gold always look great for a special occasion card.


I cut the bottom edge of the Basic White card (#159228) with a Darling Details Die. I then dry embossed the card with one of the Basics 3D Embossing Folder (#161598). I weaved the Gold & Vanilla Satin Edged Ribbon (#159555) through the slots from the die cut. The top corner was punched with the Very Best Trio Punch (#159878), then the Basic White card was matted with the Distressed Gold Specialty Paper (#159237) and attached the the Basic White base card.

The flowers & leaves were cut with the Darling Details dies using Distressed Gold Specialty Paper which was backed with Adhesive Sheet (#152334) making it easy to attach these to the card.

The sentiment is from the Phrases For All stamp set (#161403). This was stamped with VersaMark (#102283) and I used Gold Stampin’ Emboss Powder (#155555) which was set with the Heat Tool (#129056). The die to cut the sentiment is from the Labels Aglow Dies (#159551). This was attached to the card with Stampin’ Dimensionals (#104430). The Gold Festive Pearls (#159963) were added to the card.

“Love what you do and share what you love.”


INSPIRE. CREATE. SHARE.


Thursday, 6 April 2023

Abigail Rose Designer Series Paper

Hello again friends,

I have used 2 different packs of Designer Series Paper on todays card. The flower was fussy cut from the Abigail Rose DSP (#159037) and the other 2 designs are from the Tea Bouquet DSP (#158659).


I coloured the floral image with the following Stampin’ Blends - Fresh Freesia (#155518), Highland Heather (#154887), Polished Pink (#155520), Granny Apple Green (#154885), Parakeet Party (#159220), Daffodil Delight (#154883) and Blackberry Bliss (#154877).

I attached a smaller piece of the Granny Apple Green DSP  to the Fresh Freesia DSP. I punched the corner with the Very Best Trio Punch (#159878).

“Congratulations” is from the Peaceful Moments stamp set (#151595) and stamped with Gorgeous Grape ink (#147099). This was cut with a die from the Labels Aglow (#159551). This die was a bit longer than I wanted so I cut the sentiment with the words closer to on end of the die, then repositioned the die and cut a piece from the other end. I threaded the Gold Simply Elegant Trim (#155766) through the holes and wrapped this around the card front, then attached the card front to the Basic White base card (#159228).

 The sentiment and floral image were attached with Stampin’ Dimensionals (#104430). The embellishments are the Iridescent Rhinestone Basic Jewels (#158130). Of course I used the Clear Wink Of Stella (#141897) on the flowers for that bit of shimmer.

The retiring products used here are Abigail Rose DSP, Tea Boutique DSP, Peaceful Moments stamp set & Polished Pink Stampin’ Blends. The Fresh Freesia was due to retire but is being brought back with the colour revamp.


“Love what you do and share what you love.”


INSPIRE. CREATE. SHARE.


Saturday, 3 December 2022

Merriest Moments stamp set

Hi & welcome,

I have made several variations of cards using poinsettias and the wreath for Christmas cards, so here is another variation.


The Daffodil Delight card (#121689) was dry embossed with the Timber 3D Embossing Folder (#156406). I punched the corner of this card and the Cherry Cobbler card (#121681) with the Very Best Trio Punch (#159878), then these were attached to the Basic White Base card (#159228).

“Merry Christmas” is from the Brightest Glow stamp set (#159542) and this was stamped with Cherry Cobbler ink (#147083). A Labels Aglow Die (#159551) was used to cut the sentiment.

The flowers and leaves are from the Merriest Moments stamp set (#156353) and cut with the co-ordinating Merriest Frames Hybrid dies (#156358). I used Shaded Spruce ink (#147088) for the leaves and Cherry Cobbler ink for the flowers. I attached the smaller flower to the larger flower using Mini Glue Dots (#103683).

The wreath was cut from Pearlescent Specialty paper (#154291) using a Natural Prints die (#158800). This was also attached with Mini Glue dots. The flowers and sentiment were attached to the card with Stampin’ Dimensionals (#104430) and Mini Glue Dots for the leaves.

The bow is cut with a Birdhouse Die (#158847) and I used Distressed Gold Specialty Paper (#159237). This was attached with Mini Stampin’ Dimensionals (#144108).

The Real Red Pearlised Enamel Effects Basics (#156310) was used for the centre of the flowers. This does take a bit of time to dry so this is the last thing I do on the card then put the card aside to allow it to dry.

“Love what you do and share what you love.”

INSPIRE. CREATE. SHARE.


Monday, 7 November 2022

Rays Of Light

Hello everyone,

I was having a clean up in my craft room (a never ending job) and came across some bits and pieces and immediately thought “I could make a card with those pieces”, so was very happy with this beautiful card. I do love the traditional red, green & gold for Christmas.


The Rays Of Light stamp (#158925) was used for the background. I stamped this with VersaMark (#102283) onto Pearlescent Specialty Paper (#154291) and embossed with Gold Stampin’ Emboss Powder (#155555), then set with the Heat Tool (#129056). This was matted with the Shaded Spruce card (#147006) then attached to the Real Red base card (#106578).

The poinsettias were fussy cut from the Boughs Of Holly Designer Series Paper (#159600). These flowers were from the edge of the paper, so you don't need to throw any of these beautiful flowers away.

“Merry Christmas” from the Brightest Glow stamp set (#159542) was also Gold heat embossed. A Labels Aglow die (#159551) was used to cut the sentiment.

The flowers at the top and the sentiment were attached with Stampin’ Dimensionals (#104430) and the other flower was taped to the card.

“Love what you do and share what you love.”


lesleyjendra.stampinup.net


lesley.j.jendra@gmail.com

Saturday, 22 October 2022

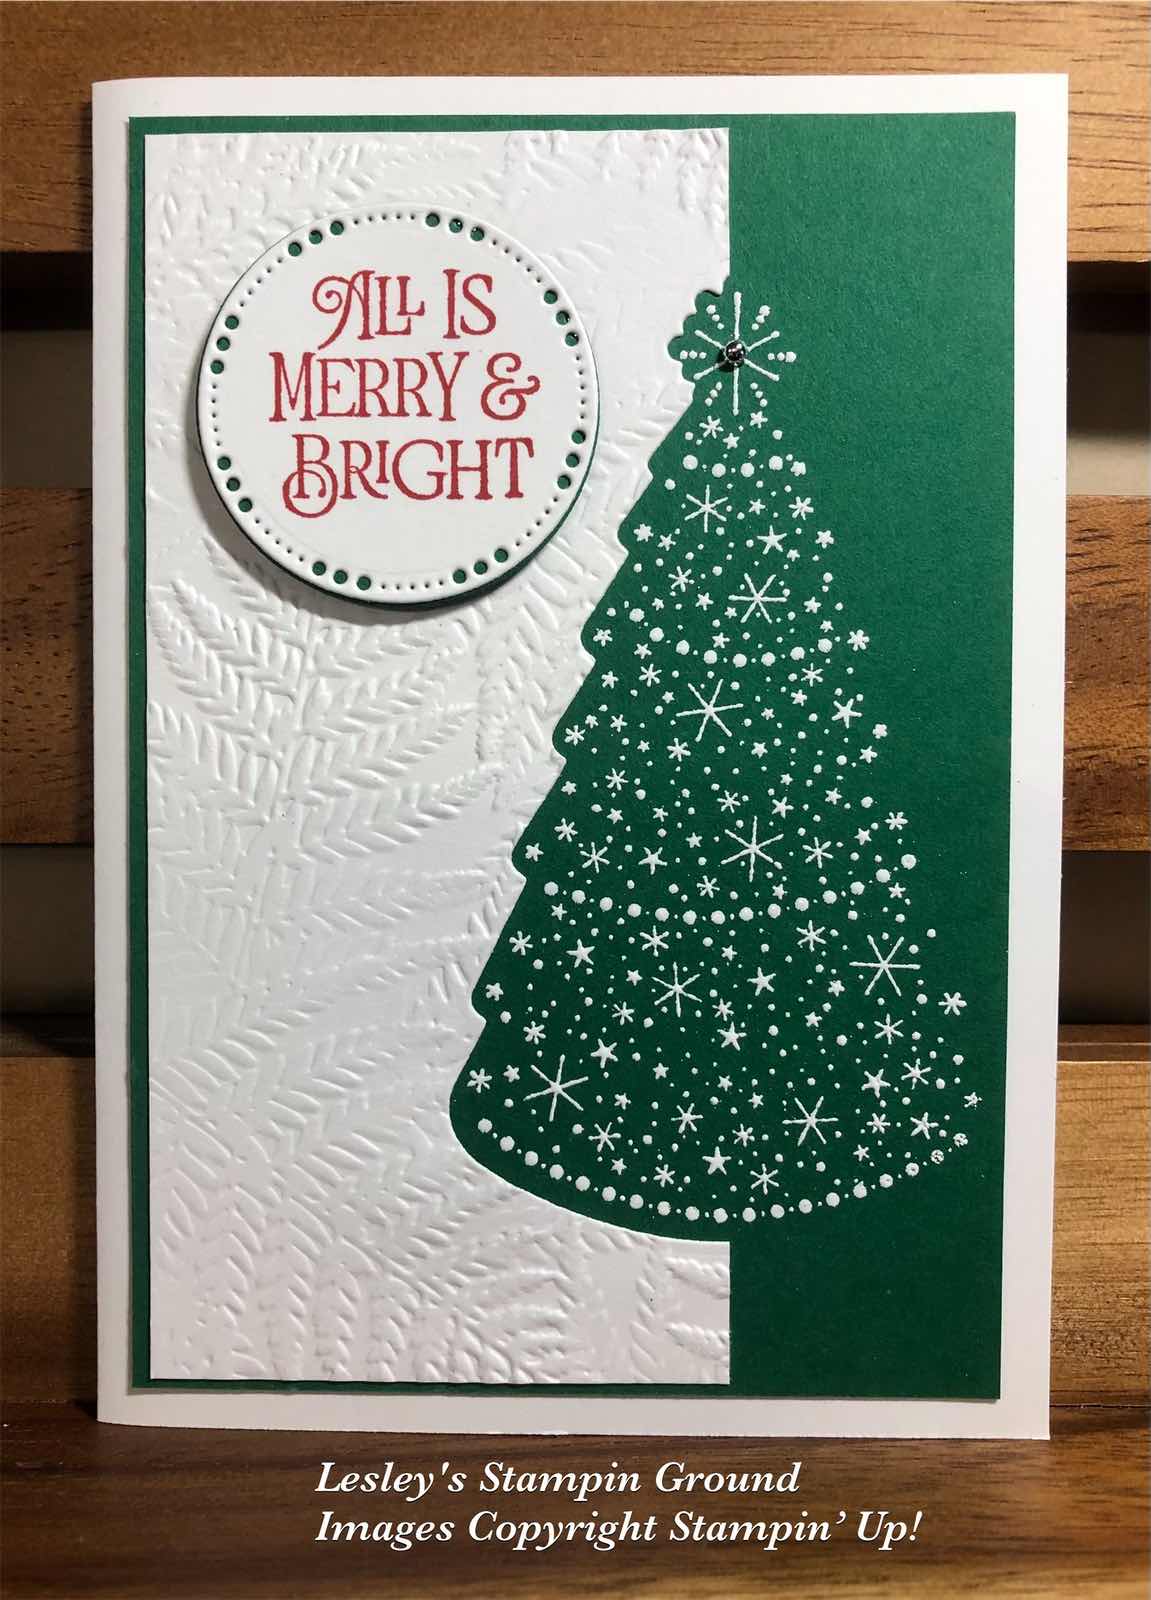
Christmas Lights

Hello stamping friends,

An easy but effective card using the Christmas Lights Bundle (#159961).


I stamped the Christmas tree from the Christmas Lights stamp set (#159538). This was stamped with VersaMark (#102283) and heat embossed with White Stampin’ Emboss Powder (#155554). This was set with the Heat Tool (#129056). 

I then placed the piece of Basic White card (#159228) on the left side of the tree and placed the die in place as shown below.


I carefully removed the white card with the die in place and cut it with the Stampin’ Cut & Emboss Machine (#149653). This removes part of the Christmas tree. I then dry embossed the white card with the Fern 3D Embossing Folder (#158804) and attached it to the card. The card front was attached to the Basic White base card.

The sentiment from Brightest Glow Stamp set (#159542) was stamped with Real Red ink (#147084). This was cut with a die from Labels Aglow (#159551). I cut another circle from the Stylish Shapes dies (#159183) and attached this to the die cut sentiment. This was attached to the card with Stampin’ Dimensionals (#104430). A silver Festive Pearl (#159963) was added to the top of the tree.

This technique could be done with many stamped images with co-ordinating dies.

“Love what you do and share what you love.”


Thursday, 13 October 2022

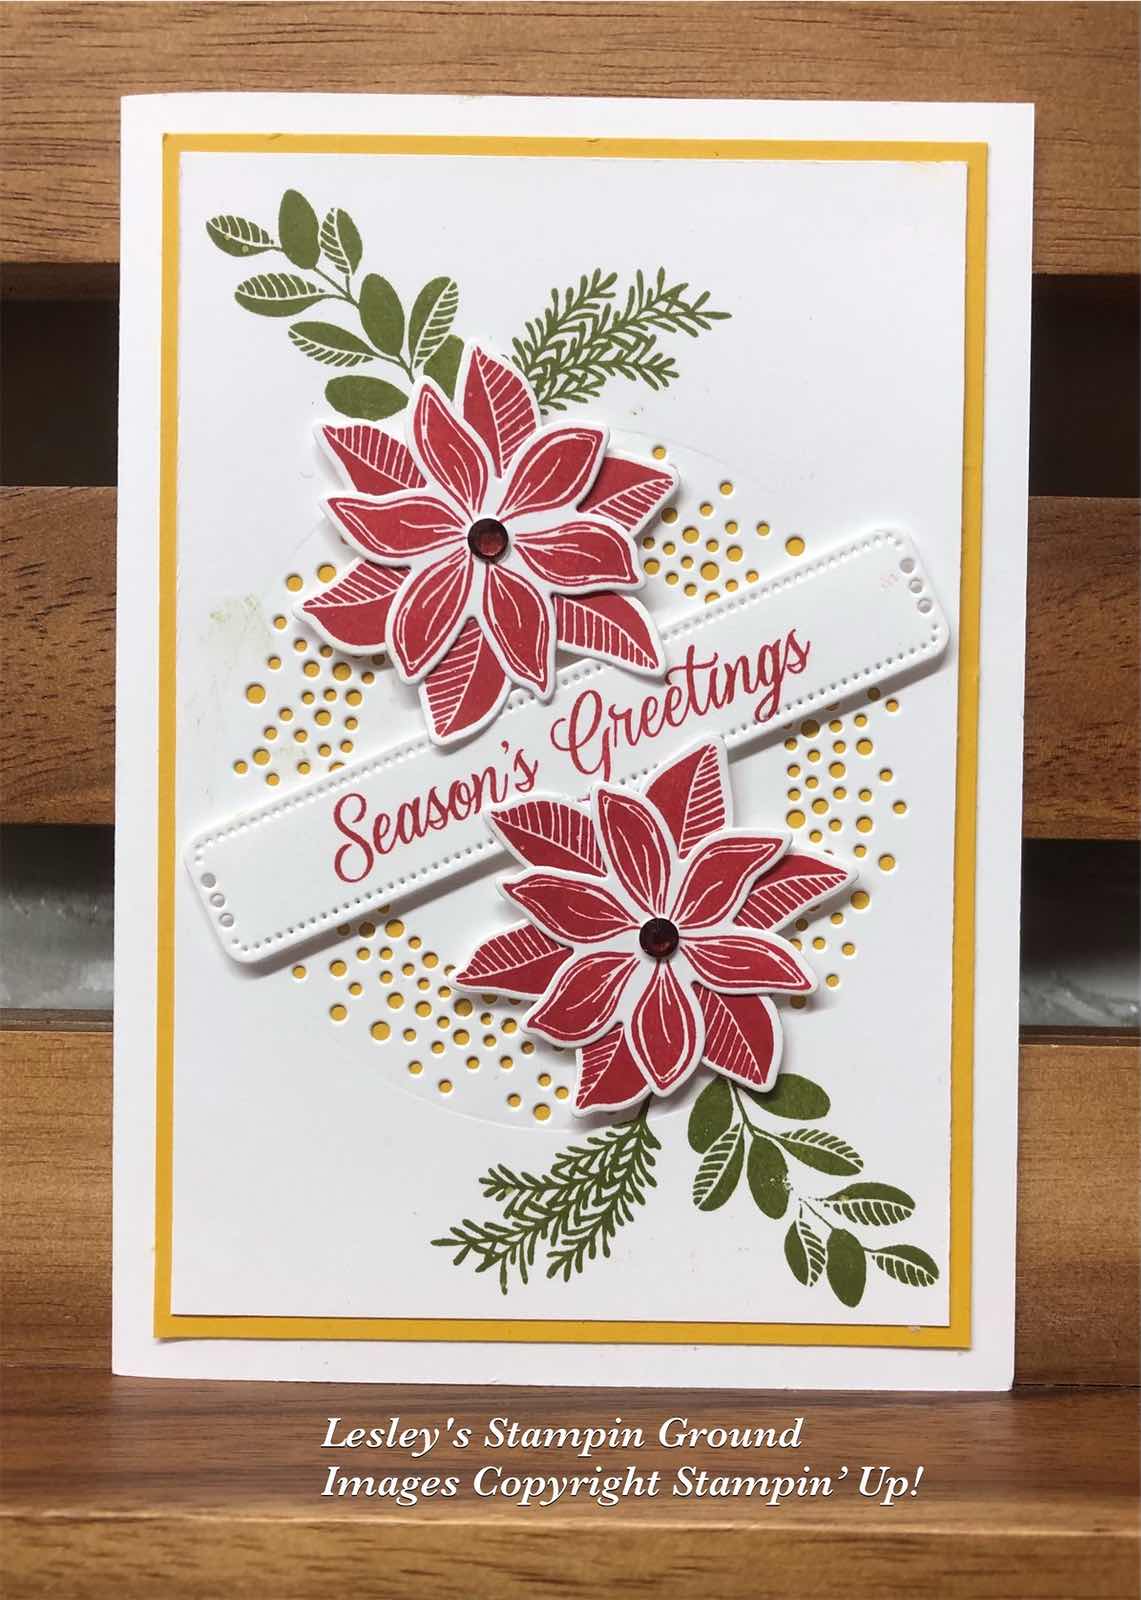
Merriest Moments

Hello friends,

Another card from my Christmas class using the Merriest Moments stamp set (#156353) for the flowers and leaves.


The flowers were stamped with Real Red ink (#147084) and assembled with Mini Glue Dots (#103683).

I used a Labels Aglow Die (#159551) for the circle of dots in the Basic White card front (#159228). The leaves from the Merriest Moments stamp set were stamped with Old Olive ink (#147090). The card front was matted with the Crushed Curry card (#131288) then attached to the Basic White base card.

“Season’s Greetings” is also from the Merriest Moments stamp set and stamped with Real Red ink. This was cut with another Labels Aglow Die. The sentiment & flowers were attached to the card with Stampin’ Dimensionals (#104430).

“Love what you do and share what you love.”


Tuesday, 11 October 2022

Christmas Banners Dies

Hello friends,

Each year I hold full day classes making Christmas cards which is a very popular class. I usually have around 15 cards for the ladies to choose from and they all work on different cards, working at their own pace, so there is no waiting for stamps, inks etc. They end up with a great variety of cards for their days work. 
This card today is one design they had to choose from this year.


The used Evening Evergreen card (#155575) and Soft Succulent card (#155777) to cut the leaves with the Christmas Banner Dies (#159576). The Merry Merlot (#147005) leaves were cut with the dies from the Holly Berry dies (159607). All the  card stock was backed with Adhesive Sheet (#152334) before cutting with the dies making it easy to attach them to the card.

The Basic White card front (#159228) was dry embossed with the Gingham Embossing Folder (#157627), then attached to the Evening Evergreen card.

The sentiment from the Brightest Glow stamp set (#159542) was stamped with Merry Merlot ink (#147112), then cut with a Labels Aglow die (#159551). The Evening Evergreen Open Weave Ribbon (#155573) was threaded through the label and wrapped around the card front. This was then attached to the Basic White base card 

“Love what you do and share what you love.”


Sunday, 2 October 2022

Snowflake Specialty Vellum

Hello crafty friends,

A super easy card today using the Snowflake Specialty Vellum (#159832). This pack includes 6 sheets, 2 each of 3 designs with iridescent foil & white flocking. I have used the iridescent foil.


I coloured the vellum with a Blending Brush (#153611) and Pacific Point ink (#147098). I attached this to a piece of Basic White card (#158228) the same size, then to the Pacific Point card (#116202). I didn't attached it directly to the Pacific Point card as the background would have been darker than I wanted.

I wrapped the Metallic Mesh Ribbon (#153550) around the card front then attached it to the Basic White Base Card.

Merry Christmas is from the Brightest Glow stamp set (#159542), stamped with Pacific Point ink and cut with a die from the Labels Aglow dies (#159551). Stampin’ Dimensionals (#104430) were used to attach this to the card. The embellishment on the sentiment is an Adhesive Backed Star (#159965).

As I said this card is super easy.

“Love what you do and share what you love.”


Monday, 5 September 2022

Season Of Chic

Hello friends,

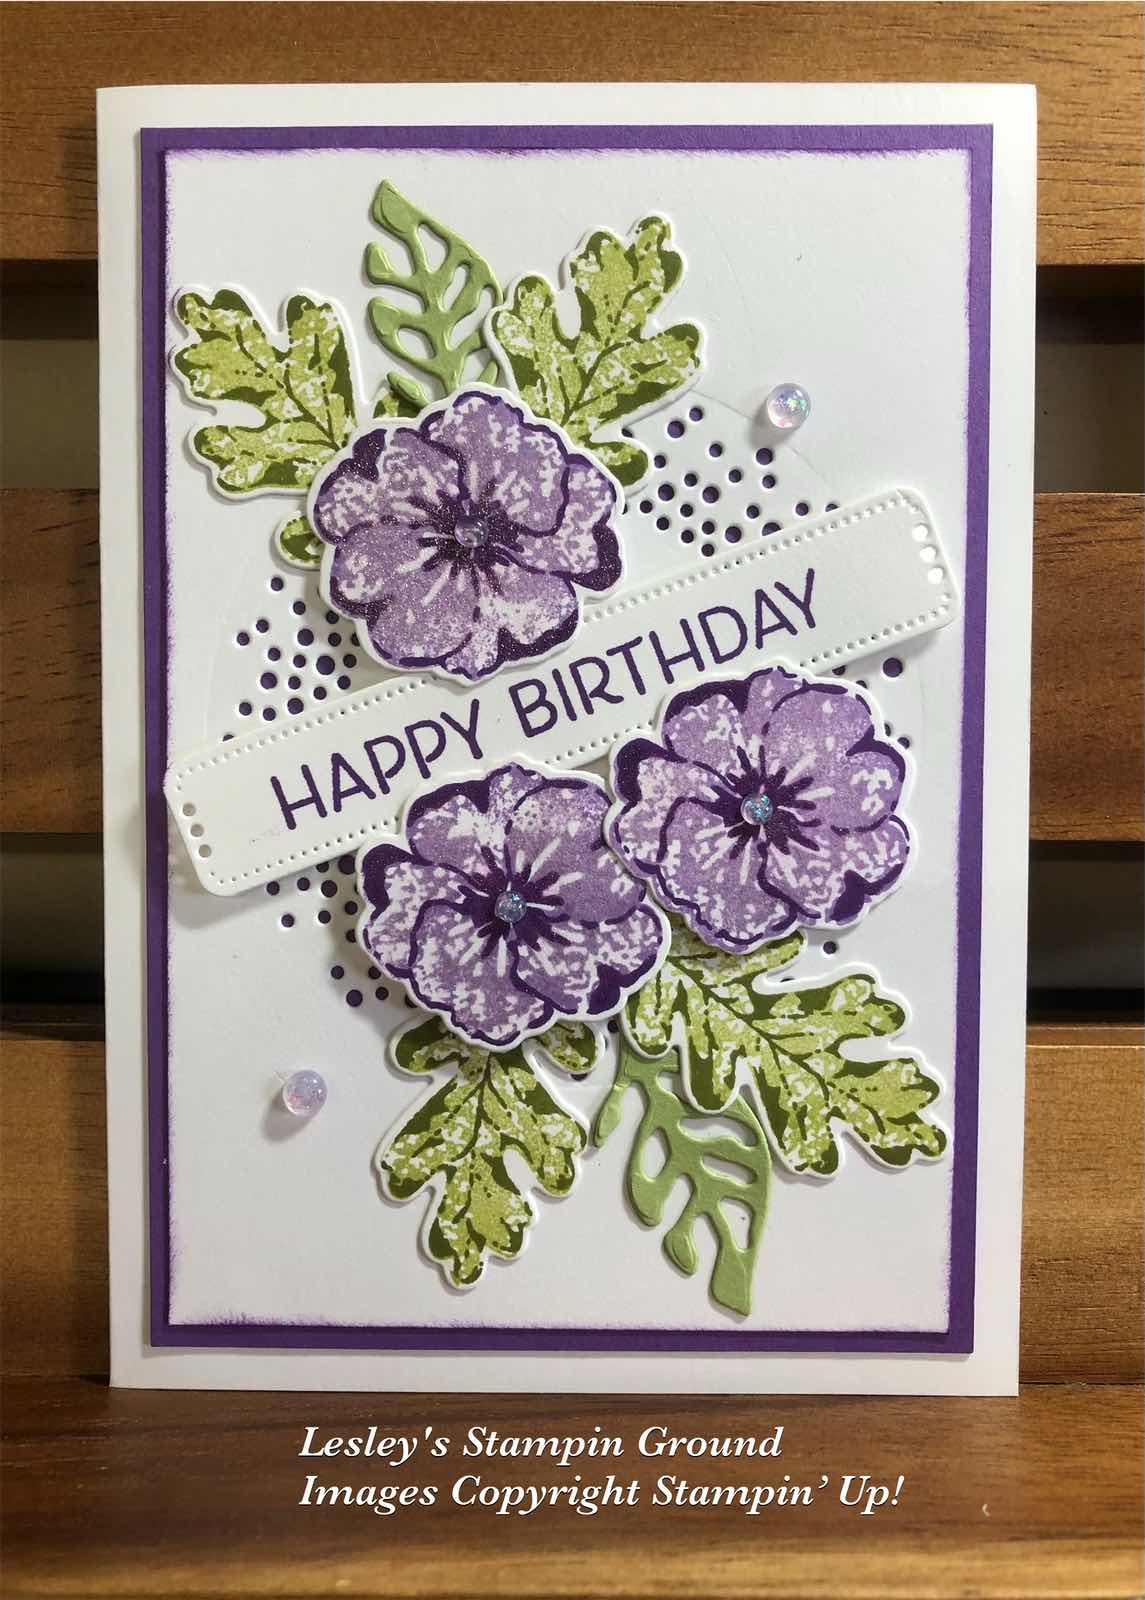
These flowers & leaves are from the Season Of Chic Stamp set (#158810). This is a Two-Step set which allows you to stamp the outline and inside colours with different inks, or you could choose to just use the outline or inside image for some variation.


The flowers were stamped with Gorgeous Grape ink (#147099) for the outline and the inside with Highland Heather (#147103). The leaves were stamped with Old Olive ink (#147090) for the outline and Pear Pizzaz (#147104) for the inside. The stamped images and the Pear Pizzaz (#131290) die cut leaves were all cut with the Chic Dies (#158815).

I used a die from the Labels Aglow Dies (#159551) for the circle of dots on the Basic White card front (#159228). This was then matted with the Gorgeous Grape card (#147011) and attached to the Basic White base card.

The leaves were attached to the card with Mini Glue Dots (#103683) and the flowers with Stampin’ Dimensionals (#104430).

“Happy Birthday” from the Artistically Inked stamp set (#154542) was stamped with Gorgeous Grape ink and cut with a Labels Aglow die. StampinDimensionals were also used to attach this to the card.

Clear Wink Of Stella (#141897) was used to add some glimmer to the flowers. The embellishments for the flower centres and on the card front are 2021-2023 In Color Opal Rounds (#159185).

“Love what you do and share what you love.”