Showing posts with label #chicdies. Show all posts

Wednesday, 30 August 2023

Seaside Bay

Hello again friends,

I am back after a short break. I had a relaxing time catching up with friends in Hervey Bay which inspired this card using the Seaside Bay stamp set (#160436).


I stamped the bird with VersaMark (#102283) on Basic White card (#159228) and added Silver Stampin’ Emboss Powder (#155555) which needs to be set with the Heat Tool (#129056). I cut the bird with a Seaside Bay die (#160444).

The shells also from the Seaside Bay stamp set were stamped with Crumb Cake ink (#147116). The card front was then dry embossed with the Painted Texture 3D Embossing Folder (#154317). This was matted with the Azure Afternoon card (#161728) and attached to the Basic White base card.

I used a die from the Chic dies (#158815) to cut another piece of Basic White card for the detailed die cut piecewhich was backed with Adhesive sheet (#152334) and this was attached to the card front.

“Feel Better Soon” is from the Wanted To Say dies (#161594). The background was cut from the Silver from the Silver Foil Specialty pack (#156457) and I used Azure Afternoon card for the top layer of the sentiment. This was also backed with Adhesive Sheet and then attached to silver card.

The sentiment and bird were attached to the card with Mini Stampin’ Dimensionals (#144108).

“Love what you do and share what you love.”

INSPIRE. CREATE. SHARE.


Monday, 7 August 2023

Season Of Chic

Hello again friends,

I have had a very busy week so sorry I have missed a couple of posts but here I am again. I have used a mix of products on this card.


The flowers from the Season Of Chic stamp set (#158810) were stamped with Lemon Lolly ink (#161666) and cut with a co-ordinating die from the Chic dies (#158815). I then cut the Lemon Lolly card (#161729) which was backed with Adhesive Sheet (#152334) with another Chic die and this was attached to the stamped flower.

I dry embossed the Basic White card front (#159228) with the Metal Plate 3D Embossing Folder (#160766) but I used the back of the embossing. I cut the corners with the Very Best Trio Punch (#159878). The card front was matted with the Lemon Lolly card then attached to the Basic White base card.

I cut the 3 circles with the Stylish Shapes Dies (#159183) and taped these together and attached them to the card. The sentiment from the Artistically Inked stamp set (#154542) was stamped with Wild Wheat ink (#161651).

The flowers were attached with Stampin’ Dimensionals (#104430). The leaves were cut with dies from the Timeless Arrangements dies (#161525) and the Lazy Days dies (#161342). I used Soft Sea Foam card (#147012), Wild Wheat card (#161734) and (retired) Brushed Metallic Gold Foil. All these were backed with Adhesive Sheet (#152334) making them easy to attach to the card.

I used the Clear Wink Of Stella (#141897) to add shimmer to the flowers and then added the Iridescent Pearl Basic Jewels (#158987) to the flower centres and the sentiment.

“Love what you do and share what you love.”

INSPIRE. CREATE. SHARE.


Monday, 21 November 2022

Fresh Cut Flowers

Hi stamping friends,

The flowers here are from the Fresh Cut Flowers stamp set (#159018).


The flowers were stamped with Tuxedo Black Memento ink (#132708) onto Basic White card (#159228). This was coloured with Stampin’ Blends - Balmy Blue (#154830), Daffodil Delight (#154883), Real Red (#154899), Granny Apple Green (#154885 and Old Olive (#154892). This was cut with the now retired Fresh Cut Stems dies.

I used the Stitched Greenery Die (#155451) on the Basic White card front. This was matted with Basic Black card (#121688) and Granny Apple Green card (#154885) then attached to the Basic White base card.

A die from the Chic Dies (#158815) was used to cut the Silver Foil (#156457) which was backed with Adhesive Sheet (#152334). This was attached to the card front and the flowers were attached with Stampin’ Dimensionals (#104430).

“Thinking Of You” from the Go To Greetings stamp set (#158763) was stamped with Tuxedo Black Memento Ink, then cut with a Frosted Flurry die (#159811). Stampin’ Dimensionals were also used to attach the sentiment. The Silver Festive Pearls (#159963) were added to the card. Of course I added Clear Wink Of Stella (#141897) to the flowers & leaves as I like that bit of shimmer on my cards.


“Love what you do and share what you love.”

INSPIRE. CREATE. SHARE.


Thursday, 17 November 2022

Texture Chic

Hi everyone,

I have seen many cards with the Twisted Ribbon technique so have used it on this card today. We all have those bits and pieces of designer series paper lying around so a great opportunity to use those “scraps” that we keep as they will come in handy one day!!


I have used the Texture Chic Specialty Designer Series Paper (#158808) for the “ribbon” and the Distressed Gold Specialty Paper (#159237) for the background.

For the strips of “ribbon” I cut them 1/2” x 3 1/2” (or 13mm x  90mm). I cut 6 of each of the 2 designs. With some DSP you may like both sides which work well together. I found that a lighter colour worked best for the “reverse side” of “ribbon”  and a darker one for the top piece. These were attached with Multipurpose Liquid Glue (#110755).

I used a piece of Basic White card (#159228) which was 138mm x 76mm (or 5 1/2” x 3”). I marked from top to bottom on both sides at 1/2” (13mm). When placing the DSP I had the bottom of the strip at the 1/2” mark on the left side and the top of the DSP strip at the 1/2” mark on the right so it is on an angle. Continue down the card at each 1/2” mark. Then place the other design of the DSP on top as you can see on the card and continue down the card. The strips will be a bit longer than you need so cut off the excess level with the white card.

This was then attached to the Distressed Gold Specialty Paper and attached to the Basic White base card.

The flowers and sentiment are from the Season Of Chic stamp set (#158810). These were stamped with VersaMark (#102283) and embossed with Gold Stampin’ Emboss Powder (#155555), then set with the Heat Tool (#129056). The Chic Dies (#158815) were used to cut out the flowers and the gold leaves. A Meadow Die (#155852) was used to cut the sentiment. The leaves were backed with Adhesive Sheet (#152334) and Mini Dimensionals (#144108) and Mini Glue Dots (#103683) were used to attach the flowers.


“Love what you do and share what you love.”


INSPIRE. CREATE. SHARE.


Monday, 5 September 2022

Season Of Chic

Hello friends,

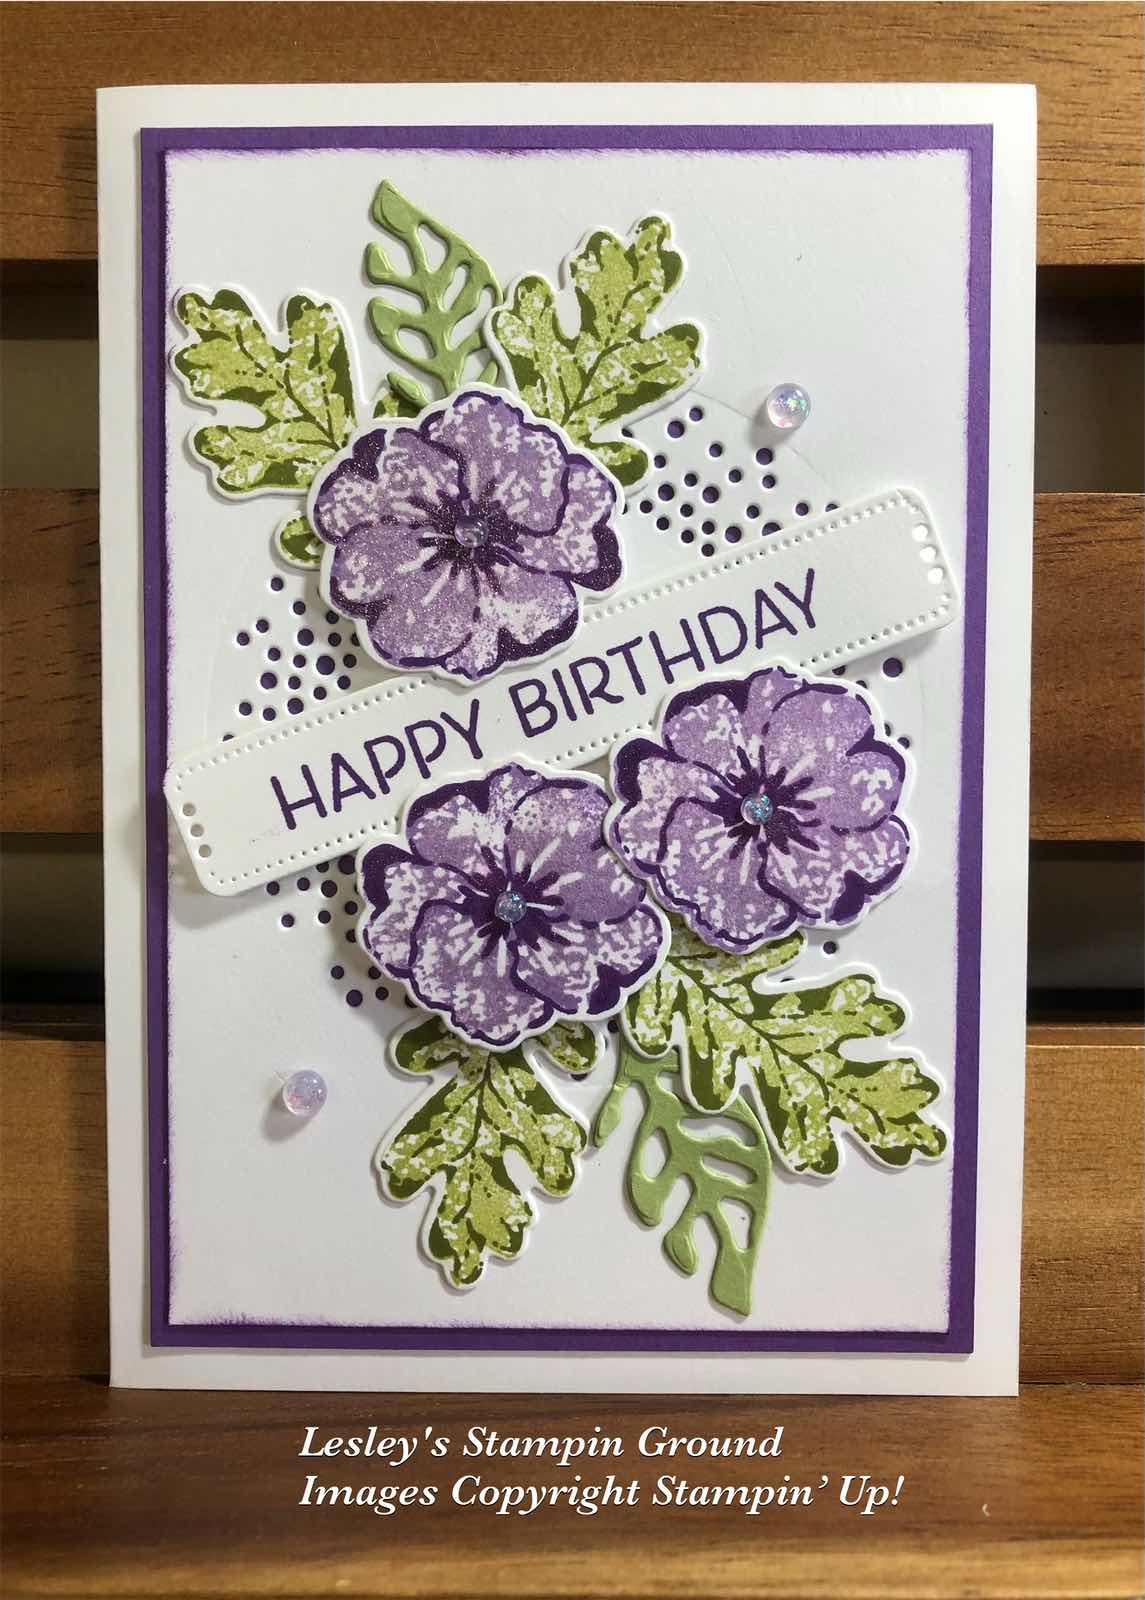
These flowers & leaves are from the Season Of Chic Stamp set (#158810). This is a Two-Step set which allows you to stamp the outline and inside colours with different inks, or you could choose to just use the outline or inside image for some variation.


The flowers were stamped with Gorgeous Grape ink (#147099) for the outline and the inside with Highland Heather (#147103). The leaves were stamped with Old Olive ink (#147090) for the outline and Pear Pizzaz (#147104) for the inside. The stamped images and the Pear Pizzaz (#131290) die cut leaves were all cut with the Chic Dies (#158815).

I used a die from the Labels Aglow Dies (#159551) for the circle of dots on the Basic White card front (#159228). This was then matted with the Gorgeous Grape card (#147011) and attached to the Basic White base card.

The leaves were attached to the card with Mini Glue Dots (#103683) and the flowers with Stampin’ Dimensionals (#104430).

“Happy Birthday” from the Artistically Inked stamp set (#154542) was stamped with Gorgeous Grape ink and cut with a Labels Aglow die. StampinDimensionals were also used to attach this to the card.

Clear Wink Of Stella (#141897) was used to add some glimmer to the flowers. The embellishments for the flower centres and on the card front are 2021-2023 In Color Opal Rounds (#159185).

“Love what you do and share what you love.”


Saturday, 30 July 2022

Texture Chic

Hello everyone,

I love the elegance of the Texture Chic Specialty Designer Series Paper (#158808). This paper has gold designs on one side of each sheet and the other sides have a beautiful range of designs which co-ordinate with the Season Of Chic stamp set (#158810). I have used the beautiful shells for this card.


The DSP was matted with Petal Pink card (#147009). I cut another piece of DSP with a Layering Diorama Die (#155565) and attached this to the card front. I backed a piece of Basic White card (#159228) with Adhesive Sheet (#152334) and cut this with a die from the Chic dies (#158815), then adhered it to the card. The base card is Basic White.

I stamped the 2 shells from the Season Of Chic stamp set, one on Basic White card and the 2nd on Petal Pink card using Petal Pink ink (#147108). These shells and the Gold Foil shells from the Brushed Metallic cardstock (#153524) were cut with the Chic dies. 

The sentiment from the same stamp set was stamped with Petal Pink ink. The circles were cut with the Stylish Shapes Dies (#159183). The sentiment and one of the shells were attached to the card with Stampin’ Dimensionals (#104430).

“Love what you do and share what you love.”