Showing posts with label #texturednotesdies. Show all posts

Tuesday, 28 April 2026

Swirled Designs

 Hello again,

I am using the Swirled Designs Bundle (#167311) today, which is retiring, so available from the Last Chance products. The bundle consists of the Swirled Designs stamp set (#167030) and the Swirled Designs dies (#167032).


The splotches from the stamp set were stamped with “stamped off” Crumb Cake ink (#147116). I then dry embossed this with the retired Exposed Brick Embossing Folder. I used the Earthen Toned Specialty Paper (#165901) to matt the card front and attached it to the Very Vanilla base card (#166785).

The “diamonds” were also cut from this specialty paper which was backed with Adhesive Sheet (#152334) using the Swirled Designs dies. 

The puppies are from the Cutest Crew stamp set (#167146). These were stamped with Tuxedo Black Memento ink (#132708) and coloured with Stampin’ Blends - Crumb Cake (#154882), Smoky Slate (#154904), Pecan Pie (#161674), Daffodil Delight (#154883), Real Red (#154899), Bubble Bath (#161675) and Granny Apple Green (#154885). The puppies were cut with a Cutest Crew die (#167148).

The sentiment is also from the Cutest Crew stamp set and stamped with VersaMark (#102283) and I added Copper powder from the Metallics Wow! Embossing Powders (#165678). This was set with the Heat Tool (#129056). I matted the sentiment with the Earthen Toned Specialty Paper, then this and the puppies were attached with Stampin’ Dimensionals (#104430). The Pressed Flower Motifs (#165215) were added to the card.


“Love what you do and share what you love.”

INSPIRE. CREATE. SHARE.


https://www.stampinup.com.au


lesley.j.jendra@gmail.com


http://lesleysstampinground.blogspot.com


Friday, 24 April 2026

Beautiful Gallery Designer Series Paper

 Hi again friends,

Designer Series Paper can make very quick & easy cards, just like this one. I have used the Beautiful Gallery 6”x6” Designer Series Paper (#165196) on this card.


The DSP was matted with Mossy Meadow card (#133683) and attached to the Very Vanilla base card (#166785).

The sign post was cut with a Wonderful Scenes die (#168665). This die set is from the “Paper Pumpkin add ons”. I used the Earthen Tones Metallic Specialty Paper (#165901).

Both sentiments were stamped with VersaMark (#102283) and I used the Copper powder from the Metallics Wow! Embossing Powders (#165678) which was set with the Heat Tool (#129056). “Happy Birthday” is from Simply Said stamp set (#163756) and the other one is from the So Sincere stamp set (#162283).

I used Stampin’ Dimensionals (#104430) to attach both sentiments and the sign post to the card. The “stones” are from the April Paper Pumpkin kit.


“Love what you do and share what you love.”

INSPIRE. CREATE. SHARE.


https://www.stampinup.com.au


lesley.j.jendra@gmail.com


http://lesleysstampinground.blogspot.com


Friday, 3 April 2026

Layered Thoughts stamp set

 Hello again stamping friends,

I am using more retiring or Last Chance Products on today’s card.


I stamped “Happy Birthday” from the Layered Thoughts stamp set (#165346). Firstly I stamped the sentiment with Berry Burst ink (#147143) onto Basic White card (3166781). I used the new Stampin’ Positioner (#167768) which will be available from the new catalogue which starts on 5th May. I cleaned the stamp and without moving the card, I re-inked the stamp with VersaMark (#102283) and stamped over the image. I then added Clear Powder from the Basics Wow! Embossing Powders (#165679) and set it with the Heat Tool (#129056). This method allows you to Heat Emboss in any colour ink.

The sentiment and the Lights Of Aurora Designer Series Paper (#165755) were cut with the Textured Notes dies (#165555). I then used a die from the Fancy Borders (#165380) to cut the hearts on the DSP.

The DSP was taped to the Basic White base card and the sentiment was attached with Stampin’ Dimensionals (#104430). I glued the 3 hearts which were from the border, with the Multipurpose Liquid Glue (#110755). Clear Wink Of Stella (#141897) was used on the hearts. The retired Tinsel Gems Three-Pack were also attached to the card.

The Last Chance products are Layered Thought stamp set, Textured Notes dies, Light Of Aurora Designer Series Paper. The Fancy Borders dies & gems are no longer available.

“Love what you do and share what you love.”

INSPIRE. CREATE. SHARE.


https://www.stampinup.com.au


lesley.j.jendra@gmail.com


http://lesleysstampinground.blogspot.com


Saturday, 21 February 2026

Friendly Foliage Bundle

 Hello friends,

I thought I would start the day with cleaning my craft table (it always needs tidying), but didn't get far when I came across some left over products from previous projects and thought they would make a lovely card, so here is the card. By the way, the table still isn't tidied, but I was happy with the card.


I stamped the leafy image from the Friendly Foliage stamp set (#167021) with VersaMark (#102283) onto Very Vanilla card (#166785). I added the Copper powder from the Metallics Wow! Embossing Powders (#165678) and set it with the Heat Tool (#129056). This was cut with dies from the Friendly Foliage dies (#167023).

The Crumb Cake card (#121685) was cut with a Textured Notes die (#165555). I attached the leafy image to this with Mini Glue Dots (#103683).

The Very Vanilla card front was dry embossed with the Exposed Brick 3D Embossing folder (#161600), then matted it with Coastal Cabana card (#131302) and attached to the Very Vanilla base card.

The flower is from the stamp set from the 2026 Virtual Card Making Retreat (#170026). This was fussy cut from the larger image. This was stamped with Tuxedo Black Memento ink (#132708) and coloured with Bubble Bath Stampin’ Blends (#161675) and Daffodil Delight Stampin’ Blends (#154883). A Stampin’ Dimensional (#104430) was used to attach the flower to the card. The leaves were cut with a die from the Fragrant Layers dies (#167154) using the Pastel Shimmer Specialty Paper (#167198). These were attached with Mini Glue Dots.

“It’s Your Day” is from the Fragrant Layers stamp set (#167150) and this was also heat embossed with Copper powder. A Textured Notes die was used to cut the sentiment. A die from the Fragrant Layers dies was used to cut the Pastel Shimmer Specialty Paper for the banner behind the sentiment. Stampin’ Dimensionals were used to attach this to the card.

The Textured Notes dies are retiring but are still available at a reduced price (in Australia), and while stocks last.


“Love what you do and share what you love.”

INSPIRE. CREATE. SHARE. 


Thursday, 4 December 2025

Traditions Of Christmas Specialty Designer Series Paper

 Hi everyone,

With all the Christmas cards I have made already this year I just realised today I haven't got enough. Here’s an easy one using the beautiful Traditions Of Christmas Specialty Designer Series Paper (#165853).


The DSP was matted with Real Red card (#106578) then attached to the Basic White base card (#166781).

“Merry Christmas” is from the Traditional Labels stamp set (#165854) and I stamped this with Real Red ink (#147084).

The Real Red and Basic White rectangles were cut with the Textured Notes dies (#165555). These were attached to the card front with Stampin’ Dimensionals (#104430).

I stamped the flower from the Delicate Pines stamp set (#166067) with Real Red ink. The flower and Real Red & Granny Apple Green card (#147014) were all cut with the same die from the Delicate Pines dies (#166073). These were attached together with Mini Glue Dots (#103683) and attached to the card.


“Love what you do and share what you love.”

INSPIRE. CREATE. SHARE.


https://www.stampinup.com.au


lesley.j.jendra@gmail.com


http://lesleysstampinground.blogspot.com


Sunday, 24 August 2025

Prairie Grass stamp set

 Hello everyone,

I love the grass in the Prairie Grass stamp set (#166168) and have used it on this card.


I stamped onto the Thoughtful Journey 6”x6” Designer Series Paper (#163303) using VersaMark (#102283). I added the Silver powder from the Metallics Wow! Embossing Powders (#165678) and set it with the Heat Tool (#129056). I re-stamped again, and slightly offsetting it, and this time adding Black from the Basics Wow! Embossing Powders (#165679). This was heat set.

I then used 2 of the dies from the Textured Notes dies (#165555) to cut the rectangles from the DSP. I taped the outside piece of DSP to Shaded Spruce card (#147006). I used Foam Adhesive Sheets (#152815) cut into thin strips to attach the next piece so it was raised up. I taped the inside piece.

“With Love” is from the Extraordinary Flora stamp set (#165243) and stamped with Shaded Spruce ink (#147088). A Beautiful Butterflies die (#164614) was used to cut the sentiment. This was attached with Stampin’ Dimensionals (#104430). The retired Adhesive-Backed Sparkle Gems were added to the card.

“Love what you do and share what you love.”

INSPIRE. CREATE. SHARE. 


Friday, 8 August 2025

Sunrise Sailing Bundle

 Hello again,

A masculine card today using the Sunrise Sailing Bundle (#165497). This bundle includes the Sunrise Sailing stamp set (#165491) and the Sunrise sailing dies (#165496).


I cut the Misty Moonlight Two Tone card stock (#166686) into 2cm strips and taped them to a piece of Basic White card (#166781) with a 5mm space in between. I alternated the strips with the light & darker colours of the Two Tone card. I cut this with a Textured Notes die (#165555). This was matted with Cherry Cobbler card (#121681) and attached to the Basic White base card.

The sailing boat from the Sunrise Sailing stamp set was stamped with Cherry Cobbler ink (#147083) and cut with the co-ordinating die from the Sunrise Sailing dies.

The sentiment is also from this stamp set and stamped with Cherry Cobbler ink. A die from Textured Notes was used to cut the sentiment. The sailing boat and sentiment were attached with Mini Stampin’ Dimensionals (#144108).

I have had a very busy few weeks and now will be away for the next couple of weeks. I was hoping to have cards to post while away but that didn't happen, so I will be back soon.


“Love what you do and share what you love.”

INSPIRE. CREATE. SHARE.


Saturday, 2 August 2025

With You In Mind

 Hi again friends,

I always love the look of black & white, so here is one suitable for a male.


“Happy Birthday” is from With You In Mind stamp set (#164747). This was stamped with VersaMark (#102283) and I used Black powder from the Basics Wow! Embossing Powder (#165679) and set it with the Heat Tool (#129056). The sentiment and Basic Black card (#121688) were cut with the Textured Notes dies (#165555).

The Basic White card front (#166781) was dry embossed with the Plaster Painting (#164656) and matted with Basic Black card. This was attached to the Basic White base card. The Botanical Textures Designer Series Paper (#165545) was attached to the card front.

I taped the sentiment to the black card then this was attached to the card with Stampin’ Dimensionals (#104430).


“Love what you do and share what you love.”

INSPIRE. CREATE. SHARE. 


Monday, 7 July 2025

Elements Of Text stamp set

 Hi again friends,

Sorry for my absence for the past few days. I’ve had a very busy week plus had cortisone injections in both shoulders, but I’m back to doing what I love - crafting.


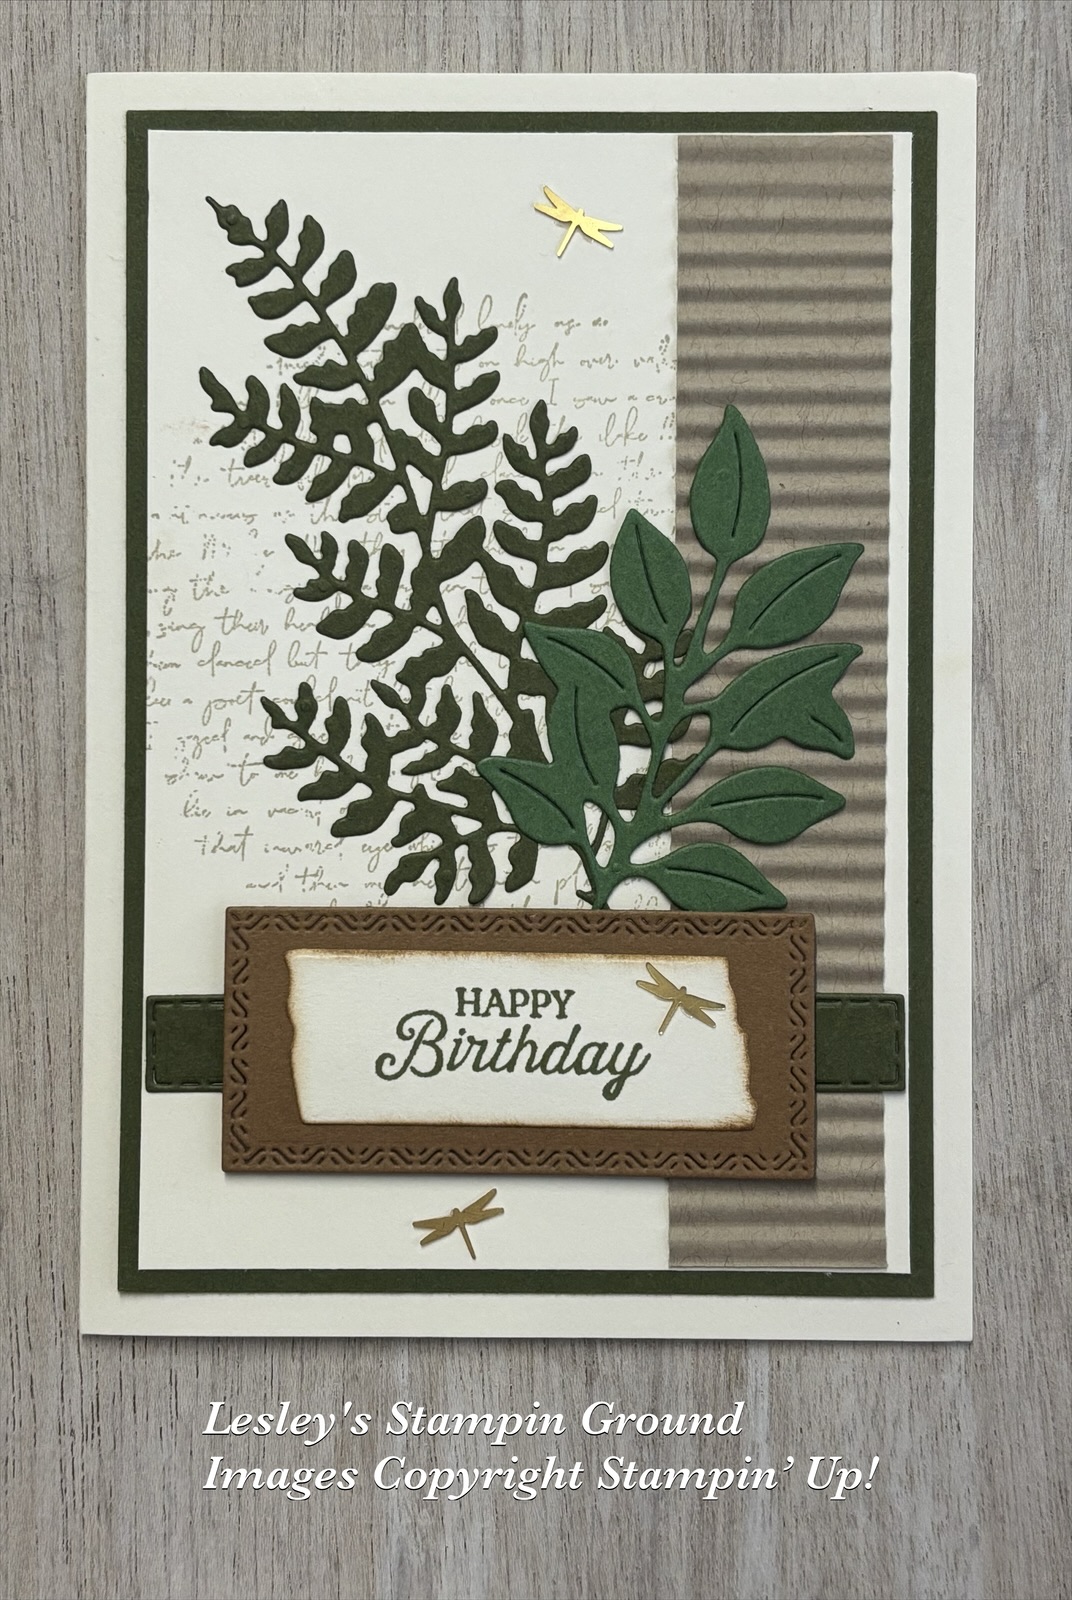
I have stamped the text from the Elements Of Text stamp set (#164774), using Crumb Cake ink (#166787) onto Very Vanilla card (#166785). This card was matted with Mossy Meadow card (#133683), then attached to the Very Vanilla base card.

I dry embossed the strip of Crumb Cake card (#121685) with the Mini Corrugated 3D Embossing Folder (#165559) and taped it to the right side of the card front.

The leaves were cut with dies from the Thankful Garden dies (#165533) and Beautiful Motifs dies (#165205). The Mossy Meadow card and the Garden Green card (#108605) were backed with Adhesive Sheet (#152334), before cutting with the dies. This makes it easy to attach the detailed die cuts to the card.

I cut a piece of Mossy Meadow card and a piece of Pecan Pie card (#161726) with the Textured Notes dies (#165555). The Mossy Meadow die cut strip was taped to the card and the Pecan Pie card was attached with Stampin’ Dimensionals (#104430).

The sentiment from the Loveliest Tree stamp set (#163714) was stamped with Mossy Meadow ink (#147111), then cut with a die from the Inspiring Imperfections (#165166) and attached to the card.

The dragonflies are from the Adhesive-Backed Dragonflies & Birds (#162743).


“Love what you do and share what you love.”

INSPIRE. CREATE. SHARE.


https://www.stampinup.com.au


lesley.j.jendra@gmail.com


http://lesleysstampinground.blogspot.com


Friday, 27 June 2025

Party Alphabet dies

 Hello again,

This card would be a great masculine card but easily changed to a feminine card by using different colours & Designer Series Papers.


I cut the letters with the Party Alphabet Dies (#165263) using Basic Black card (#121688) and Real Red card (#106578). I taped the black letters to the red letters with a slight offset to give a shadow effect. 

A design from the Country Woods Designer Series Paper (#163393) was matted wth Real Red card then attached to the Basic White base card (#166781).

Below the “H” & “A”, I have used a design from the Metallic Textures Rub-Ons (#165270). The pack of  Rub-Ons includes both Silver & Gold. I used silver.

“Birthday” is from the Layered Thoughts stamp set (#165346). This stamp does include “Happy” but I only wanted “Birthday”. So when I inked the stamp with Real Red ink (#147084), I covered Happy with a post it note, added the ink, removed the post it note and stamped “Birthday” onto Basic White card.

I used a Textured Notes Die (#165555) to cut the sentiment. To cut this the correct size I used a larger die to cut 2 sides, then repositioned the die to cut the other 2 sides.

The letters & “birthday” were attached with Stampin’ Dimensionals (#104430).


“Love what you do and share what you love.”

INSPIRE  CREATE  SHARE.


https://www.stampinup.com.au


lesley.j.jendra@gmail.com


http://lesleysstampinground.blogspot.com


Thursday, 19 June 2025

Gallery Blooms dies & Charming Day dies

 Hello again friends,

These leaves are cut using the Gallery Blooms dies (#165212) and the Charming Days dies (#166135).


For the background, I stamped an image from the Beautiful Motifs stamp set (#165198) onto Basic White card (#166781) with Crumb Cake ink (#147116), I then stamped the “blotches” from the Elements Of Text stamp set (#164774). This card was then dry embossed with the Exposed Brick 3D Embossing Folder (#161600), then matted with Pecan Pie card (#161726) and attached to the Basic White base card.

I stamped another image from the Elements Of Text stamp set using Soft Sea Foam ink (#147102), then cut this with a die from the Textured Notes dies (#165555). I attached this to the card front with Stampin’ Dimensionals (#104430).

The leaves were cut with card which was backed with Adhesive Sheet (#152334). The coloured cards used are Granny Apple Green (#147014), Pecan Pie, Cajun Craze (#121683) and Crushed Curry (#131288).

“Happy Birthday” from Simply Said stamp set (#163756) was stamped with Pecan Pie ink and cut with another Textured Notes dies. This was attached at each end with Mini Stampin’ Dimensionals (#144108).


Love what you do and share what you love.”

INSPIRE. CREATE. SHARE.  


Thursday, 29 May 2025

Metallic Textures Rub-Ons

 Hello friends,

The Metallic Textures Rub-Ons (#165270) have a great range of designs in both gold & silver. These are so easy to apply and look fantastic on your projects.


I used the gold rub-ons for the “woodgrain” and the row of dots along the bottom of the card front. To use these, cut the design from the sheet, peel away the backing sheet. Then place the silver/adhesive side onto the paper, rub with your finger until the image transfers to the paper. Peel away the sheet to reveal the image. I cut the Basic White card (#166781) with the “woodgrain” with a Textured Notes die (#165555).

The card front was dry embossed with the (retired) Timber Embossing Folder and matted with Real Red card (#106578) then attached to the Basic White base card. 

The Hibiscus from the Happy Hibiscus stamp set (#164877) was stamped with Real Red ink (#147084), and using the stamping off method for the lighter colour. This was the cut & embossed with the Happy Hibiscus Hybrid Embossing Folder (#164879). The leaves were also cut with the dies (included in the hybrid embossing folder), using Garden Green card (#108605).

The sentiment is from the More Messages stamp set (#165471), stamped with Real Red ink and cut with the More Messages die (#165472).

The “woodgrain” was taped to the card front. The sentiment & hibiscus were attached with Stampin’ Dimensionals (#104430) and I used Mini Glue Dots (#103683) to attach the leaves. 

Clear Wink Of Stella (#141897) was added to the flower. The Flower Accents (#165171) were added to finish the card.


“Love what you do and share what you love.”

INSPIRE. CREATE. SHARE. 


Thursday, 8 May 2025

Beautiful Gallery Designer Series Paper

 Hello friends,

I love these designs in the Beautiful Gallery Designer Series Paper (#165196) with an “old world” look.


I used a Textured Notes die (#165555) to cut the middle of the DSP. I then used the next larger size die to cut the Secret Sea card (#165296). These two pieces were taped together and the larger piece of DSP was also matted with Secret Sea card.

 I attached the smaller piece of matted DSP with Stampin’ Dimensionals (#104430) on top of the cut out piece.

“Congratulations” was stamped with Secret Sea ink (#165285) using the More Messages stamp (#165471) and cut it with the co-ordinating More Messages die (#165472). This stamp & die is also available as a bundle - More Messages bundle (#165473). This stamp has a variety of sentiments and all cut with the one die. I am now getting quite a collection of sentiments in various colours and put them aside for a card when needed. The sentiment was attached with Mini Stampin’ Dimensionals 144108).

The base card is Basic Beige (#164512).

“Love what you do and share what you love.”

INSPIRE. CREATE. SHARE. 


Tuesday, 18 March 2025

With You In Mind

 Hello & welcome,

I am back after a very busy week, but had a fabulous time at Stampin’ Up! On Stage in Brisbane for 3 days. 

I am showing another card today using the Baby Wipes Technique, as shown in a post on 4th March. When I do this technique I stamp a variety of images to be able to use at a later time as I dont like to waste the ink.


The sentiment and butterfly were both stamped with this technique. “Happy Birthday” is from the With You In Mind stamp set (#164747). The butterfly is from the Sketched Butterflies stamp set (#163490). The butterflies were cut with the Sketched Butterflies dies (#163491). The small butterfly was cut from Azure Afternoon card (#161728).

The Real Red card and the sentiment were cut with the Textured Notes dies (#165555). The Azure Afternoon card front was dry embossed with the Soft Waves embossing folder (#164695) and attached to the Basic White base card (#159228).

The Real Red card was taped to the card. I used Stampin’ Dimensionals (#104430) to attach the sentiment & butterfly. The small butterfly was attached with a Mini Glue Dot (#103683). The Iridescent Adhesive-Backed Discs (#161954) were added to the card.

“Love what you do and share what you love.”

INSPIRE. CREATE. SHARE. 


https://www.stampinup.com.au


lesley.j.jendra@gmail.com


http://lesleysstampinground.blogspot.com


Saturday, 8 March 2025

You Are Remarkable

 Hi friends,

I am very thankful not to have any effect from the cyclone overnight. Many areas have been affected but we are one of the lucky ones. So I’m now back in the craft room getting organised for upcoming classes.

Today I am using the You Are Remarkable stamp set (#165445) for the floral image.


I stamped the outline of the floral image with VersaMark (#102283) and used the Gold from the Wow! Metallics Embossing Powder (#165678) which was set with the Heat Tool (#129056). This stamp set is a 2 Step stamp so I then stamped the flower with Highland Heather ink (#147103), the leaves with Lost Lagoon ink (#161678) and the flower centre with Daffodil Delight ink (#147094).

The Perennial Lavender Designer Series Paper (#162593) was attached to the Basic White Base card (#159228).

I cut the stamped image and the Gorgeous Grape card (#147011) with the Textured Notes dies (#165555). A die from the Framed Scenes (#165396) was used for the squiggly lines on the Gorgeous Grape card.

“Happy Birthday” from the So Sincere stamp set (#162283) was stamped with Gorgeous Grape ink (#147099). This was also cut with a Textured Notes dies. The floral image and sentiment were attached with Stampin’ Dimensionals (#104430).

The dragonflies are from the Adhesive-Backed Dragonflies & Birds (#162743).


“Love what you do and share what you love.”

INSPIRE. CREATE. SHARE