Thursday, 19 June 2025

Gallery Blooms dies & Charming Day dies

 Hello again friends,

These leaves are cut using the Gallery Blooms dies (#165212) and the Charming Days dies (#166135).


For the background, I stamped an image from the Beautiful Motifs stamp set (#165198) onto Basic White card (#166781) with Crumb Cake ink (#147116), I then stamped the “blotches” from the Elements Of Text stamp set (#164774). This card was then dry embossed with the Exposed Brick 3D Embossing Folder (#161600), then matted with Pecan Pie card (#161726) and attached to the Basic White base card.

I stamped another image from the Elements Of Text stamp set using Soft Sea Foam ink (#147102), then cut this with a die from the Textured Notes dies (#165555). I attached this to the card front with Stampin’ Dimensionals (#104430).

The leaves were cut with card which was backed with Adhesive Sheet (#152334). The coloured cards used are Granny Apple Green (#147014), Pecan Pie, Cajun Craze (#121683) and Crushed Curry (#131288).

“Happy Birthday” from Simply Said stamp set (#163756) was stamped with Pecan Pie ink and cut with another Textured Notes dies. This was attached at each end with Mini Stampin’ Dimensionals (#144108).


Love what you do and share what you love.”

INSPIRE. CREATE. SHARE.  


Wednesday, 18 June 2025

Simple Scrapbooking

 Hi friends,

Another simple double page scrapbook layout, this time using the Floral Delight Designer Series Paper (#164700). I usually find the plainer designs on the reverse of the DSP is great for scrapbooking.


The Alphabet A La Mode dies (#160750) were used to cut the letters for the title. I used Basic Black card (#121688) backed with Adhesive Sheet (#152334) and attached them to the page.

The leaves are cut using the Charming Day Dies (#166135). I used Granny Apple Green card (#147014) and Pecan Pie card (#161726), both backed with Adhesive Sheet.

The photos were matted with Basic Black card and taped to the pages and the leaves were attached.


“Love what you do and share what you love.”

INSPIRE. CREATE. SHARE. 


Tuesday, 17 June 2025

Double scrapbook layout

 Hello friends,

I have made a double scrapbook layout with photos from a recent short holiday. I like to include lots of photos and limit the embellishments for simple pages on my scrapbooking.


The base pages are from the Country Woods Designer Series Paper (#163393). I dry embossed the Cajun Craze card (#121683) with the Birch Wood 3D Embossing Folder (#164069). This was attached to the base pages. 

The other DSP is from the Memories In Bloom Scrapbooking Workshop kit (#166713).

I matted the photos with Basic Black card (#121688), and some of the photos were double matted with Granny Apple Green card (#147014).

The leaves were cut with an Autumn Leaves die (#162185). These are retiring and are on the Last Chance products, while stocks last. I used Cherry Cobbler card (#121681), Daffodil Delight card (#121680) and Crumb Cake card (#121685) for the leaves.


“Love what you do and share what you love.”

INSPIRE. CREATE. SHARE. 


Monday, 16 June 2025

Terrific Toadstools

 Hello & welcome,

Before I put the Beautiful Gallery Designer Series Paper (#165196) from yesterday’s card, I thought I would use it again on this card with a totally different look.


Again I matted the DSP with Mossy Meadow card (#133683). This was attached to the Basic White base card (#166781).

I used the Spotlight On Nature dies (#163580) to cut the circles. “Best Of Luck” is from the Unbounded Love stamp set (#163378) and stamped with Mossy Meadow ink (#147111).

The toadstools are from the Terrific Toadstools stamp set (#164783). These were stamped with Pecan Pie ink (#161665) and Timid Tiger ink (#165278). The stalks were stamped with Crumb Cake ink (#147116) and the Terrific Toadstools Builder Punch (#164789) was used to punch the toadstools & stalks.

I used a die from the Mixed Labels dies (#164652) to cut the small leaves from Old Olive card (#106576).

The mossy meadow circle was attached with Mini Glue Dots (#103683). Mini Stampin’ Dimensionals (#144108) were used to attach the sentiment and toadstools. Mini Glue Dots were used to attach the leaves. The Holographic Resin Dots (#165598) were added to the card.


“Love what you do and share what you love.”

INSPIRE. CREATE. SHARE. 


https://www.stampinup.com.au


Sunday, 15 June 2025

Beautiful Gallery Designer Series Paper

 Hi again everyone,

The Beautiful Gallery 6”x6” Designer Series Paper (#165196) has a lovely range of “old world” designs from florals to landscapes. The plainer piece of DSP on the left is the back of the floral design.


I used a die from the Fancy Borders (#165380) to cut the leaves in the DSP. The 2 pieces of DSP were attached to the Mossy Meadow card (#133683). This was attached to the Basic Beige base card (#164512).

I cut 2 flowers with a die from the Charming Day dies (#166135). I daubered the edges with Mossy Meadow ink (#147111) and added Clear Wink Of Stella (#141897). I attached these together with Mini Glue Dots (#103683), slightly offsetting them. These were attached to the card with Mini Stampin’ Dimensionals (#144108). I cut the small leaves from Mossy Meadow card, using a Mixed Labels die (#164652). This card was backed with Adhesive Sheet (#152334), making it easy to attach them to the card.

I also used Clear Wink Of Stella on these die cut leaves and the leaves cut from the Fancy Borders die.

“Thinking Of You” from Beautiful Motifs stamp set (#165198) was stamped with Mossy Meadow ink and cut with a Beautiful Butterflies die (#164614), then attached with Mini Stampin’ Dimensionals.


“Love what you do and share what you love,”

INSPIRE. CREATE. SHARE. 


Saturday, 14 June 2025

Storybook Moments Specialty Designer Series Paper

 Hello friends,

How cute is the Storybook Moments Specialty Designer Series Paper (#164662). As part of this pack there are 2 sheets of die cut images and I have used 2 of the images on this card.


The DSP for the card front is from the same pack. This was matted with Pretty Peacock card (#150886) then attached to the Basic White base card (#166781).

The sentiment is from the Everyday You & Me stamp set (#166629) and stamped with Pretty Peacock ink (#150083).

I cut the 3 circles from Basic White card using the Spotlight On Nature dies (#163580). The one with the sentiment was attached with Stampin’ Dimensionals (#104430) & the other 2 were taped to the card. 

The 2 cute die cut images were attached with Mini Stampin’ Dimensionals (#144108). The Antique Pearls (#164679) were added to finish the card.


“Love what you do and share what you love.”

INSPIRE. CREATE. SHARE.


https://www.stampinup.com.au


lesley.j.jendra@gmail.com


http://lesleysstampinground.blogspot.com


Friday, 13 June 2025

Sunrise Sailing Bundle

 Hi again my friends,

I have made a masculine card today using the Sunrise Sailing Bundle (#165497) which consists of the Sunrise Sailing stamp set (#165491) and Sunrise Sailing dies (#165496).


I stamped the larger yacht with VersaMark (#102283) and used Silver powder from the Metallics Wow! Embossing Powder (#165678), and set it with the Heat Tool (#129056). I stamped the sails with Azure Afternoon ink (#161663) using the stamping off method for a lighter colour. For the boat I used full strength Azure Afternoon ink.

The 2 yachts were cut with the Sunrise Sailing dies. I used Silver Foil (#163387) and Cherry Cobbler card (#121681) for the small yacht.

A die from the Everyday Arches dies (#164629) was used to cut the Winter Meadow Designer Series Paper (#162133). This was attached to the Cloud Cover from the Flower Garden Foils Specialty Paper (#165511). The foil was matted with Cherry Cobbler card and attached to the Basic White Base card (#166781).

The sentiment is also from the Sunrise Sailing stamp set and stamped with Cherry Cobbler ink (#147083). I cut this with the same Everyday Arches die, as shown below, as I wanted the “stitching” around the sentiment, the same as the arch.


The larger yacht and sentiment were attached with Mini Stampin’ Dimensionals (#144108) and the small yacht with Mini Glue Dots (#103683).

“Love what you do and share what you love.”

Thursday, 12 June 2025

Charming Day Bundle

 Hi friends,

One great perk of being a Stampin’ Up! demonstrator is that you can get access to products early, so here is a sneak peek of the Charming Day Bundle (#166136). This will be available early July.


I used one of the 3 designs from the Irresistible Designs Specialty Designer Series Paper (#165305) for the card front. I used a Blending Brush (#153611) to apply the Bubble Bath ink (#161664). This DSP has a coating which resists the ink so the design is more prominent once the ink is applied. I matted the card front with Pool Party card (#124391) and attached it to the Basic White Base card (#166781).

The floral image from the Charming Day stamp set (#166126) was stamped with Tuxedo Black Memento ink (#132708). The flowers were coloured with Bubble Bath Stampin’ Blends (#161675) and the leaves with Pool Party Stampin’ Blends (#154894).

I cut the floral image and extra leaves with the Charming Days dies (#166135). Pool Party card was used for the extra leaves. The floral image was attached with Mini Stampin’ Dimensionals (#144108) and I used Mini Glue Dots (#103683) to attach the die cut leaves.

“Lots Of Love” from the More Messages stamp set (#165471) was stamped with Petunia Pop ink (#163811), then cut with the More Messages die (#165472). This was also attached with Mini Stampin’ Dimensionals. The embellishments are from the retired Purple Adhesive-Backed Sequins.


“Love what you do and share what you love.”

INSPIRE. CREATE. SHARE. 


Wednesday, 11 June 2025

Sunflower 3D Embossing Folder

 Hello again my friends,

I have just used the stunning Sunflower 3D Embossing Folder (#166145) for this card. This embossing folder will be available from the Online Exclusives in early July. 


This folder is large - 15.2cm x 21.6cm (6”x8-1/2”) and has bold textured sunflower designs. After embossing the Daffodil Delight card (#121680) I added some colour with Sponge Daubers (#133773), using Crushed Curry ink (#147087) on the petals, Lemon Lime Twist ink (#147145) on the leaves and Pecan Pie ink (#161665) on the flower centres. I then added some glimmer to the petals with the Clear Wink Of Stella (#141897).

I matted this card with Pecan Pie card (#161726) and attached it to the Basic White base card (#166781).

The sentiment is from the Year Of Flowers stamp set (#165367) and stamped with Pecan Pie ink. A Perennial Postage die (#162607) was used to cut the sentiment. Mini Stampin’ Dimensionals (#144108) were used to attach it to the card.

“Love what you do and share what you love.”

INSPIRE.  CREATE.  SHARE.


https://www.stampinup.com.au


lesley.j.jendra@gmail.com


http://lesleysstampinground.blogspot.com


Tuesday, 10 June 2025

Beautiful Blues Kit

 Hi friends,

I am using the Beautiful Blues Kit (#165658) for the card front of this card. The great thing about kits is you can make them as shown in the kit or put your own twist on them.


One of the card bases in this kit has a design on both sides, so I cut off one side to use. I then cut it in 3 pieces and matted it with Silver Foil Sheet (#163387) and attached it to the Basic White base card (#166781).

The sentiment from the Year Of Flowers stamp set (#165367) was stamped with Blueberry Bushel ink (#147138) and cut it with a Year Of Flowers die (#165374). The Silver Foil leaves were also cut with dies from the Year Of Flowers. This silver foil was backed with Adhesive Sheet (#152334) making it easy to attach these small detailed leaves to the card.

The embellishments are also from the kit.

“Love what you do and share what you love.”

INSPIRE. CREATE. SHARE. 


Sunday, 8 June 2025

Party Banners Dies

 Hello again friends,

The Party Banners dies (#165264) are great for making banners for all occasions as well as using for cards. I have made this welcome banner which I have hung in the front entry of our home. The largest banner die is 17.8cm x 13.7cm (#7”x5-3/8”) so quite a large size. With 14 different sizes of banner dies you can make you banner any size to suit your requirements.


I used the largest banner die for the Highland Heather card (#147010) for the background. The slightly  smaller dies were used for the Gorgeous Grape card (#147011) and the Designer Series Paper. This is a retired paper. We all have excess of DSP that needs to be used, don't we.

I dry embossed the DSP with the Mini Corrugated 3D embossing folder (#165559) and the Highland Heather card with the So Swirly embossing folder (#163791). I taped these banners together.

The letters are cut from Gold Foil Sheets (#132622). I don’t have the Party Alphabet dies (#165263) which would have been perfect. (I cut these with an Electronic cutter).

The butterflies are cut with dies from the Beautiful Butterflies dies (#164614) using Highland Heather & Gorgeous Grape card.

The flowers are from the Extraordinary Flora Washi Tape (#165269).
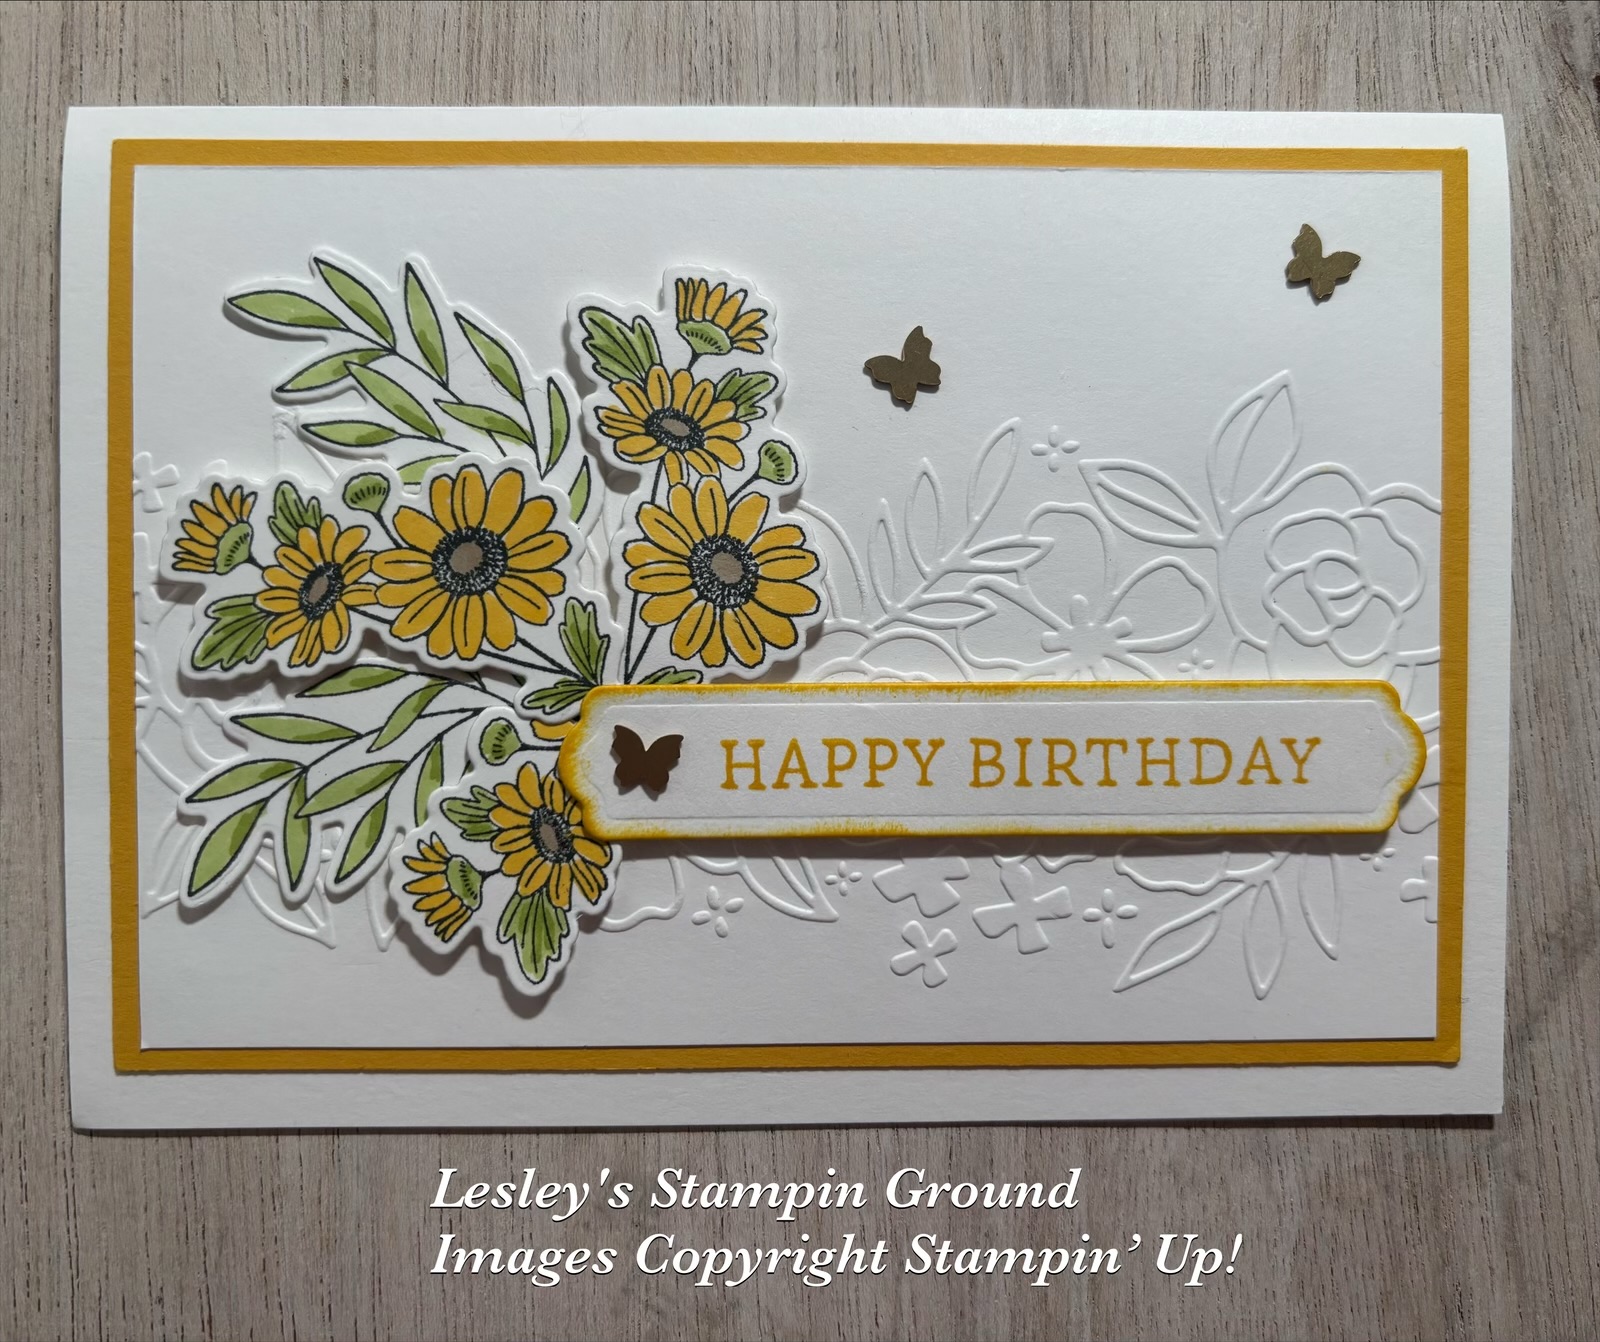
 I must be obsessed with this tape as I have used it on so many projects.

I used Mini Glue Dots (#103683), Mini Stampin’ Dimensionals (#144108) and Stampin’ Dimensionals (#104430) to attach the flowers, leaves, letters & butterflies to the banners. The Flower Accents (#165171) were attached to each butterfly.

I threaded the Gold Ribbon from the Gold & Silver 1/8” Trim Combo Pack (#161633) through the banners to hang it.


“Love what you do and share what you love.”

INSPIRE. CREATE. SHARE.


Saturday, 7 June 2025

Extraordinary Flora Washi Tape

 Hi everyone,

I have lots of images cut from the Extraordinary Flora Washi Tape (#165269), from previous projects, so here’s today’s card using some of the flowers & leaves.


The Washi tape was attached to a piece of Basic White card (#166781) and cut with the Extraordinary Flora die (#165244). This one die cuts all the images at one time, making it so easy.

I dry embossed the Basic White card front with the Mini Corrugated 3D embossing folder (#165559) and matted it with Strawberry Slush card (#165297). This was attached to the Basic White base card.

I used 2 dies from the Everyday Arches dies (#164629) to cut the arch, also using Strawberry Slush card. This was attached to the card with Mini Glue Dots (#103683).

The larger flower with the leaves was attached with Mini Stampin’ Dimensionals (#144108) and all the other leaves & flowers were attached with Mini Glue Dots. The embellishments are from the Strawberry Slush & Pretty In Pink Gems (#165615). I added some glimmer to the flowers with the Clear Wink Of Stella (#141897).

At this stage I have left off a sentiment and will put one on when I decide what I need the card for.

“Love what you do and share what you love.”

INSPIRE. CREATE. SHARE. 


Friday, 6 June 2025

Inspiring Imperfections

 Hello again friends,

These vases are from the Inspiring  Imperfections Bundle (#165167) which consists of the Inspiring Imperfections stamp set (#165161) and Inspiring Imperfections dies (#165166).


The vases were stamped onto Coastal Cabana card (#131302) with VersaMark (#102283) and I used the white powder from the Basics Wow! Embossing Powder (#165679) for one vase and Gold powder from the Metallics Wow! Embossing Powder (#165678) for the other. These were cut with an Inspiring Impressions die.

The card front is from the Irresistible Designs Specialty Designer Series Paper (#165305). I coloured this using Blending Brushes (#153611) with Flirty Flamingo ink (#147052), Coastal Cabana ink (#147097), Daffodil Delight ink (#147094) and Azure Afternoon ink (#161663). This paper has a UV-coated pattern which resists ink so you can see the pattern once you apply the ink. There are 3 different designs in the pack. The card front was matted with Coastal Cabana card and attached to the Basic White base card (#166781).

The Gold Foil Sheet (#132622) was dry embossed with the Mini Corrugated 3D embossing folder (#165559). This was taped to the card front and the vases were attached with Mini Stampin’ Dimensionals (#144108) and tape.

“Happy Birthday” is from the Loveliest Tree stamp set 163714) and stamped with Coastal Cabana ink, then cut with a Mixed Labels die (#164652). Mini Stampin’ Dimensionals were also used to attach the sentiment. The embellishments are the beautiful Flower Accents (#165171).

“Love what you do and share what you love.”

INSPIRE. CREATE. SHARE. 


Thursday, 5 June 2025

Gallery Blooms bundle

 Hi friends,

I have used the Gallery Blooms Bundle (#165206) on today’s card. This bundle includes the Gallery Blooms stamp set (#165211) and Gallery Blooms dies (#165212).


The floral image was stamped with Tuxedo Black Memento ink (#132708). This was coloured with Petunia Pop Stampin’ Blends (#163828) and Soft Sea Foam Stampin’ Blends (#154902). A co-ordinating die was used to cut this image.

The frame is also cut with one of the Gallery Blooms dies using Gold Foil Sheet (#132622). The leaf dies from the same set cut the Lost Lagoon card (#133686).

The Basic White card front (#166781) was dry embossed with the Damask Designs Embossing Folder (#165214), then matted with Petunia Pop card (#163802) and attached to the Basic White card base.

The frame and floral image were attached to the card with Stampin’ Dimensionals (#104430). The leaves were attached with Mini Glue Dots (#103683).

I used the More Messages Bundle (#165473) to stamp & cut the sentiment. This was attached with Mini Stampin’ Dimensionals (#144108). The retired Blooming Pearls were added to the card.


“Love what you do and share what you love.”

INSPIRE. CREATE. SHARE.