Monday 28 February 2022

Waves Of Inspiration

Hi everyone,

At last the rain has stopped here, although heading south and causing flooding in so many areas, so thinking of everyone in all the disaster areas. Please stay safe.

The Waves Of Inspiration Bundle (#158841) is an early release from the upcoming 2022/2023 annual catalogue, due in May. You can purchase this bundle as well as other products in the collection from 1st March. 

I have just had my first play with some of the products.


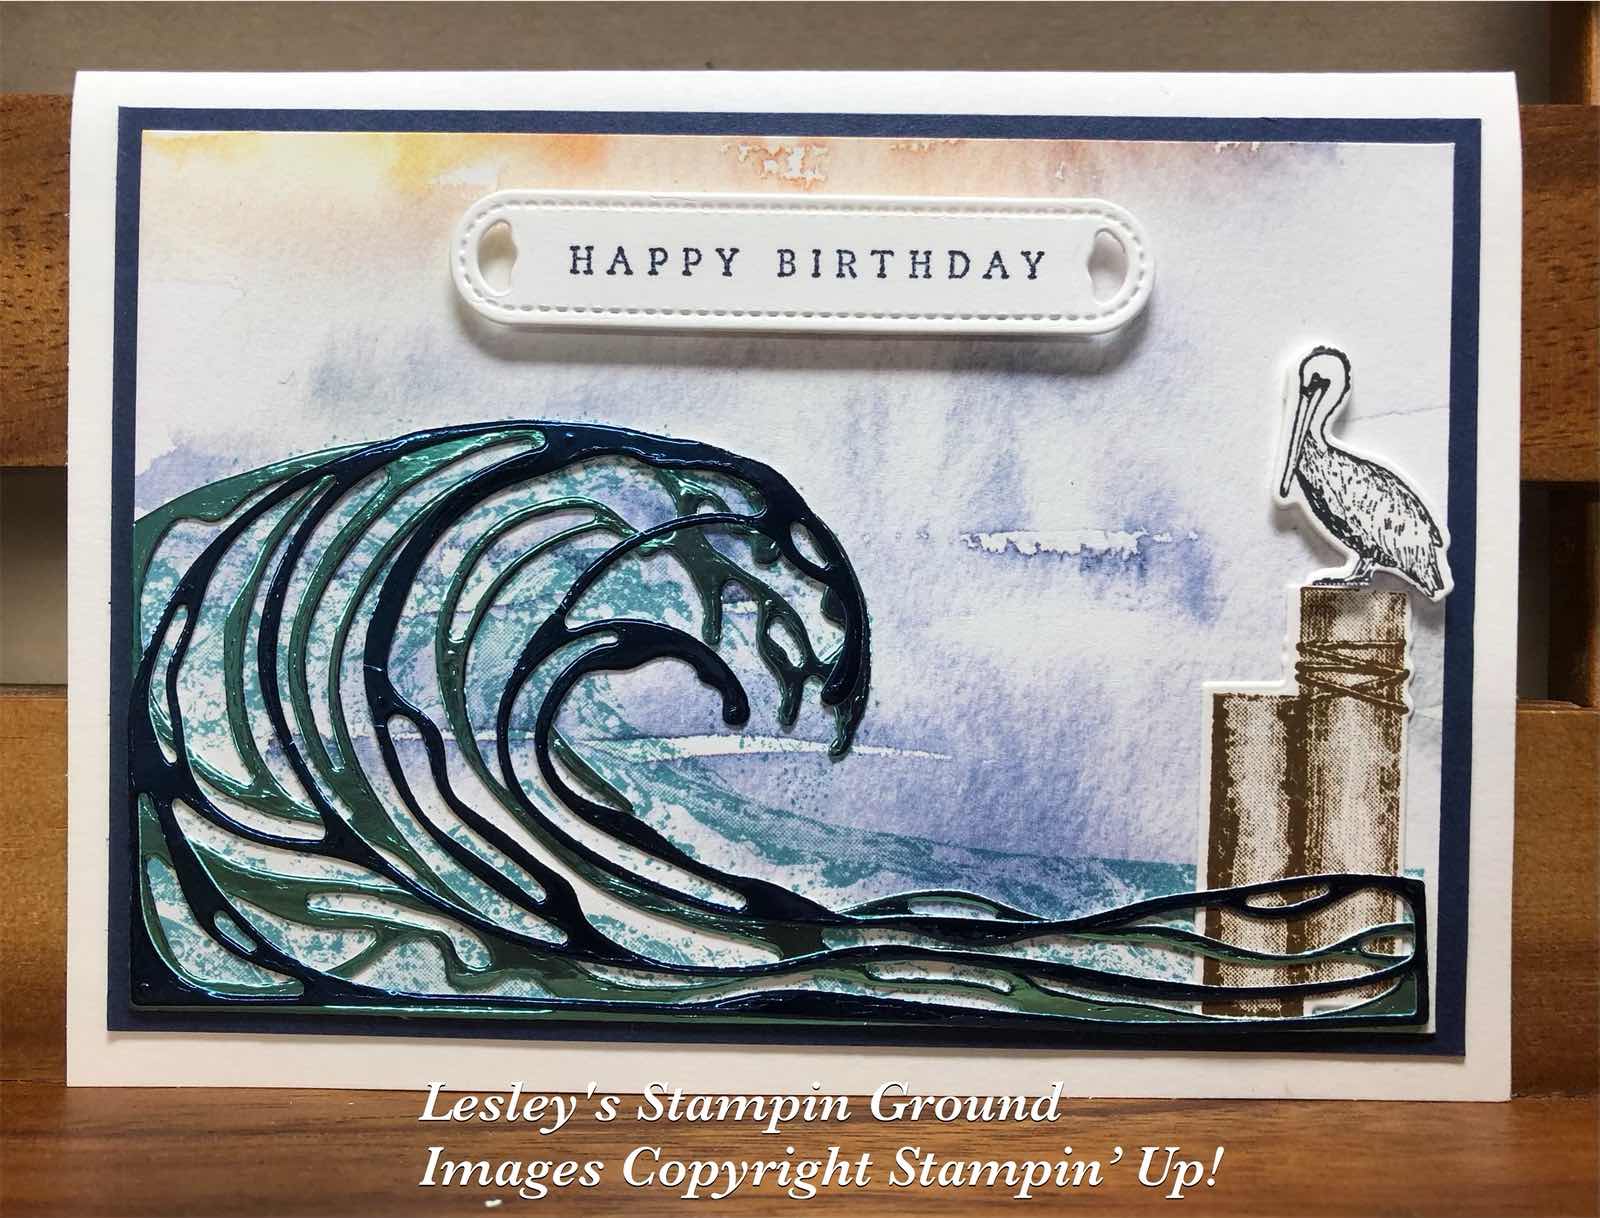
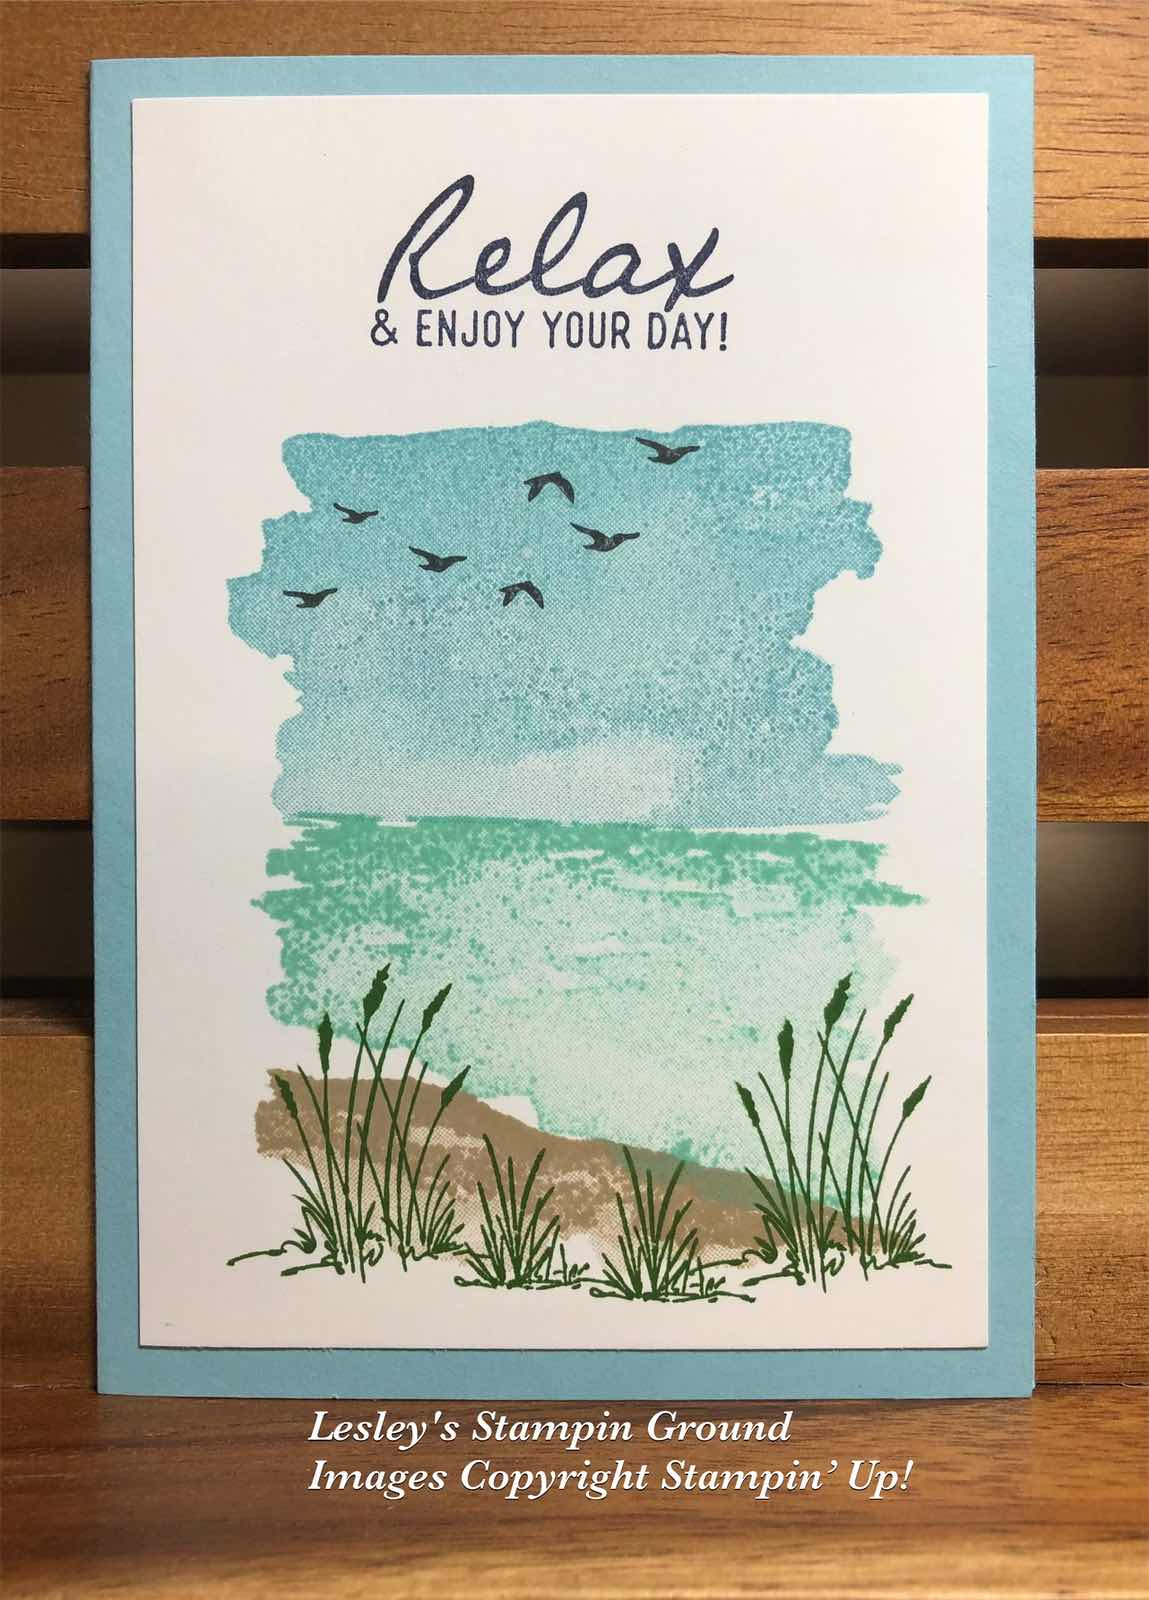
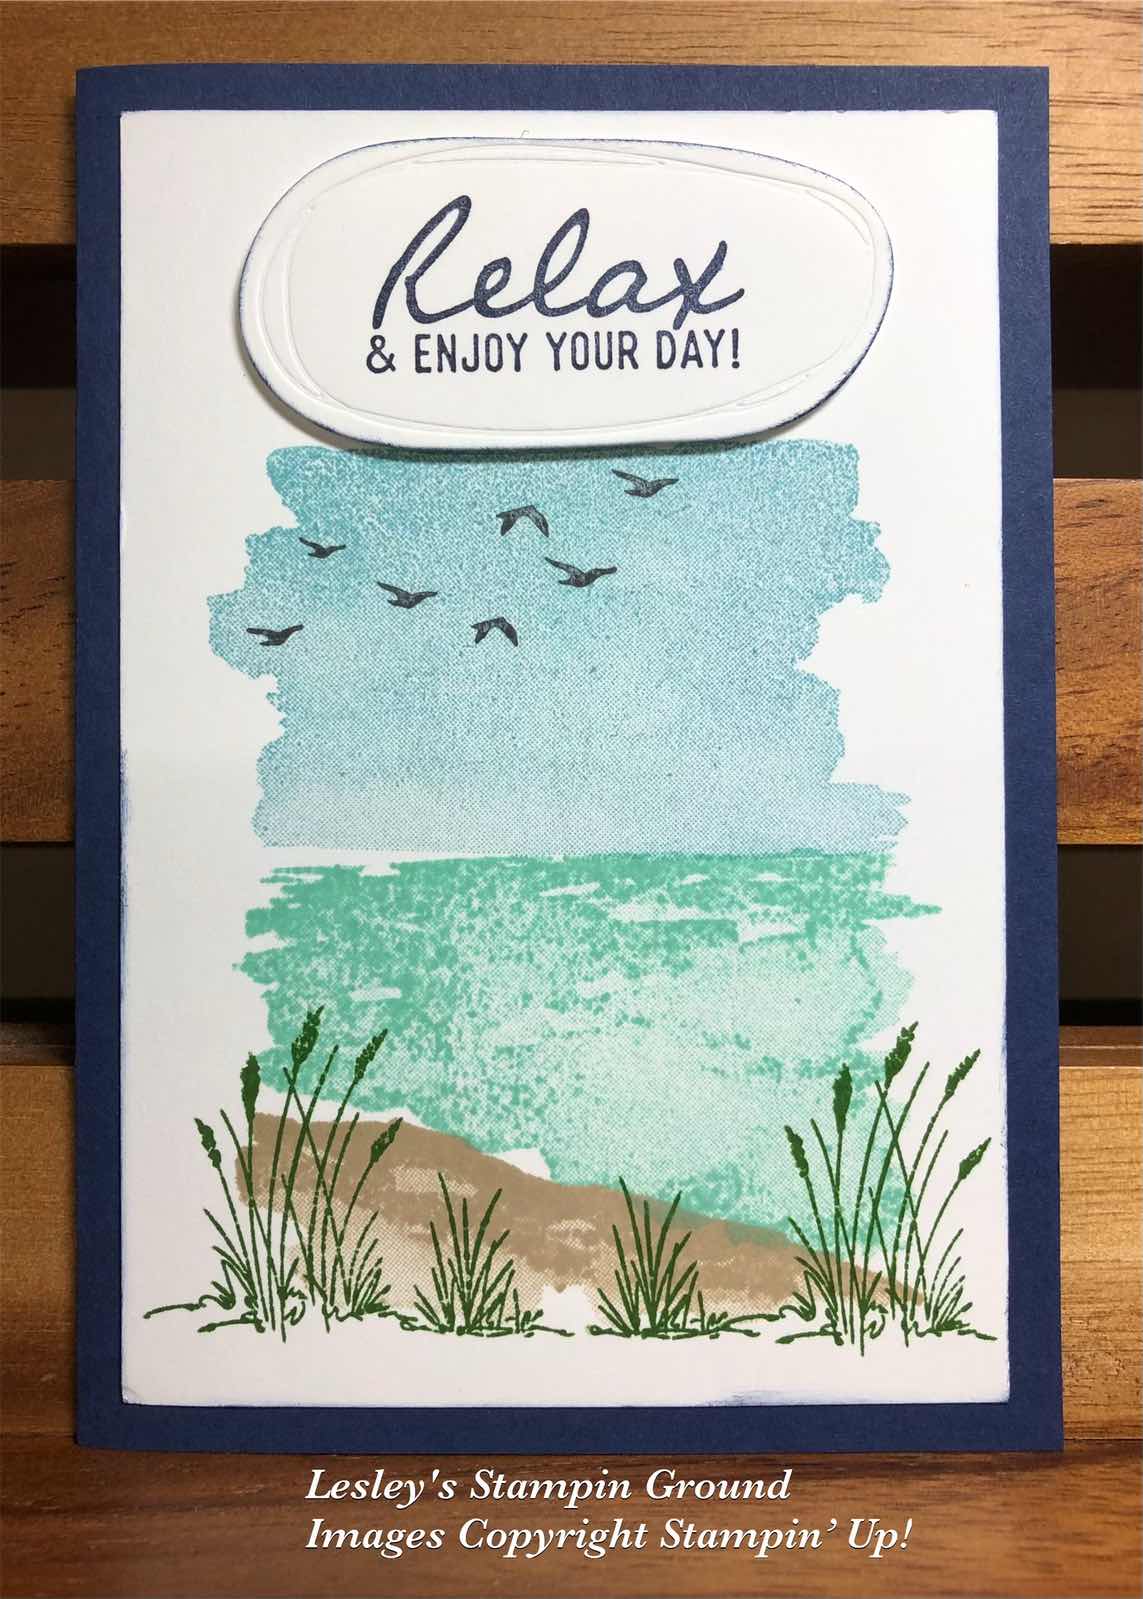
I stamped the wave from the Waves Of Inspiration stamp set (#158833) onto a piece of the New Horizons Designer Series Paper (#157768) with Balmy Blue ink (#147105). I stamped the pelican on the post from the same stamp set, with Soft Suede ink (#147115) and Tuxedo Black Memento ink (#132708). These were cut with a die from the Waves Dies (#158840). I cut the pelican from both images and used the Soft Suede posts and the black pelican. The pelican was attached with Mini Glue Dots (#103683).

Another product included in the Waves Of Ocean collection (#161797) is the Blue Foils Specialty Paper (#159983). There are 3 colours included in this pack - Coastal Cabana, Night Of Navy & Silver. I used the Coastal Cabana & Night Of Navy foils for the waves cut with the Waves dies. I had adhered the Adhesive Sheets (#152334) to the back of the foils for ease of attaching these detailed cut-outs to the card.

“Happy Birthday” is one of the sentiments from the Waves Of Inspiration stamp set and cut with another Waves die. This was attached to the card with Stampin’ Dimensionals (#104430).

TIP: The stamp set & dies are available from 1st March and will also be available in the next annual catalogue. The Waves Of Ocean Designer Series Paper (#159982), Blue Foils Specialty Paper and the Rhinestone Waves Basic Jewels (#159396) are available from 1st March and while stocks last.

“Love what you do and share what you love.”


Sunday 27 February 2022

Dahlia Days

Hello again,

The rain still hasn’t stopped here and hasn’t let up all day. Hopefully everyone in the flooded areas are safe. On the positive side, it’s good weather for crafting!!


The patterned paper is from the Pattern Party Designer Series Paper (#155426). I cut 2 triangles and attached these to the Real Red card (#106578), then this was attached to the Basic White base card (#159228).

The dahlias, leaves and sentiment are all from the Dahlia Days stamp set (#157799). I used Pacific Point ink (#147098) and Real red ink (#147084) for the dahlias. The leaves were stamped with Granny Apple Green ink (#147095) and the sentiment with Real red ink. The flowers & leaves were cut with dies from the Detailed Dahlias (#157801). The dies to cut the sentiment and the Real Red card under the sentiment are from the Ornate Frames (#150664).

The leaves and blue flower were taped to the card and Stampin’ Dimensionals (#104430) were used for the red flower and sentiment. The Brushed Brass Butterflies (#158136) were attached to the card.

“Love what you do and share what you love.”


Saturday 26 February 2022

Heart & Home Doilies

Hello friends,

The deluge of rain and flooding is continuing in the south east of Qld, so I hope everyone is safe. I am lucky to be well & truely out of flood level, so can occupy myself in the craft room.

I have stamped on one of the Heart & Home Doilies (#157956) using an image from the Friendly Hello stamp set (#158075). This is a set from Sale-a-bration which is continuing till 16th March in Australia.


I cut a circle from a post-it note with a Layering Circles Die (#151770) to make a mask about the size of the dotted area of the inside of the doily. I then placed the mask over the doily (see above) so when I stamped the image it only stamped on the solid area. I stamped the image with VersaMark (#102283), removed the mask, then added the White Stampin’ Emboss Powder (#155554) and set with the Heat Tool (#129056).

I stamped the splotches from the Colour & Contour stamp set (#154994) with Smoky Slate ink (#147113) onto the Basic White base card (#159228). I added a strip of Misty Moonlight card (#153086) to the card, then added a piece of the Home & Heart Designer Series Paper (#157928). I daubered the edges of the card front with Misty Moonlight ink (#153118).

The sentiment is from the Blessings Of Home stamp set (#157930) and stamped with Misty Moonlight ink. I used the Messages Die (#154422) to cut the sentiment. The doily was attached to the card with Stampin’ Dimensionals (#104430). The right side of the sentiment was attached with Mini Stampin’ Dimensionals (#144108) and a Mini Glue Dot (#103683) on the left of the sentiment, as the doily is already on Dimensionals.

The embellishments used are the Rhinestone Basic Jewels (#144220).


“Love what you do and share what you love.”


Friday 25 February 2022

Art Gallery

Hello stamping friends,

It’s always nice to re-visit some products in the annual catalogue. It’s so easy to play with all the new products once the mini catalogue arrives but there are still so many exciting products in the annual catty. These flowers and sentiment are from the Art Gallery stamp set (#158201).


This stamp set is a Two-Step set which means you can stamp 2 images with different colours. For the single flower I stamped the darker colour with Pumpkin Pie ink (#147086), then stamped the lighter colour with Pale Papaya ink (#155670). The group of small flowers was stamped with Daffodil Delight ink (#147094) for the background and Mango Melody ink (#147093) for the darker colour. The leaves were stamped with Pear Pizzaz ink (#147104). All these stamped images were then cut with dies from the co-ordinating Floral Gallery dies (#154316).

I attached the Paper Lattice (#155697) to the Very Vanilla card front (#106550) using Mini Glue Dots (#103683). The yellow flowers and leaves were also attached with Mini Glue Dots and the orange flower with Stampin’ Dimensionals (#104430).

The sentiment was stamped with Pumpkin Pie ink. The sentiment and the label under it were cut with Ornate Frames Dies (#150664). Stampin’ Dimensionals were used to attach this to the card. I daubered the edges of the card front with Pumpkin Pie ink, then this was attached to the Very Vanilla base card. The embellishments are from the Holiday Rhinestone Basic Jewels (#150457).

TIP: When I attached the Paper Lattice, I used adhesive under areas which would not be visible on the finished card - under the flowers and sentiment.

“Love what you do and share what you love.”


For those in any areas flooding in Queensland, please stay safe. This is a good excuse to stay home & craft if you are out of flood areas.


Thursday 24 February 2022

Seas The Day Bundle

Hi & welcome friends,

The Seas The Day Bundle (#157858) consists of the Seas The Day stamp set (#157849) and the Sea Dies (#157857) and have been used for this cute card.


The fish, octopus, star fish & crab are all from the Seas The Day stamp set. The inks used are Real Red (#147084), Pacific Point (#147098), So Saffron (#147109), Crumb Cake (#147116) and Pale Papaya (#155670).

I cut the Basic White card front (#159228) with a die from the Sea dies, then I coloured this with Blending Brushes (#153611) using Balmy Blue ink (#147105) around the outside and Pear Pizzaz (#147104) and Daffodil Delight (#147094) for the seaweed.

I dry embossed the Balmy Blue card (#147007) for the background with the retired Seabed Embossing folder, then attached the die cut piece on top with Stampin’ Dimensionals (#104430). This was attached to the Basic White base card.

“Happy Birthday” is from the Calming Camellia stamp set (#158117) and stamped with Pacific Point ink and cut with a Bouquet Of Love die (#157641). The sentiment, fish & octopus were attached with Mini Stampin’ Dimensionals (#144108). I used Mini Glue Dots (#103683) to attach the star fish & crab to the card.

“Love what you do and share what you love.”


Tuesday 22 February 2022

Daisy Lane

Hello again my friends,

These daisies are stamped from the Daisy Lane stamp set (#149325). I stamp 2 images for each flower and offset them for a lovely flower.


The flowers were stamped with Flirty Flamingo ink (#147052) and punched with the Medium Daisy punch (#149517). The flowers were assembled using Mini Glue Dots (#103683) at the centre of the daisy.

The Mother Of Pearl 12”x12” Specialty Paper (#157666) was embossed with the Gingham Embossing Folder (#157627), then matted with Flirty Flamingo card (#141421). The base card is Shimmery White cardstock (#121717).

The leaves are cut with a die from the Artistic Dies (#155371). I backed the Gold Foil sheet (#132622) with Adhesive Sheets (#152334) before cutting with the die, then the leaves were adhered to the Mother Of Pearl card. The daisies were attached with Stampin’ Dimensionals (#104430).

“Hugs, Prayers & Love” is from the Positive Thoughts stamp set (#151490). Those 3 words are on one stamp. I wanted individual words, so I masked 2 of the words with a post it note, inked the other word, removed the post it note, then stamped the word on Shimmery White card. I did this with each word, then cut the words individually with an Ornate Frames die (#150664). These were then attached to the card with Mini Stampin’ Dimensionals (#144108). I added the Iridescent Rhinestone Basic Jewels (#158130) to each of the labels and the centre of the flowers.


“Love what you do and share what you love.”


Monday 21 February 2022

Calming Camellia

Hello friends,

The Calming Camellias stamp set (#158117) is a free Host set from Sale-a-bration and this stamped flower is from that set.


I used Blushing Bride ink (#147100) to stamp the flower onto another Sale-a-bration product - Simply Marbleous Designer Series Paper (#158128). I used the Blushing Bride colour of the DSP. This was cut with an Ornate Layers Die (#152726).

The Basic White card front (#159228) was dry embossed with the Gingham Embossing Folder (#157627). The stamped & die cut piece was attached to the card front and the White Glittered Organdy ribbon (#156408) was wrapped around the corner of the card. Before attaching the ribbon I coloured it with a dauber and  Blushing Bride ink. The base card is Blushing Bride (#131287).

“Happy Birthday” is from the Calming Camellia stamp set and also stamped with Blushing bride ink. A Seasonal Labels Die (#156299) was used to cut the sentiment then attached with Mini Stampin’ Dimensionals (#144108). The Iridescent Rhinestone Basic Jewels (#158130) were added to the card.


“Love what you do and share what you love.”

Saturday 19 February 2022

Flowing Flowers

Welcome everyone,

I often have bits & pieces left after making a card as I have stamped or cut too many images or it just wasn’t right for that particular project. I actually have a box of these leftovers but I find when I need a card in a hurry, these certainly come in very handy. The flower and leaves on this card are from that box of goodies.


The flower from the Flowing Flowers stamp set (#157880) was stamped with Poppy Parade ink (#147050), then fussy cut. The leaves were cut with a die from the Forever Flourishing dies (#152714) and I used Pear Pizzaz card (#131290).

I stamped the splotches from the Quiet Meadow stamp set (#155082) with Crumb Cake ink (#147116) onto the Basic White card front (#159228). The strip of Pattern Party 12”x12” Designer Series Paper (#155426) was attached to the card front, then I daubered around the card with Poppy parade ink. 

The flower was attached to the card with Stampin’ Dimensionals (#104430) and the leaves with Mini Glue Dots (#103683). “Happy Birthday” is also from the Flowing Flowers stamp set and I used Poppy Parade ink. The die to cut this is from the Potted Succulents dies (#154330). Stampin’ Dimensionals were used to attach the sentiment. The embellishments are the Red Rhinestones Basic Jewels (#146924).


TIP: Many of the die sets have label dies which are suitable for a great range of sentiments, so it’s worthwhile checking your dies to see what one suits your particular sentiment. It could be in an unexpected set and it’s easy to forget what is available. I am currently cutting out all my label dies, and labelling what die set they belong to and placing them in a folder so it it easy to find the die I want.

“Love what you do and share what you love.”


Friday 18 February 2022

Shaded Summer stamp set

Hi friend,

The stamp set used on this card is the Shaded Summer stamp set (#155783). You may have been lucky enough to get the matching dies in a previous Sale-a-bration. However I have chosen not to use them on this card.


I stamped the floral image with VersaMark (#102283) and embossed this with Silver Stampin’ Emboss Powder (#155555) and set it with the Heat Tool (#129156). The flowers were coloured with Daffodil Delight Stampin’ Blends (#154883) and Flirty Flamingo Stampin’ Blends (#154884). I used Mint Macaron Stampin’ Blends (#154889) for the leaves. I cut this image and the Daffodil Delight card (#121680) with the Layering Diorama Dies (#155565).

I stamped the smaller floral image from the Shaded Summer stamp set on the Basic White card front (#159228) with Soft Sea Foam ink (#147102). I then coloured the background with a Blending Brush (#153611) and Daffodil Delight ink (#147094). I dry embossed the card front with the Tasteful Textile 3D Embossing Folder (#152718). 

I cut the greenery using the Flowers Of Home dies (#157938). The Soft Sea Foam card (#147012) was backed with Adhesive Sheet (#152334) before cutting with the dies. These were attached to the card and the Silver trim is from the Simply Elegant Trim (#155766). The matted card was attached with Stampin’ Dimensionals (#104430). 

“Best Wishes” is from the Art Gallery stamp set (#158201) and stamped with Flirty Flamingo ink (#147052). The Messages Die (#154422) was used to cut the sentiment and attached to the card with Mini Stampin’ Dimensionals (#144108).

 The beautiful Iridescent Rhinestone Basic Jewels (#158130) were added to the card.

“Love what you do and share what you love.”


Thursday 17 February 2022

Flowing Flowers stamp set

Hello friends,

I have used the Flowing Flowers stamp set (#157880) for all the stamped images on this pretty card. 


I stamped the 2 floral images on the Basic White card front (#159228) with Balmy Blue ink (#147105) and Fresh Freesia ink (#155611). Then I dry embossed this with the Tasteful Textile 3D Embossing Folder (#152718). The edges were daubered with Poppy Parade ink (#147050). The larger flowers were stamped with Poppy Parade ink and Mango Melody ink (#147093), then fussy cut.

I cut the greenery from Pear Pizzaz card (#131290) which had been backed with Adhesive Sheet (#152334) before cutting with the Flowers Of Home Dies (#157938). I attached the greenery to the card front, then attached the flowers with Stampin’ Dimensionals (#104430).

“Happy Birthday” was stamped with Poppy Parade ink and I used an Ornate Frames Die (#159664) to cut the sentiment. Mini Stampin’ Dimensionals (#144108) were used to attach this to the card. I added the Red Rhinestone Basic Jewels (#146924) to the red flower and Champagne Rhinestone Basic Jewels (#151193) to the yellow flower.

TIP: Stamp on the card before dry embossing to get the best result with the stamping.

“Love what you do and share what you love.”


Wednesday 16 February 2022

Daffodil Daydream Bundle

Hi stamping friends,

What a pretty card for Mother’s Day or for any special person or occasion, using the Daffodil Daydream Bundle (#157795) and some beautiful DSP & specialty paper.


The daffodil image from the Daffodil Daydream stamp set (#157786) was stamped with Tuxedo Black Memento ink (#132708) onto Basic White card (#159228). This was cut with the co-ordinating die from the Daffodil Dies (#157794). I used the Daffodil Delight (#154883) and Granny Apple Green (#154885) Stampin’  Blends to colour the flowers & leaves.

The sentiment is also from the same stamp set and stamped with Daffodil Delight ink (#147094) and cut with a die from the Tasteful Labels Dies (#152886). I used Daffodil Delight card (#121680) for the butterfly which was cut with a Daffodil die. I added Clear Wink Of Stella (#141897) to the butterfly and attached it to the sentiment with a Mini Glue Dot (#103683).

The striped DSP is from the Abstract Beauty 4”x6” Specialty Designer Series Paper (#158039) and attached to the Basic White base card. I cut the Mother Of Pearl 12”x12” Specialty Paper (#157666) with an Ornate Layers Die (#152726). The Daffodils were attached to the card with Stampin’ Dimensionals (#104430). The White Glittered Organdy Ribbon (#156408) was attached to the card under the sentiment and the sentiment was attached with Mini Stampin’ Dimensionals (#144108). 

The beautiful Brushed Brass Butterflies (#158136) were added to the card.

“Love what you do and share what you love.”


Tuesday 15 February 2022

Pansy Petals Designer Series Paper

Hi everyone,

There are many designer papers that co-ordinate with dies which allows you to cut images from the DSP with a die. The Pansy Petal 12’x12” Designer Series Paper (#155807) has some images that can be cut with the Pansy dies (#155680).


The 3 pansies were cut with the co-ordinating dies. The leaves were cut and embossed with another die using Soft Succulent card (#155777).  I used the banner die from the Bloom dies (#155989) to cut the 3 pieces of DSP, also from the Pansy Petal DSP.

The Basic White card front (#159228) was dry embossed with the Gingham Embossing Folder (#157627) and the edges were daubered with Soft Succulent ink (#155778). This was attached to the Basic White base card. 

The leaves, banners and purple pansy were taped to the card. The other 2 pansies were attached with Mini Stampin’ Dimensionals (#144108). “Happy Birthday” is from the Pansy Patch stamp set (#154999), and stamped with Soft Succulent ink. I used the Messages Die (#154422) to cut the sentiment. The Soft Succulent Open Weave Ribbon (#155780) was attached under the sentiment. The sentiment was attached with Mini Stampin’ Dimensionals. 

The Genial Gems (#155500) include 2 colours and I used the Pale Papaya gems on the flowers & the Mint Macaron gems on the sentiment and card front.


“Love what you do and share what you love.”


Monday 14 February 2022

New Horizons Designer Series Paper

Hi and welcome stamping friends,

I used the beautiful New Horizons 6”x6” Designer Series Paper (#157768) on this card. I made a larger card than normal as I didn't want to lose too much of this beautiful paper. I used the full width of the designer paper and cut 3.5cm off the bottom.


The Basic White base card (#159228) was cut at 16.5cm x 26cm and scored on the long side at 13cm.

I used a Stitched Rectangles die (#151820) to cut the rectangle from the centre of the Designer Paper. I used the next size die to cut the Night Of Navy card (#106577) which I used to matt this. I then attached this with Stampin’ Dimensionals (#104430) onto the DSP covering the cut out area. I had 3 options of what way I would use the DSP at the back. On the card I chose to turn the DSP around which I liked the effect with the colours being reversed.

The next option was to use it the same way as shown below-


And the 3rd option was to use the back of the DSP as shown -


Blackberry Bliss card (#133682) was used to matt the larger piece of designer paper before attaching it to the base card.

The bird from the Soaring Swallows stamp set (#157804) was stamped with VersaMark (#102283) and heat embossed with Gold Stampin’ Emboss Powder (#155555), and set with the Heat Tool (#128056). The sentiment is from the same stamp set and stamped with Night Of Navy ink (#147110) and cut with another Stitched Rectangles die. The Gold trim is from the Simply Elegant Trim (#155766) and the sentiment was attached to the card with Mini Stampin’ Dimensionals (#144108). The Night Of Navy Rhinestones from the Holiday Rhinestones Basic Jewels (#150457) were added to the card.


“Love what you do and share what you love.”


Sunday 13 February 2022

Bouquet Of Love Hybrid Embossing Folder

Hi my lovely friends,

I have chosen pink & mauve for this Valentine’s card instead of the traditional red.


I have used the Bouquet Of Love Hybrid Embossing Folder (#157641) which also includes dies. The larger heart die can be used with the folder to cut the heart. There are 3 ways you can use this folder & dies. For the Basic White card (#159228) I inserted the Heart die into the embossing folder, placed the card in the folder and ran it through the Stampin’ Cut & Emboss Machine (#149653). This cuts the heart and embossing the card at the same time. Then I repeated this with  a piece of Magenta Madness card (#153085) for the heart. Then with the Fresh Freesia card (#155614) I just embossed it without the heart die. I attached the white card to the Fresh Freesia card lining up the hearts. The Magenta Madness heart was attached to the card with Stampin’ Dimensionals (#104430). The white card was matted with Magenta Madness card then attached to the Basic White Base card. 

The small hearts were cut with a die from the Sweet Hearts Dies (#157623) and attached to the card with Mini Glue Dots (#103683). I added the Iridescent Rhinestone Basic jewels (#158130) to each of the small hearts.

“Happy Valentine’s Day” from Sweet Conversations stamp set (#157618) was stamped with Magenta Madness ink (#153117) and cut with the Messages Die (#154422).

TIP: The Messages die is one large die with 19 different label cut outs which makes this die very versatile. It can be used for a great variety of sentiments as well as co-ordinating with 2 stamp sets which also contain a variety of sentiments. These stamp sets are Many Happenings (#155001) and Many Messages (#154510).

“Love what you do and share what you love.”


Saturday 12 February 2022

Flowering Tulips stamp set

Hello friends,

I have used the Flowering Tulips stamp set (#157672) and the beautiful Flowering Fields Designer Series Paper (#157670) for this easy card.


I stamped the stem and leaves from the Flowering Tulips stamp set using Pear Pizzaz ink (#147104) onto the Basic White card (#159228). The flower is a 2 step stamp and I used Poppy Parade ink (#147050). To get the lighter red colour I used the stamping off method. The centre of the flower was stamped with Tuxedo Black Memento ink (#132708). I attached the Designer paper to the white card, then matted this with Poppy Parade card (#121694). The Real Red Double Stitched Satin Ribbon (#151155) was wrapped around the card, then this was attached to the Basic White base card.

The sentiment is from the same stamp set and stamped with Poppy Parade ink. A die from the Seasonal Labels (#156299) cut the sentiment and attached to the card with Stampin’ Dimensionals (#104430). I chose the Garden Gems (no longer available) for the embellishments.

TIP: For the stamping off method, ink your stamp as usual, then lightly stamp onto scrap paper, then stamp onto the card. This gives a lighter colour. I find this works better with darker colours but it’s always worth trying it with any colour.

“Love what you do and share what you love.”


Friday 11 February 2022

Flowing Flowers

Hello stamping friends,

I have stamped the flowers from the Flowing Flowers stamp set (#157880) using the masking technique.


First I stamped the Polished Pink (#155712) flower, then using a mask on the pink flower I stamped the next flower with Pale Papaya ink (#155670). I added a mask over this flower as well and stamped the 3rd flower with Fresh Freesia ink (#155611). I stamped the leaves with Soft Sea Foam ink (#147102), also using masks on the flowers.

The swirl from the Sentimental Swirls stamp set (#157996) was stamped with So Saffron ink (#147109). I matted this Basic White card (#159228) with Basic Black card (#121688), then attached the card front to the Basic White base card.

“Happy Birthday” is from the Artistically Inked stamp set (#154542) and also stamped with So Saffron ink. The label die from the Bloom dies (#155989) was used to cut the sentiment. I attached this to the card with Stampin’ Dimensionals (#104430). The butterfly was cut with a Brilliant Wings Die (#155523) using the gold from the Gold & Rose Gold 6”x6” Metallic Specialty Paper (#156844) and a Mini Glue Dot (#103683) was used to attach this to the sentiment. The Brushed Brass Butterflies (#158136) were also added to the card.

TIP: When I make a mask for this technique, I stamp the image on a post-it note and cut around the image without leaving any margin outside the outline of the image. This allows the next image to stamp as close as possible to the masked image. Also, I use a post-it note as it thinner than cardstock and has a sticky area to allow it to stick to the card.

“Love what you do and share what you love.”


Thursday 10 February 2022

Flowering Tulips Bundle

Hi friends,

These beautiful tulips are made using the Tulip Dies (#157677) and the Simply Marbleous 6”x6” Designer Series Paper (#158128).


Below are the dies I used to make the tulips. The mauve & yellow ones are made with the first set of dies and the pink tulip with the second set of dies.


The first die for each flower is different but the other 2 pieces are the same. The larger part of the flower which forms the outside of the tulips has score lines to allow you to fold it to form the flowers. I used both sides of the Simply Marbleous DSP to give dimension to the flowers with the dark and lighter colours.

I cut the scalloped rectangle with a die from the Stitched So Sweetly dies (#151690). The stems and leaves were stamped with Pear Pizzaz ink (#147104) using the images from the Flowering Tulips stamp set (#157672). The flowers were attached with Stampin Dimensionals (#104430).

The sentiment is also from the Flowering Tulips stamp set and stamped with Mango Melody ink (#147093). The die to cut this is from the Seasonal Labels (#156299). I attached the scalloped rectangle to the DSP from the Flowering Fields 12”x12” Designer Series Paper (#157670), then attached the sentiment with Stampin’ Dimensionals.  I chose the Iridescent Rhinestone Basic Jewels (#158130) to add some bling to the card.

TIP: Have a play with these dies and see what combinations you can come up with. I am sure the way I have made these isn’t the only way.

“Love what you do and share what you love.”


Wednesday 9 February 2022

Bouquet Of Love Hybrid Embossing Folder

Hi,

With Valentine’s Day coming up next week, this card could be used for that occasion as well as an Anniversary card.


The Bouquet Of Love Hybrid Embossing Folder (#157641) includes the folder as well as dies. The largest of the heart dies fits into the embossing folder, so it cuts the heart at the same time as it embosses the rest of the card. You can use the folder without the die or you can use the die separately so it’s a very versatile set. To make this card I embossed the Basic White card (#159228) with the embossing folder only. Then I used Real Red card (#106578) in the embossing folder with the heart die. I only used the embossed heart from the red card and attached it over the heart of the white card with Stampin’ Dimensionals (#104430). I matted this with Real Red card, then wrapped the Real Red Double Stitched Satin Ribbon (#151155) around the card front. The base card is also Basic White.

I cut the small hearts from the Sweet Heart Dies (#157623). I added the Shimmery Crystals Effects (#150892) to the hearts for a shimmery glossy effect. These were attached to the card with Mini Stampin’ Dimensionals (#144108).

“Happy Anniversary” is from A Wish For Everything stamp set (#149320) and stamped with Real Red ink (#147084). This was cut with the Messages die (#154422) and attached with Mini Stampin’ Dimensionals. 

“Love what you do and share what you love.”


Tuesday 8 February 2022

Dahlia Days Bundle

Hello & welcome,

Today I have made 2 cards basically with the same products but what a difference colour makes to the finished cards.


I have used the Dahlia Days stamp set (#157799) for the flowers & leaves on both cards. I have used the detailed background die from the Detailed Dahlias Dies (#157801) to cut the Basic White card (#159228) which was adhered to the Designer Paper on the first card. The Simply Marbleous 6”x6” Designer Series Paper (#158128) has been used on both cards. The stitching on the second card was done with the Stitched Greenery Die (#155451).

On the first card I stamped the flowers with Flirty Flamingo ink (#147052) and Fresh Freesia ink (#155611). I used Magenta Madness ink (#153117) and Gorgeous Grape ink (#147099) for the flowers on the second card. The leaves were stamped with Granny Apple Green ink (#147095). The leaves & flowers are all cut with the Detailed Dahlia dies.

The sentiments are both from the Special Moments stamp set (#158081) - a Sale-a-bration product. “With Sympathy” was stamped with Flirty Flamingo ink and I used Gorgeous Grape ink for the second sentiment. The label die from the Potted Succulents dies (#154330) was used to cut the sentiments. The sentiments and flowers are all attached to the cards with Stampin’ Dimensionals (#104430). I used Mini Glue Dots (#103683) to attach the leaves.

The base cards are Basic White and I added the Iridescent Rhinestone Basic Jewels (#158130) to both cards.

TIP: I used the Adhesive Sheet (#152334) on the Basic White card before cutting with the Detailed Dahlia die. 

“Love what you do and share what you love.”


Monday 7 February 2022

Calming Camellia

Hi again my friends,

Sale-a-bration is a great time of the year when you can earn free products when placing a qualifying Stampin’ Up! order ($90 or $180 in Australia). There has been an extension of Sale-a-bration in Australia till 16th March so still time to get some fantastic products. The Calming Camellia stamp set (#158117) is a Sale-a-bration host set which you can earn by hosting a party or placing a personal order of $500. I have used this stamp set on this card.


I stamped the leaves with Soft Sea Foam ink (#147102) onto the Basic White card front (#159228). I then dry embossed this with the Tasteful Textile 3D Embossing Folder (#152718). The edges were daubered with Flirty Flamingo ink (#147052), then attached to the Basic White base card.

I stamped the flowers with Flirty Flamingo ink and cut it with a die from the Encircled In Beauty Dies (#155546). I only used the circle from the cut out. I then cut the Flirty Flamingo card (#141421) which was backed with Adhesive Sheet (#152334) with the same die for the outside detailed cut-out. This was attached to the card, then the circle with the stamped flower was attached with Stampin’ Dimensionals (#104430).

“Happy Birthday” is also from the Calming Camellia stamp set and stamped with Flirty Flamingo ink. I used a label die from the Pretty Pillow Box dies (#156321) to cut the sentiment and a die from the Potted Succulents Dies (#154330) was used to cut the Flirty Flamingo card under the sentiment. The sentiment was attached to the card with Stampin’ Dimensionals. The beautiful Iridescent Rhinestone Basic Jewels (#158130) were added to finish the card.

TIP: The adhesive sheet is ideal for adhering cut outs when using detailed dies. Just adhere it to the back of the card before cutting with a die. Remove the backing and attach to your card. So simple!!

“Love what you do and share what you love.”


Saturday 5 February 2022

Sentimental Swirls

Hi friends,

The stamping on this card is all from the Sentimental Swirls stamp set (#157996).


I set up the swirl stamp on the Stamparatus (#148187) and stamped the swirl with Pear Pizzaz ink (#147104) on Basic White card (#159228). Then I positioned the scalloped rectangle which was cut with a Stitched So sweetly die (#151690) onto the Stamparatus so when this was stamped it would match the image on the card front, but only seeing part of the image. The stitching on the card front was achieved with the Stitched Greenery die (#155451). The Pale Papaya Open Weave Ribbon (#155672) was wrapped around the card front, then it was matted with the Pale Papaya card (#155669). The small rectangle was attached to the card with Stampin’ Dimensionals (#104430).

I stamped the flowers with Pale Papaya ink (#155670) - one on Basic White card and the other on Pale Papaya card (#155669) and these were punched with the Flowers & Leaves Punch (#155373). The small leaves were stamped with Soft Sea Foam ink (#147102). The bird and sentiment were also stamped with Pale Papaya ink. “Hello” was cut with a Stitched So Sweetly die. 

I added sparkle to the flowers & bird with the Clear Wink Of Stella Brush (#141897) and added the Genial Gems (#155500) to the flower centres and the card.

The flowers and sentiment were attached to the card with Stampin’ Dimensionals.


“Love what you do and share what you love.”


Friday 4 February 2022

Grove Dies

Hi everyone,

I have used the Grove Dies (#157844) for the trees & the deer on this simple card.


For the background I have used one of the designs from the New Horizons 6”x6” Designer Series Paper (#157768). I cut the Mossy Meadow card (#133683) with a Grove die for the trees and attached this to the DSP. I then matted this with the Brushed Metallic 12”X12” cardstock (#153524) and attached it to the Very Vanilla base card (#106550).

The deer were also cut with the Groves dies and using the Brushed Metallics cardstock. I attached these to the card with Mini Stampin’ Dimensionals (#144108). Best Wishes from the Special Moments stamp set (#158081) was stamped with Mossy Meadow ink (#147111) and cut with the Messages Die (#154422). The Pebbles Enamel Shapes (#158141) were added to the card.

TIP: The Special Moments stamp set is a Sale-a-bration product. Sale-a-bration is extended in Australia till 16th March so you have extra time to get some free products (with a qualifying $90 or $180 order).


“Love what you do and share what you love.”


Thursday 3 February 2022

Oceanfront stamp set

Hello friends,

It isn’t very often that I just stamp on a card, (as I am sure you know I love dies and embossing), but I have just stamped on this card using the Oceanfront stamp set (#157862).


I stamped the foreground with Crumb Cake ink (#147116) onto Basic White card (#159228). The sea was stamped with Pool party ink (#147105), then the sky with Balmy Blue ink (#147105). I used Garden Green ink (#147089) for the grass. The birds are from the On The Horizon stamp set (#157770) and stamped with Tuxedo Black Memento ink (#132708). The sentiment also from On the Horizons stamp set was stamped with Night Of Navy ink (#147110). The card front was attached to the Balmy Blue card (#147007). So this is a quick & easy card with simple stamping.

Then I couldn’t resist and add some extra elements to step it up a bit. Below is the next card which is stamped exactly the same except I stamped the sentiment on a separate piece of card and cut it with one of the Beautiful Shapes Dies (#158046) and attached it to the card with Stampin’ Dimensionals (#104430). I chose Night Of Navy card (#106577) for the base card.


Then the next card had another element added which is the boat from Sailing Home stamp set (#149457). The boat was stamped with Night Of Navy ink, cut with a Smooth Sailing Die (#149576) and attached to the card with Mini Stampin’ Dimensionals (#144108). The card front was matted with Night Of Navy card and attached to the Balmy Blue base card.


I hope this has shown how easy it is to just stamp a simple card or you can add a couple of extra elements to step it up and they are all great masculine cards.


“Love what you do and share what you love.”