Wednesday 23 December 2020

Dragonfly Garden

Hello again friends,

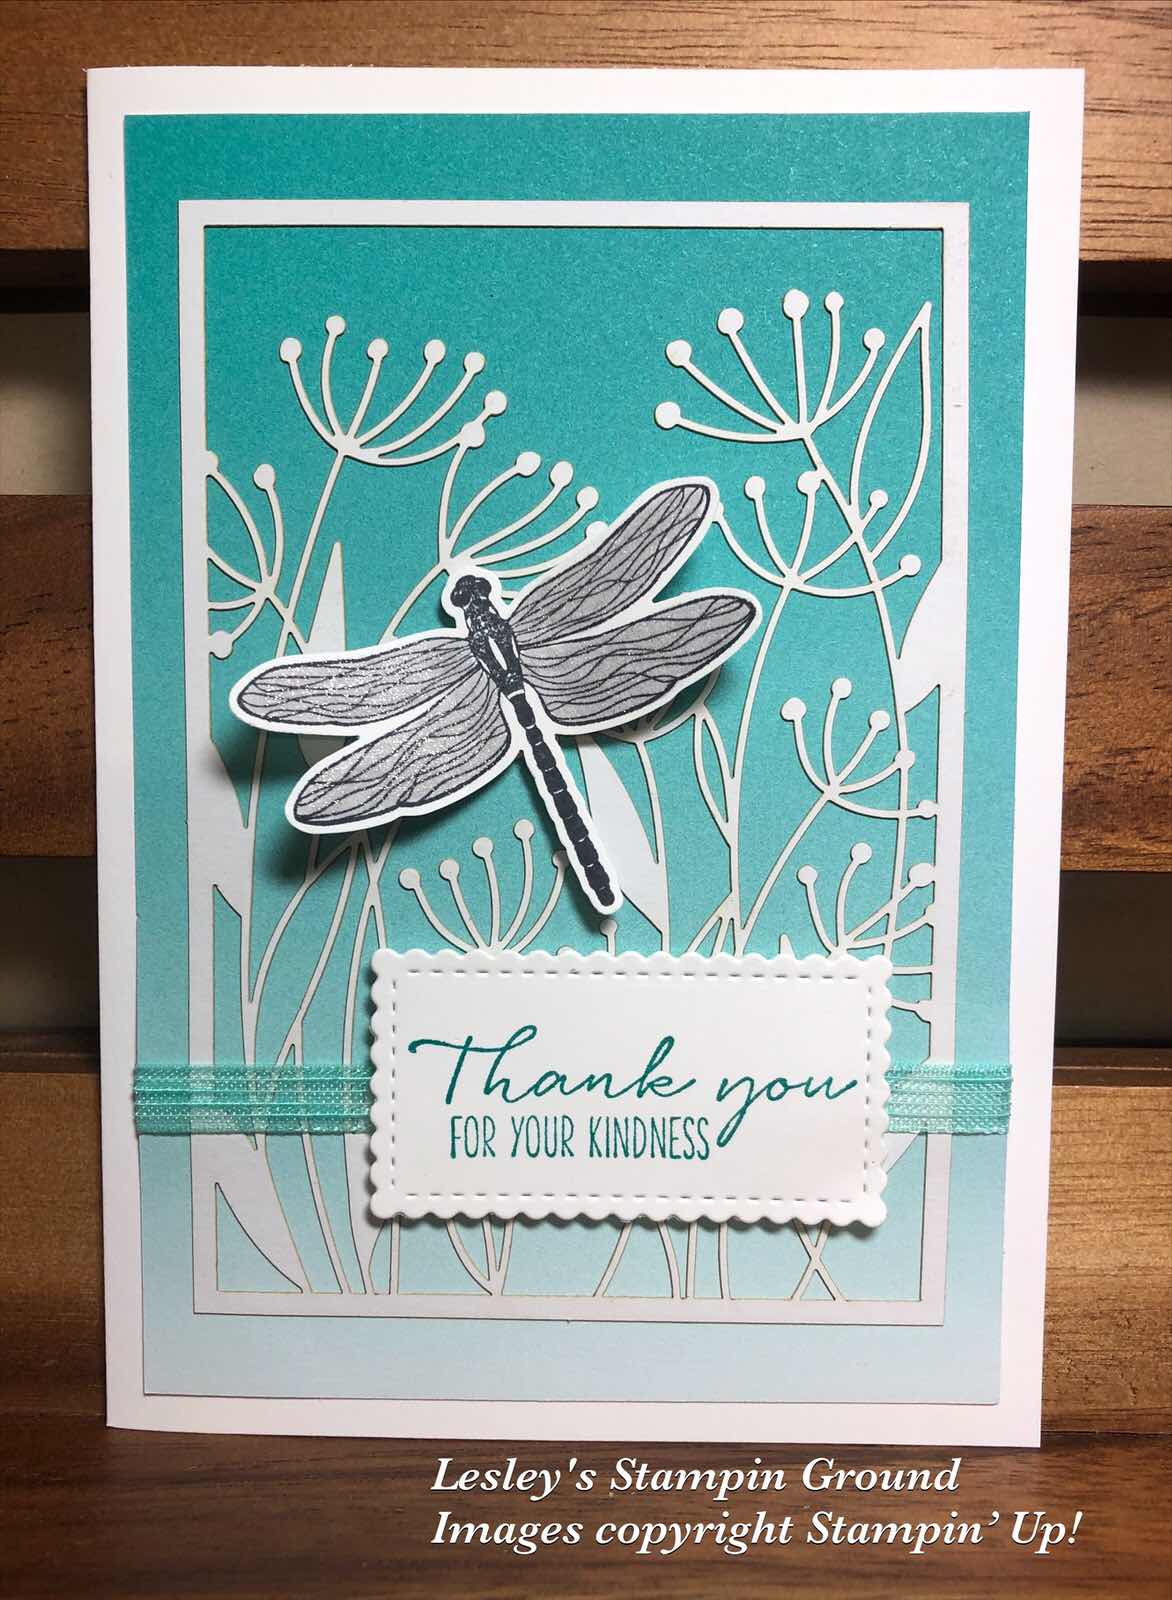
I have another sneak peek today, using 2 products from the Dandy Garden Suite (#155981). I chose this set today as I was looking out my window this morning and I couldn’t believe the number of dragonflies flying around the garden.


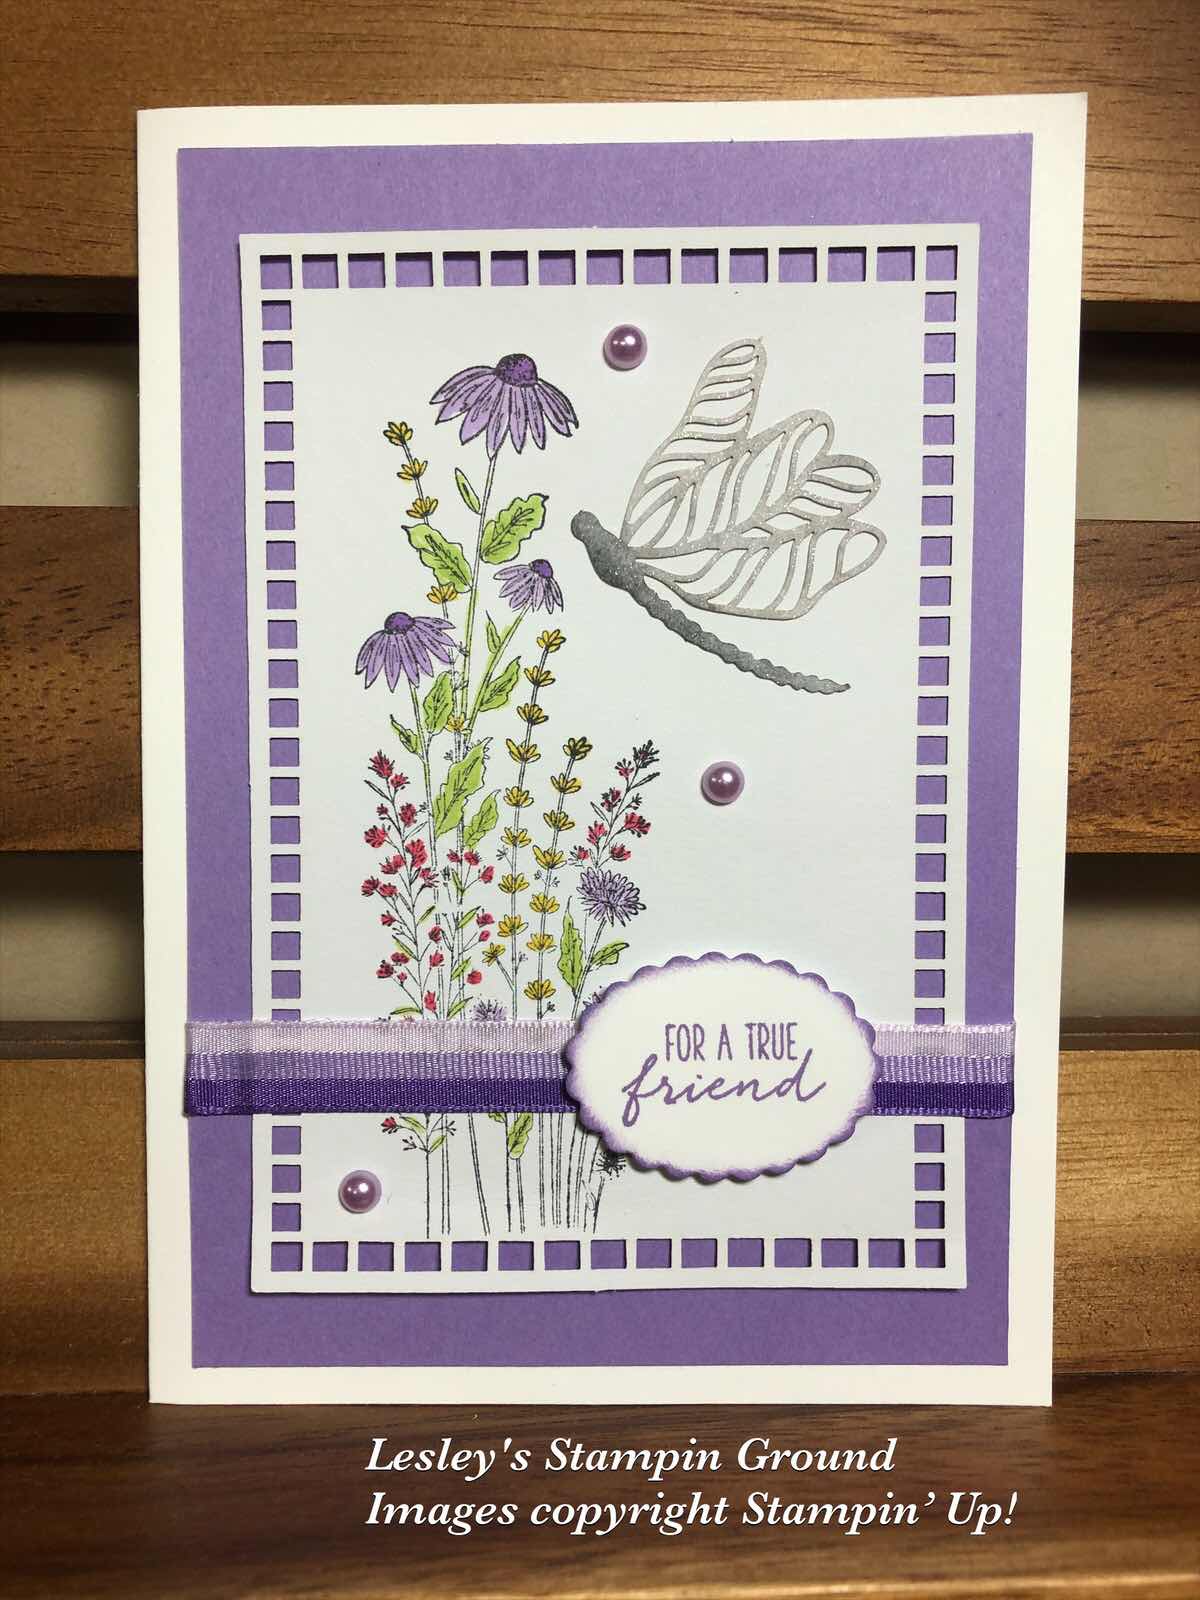
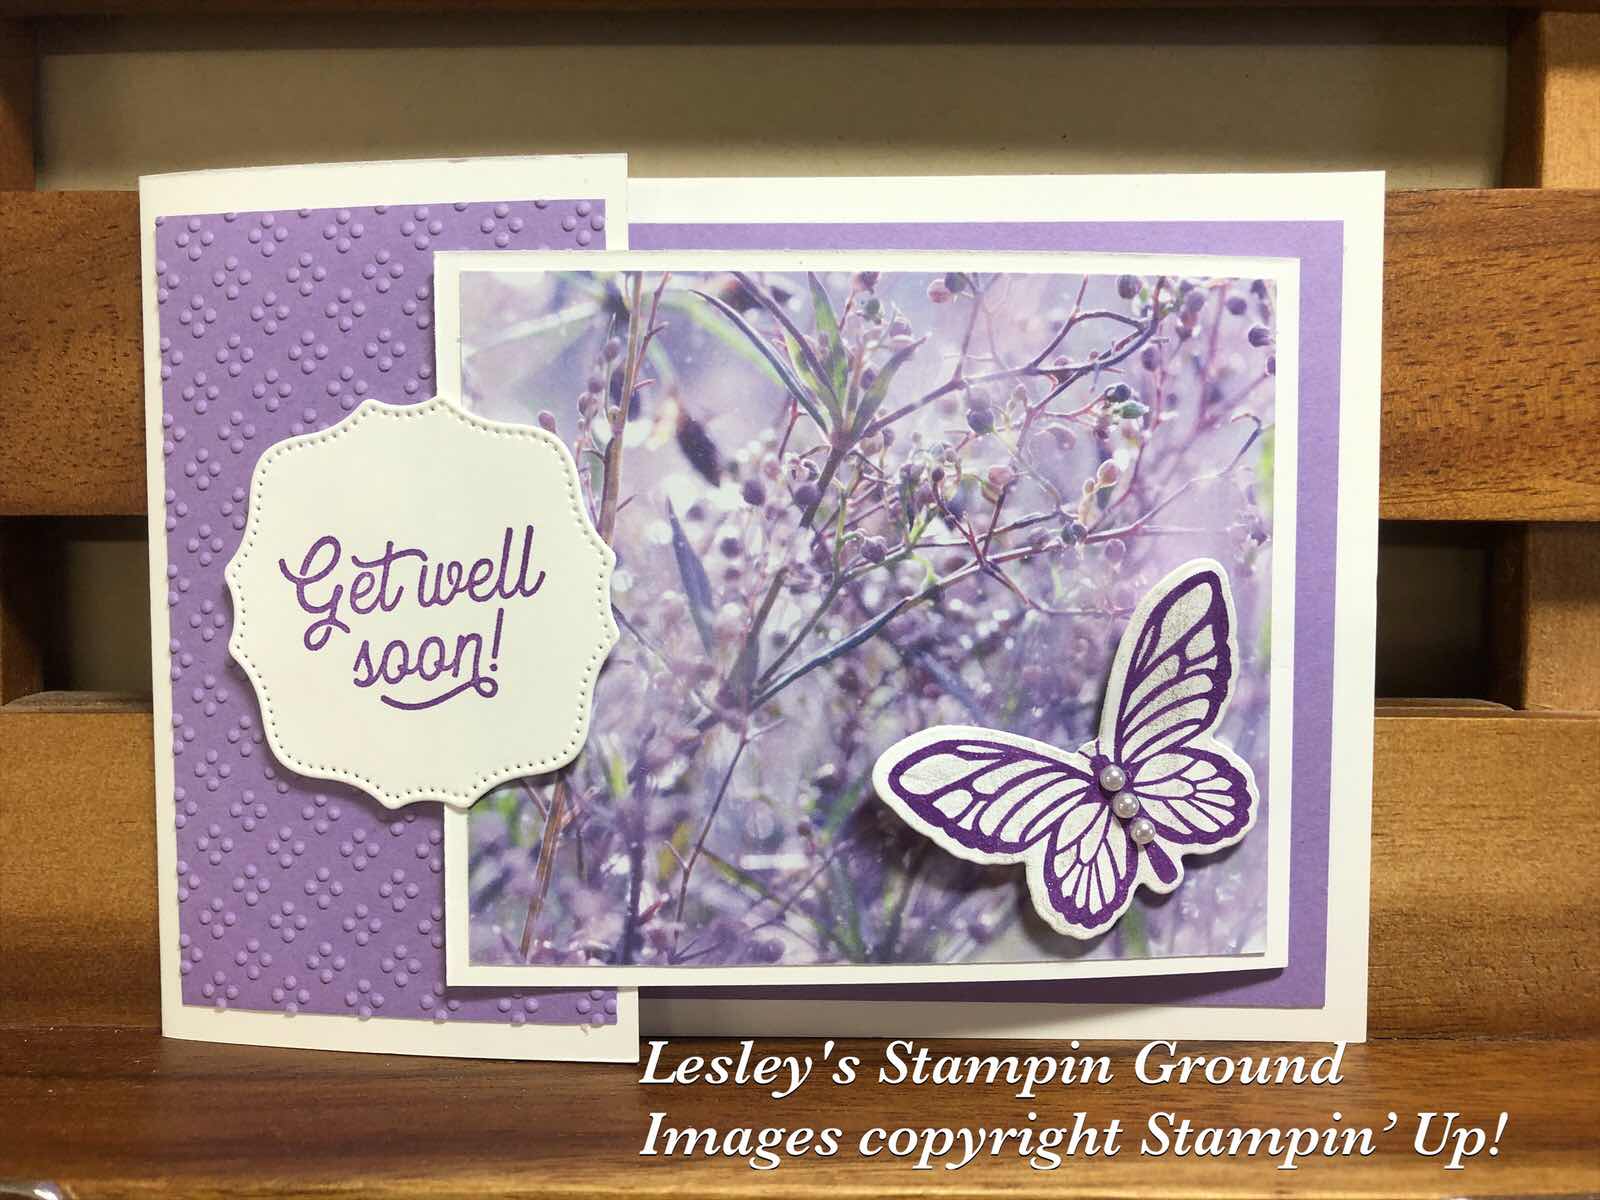
I stamped the flowers from the Dragonfly Garden stamp set (#c154411) using Tuxedo Black Memento ink (#132708). This was stamped onto a card front from the Dandy Laser-Cut Paper (#154300). I coloured the image with Stampin’ Blends - Highland Heather (#154887), Granny Apple Green (#154885), Daffodil Delight (#154883) and Poppy Parade (#154958). The cardfront was attached to the Highland Heather card (# 147010), then I wrapped the 3/8” Tricolor Ribbon (#149708) around these 2  cards. This was attached to the Whisper White base card (#106549). The sentiment is also from the Dragonfly Garden stamp set and stamped with Highland Heather ink (#147103). I cut this with the Messages die (#154422). This is a large die with various shaped cutouts. There is also a co-ordinating stamp set for this die, but I find that many sentiments can be cut with this die. I used the Mini Stampin’ Dimensionals (#144108) to attach the sentiment to the card.
The dragonfly is also from the Dandy Laser-Cut Paper. I daubered Smokey Slate ink (#147113) on the wings and Black Memento ink on the body, then added glitter using the Wink Of Stella Glitter Brush (#141897). This was glued to the card with the Fine-Tip Glue Pen (#138309). The Pastel Pearls (#154571) were added to the card.

I am going to have a week or so off as it’s a busy time of the year with getting together with (some) family & friends.  So I would like to wish you all a very Merry Christmas and I should be back before the New Year.

Stay safe, relax and hopefully you can catch up with family & friends too.

“Love what you do and share what you love.”


Tuesday 22 December 2020

Simply Succulents Bundle

Hello friends,

After yet another busy day, I have enjoyed sitting and colouring these succulents from the Simply Succulents stamp set (#154480) which are from the upcoming January-June Mini catalogue.


I stamped the image onto Whisper White card (#106549) using Tuxedo Black Memento ink (#132708). The Stampin’ Blends used are Mint Macaron (#154889), Just Jade (#153107), Granny Apple Green (#154885), Soft Sea Foam (#154902), Petal Pink (#154893) and Flirty Flamingo (#154884).
The pot was stamped with Flirty Flamingo ink (#147052) and I coloured the band of the pot using Flirty Flamingo Stampin’ Blends. 
The sentiment, also from the Simply Succulents stamp set was stamped with Flirty Flamingo ink, then cut with a die from the Potted Succulents Dies (#154330).
The background was also cut with a die from the same die set. I glued this to the Whisper White base card using the Mulitpurpose Liquid Glue (#110755). I used a sponge to dab the glue to the back of the die cut piece. The other option would have been to adhere Adhesive Sheet (#152334) to the back of the card before cutting.
The pot was taped to the card and the succulents were attached using Stampin’ Dimensionals (#104430), then the sentiment was taped on top.

Have a great day!!

“Love what you do and share what you love.”


Monday 21 December 2020

Sympathy card

Hello again,

Unfortunately I needed a Sympathy card so have used the Wreath Builder Dies (#152722) for this card.


The base card and card front are Whisper White (#106549). I dry embossed the card front with the Ornate Floral 3D Embossing Folder (#152725), then wrapped the Silver 3/8” Metallic-Edge Ribbon (#144213) around the card. The sentiment is from a retired stamp set (Painted Glass) but I like this as it is very elegant. This was stamped with VersaMark (#102283) and I used the Silver Stampin’ Emboss Powder (#109131) and set it with the Heat Tool (#129056). I then cut this with the Stitched Nested Labels (#149638) and attached it to the card with Mini Stampin’ Dimensionals (#144108).
The wreath was cut from Silver Foil (#132178) using a die from the Wreath Builder dies (#152722). The flowers, also from the same die set were cut from Purple Posy card (#150887). The wreath and flowers were all attached with Mini Glue Dots (#103683).

Have a great day. Hopefully you won’t  be too busy with Christmas only days away.

“Love what you do and share what you love”.


Saturday 19 December 2020

Classic Christmas Designer Series Paper

Hello,

I usually have so many scraps of Designer Paper, which of course I don’t want to throw away, and often wonder what I am going to do with them. Well, on today’s card I have used some strips of the Classic Christmas Designer Series Paper (#155969).


I attached the 4 strips of designer paper to the Whisper White card front (#106549). The easiest way to do this is have the pieces longer than needed and cut level with the card front after they are taped to the card.
I attached a piece of Cherry Cobbler card (#121681) to the Foam Adhesive Sheets (#152815), then cut “Merry Christmas” with the Word Wishes Dies (#149629). These Foam Adhesive Sheets have adhesive on both sides and can be cut with scissors or open dies and great when you want to add dimension easily to smaller pieces.
The holly leaves are from the Christmas Gleaming stamp set (#150464) and stamped with Shaded Spruce ink (#147088). These were fussy cut before attaching to the card using Stampin’ Dimensionals (#104430). I added the Cherry Cobbler Holiday Rhinestone Basic Jewels (#150457) to the “berries”. The edges of the card front were sponged with Cherry Cobbler ink (#147083) before attaching it to the Whisper White base card.

Hopefully you have finished all your Christmas cards now, but if not this is an easy one to make.

Enjoy your weekend!!


“Love what you do and share what you love.”


Friday 18 December 2020

Ornate Style stamp set

Hello again,

These flowers are from the Ornate Style stamp set (#152572) and stamped with Tuxedo Black Memento ink (#132708).


After stamping the flowers on Whisper White card (#106549),  I coloured them with the following Stampin’ Blends - Granny Apple Green (#154885), Rococo Rose (#154900), Highland Heather (#154887), Purple Posy (#154896), Rich Razzleberry (#154898) and Flirty Flamingo (#154884). Then I cut the white card with dies from the Stitched Triangles (#152710). These were attached to the Granny Apple Green base card (#147014).
The sentiment is from the Butterfly Wishes stamp set (#149346) and stamped with Granny Apple Green ink (#147095). The sentiment and the Rainbow Glimmer Paper (#153056) under the sentiment were cut with the Stitched Nested Labels (#149638). 
I punched the dragonflies using the Dragonflies Punch (#154240) from the Black Glitter Paper (#153518). The dragonflies and sentiment were attached to the card with Stampin’ Dimensionals (#104430).

I hope you have a great weekend.

“Love what you do and share what you love”


Thursday 17 December 2020

Wildly Happy

Welcome my friends,

I’m having a change today from Christmas cards and the new products from the upcoming mini catalogue. I have used stamps from the Annual catalogue on this card, which are sometimes forgotten when new products arrive. However there are still loads of great products in this catalogue.


The base card and card front are Very Vanilla card (#106550). I stamped the verse and the leaves from the Very Versailles stamp set (#c149275) using Crumb Cake ink (#147116) and Soft Sea Foam ink (#147102). The image of the foxes from the Wildly Happy stamp set (#c149408) were stamped with Soft Suede ink (#147115). I added some colour with the Crumb Cake Stampin’ Blends (#154882). The sentiment from Many Mates stamp set (#c152633) was also stamped with Soft Suede ink. All the ovals were cut with the Layering Ovals Dies (#151771). The ribbon is the retired Copper Trim and this was wrapped around the card front. The ovals were attached to the card with Stampin’ Dimensionals (#104430).

Have a great day!!

“Love what you do and share what you love.”


Wednesday 16 December 2020

Wonder Of The Season Memories & More Card Pack

Hello again,

The Memories & More card packs are great for both cards and scrapbooking or memory keeping. Today’s card uses 2 cards from the Wonder Of The Season Memories & More Card Pack (#153538).


The base card is Whisper White (#106549). I wrapped the Real Red 3/8” Double Stitched Satin Ribbon (#151155) around the red & gold card from the memories & more card pack. The card with the Christmas Tree is also from the pack and I matted this with the Red Foil from the Red & Green Foil Sheets (#153510). This was attached to the card with Stampin’ Dimensionals (#104430). I added the Red Rhinestone Basic Jewels (#146924) to “decorate” the tree. The sentiment is from the Curvy Christmas stamp set (#155364) and this was cut with an Ornate Frames Die (#150664). I stamped the sentiment using Real Red ink (#147084) onto Whisper White card using the Stamparatus (#148187). I then re-stamped using VersaMark (#102283) and added Clear Stampin’ Emboss Powder (#109130) and set it with the Heat Tool (#129056). This gives a gloss to the stamped sentiment. I used Stampin’ Dimensionals to add the sentiment on top of the ribbon.

I hope your day has been an enjoyable one!!

“Love what you do and share what you love.”


Tuesday 15 December 2020

Gold Cards & Envelopes

Hi again friends,

Here’s another easy Christmas card and for me was very quick as I had the dove and sentiment already stamped as they were left from some other cards I was making. It’s great to have some cut-outs put aside for that last minute card.


The base card is from the Gold Cards & Envelopes (#153532). These are Vanilla cards with a Gold border. I cut a piece of one of the cards from the Wonder Of The Season Memories & More Card Pack (#153538) to fit inside the border of the base card. The wreath is cut from Pear Pizzaz card (#131290) using a Wreath Builder Die (#152722). This was attached to the card with Mini Glue Dots (#103683). The dove from the Dove Of Hope stamp set (#153406) was stamped with VersaMark (#102283) and heat embossed with Gold Stampin’ Emboss Powder (#109129), then heat set with the Heat Tool (#129056). The dove was then cut with the co-ordinating die from the Detailed Dove Dies (#153526).
The sentiment is also from the Dove Of Hope stamp set and stamped with Real Red ink (#147084), then cut with a Stitched Rectangle Die (#151820).  I used Mini Stampin’ Dimensionals (#144108) to attach the sentiment and dove to the card. 


Have a fantastic day.


“Love what you do and share what you love.”


Monday 14 December 2020

Sand & Sea Suite

Hello friends,

I knew as soon as I saw the Sand & Sea suite (#155980) it was a must have. I just love the way the die, stamp set and embossing folder all co-ordinate so beautifully.


Firstly I cut the Whisper White card (#106549) with the Seaside Shells Die (#156095). Then I stamped the individual shells from the Friends Are Like Seashells stamp set (#154368) onto the corresponding areas of the die-cut. Normally stamping is done before cutting with a die but in this case you must cut first then stamp. I used Blushing Bride ink (#147100), Seaside Spray ink (#150085), Highland Heather ink (#147103), So Saffron ink (#147109) and Pool Party ink (#147107) for the shells. I sponged the seaweed with Soft Sea Foam ink (#147102). Next I embossed this with the Seashells 3D Embossing Folder (#154309). It is easy to line up the image with the embossing folder.
I attached the die cut piece to the Subtles 6”x6” Designer Series Paper (#153072). I used Stampin’ Dimensionals (#104430) under each of the seashells to give a curved shape to the shells, and used the Fine-Tip Glue Pen (#138309) to glue the rest of the card.
The sentiment is also from the Friends Are Like Seashells stamp set and stamped with Balmy Blue ink (#147105). A die from the Stitched Rectangles (#151820) was used to cut the sentiment and this was attached with Stampin’ Dimensionals.

I am looking forward to playing with all the possibilities that can be achieved with this suite, which also includes designer series paper and embellishments. These products will be available in the January-June Mini Catalogue from 5th January.

Have a great day.

“Love what you do and share what you love”


Sunday 13 December 2020

Dandy Laser-Cut Paper

Hello again,

Things have been a bit busy the last few weeks with Christmas just around the corner, but hopefully things will start to settle down in the next week and I can get back into the craft room again.
Today’s card is another very easy card as again I have limited time.


I have used the Bermuda Bay from the Oh So Ombre 6”x6” Designer Series Paper (#155225). I have glued the Dandy Laser Cut Paper (#154300) to the DSP. I glued this using Multipurpose Liquid Glue (#110755) and sponged it over the back of the laser-cut paper. The Coastal Cabana ribbon from the Playing with Patterns Ribbon Combo Pack (#152468) was wrapped around the card front before attaching it to the Whisper White base card (#106549).
I stamped the dragonfly from the Dragonfly Garden stamp set (#c154411) using Tuxedo Black Memento ink (#132708). This was punched with the co-ordinating Dragonflies punch (#154240). The wings were coloured with the Light Smoky Slate Stampin’ Blend (#154904), then using the Clear Wink Of Stella Brush (#141897) to add glitter to the wings. 
The sentiment from the Dragonfly Garden stamp set was stamped with Bermuda Bay ink (#147096) and cut with a Stitched So Sweetly Die (#151690). The sentiment and dragonfly were attached with Stampin’ Dimensionals (#104430).

Now some information about Whisper White cardstock from Stampin’ Up!


Whisper White has been a Stampin’ Up! staple for so long. We love it and we know you love it, too. We are sad to announce that the supplier’s mill producing our Whisper White cardstock has permanently closed due to impacts from the COVID-19 pandemic. Unfortunately, we weren’t given much notice on this closure. This means that the technology unique to this particular supplier is now unavailable to us and we can no longer offer our Whisper White cardstock and related products, such as Whisper White Note Cards & Envelopes. Please note that this won’t affect any of our other cardstocks, this only affects Whisper White.

We know Whisper White has a huge fan base; we’re big fans, too! And we are crushed that it’s going away. Even though this decision was out of our hands, rest assured that we jumped right into action to find the best replacement paper possible. We have dedicated many hours to source and test alternative cardstock options from several suppliers to find the perfect fit that still maintains the Stampin’ Up! quality you know and trust. We are happy to share that we have found a winner for our new cardstock, Basic White! 

The quality of our new Basic White was thoroughly tested by our quality assurance and product teams. It also tested very well with demonstrators and concept artists who gave it a huge thumbs up. We believe in the quality of the new Basic White cardstock and we know it will become your new crafting staple!


Whisper White card will be available while stocks last and Basic White will be available as soon as it is in stock and not too far away. I am looking forward to using this new card.

Have a great day.

“Love what you do and share what you love”.


Thursday 10 December 2020

Snowflake Wishes Bundle

Hi everyone,

I love the combination of the snowflakes with the Balmy Blue Glimmer Paper (#153513) so have used them again on this Christmas card.


The card stock is Whisper White (#106549) and Balmy Blue (#147007). I cut the detailed pattern at the lower part of the card front using a die from the Ornate Layers Dies (#152726), then I dry embossed the top part with the Winter Snow Embossing Folder (#153577). I wrapped the Silver/White 3/8” Metallic-Edged Ribbon (#144213) around the card then attached the card front to the Balmy Blue card.
The sentiment from the Snowflake Wishes stamp set (#153444) was stamped using Balmy Blue ink (#147105). The Whisper white card and Balmy Blue card for the sentiment were cut with Hippo & Friends Dies (#153585). This was attached to the card with Stampin’ Dimensionals (#104430). The snowflakes, cut with the So Many Snowflake Dies (#153560) were cut from Balmy Blue Glimmer Paper. These were attached with Mini Glue Dots (#103683) and Mini Stampin’ Dimensionals (#144108). The Rhinestone Basic Jewels (#144220) were added to the sentiment to finish the card.

I hope you have had a great day.

“Love what you do and share what you love.”


Wednesday 9 December 2020

Poinsettia Place designer Series Paper

Hello,

If you are needing a card at the last minute this is a very easy one.


The base card is Garden Green (#108605) and the DSP is from the beautiful Poinsettia Place Designer Series Paper (#153487). I cut a piece of the Copper Foil Sheet (#142020) and the Whisper White card (#106549) for the sentiment using the Ornate Layers Dies (#152726). I stamped “Merry Christmas” from the Poinsettia Petals stamp set (#153475) using Garden Green ink (#147089). I attached the copper foil cut out to the card with Stampin’ Dimensionals (#104435).

Well that was easy wasn’t it!

Don’t forget that there are many products retiring from the current Mini catalogue to make way for the new Mini catalogue which will be available from 5th January. Many of the retiring products are discounted and are only available while stocks last so don’t delay in placing an order today.

Here is the list of retiring products- 


Have a fantastic day!

“Love what you do and share what you love”.


Monday 7 December 2020

Ornate Layers Dies

Hello friends,

Today I have made 4 cards all the same, just using different colours and sentiments. I love how this worked with a slimline card.


The Whisper White base cards (#106549) were cut at 21cmx18cm and scored at 9cm.
I applied the Shimmery White Embossing Paste (#145645) to the card fronts using Decorative Masks (#150697) and a Palette Knife (#142808)
The flowers were stamped with the floral image from the Art Gallery stamp set (#154421). This is a Two-Step stamp, so I stamped the lighter image for the base of the flowers and the darker colour on top, then cut them with a co-odinating die from the Floral Gallery Dies (#154316). These are available as the Art Gallery bundle (#156227) and will be available from 5th January. 
I used the Ornate Layers dies (#152726) to cut the coloured card, the Silver Foil (#132178) and the sentiment.
The colours I have used for the top card are So Saffron ink (#147109) and Mango Melody ink (#147093) with So Saffron card (#108611).
The next card is Coastal Cabana ink (#147097) and Bermuda Bay ink (#147096) with Coastal Cabana card (#131302)
The 3rd card is Highland Heather ink (#147103) and Gorgeous Grape ink (#147099) with Highland Heather card (#147010).
The 4th card is Poppy Parade ink (#147050) and Cherry Cobbler ink (#147083) with Poppy Parade card (#121694).
“Congratulations” is from the Peaceful Moments stamp set (#151595).
“Sending Positive Thoughts” is from the Positive Thoughts stamp set (#151490).
“Thank You” is from the Ornate Thanks stamp set (#149471).
“Wishing you the Happiest of Birthdays” is from the Quite curvy stamp set (#154430).
The Silver Foil leaves are cut with a Curvy Die (#154319). I used the Adhesive sheet (#152334) on the back of the foil before cutting the leaves and I used Stampin’ Dimensionals (#104430) and Mini Stampin’ Dimensionals (#144108) to attach the sentiment and flowers to the card.

I hope your day has been amazing!!

“Love what you do and share what you love.”


Saturday 5 December 2020

Art Gallery Bundle

Hello everyone,

Today’s card shows 2 stamp sets which will be available in January - the Art Gallery stamp set (#154421) and the Many Messages stamp set (#154510).


Firstly I created the background on the Very Vanilla card (#106550) using Shimmery White Embossing Paste (#145645) and adding a drop (a little goes a long way) of So Saffron re-inker (#154905). I mixed the ink with the paste then using one of the Basic Pattern Decorative Masks (#150697), placed the mask on top of the card then I applied the paste over the top. I didn't want a perfect finish so just randomly spread the paste using a Palette Knife (#142808). This embossing paste sets quickly, so wash the mask and palette knife as soon as possible. I usually always have some extra paste so I apply it to extra card to use at a later date so as not to waste it. If it’s not coloured it can be returned to the tub.
I attached this card and a piece of the So Saffron Designer Paper from the Subtles 6”x6” Designer Series Paper (#153072) to Crushed Curry card (#131288). I wrapped the Gold 3/8” Metallic-Edge Ribbon (#144146) around the card front before attaching the card to the Very Vanilla base card.
The top flower was stamped with So Saffron ink (#147109) for the base image followed by Crushed Curry ink (#147087) for smaller images of the flower. The flower below the sentiment was stamped with Crushed Curry ink. Both flowers were cut with the co-ordinating dies from the Floral Gallery Dies (#154316). The leaves cut from the Soft Sea Foam card (#147012) were cut with a Curvy Die (#154319). These were attached to the card with Mini Glue Dots (#103683).
The sentiment is from the Many Messages stamp set and cut with a Hippo & Friends Die (#153585). The Gold Foil Sheet (#132622) was also cut with one of these dies. The sentiment and flowers were all attached using Stampin’ Dimensionals (#104430). A Gold Glitter Enamel Dot (#152155) was attached to the lower corner of the card.

Enjoy the rest of your weekend.

“Love what you do and share what you love”


Friday 4 December 2020

Floating & Fluttering Bundle

Hello friends,

I have some sneak peeks on todays card using products from the upcoming Mini catalogue and Sale-a-bration catalogue. Both are available from the 5th January 2021.


The group of butterflies and leaves are from the Floating & Fluttering stamp set (#154424).  These are stamped as one image with VersaMark (#102283) and heat embossed with Gold Stampin’ Emboss Powder (#109129), then set with the Heat Tool (#129056). This is cut with a die from the Fluttering Dies (#154318). I coloured the image with Stampin’ Blends - Bermuda Bay (#154878), Mango Melody (#154888), Petal Pink (#154893) and Old Olive (#154892). I cut the the single butterfly from Gold Foil Sheet (#132622).
The base card is Whisper White (#106549). The Oh So Ombre Designer Series Paper (#155225) was dry embossed with the Painted Texture 3D Embossing Folder (#154317). I wrapped the Snowflake Splendor 1/4” Ribbon (#153548) around the card front, then attached this to the base card.
I used the piece of DSP that I had left over after cutting the card front, for the greeting. “Thank You” from the Heal Your Heart stamp set (#155291) was stamped with Tuxedo Black Memento ink (#132708) onto this DSP then cut with a die from the Fluttering Dies. The butterflies were attached with Stampin’ Dimensionals (#104430) and I added the Gilded Gems (#152478) to the greeting and gold butterfly.
The Designer Series Paper and the Heal Your Heart Stamp set are both free products during Sale-a-bration. From 5th January till 28th February, for each $90 you spend on Stampin’ Up! Products, you can choose a free Sale-a-bration product. There is a range of products to choose from.

Have a great weekend!!

“Love what you do and share what you love.”


Thursday 3 December 2020

Feels Like Frost Designer Series Paper

Hi again,

I have used some of my favourites again on todays card - butterflies, purple/mauve and this easy fancy fold card.


I have used Whisper White card (#106549) and Highland Heather card (#147010). The Designer Series Paper is from the Feels Like Frost DSP (#150444).
The size of the base card is 21cm x 10.5cm and scored at 6cm from the left.
The Highland Heather card was cut at 9.5cm x 14cm for the inside of the card and 9.5cm x 5.5cm for the piece on the front of the card. I dry embossed the smaller card with the Wrapped In Texture Embossing Folder (#153574).
The other white card with the flap is 23cm x 8.5cm and scored at 10cm from the right.
“Get Well Soon” is from the Many Mates stamp set (#152633) and I stamped this with Highland Heather ink (#147103). This was cut with a die from the Hippo & Friends dies (#153585). I attached the sentiment with Stampin’ Dimensionals (#104430). You need to only attach the Dimensionals on the left side of the sentiment to allow you to tuck the flap under the right side.
The butterfly on the outside and inside of the card were stamped with an image from the Floating & Fluttering stamp set (#154424). This is a sneak peek from the upcoming Mini catalogue available from 5th January. I stamped this with Gorgeous Grape ink (#147099) and cut the butterflies with dies from the co-ordinating Fluttering Dies (#154318). I wanted to add some glitter to the butterfly, but some inks tend to run as did this Gorgeous Grape ink. So I added some Clear Wink Of Stella (#141897) to Whisper White card, then stamped the butterfly, so no problem with it “bleeding”. The butterfly on the front was attached with Mini Stampin’ Dimensionals (#144108).
To finish the card Pearl Basic Jewels (#144219) were added to the body of the butterfly.

Hope you are having a great day!

“Love what you do and share what you love.”


Wednesday 2 December 2020

Zany Zebras

Welcome everyone,

I think you all know I love dies and have used 3 different sets on this cute card. I also love some glitter and shine on my cards so have also used some glitter here.


The base card is Whisper White (#106549) and the next layer is Real Red card (#106578). The Whisper White card on top has been dry embossed with the Painted Texture 3D Embossing Folder (#154317). This is a sneak peek from the upcoming mini catalogue available from 5th January.
I stamped the cute Zebra from the Zany Zebras stamp set (#c152536) on Whisper White card. This, as well as the Black Glitter Paper (#153518) were cut with dies from the Hippo & Friends Dies (#153585). I attached these using Stampin’ Dimensionals (#104430).
The dies for “Happy Birthday” are from the Well Written Dies (#151816) and cut from the Red Foil from the Red & Green Foil Sheets (#153510). I had adhered Adhesive Sheets (#152334) to the back of the foil before cutting. Using these adhesive sheets allows you to easily attach fine detailed pieces to your project.

I also added some extra glimmer to the zebra using the Clear Wink Of Stella brush (#141897) where the line markings are but I don't think it shows very well in the photo.

Have a great day.

“Love what you do and share what you love!”


Monday 30 November 2020

Boho Indigo

Hi ladies & guys,

Did you realise that one of  Ornate Border Dies (#152724) matches with the Ornate Layers Dies (#152726)?  I love when so many products co-ordinate. I have used both on this card.


I cut a piece from the right side of the Whisper White card front (#106549) using a die from the Ornate Borders Dies giving the lovely scalloped detail down the edge of the card. Then I cut the Bumblebee card (#153082) and another piece of Whisper White card with the Ornate Layers Dies. These were attached to the card front.
The vase and flowers are stamped with images from the stamp set which is included in the Boho Indigo Product Medley (#153132). The vase was stamped with Bumblebee ink (#153116) and the flowers with Magenta Madness ink (#153117). The leaves, vase and flowers are all cut with the dies from the Boho Indigo Product Medley dies. The leaves are Just Jade card (#153084) which had Adhesive Sheet (#152334) adhered to the back before cutting. 
The sentiment is from the Many Mates stamp set (#152633) and stamped with Bumblebee ink. The die to cut the sentiment is from the Hippo & Friends dies (#153585). The vase, flowers and sentiment were attached with Stampin’ Dimensionals (#104430).
I attached a piece of the Flowers For Every Season 6”x6” Designer Series Paper (#152486) to the card as shown below.


The Pearl Basic Jewels (#144219) were added to the flower centres and also the flowers on the vase.

Have a great day!

“Love what you do and share what you love.”


Saturday 28 November 2020

Wreath Builder Dies

Hello friends,

I haven’t done any stamping on this card which is a little usual for me. I have used the Wreath Builder Dies (#152722) and the Well Written Dies (#151816).


I have used the Brass Foil Sheet (#153057) and Shaded Spruce card (#147006) for the wreaths which were cut with the Wreath Builder Dies. I attached these to the In Good Taste Designer Series Paper (#152494) using Mini Glue Dots (#103683). Under the DSP is Shaded Spruce card and the base card is Very Vanilla (#106550). The flowers, also cut with Wreath Builder dies, were cut from Melon Mambo card (#119980), Mango Melody card (#147013) and Pacific Point card (#116202). I cut 2 of each colour and assembled them using Mini Stampin’ Dimensionals (#144108) and used Mini Glue dots to attach them to the wreath. The flower centres were also cut from the Brass Foil and attached with Mini Glue Dots. Using Adhesive sheets (#152334) on the back of the Brass Foil, I cut “Thanks” using the Well Written Dies. The actual word is “Thanksgiving” but I only wanted “Thanks” so cut off  the rest of the word. I added a trio of Gilded Gems (#152478) under the sentiment.

I hope you are having a relaxing weekend.

“Love what you do and share what you love.”


Thursday 26 November 2020

In The Pines Bundle

Hi everyone,

Have you finished making your Christmas cards yet? Or perhaps haven’t started!! All I have to do is write on all mine so had better get that done soon and get them posted so I don't leave it till the last minute. Here’s another Christmas card for some inspiration if needed and easy to make.


The base card is Real Red (#106578). I attached the Plush Poinsettia Specialty Paper (#153486) to the same size Whisper White card (#106549), then attached this to the Granny Apple Green card (#147014). The Real Red Sheer Ribbon (#153535) was wrapped around the card front. The pine tree from In The Pines stamp set (#p153448) was stamped with VersaMark (#102283) and heat embossed with Gold Stampin’ Emboss Powder (#109129). The Heat Tool (#129056) was used to set the powder. The 2 trees were cut with dies from Pine Woods dies (#153563). The star and unstamped tree were cut from Gold Foil Sheets (#132622). The die for the star is from the Stitched Stars Dies (#150653). I used Adhesive Sheets (#152334) on the back of the Gold Foil before cutting with the dies.
The sentiment is from the Itty Bitty Christmas stamp set (#c150513) and stamped with Real Red ink (#147084), then cut with a Stitched So Sweetly Die (#151690). I coloured the stamped tree using Granny Apple Green Stampin’ Blends (#154885) and attached this and the sentiment to the card with Stampin’ Dimensionals (#104430). The embellishments are from the Wonderful Gems (#153536).


I hope your day has been fantastic!!

“Love what you do and share what you love.”


Wednesday 25 November 2020

Borders Abound

Hi again,

This gorgeous designer series paper is from the Flowers For Every Season 6”x6” DSP (#152486). This pack includes floral images for each of the 4 seasons on one side and more subtle designs on the reverse, so a very versatile pack for the whole year.


I stamped the floral border image from the Borders Abound stamp set (#152627) using VersaMark (#102283) and Gold Stampin’ Emboss Powder (#109129), which needs to be set with the Heat Tool (#129056). This stamp set has 4 border images, again 1 for each season. I coloured these flowers with Poppy Parade Stampin’ Blends (#154958), Daffodil Delight Stampin’ Blends (#154883) and Balmy Blue Stampin’ Blends (#154830).
We all like to save when we can, so when I use some of the specialty papers, like the Gold Foil (#132622) on this card, I remove the middle section (as shown below) and then can use that for another project, so no waste.


I attached the Designer Series Paper to Whisper White card (#106549) with the stamped border. I wrapped the 5/8” Polka Dot Tulle Ribbon (#146912) around this card front. Before attaching the ribbon I coloured this white ribbon by sponging with Poppy Parade ink (#147050). The cardfront was then attached to the Gold Foil, then this was attached to the Poppy Parade base card (#121694).
“Best Wishes” is also from the Borders Abound stamp set and Gold embossed. I cut the ends of the sentiment and the Gold Foil under the sentiment using the Banners Pick A Punch (#153608). I used some of the Gold Trim from the Forever Greenery Trim Combo Pack (#152475) and attached it under the sentiment and the sentiment was attached with Stampin’ Dimensionals (#104430). Wonderful Gems (#153536) were added to the card & sentiment.

Have a fantastic day!!

“Love what you do and share what you love”.


Tuesday 24 November 2020

Poinsettia Dies

Hello my friends,

I have chosen to use subtle colours on this Christmas card using the Poinsettia Dies (#153522) to cut the flower.


As well as the Whisper White card (#106549) I have used the Gold from the Brushed Metallic 12” x 12” cardstock. I cut a piece of the white card using one of the Curvy Dies (#154319), then dry embossed the lower piece with one of the Wrapped In Texture Embossing Folders (#153574). Both pieces were then attached to the Gold Metallic card.
I cut the 4 layers of the poinsettia using the Poinsettia Dies and sponged the edges of the petals with Soft Sea Foam ink (#147102). Clear Wink Of Stella (#141897) was brushed onto the petals giving a lovely glimmer. I assembled the flower with Mini Glue Dots (#103683) and then it was attached to the card with Stampin’ Dimensionals (#104430). 
The “berries” were cut with a die from the Poinsettia Dies and the leaves from the Soft Seafoam card (#147012) were cut with a die from the Curvy Dies. All were attached with Mini Glue Dots.
“Merry Christmas” is from the Curvy Christmas stamp set (#p155364). This was heat embossed with VersaMark (#102283) and Gold Stampin’ Emboss Powder (#109129), then set with the Heat Tool (#129056). A die from the Ornate Frames (#150664) was used to cut the sentiment. Mini Stampin’ Dimensionals (#144108) were used to attach the sentiment to the card. A Gilded Gem (#152478) was attached to the centre of the poinsettia.

Have a fantastic day!!

“Love what you do and share what you love”


Monday 23 November 2020

So Many Snowflakes Dies

Hello everyone,

Here’s an easy card using the So Many Snowflakes Dies (#153560).


The finished size of this card is 13cm x 13cm. I used Whisper White card (#106549) for the base. I cut the Snowflake Splendor Designer Series Paper (#153512) 12cm x 12cm. The snowflakes are cut from the beautiful Balmy Blue Glimmer Paper (#153513) using dies from the So Many Snowflakes Dies (#153560). These were attached to the card with Mini Glue Dots (#103683). The sentiment from the Wrapped In Christmas stamp set (#153481) was stamped with Pacific Point ink (#147098), then cut with a Layering Circles Die (#151770). I attached the sentiment with Stampin’ Dimensionals (#104430). The Blue Adhesive-Backed Gems (#153547) were added to the centre of each of the snowflakes.

Don’t forget the one day only sale is on (today) Tuesday 24th November. Most products in the Annual Catalogue are 10% off. There are a few exceptions which you will find here. Don’t miss out on some great specials. Contact me for further info or order here - lesleyjendra.stampinup.net

Have a great day.

“Love what you do and share what you love!!”


Sunday 22 November 2020

Ornate Style Bundle

Hi and welcome again everyone,

I love the Ornate Style Bundle (#c154119) which includes the Ornate Style stamp set (#c152572) and the Ornate Layers Dies (#152726) and used on todays card.


I stamped the floral image using VersaMark (#102283) and heat embossed with the White Stampin’ Emboss Powder (#109132) onto the Whisper White card (#106549). This was then set with the Heat Tool (#129056). I coloured the image with the following Stampin’ Blends - Granny Apple Green (#154885), Highland Heather (#154887), Purple Posy (#154896) and Rococo Rose (#154900). I then cut this with an Ornate Layering Die.
The Designer Series Paper is from the Artistry Blooms pack (#152495) and I dry embossed this with the Dainty Diamonds 3D Embossing Folder (#152702). Doesn’t the Ombré effect on the DSP look great.
I used Stampin’ Dimensionals (#104430) to attach the die-cut to the DSP. The sentiment is from the Comfort & Hope stamp set (#c152509), stamped with Highland Heather ink (#147103)  and cut with an Ornate Frames Die (#150664). This was attached with Mini Stampin’ Dimensionals (#144108).

I hope your weekend has been a fun one.

“Love what you do and share what you love.”