Monday 31 January 2022

Soaring Swallows Bundle

Welcome everyone,

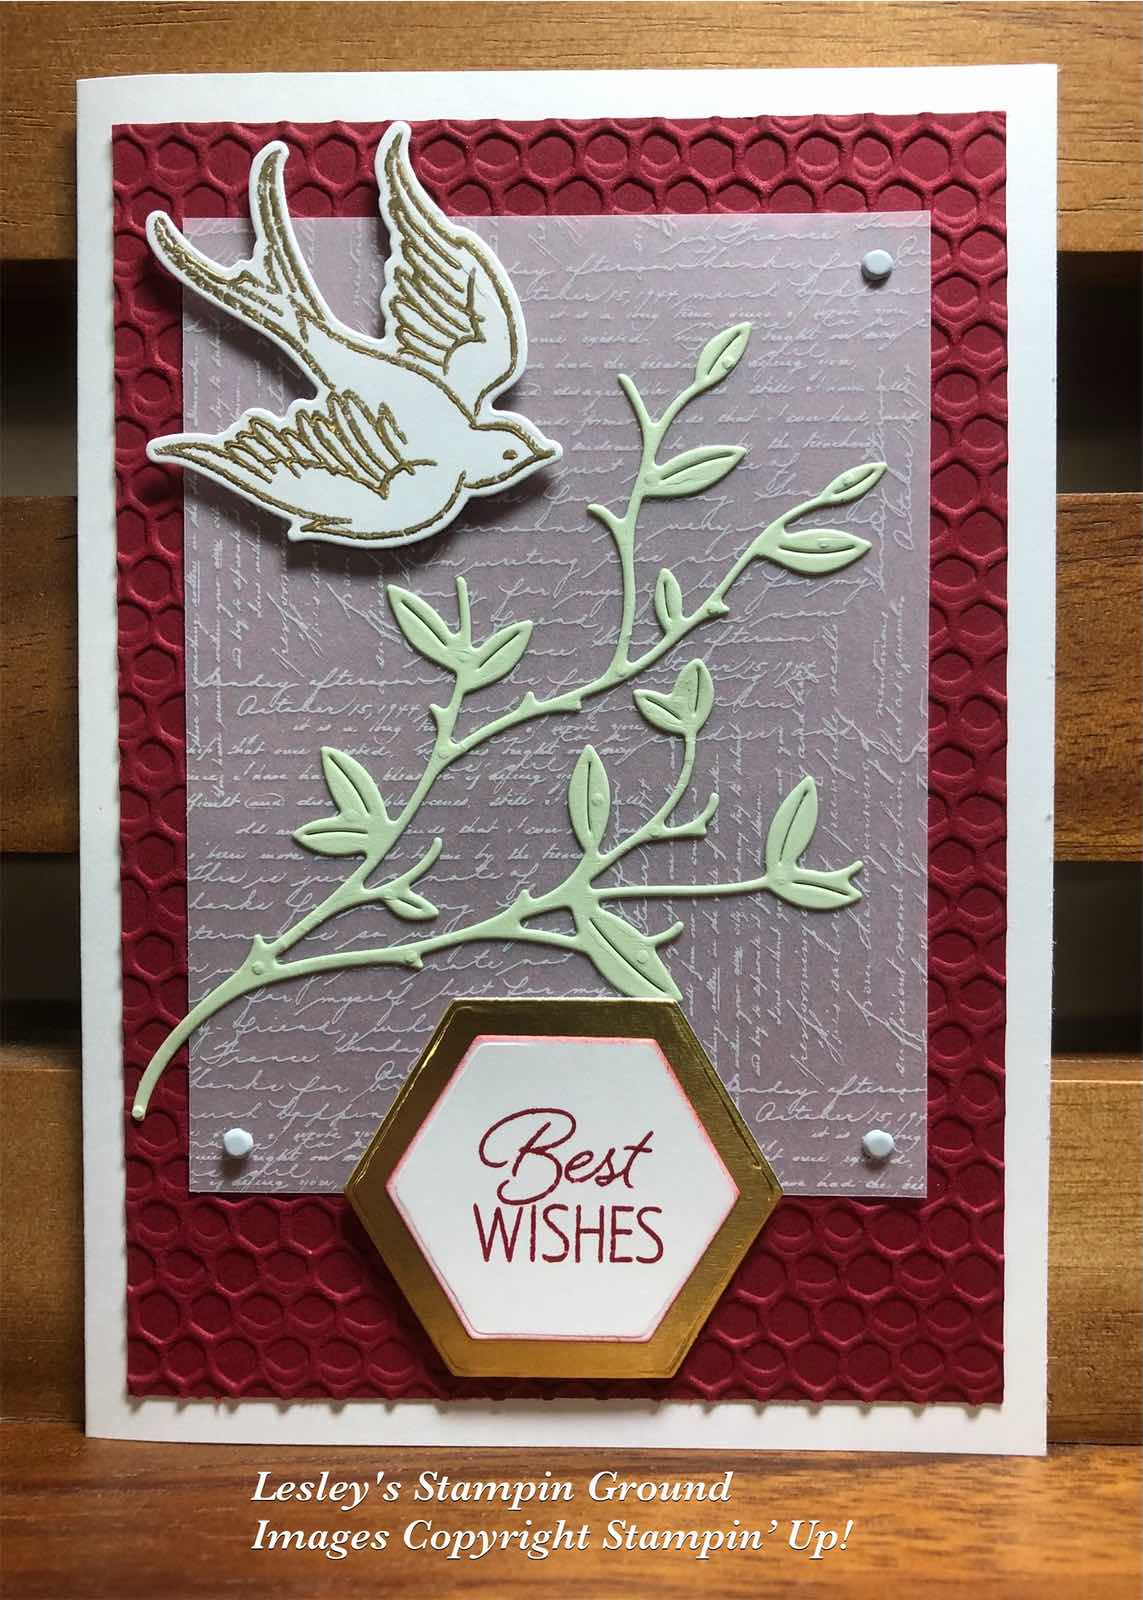
The Soaring Swallows Bundle (#157810) was used for the bird & sentiment on this card. The bundle includes the Soaring Swallows stamp set (#157804) and the Swallow Dies (#157809) and when purchased as a bundle you save 10%.


The bird & sentiment were both stamped with VersaMark (#102283) and heat embossed with Gold Stampin’ Emboss Powder (#155555), then set with the Heat Tool (#129056). Both were cut with dies from the Swallows dies.

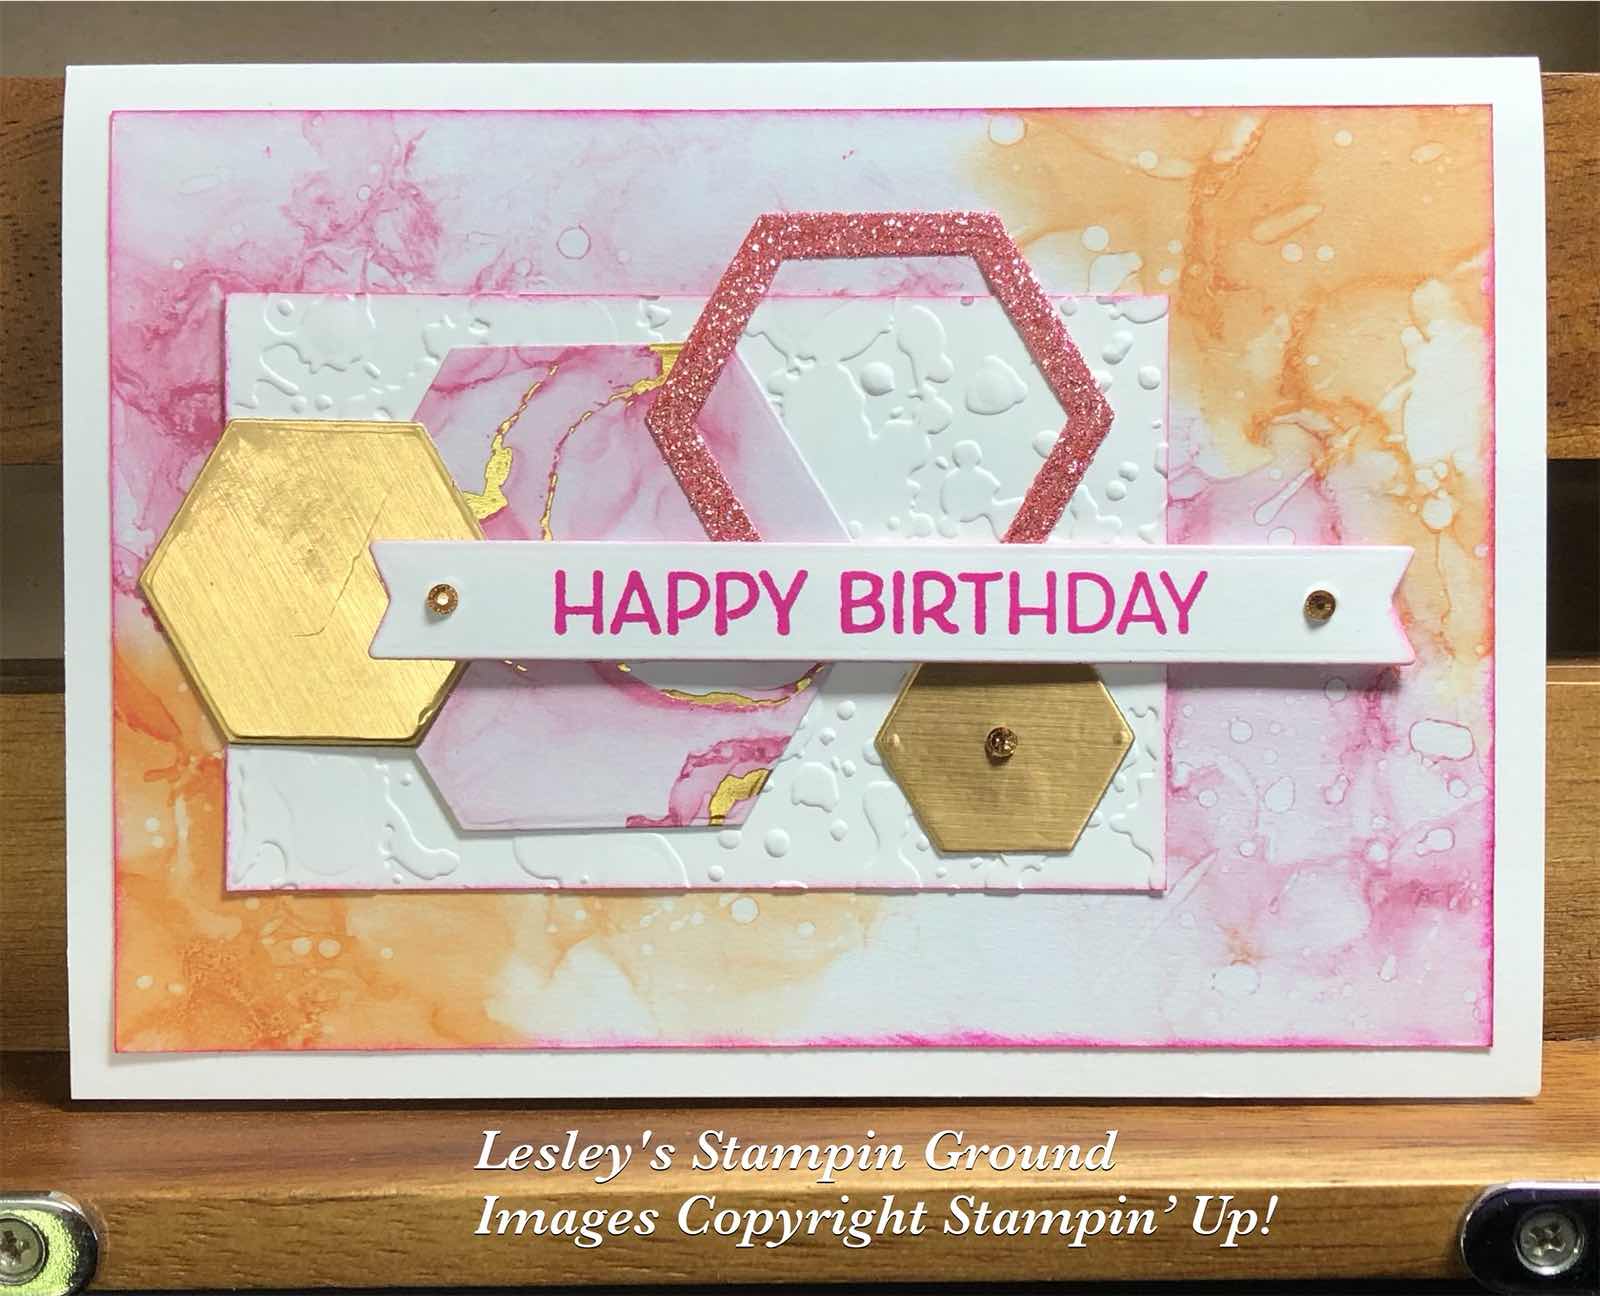
I dry embossed the Basic White card front (#159228) with the stripes from the Stripes & Splatters 3D Embossing Folder (#157980), then attached the Abstract Beauty 4”x6” Specialty Designer Series Paper (#158039).

The gold card from the Brushed Metallics 12”x12” cardstock (#153524) and the pink card from the Supple Shimmer 12”x12” Specialty Paper (#158068) were both cut with a Beautiful Shapes Die (#158046). The gold circle, the sentiment and the bird were attached with Stampin’ Dimensionals (#104430).

I daubered the card front with Polished Pink ink (#155712) before attaching it to the Basic White base card. The Iridescent Rhinestone Basic Jewels (#158130) were added to the card.


“Love what you do and share what you love.”


Sunday 30 January 2022

Sale-a-bration Friendly Hello

Hello again,

I am loving the Friendly Hello stamp set & Designer Series Paper (#159990) which is a Sale-a-bration product. Due to some delays with some of these products, Sale-a-bration is being extended for a few more weeks so there is still time to gets some free products with qualifying orders. The Friendly Hello set which includes the stamp set & DSP is free with a $180 order (in Australia). There are other products with $90 orders.


I stamped the bird & flower image twice with Tuxedo Black Memento ink (#132708) on Basic White card (#159228), then fussy cut the images. I coloured them with the following Stampin’ Blends - Daffodil Delight (#154883), Flirty Flamingo (#154884), Fresh Freesia (#155518), Pool Party (#154894), Pale Papaya (#155519), Granny Apple Green (#154885) and Crumb Cake (#154882).

I used the Stitched Greenery Die (#155451) for the stitching on the Basic White card front, then this was attached to the Pool Party card (#124391). The base card is also Basic White. The striped paper is from the Friendly Hello DSP.

I lightly coloured the white side of the Heart & Home Doilies (#157956) with Pool Party ink (#147107) and a Blending Brush (#153611). Best Wishes from the Art Gallery stamp set (#158201) was stamped with Pool Party ink (#147107) then cut with the Messages die (#154422). The sentiment and the bird & flowers on the left were attached with Mini Stampin’ Dimensionals (#144108) and I used Mini Glue Dots (#103683) for the image on the right. The Iridescent Rhinestone Basic Jewels (#158130) were my choice of embellishment for this card.


TIP: The Messages die is one die but it has 18 different cut outs for a range of sentiments. There are 2 stamp sets which co-ordinate with the die or you can choose other sentiments and use the appropriate cut-out from this die.

“Love what you do and share what you love.”


Saturday 29 January 2022

Friendly Hello & Honeybee Home

Hello friends,

I have combined the Friendly Hello stamp set (#159990) with the Honeybee Home stamp set (#157943) for this card.


I stamped the leaves from the Friendly Hello stamp set onto Basic White card (#159228) using Just Jade ink (#153115). Then I dry embossed this with the Tasteful Textile 3D Embossing Folder (#152718). This was matted with Pale Papaya card (#155669) then attached to the Basic White base card.

The 2 larger flowers from the Friendly Hello stamp set and the smaller flowers from the Honeybee Home stamp set were stamped with Tuxedo Black Memento ink (#132708). The 2 larger flowers were fussy cut and the small flowers were cut with the Honeybee Blooms Dies (#157951). All the flowers were coloured with Pale Papaya Stampin’ Blends (#155519) and the leaves with Soft Succulent Stampin’ Blends (#155521). 

The Gold trim from the Simply Elegant Trim (#155766) was attached to the card front and the flowers were attached with Mini Stampin’ Dimensionals (#144108). The sentiment is also from the Friendly Hello stamp set and stamped with Tuxedo Black Memento ink, then cut with a die from the Ornate Frames (#150664). This was attached with Stampin’ Dimensionals (#104430). The Adhesive Backed Hexagons (#158148) were added to the card. Clear Wink Of Stella (#141897) was used on all the flowers to add that bit of sparkle.

TIP: When stamping and dry embossing on the same piece of card, it is usually best to stamp first, then emboss. If you emboss first you won’t get the best stamping image. However I have very occasionally embossed first for a different effect, depending on the stamp. It’s always worth experimenting.


“Love what you do and share what you love.”


Friday 28 January 2022

Beautiful Shapes Dies

Hello crafty friends,

I am sure you are all like me and have lots of bits and pieces of designer papers that we just don't want to throw out as we may be able to use them on a project some day. Well this card is using bits and pieces and cut with the Beautiful Shapes dies (#158046).


The Expressions In Ink 12”x12” Specialty Designer Series Paper (#155464) was used for the card front and was also cut with one of the Hexagon dies from the Beautiful Shapes dies. I used the Brushed Metallic 12”x12” Cardstock (#153524) and the pink card from the Supple Shimmer Specialty Paper (#158068) to cut the other hexagons.

The Basic White card (#159228) was dry embossed with the splatters from the  Stripes & Splatters 3D Embossing Folder (#157980) and attached to the DSP. The hexagons were attached to the card. “Happy Birthday” is from the Artistically Inked stamp set (#154542) and stamped with Magenta Madness ink (#153117). A die from the Bloom Dies (#155989) was used to cut the sentiment and attached to the card with Stampin’ Dimensionals (#104430). The embellishments are Champagne Rhinestone Basic Jewels (#151193).

TIP: You could use any shapes for this card. Just have a play with what you have and with various designer papers for a unique look.


“Love what you do and share what you love.”


Thursday 27 January 2022

Daffodil Daydream Bundle

Hi friends,

The Slim Card Dies (#157965) has 4 dies which can be used for a slim line card and I have used one for the background of this card.


Before cutting the Basic White card (#159228) with the die, I adhered the Adhesive Sheet (#152334) to the back. This makes it so much easier to attach it to the base card. This was then attached to the Basic White base card which was cut at 22cm x 18cm and scored in half at 9cm. This fits perfectly into the Slimline Envelopes (#157981).

The daffodils from the Daffodil Daydream stamp set (#157786) were stamped with Tuxedo Black Memento ink (#132708). These were cut with the Daffodil Dies (#157794). The Stampin’ Blends to colour the images are Daffodil Delight (#154883) and Granny Apple Green (#154885).

“Happy Birthday” is from the Biggest Wish stamp set (#155952). “Birthday” was stamped with Daffodil Delight ink (#147094) and “Happy” with Granny Apple Green ink (#147095). I used a Hippo & Friends Die (#153585) to cut the sentiment. Stampin’ Dimensionals (#104430) were used to attach the sentiment and the daffodils with the 3 flowers to the card. I used the Clear Wink Of Stella Brush (#141897) for some glitter on the flowers and the embellishment are from the Playing With Patterns Resin Dots (#152467).


“Love what you do and share what you love.”


Wednesday 26 January 2022

Grassy Grove Bundle

Hi & welcome again,

The Grassy Grove stamp set (#157836) and the Grove Dies (#157844) can be purchased in a bundle - the Grassy Grove Bundle (#157845). You will save 10% on all bundles.


I stamped the bushy image from the Grassy Grove stamp set with Soft Sea Foam ink (#147012) onto Basic White card (#159228), then I re-stamped it with Pear Pizzaz ink (#147104) below the first image. Next I stamped the grassy image with Old Olive ink (#147090). I stamped the tall trees with Garden Green ink (#147089) on the right of the card and stamped a second one on another piece of card and cut this with a Grove Die.

I cut the stamped card with a die from the Nature’s Thoughts (#153586) and matted it with the Brushed Metallic 12”x12” cardstock (#153524). There are 3 colours of gold in this pack and I used the other colours for the deers also cut with Grove dies.

The background is from the Beauty Of The Earth 12”x12” Designer Series Paper (#155841) and this was attached to the Basic White base card.

“Best Wishes” from the Special Moments stamp set (#158081) - a Sale-a-bration set - was stamped with Old Olive ink and was cut with a die from the Smooth Sailing Dies (#149576). The sentiment, cut out trees and the deer are all attached to the card with Stampin’ Dimensionals (#104430) and Mini Stampin’ Dimensionals (#144108). The pebbles are from the Pebbles Enamel Shapes (158141).

“Love what you do and share what you love.”


Tuesday 25 January 2022

Expressions Of Friendship

Hi friends,

In each catalogue you will find some products which you can earn as a host or by placing an individual order of $250 (in Australia). These are great value. The Expressions Of Friendship stamp set (#158460) is one of these from the Mini Catalogue.


I stamped this beautiful image with Tuxedo Black Memento ink (#132708) onto Basic White card (#159228). The tree trunk was coloured with Crumb Cake Stampin’ Blends (#153882) and the leaves with Granny Apple Green Stampin’ Blends (#154885). For the grass I used Old Olive Stampin’ Blends (#154892) and the swing seat was 600 (#159462)- one of the new Natural Tones Stampin’ Blends. There are 10 different skin tones available numbered 100-1000.

The dress was coloured with Polished Pink SB (#155520) and the hair with 400 of Natural tones SB (#159461) and Ivory SB (#154922). I lightly coloured the background with Pool Party ink (#147107) using a Blending Brush (#153611) and the tree with Granny Apple Green ink (#147095).

I used a Stitched With Whimsy die (#155314) to create the “stitching” on the card. “Happy Birthday” is also from the same stamp set and stamped with Polished Pink ink (#155712). I used a Hippo & Friends die (#153585) to cut the sentiment and attached it with Mini Stampin’ Dimensionals (#144108). The card front was matted with Polished Pink card (#155711), then attached to the Basic White base card. The Pebble Enamel Shapes (#158141) were placed on the card.

“Love what you do and share what you love.”


Monday 24 January 2022

Honeybee Home Bundle

Hello & welcome,

Today’s card is highlighting the Honeybee Home Bundle (#157952) which includes the Honeybee Home stamp set (#157943) and the Honeybee Blooms Dies (#157951).


I stamped the floral images and the bee with Tuxedo Black Memento ink (#132708) on Basic White card (#159228). The Stampin’ Blends used to colour these images are Pale Papaya (#155519), Soft Succulent (#155521) and Daffodil Delight (#154883). The co-ordinating dies were used to cut these flowers & the bee.

I used the Adhesive Sheet (#152334) on the back of the Evening Evergreen card (#155575) and Soft Succulent card (#155777) before cutting these with the dies. These were attached to the Basic White card front which had been dry embossed with the Hive 3D Embossing Folder (#157955). The edges of the card front were daubered with Evening Evergreen ink. 

The coloured flowers and the bee were attached to the card with Mini Stampin’ Dimensionals (#144108).

The sentiment from Artistically Inked stamp set (#154542) was stamped with Evening Evergreen ink (#155576), then cut with the Messages die (#154422). The Elegant Faceted Gems (#152464) were added to the card and sentiment.

TIP: The Tuxedo Black Memento ink is ideal when using Stampin’ Blends as it won’t bleed. It is also a great general-purpose ink.


“Love what you do and share what you love.”


Sunday 23 January 2022

Symbols Of Fortune Specialty Designer Series Paper

Hello,

The Symbols Of Fortune 12”x12” Specialty Designer Series Paper (#157652) has a beautiful range of designs including Gold foil. I have used 2 of the designs on this card.


I cut the designer paper with the crane using a hexagon die from the Beautiful Shapes Dies (#158046). Then I cut the Evening Evergreen card (#155575) with the larger hexagon and used this to matt the DSP. This was attached with Stampin’ Dimensionals (#104430) to the Gold/gray DSP which was cut with a die from the Nature’s Thoughts (#153586). I used Soft Succulent card (#155777) and Evening Evergreen card on the Basic White base card (#159228).

The small Evening Evergreen hexagons were cut with dies also from the Beautiful Shapes Dies. The sentiment is from the Blessings Of Home stamp set (#157930) and stamped with Evening Evergreen ink (#155576). I used the Messages die (#154422) to cut the sentiment, then attached it to the card with Mini Stampin’ Dimensionals (#144108)

TIP: The Messages die co-ordinates with 2 stamp sets - Many Happenings (#155001) and Many Messages (#154510). Both these sets have a great range of sentiments. However you can also use sentiments from other stamp sets (which I have done on this card), and find the perfect cut out to suit that particular sentiment, so it’s a very versatile die.

“Love what you do and share what you love.”


Saturday 22 January 2022

Bouquet Of Love Hybrid Embossing Folder

Hi my friends,

The Bouquet Of Love Hybrid Embossing Folder (#157641) will emboss and cut at the same time. You can use the embossing folder alone or if you add the heart die to the folder, it will cut the heart at the same time.

Here’s a very easy card for a special occasion.


I embossed the beautiful Mother Of Pearl 12”x12” Specialty Paper (#157666). This was attached to the Real Red card (#106578). The heart was attached with a double layer of Stampin’ Dimensionals (#104430). The card front was attached to the Shimmery White Base card (#121717).

The sentiment is from the Blessings Of Home stamp set (#157930) and stamped with Real Red ink (#147084) onto Shimmery White card. I cut this with a Stitched Rectangles Die (#151820) and attached it to the card with Stampin’ Dimensionals.

The small hearts were cut with a die from the Sweet Hearts Dies (#157623) using the Red Glitter paper from the Ombre Specialty Paper (#155784) and attached to the card with Mini Glue Dots (#103683).

TIP: The beautiful shine on the Mother Of Pearl paper makes it ideal for a special occasion card and this would be great for a wedding card.


“Love what you do and share what you love.”


Friday 21 January 2022

Dahlia Days Bundle

Hi everyone,

The Dahlia Days Bundle (#157802) includes the Dahlia Days stamp set (#157799) and the Detailed Dahlias Dies (#157801). This is another one of my favourite sets.


I adhered Adhesive Sheets (#152334) the the back of the Gold Foil Sheet (#132622) before cutting with the Detailed Dahlia Dies. This was attached to the Blackberry Bliss card (#133682). I cut a triangle with the Abstract Beauty Specialty Designer Series Paper (#158039) and placed this on the card. The Base card is Basic White (#159228).

The Dahlia, small flowers and leaves are all images from the Dahlia Days stamp set. The Dahlia was stamped with Blackberry Bliss ink (#147092). For the small flowers I also used Blackberry Bliss ink but used the Stampin’ Off method to get a lighter colour. The leaves were stamped with Granny Apple Green ink (#147095). I used the co-ordinating dies in the Detailed Dahlia dies to cut these stamped images.

“Happy Birthday” is from the Special Moments stamp set (#158081) - a Sale-a-bration product. This was stamped with Blackberry Bliss ink then cut with a Potted Succulent die (#154330). The sentiment, dahlia and small flowers were all attached with Stampin’ Dimensionals (#104430) and Mini Stampin’ Dimensionals (#144108). One of the Brushed Brass Butterflies (#158136) was added to the sentiment.

TIP: To do the Stampin’ Off Method, just ink the stamp as usual, then tap the stamp once onto scrap paper then stamp on the card. This gives a lighter colour, so some of the lighter colours may not work as well as darker ones. Just test it first before stamping on your card if you are unsure.

“Love what you do and share what you love.”


Thursday 20 January 2022

Supple Shimmer Specialty Paper

Hi again friends,

If you like some glitter on your cards you will want to get your hands on the beautiful Supple Shimmer 12”x12” Specialty Paper (#158068). This pack consists of pink and blue glitter paper and both have been used on this card. This was very difficult to photograph with all the glimmer so looks much nicer in real life.


Another beautiful paper is the Mother Of Pearl 12”x12” Specialty Paper (#157666) and I have used this for the background. This was attached to the Basic White base card (#159228). I adhered Adhesive Sheet (#152334) to the blue shimmer paper before cutting with the die from the Sea Dies (#157857) then attached this to the Mother Of Pearl Paper. The Pink Shimmer Paper was cut with the seahorse die from the Sea Life Dies (#155684). This was attached to the card with Mini Stampin’ Dimensionals (#144108).

“Thinking Of You” is from the Soaring Swallows stamp set (#157804) and stamped with Coastal Cabana ink (#147097). I cut this with a die from the Beautiful Shapes Dies (#158046) and also attached it to the card with Mini Stampin’ Dimensionals. Instead of adding embellishments I used the dots from the die cut.

“Love what you do and share what you love.”


Wednesday 19 January 2022

Seas The Day Bundle

Hi and welcome friends,

Just received the Seas The Day Bundle (#157858) so had to play with it. Here’s one of the cards I have made so far.


Firstly I stamped a piece of Basic White card (#159228) with the Gentle Waves background stamp (#157868) using Balmy Blue ink (#147105). I stamped the sea weed from the Seas The Day stamp set (#157849) with Mint Macaron ink (#147106) over the waves.

Next I adhered some Adhesive Sheet (#152334) to the back of the Balmy Blue card (#147007) before cutting this with a Seas Die (#157857). The fish, octopus & starfish are also from the Seas The Day stamp set. These were stamped with Misty Moonlight ink (#153118), Poppy Parade ink (#147050), So Saffron ink (#147109) and Pale Papaya ink (#155670). The co-ordinating Sea Dies cut these images.

“Best wishes” is from the Sale-a-bration Special Moments Stamp set (#158081). This set has 21 different sentiments so covers a range of occasions. This was stamped with Misty Moonlight ink, then cut with the die from Bouquet Of Love Hybrid Embossing Folder (#157641) which includes 9 dies.

I arranged the octopus between the seaweed, then added the Balmy Blue cut out to the card with the stamped waves. The sentiment, fish and starfish are all attached to the card with Mini Stampin’ Dimensionals (#104430). The clear embellishments from the Elegant Faceted Gems (#152464) were added to the card. I also used the Clear Wink Of Stella Brush (#141897) to add some extra sparkle to each of the stamped images.

TIP: Even though there are 2 different sizes of  Stampin’ Dimensionals, sometimes you want a smaller piece.  For the starfish I wanted small narrow pieces so I generally use the pieces around the outside and cut narrow strips which work perfectly.

“Love what you do and share what you love.”


Tuesday 18 January 2022

Soaring Swallows Bundle

Hello stamping friends,

I have used all new products on todays card. I am loving so many of the products from the new Mini catalogue.


I dry embossed the Cherry Cobbler card (#121681) with the Hive 3D Embossing Folder (#157955). This was attached to the Basic White base card (#159228).
I stamped the Swallow from the Soaring Swallows stamp set (#157804) with VersaMark (#102283) and added the Gold Stampin’ Emboss Powder (#155555) which was set with the Heat Tool (#129056). The bird and the leaves were cut with dies from the Swallows Dies (#157809). I used Soft Sea Foam card (#154902) for the leaves which was backed with Adhesive Sheet (#152334)

The Vellum is the 12”x12” Layering Designs (#157764). I attached this to the Cherry Cobbler card using the round Brads from the Round & Square Brads (#155570). The swallow was attached to the card with Stampin’ Dimensionals (#104430).

The sentiment, also from the Soaring Swallows stamp set, was stamped with Cherry Cobbler ink (#147083). This and the Gold Foil (#132622) were cut with the Beautiful Shapes Dies (#158046) and attached to the card with Stampin’ Dimensionals.


TIP: Brads are a great way of attaching Vellum to the card. I also added a small amount of tape to the back of the vellum behind the bird.

“Love what you do and share what you love.”


Monday 17 January 2022

Friendly Hello Slimline card

Hi,

Here is another slim line card, this time using the Slim Card Dies (#157965) to cut the fancy curve at the bottom of the card.


I cut the Friendly Hello Designer Series Paper (#159990) and the Shaded Spruce card (#147006) with one of the Slim Card dies. I attached the DSP which is part of the Friendly Hello stamp set & Designer Series Paper from Sale-a-bration to the Shaded Spruce card.

I stamped the flowers with Tuxedo Black Memento ink (#132708), the small bunches of leaves with Granny Apple Green ink (#147095) and the single leaves with Shaded Spruce ink (#147088).  These leaves were coloured with Soft Sea Foam Stampin’ Blends (#154902). I added colour to the flowers with Fresh Freesia Stampin’ Blends (#155518) .  All these images are from the Friendly Hello stamp set and I fussy cut all these stamped images.

“Happy Birthday” is from Biggest Wish stamp set (#155052) and stamped on Basic White card (#159228). This was stamped with Granny Apple Green ink and Shaded Spruce ink. I used a die from the Tailor Made Tags (#155563) to cut the sentiment.

The base card is Basic White and the finished size is 21cm x 9.5cm. This fits the Slimline Envelopes (#157981). The flowers were attached with Stampin’ Dimensionals (104430). The embellishments are Iridescent Basic Jewels (#158130).

TIP: You can use smaller pieces of the Shaded Spruce card by cutting a narrow strip, approximately 1cm, to attach to the top of the DSP and another strip, approximately 3cm, to attach to the bottom of the DSP, rather than one full piece. 


“Love what you do and share what you love.”


Sunday 16 January 2022

Slim Line card & envelopes

Hi friends,

I hope you haven’t missed the lovely Slimline Envelopes (#157981) in the new Mini Catalogue. There are 15 envelopes in 3 colours with a design printed inside. The colours are White, Smoky Slate and Soft Succulent.


I cut a piece of Basic White card (#159228) 21cm x19cm and scored in half at 9.5cm (on the 19cm side) so this fitted neatly into the envelope.


I stamped the flowers and leaves from the Friendly Hello stamp set (#159990) from Sale-a-bration. The flowers were stamped with Tuxedo Black Memento Ink (#132708) and added the colour with the Pale Papaya Stampin’ Blends (#155519). The leaves were stamped with Granny Apple Green ink (#147095). The flowers & leaves were fussy cut. The sentiment is from the Positive Thoughts stamp set (#151490) using Granny Apple Green ink, then cut with a die from the Beautiful Shapes (#158046).

The Gold leaves were cut with the Artistic Dies (#155371) using the Gold & Rose Gold 6”x6” Metallic Specialty Paper (#156844) which had Adhesive Sheet (#152334) adhered to the back. The flowers, leaves & sentiment were attached to the Vellum 12”x12” Layering Designs (#157764). I used Stampin’ Dimensionals (#104430) for the flowers & Mini Glue Dots (#103683) for the stamped leaves. This was then attached to the Granny Apple Green card (#147014) which had been attached to the base card. The heart embellishments are retired.

Don’t forget to decorate your envelope.


TIP: When using vellum I attach all the pieces to the vellum first before attaching it to the card, then only add adhesive on the back of the vellum where it won’t be seen from the front. It’s easy to see from the back where all the elements are already attached. The heart at the bottom left is also covering a glue dot.


“Love what you do and share what you love.”


Saturday 15 January 2022

Gentle Waves

Hi again,

As soon as I saw the Gentle Waves stamp (#157868) I knew it would be able to be used with many other products like the Sailing Home stamp set (#149457) as I have used on this card.


I stamped the Gentle Waves onto Basic White card (#159228) using Balmy Blue ink (#147105). I matted this with Balmy Blue card (#147007). The base card is Basic White.

The lighthouse and boats are from the Sailing Home stamp set. The boats were stamped with Bumblebee ink (#153116) and Misty Moonlight ink (#153118). The lighthouse was stamped with VersaMark (#102283) and heat embossed with Silver Stampin’ Emboss Powder (#155555) then set with the Heat Tool (#129056). The boats & lighthouse were all cut with the Smooth Sailing Dies (#149576). The Horizon Dies (#157778) were used to cut the grass & hills in the foreground with Old Olive card (#106576).

“Happy Birthday” is from the Calming Camellia stamp set (#158117). This was stamped with Misty Moonlight ink then cut with a die from the Pretty Pillow Boxes Dies (#156321). The lighthouse, yellow boat, sentiment and grass were all attached using Mini Stampin’ Dimensionals (#144108).

TIP: The Calming Camellia stamp set is a free host set from Sale-a-bration with an order of $500 (in Australia).
The Pretty Pillow Boxes Dies are continuing from the previous mini catalogue.


“Love what you do and share what you love.”


Friday 14 January 2022

Flowing Flowers stamp set

Hello my crafty friends,

These flowers are from the Flowing Flowers Stamp Set (#157880) and I have used the Masking Technique when stamping the flowers.


I stamped the flower on the right with Flirty Flamingo ink (#147052). I made a mask by stamping this flower on a post-it note and cut out the flower then this was placed on top of the stamped image on the Basic White card (#159228). Then I stamped the second flower with Fresh Freesia ink (#155611) overlapping the images.

I dry embossed the stamped card front with the Tasteful Textures 3D embossing Folder (#152718) and attached it to a triangle of the Flirty Flaming card (#141421). The base card is Basic White.

“Thank You” is also from the Flowing Flowers stamp set and stamped with Flirty Flamingo ink. This was cut with a die from the Sweet Hearts Dies (#157623). I threaded the Silver Simply Elegant Trim (#155766) through the tag. The row of hearts were also cut with the Sweet Hearts Dies. I used Flirty Flamingo card which was backed with Adhesive Sheets (#152334). One of the hearts from the middle of the row of hearts was attached to the tag. The tag was attached to the card with Stampin’ Dimensionals (#104430).

“Love what you do and share what you love.”


Thursday 13 January 2022

Daffodil Dies

Hello my friends,

These daffodils were made using the Daffodil Dies (#157794). There are 24 dies in this set which may seem a bit daunting when you first see them but there are 2 of each of some of the dies and then there are 2 layers for many of the dies. There are also stems, leaves and small butterflies, so a great variety of dies.


The dies shown have the base of the petals/flowers above the co-ordinating detailed dies, so you can see which ones match. 


I cut the solid pieces of the flowers & petals from Daffodil Delight card (#121680) and the top layer from Crushed Curry card (#131288) which had been backed with Adhesive Sheets (#152334) before cutting with the dies. I assembled the flowers with Mini Glue Dots (#103683) and Stampin’ Dimensionals (#104430).

I cut the leaves and stems using Mossy Meadow card (#133683) also using the Daffodil Dies. These also had Adhesive Sheets adhered to the back.

I stamped the “splatters” from the Daffodil Daydream stamp set (#157786) onto a piece of the Abstract Beauty Specialty Designer Series Paper (#158039) using Mint Macaron ink (#147106). I matted the DSP with Crushed Curry card and attached it to the Basic White base card (#159228).

“Hugs” was cut with the Layering Hugs Dies (#144860) from Crushed Curry card. The tag was cut with one of the Tailor Made Tags Dies (#155563) from Daffodil Delight card. I threaded the Gold Simply Elegant Trim (#155766) through the tag then this was attached to the card with Stampin’ Dimensionals. 

I used the Clear Wink Of Stella Glitter Brush (#141897) on the detailed die cuts of the flowers. The cute little Brushed Brass Butterflies (#158136) were added to the card.

TIP: Adhesive sheets adhered to the back of the card before cutting with detailed dies makes it so easy to attach the detailed cutouts to the card.


“Love what you do and share what you love.”


Wednesday 12 January 2022

Daffodil Daydream Bundle

Hi everyone,

The Daffodil Daydream Bundle (#157795) consists of the Daffodil Daydream stamp set (#157786) and the Daffodil Dies (#157794).


I stamped the 2 daffodil images with Tuxedo Black Memento ink (#132708) onto Basic White card (#159228). The flowers were coloured with Daffodil Delight Stampin’ Blends (#154883) and the leaves with Old Olive Stampin’ Blends (#154892). I added glimmer to the flowers with the Clear Wink Of Stella Glitter Brush (#141897). These were cut with the co-ordinating dies. 

The Designer Series Paper is Abstract Beauty Specialty (#158039) and matted with the Basic Black card (#121688). This was attached to the Basic White base card. 

“Congratulations” is from the Peaceful Moments stamp set (#151595). I stamped this with VersaMark (#102283) and used the Black Stampin’ Emboss Powder (#155554) and set it with Heat Tool (#129056). I used a die from the Potted Succulents (#154330) to cut the sentiment. 

The sentiment, the daffodils on the left and the butterfly were attached with Stampin’ Dimensionals (#104430). The butterfly was cut with a die from the Daffodil Dies using the (retired) Black Glitter Paper. The Classic Matt Dots (#158146) were attached to the card.

“Love what you do and share what you love.”


Tuesday 11 January 2022

Butterflies & Flowers Layering Masks

Hello & welcome,

I have used the background mask from the Butterflies & Flowers Layering Masks (#158142) using Blending Brushes (#153611) to achieve the “rainbow” effect. I think these are one of my favourite products from the mini catalogue, but I will probably say that about a lot of the products!! So many great ones.


The inks I used with the mask are Mint Macaron (#147106), So Saffron (#147109), Pool Party (#147107), Fresh Freesia (#155611) and Misty Moonlight (#153118). The Denim Ribbon (#149590) was wrapped around the card front, then the card front was attached to the Basic White base card (#159228).

The bird and flowers from the Friendly Hello stamp set (#159990) was stamped with Tuxedo Black Memento ink (#132708). This stamp set is a Sale-a-bration product. The bird was coloured with Pool Party Stampin’ Blends (#154894), the flowers with Daffodil Delight Stampin’ Blends (#154883), the leaves with Granny Apple Green Stampin’ Blends (#154885), Poppy Parade Stampin’ Blends (#154958) for the flower centres and the branch with Crumb Cake Stampin’ Blends (#154882). I cut this with a die from the Layering Circles Dies (#151770). I attached the circle to the Heart & Home Doilies (#157956) with Stampin’ Dimensionals (#104430).

The sentiment, also from the Friendly Hello stamp set, was stamped with Misty Moonlight ink (#153118), then cut with a Sweet Hearts Die (#157623). Stampin’ Dimensionals were also used to attach this to the card. Rhinestone Basic Jewels (#144220) was my choice of embellishments.


TIP: When using Blending Brushes you can achieve various depths of colours depending on how dark or light the ink is, and also how hard you press when using the brushes. I find it best to start light and slowly add extra colour till you get the desired results. Also after inking the brush, wipe some excess off onto a piece of scrap paper so you don’t have an unwanted dark area which can’t be fixed.

“Love what you do and share what you love.”


Monday 10 January 2022

Friendly Hello Stamp Set & Designer Series Paper

Hi friends,

The Friendly Hello stamp set and Designer Series Paper (#159990) is a free product from Sale-a-bration with a $180 order in Australia. These co-ordinate beautifully together. Some of the stamp images match with the images on the designer paper so a very versatile set.


I stamped the flowers with Tuxedo Black Memento ink (#132708) onto the Petal Pink DSP. I cut the other piece of DSP with the bird and the Basic Black card (#121688) with the Stitched So sweetly Dies (#151690). These were attached to the card with Stampin’ Dimensionals (#104430). The base card is Basic White (#159228).

The sentiment is from the Friendly Hello stamp set and stamped with Petal Pink ink (#147108) and cut with an Ornate Frames Die (#159664). The edges of the sentiment were daubered with Petal Pink ink and then I added the Clear diamond shapes from the Silver & Clear Epoxy Essentials (#155567) to finish the card.

Another easy card so great when you don’t have a lot of time.

TIP: Sale-a-bration continues till 28th February and there is a range of free products to choose from with every $90 or $180 order of Stampin’ Up! products from the new mini catalogue and/or the Annual catalogue.

“Love what you do and share what you love.”


lesleyjendra.stampinup.net


lesley.j.jendra@gmail.com

Sunday 9 January 2022

Sentimental Swirls

Hello everyone,

The Sentimental Swirls stamp set (#157996) has this beautiful swirl with a variety of smaller images of flowers, birds butterflies, leaves as well as some popular sentiments. The Flowers & Leaves punch (#155373) and the Strawberry Builder punch (#154239) from the annual catalogue also co-ordinates with some of the images. 


I stamped the swirl with VersaMark (#102283) onto Basic White card (#159228). Then I added the Silver Stampin’ Emboss Powder (#155555) and set it with the Heat Tool (#129056). I stamped the bird with Pale Papaya ink (#155670). Then I dry embossed the card front with the Timeworn Type 3D Embossing Folder (#156505). Unfortunately this folder hasn’t carried over to the current catalogue so now retired.

The white card front was then matted with Polished Pink card (#155711). I wrapped the White Glittered Organdy Ribbon (also now retired) around the card. The sentiment & one flower were stamped with Polished Pink ink (#155712) and the other flower with Highland Heather ink (#147103). The flowers were punched with the Flowers & Leaves punch. I used a Beautiful Shapes Die (#158046) to cut the sentiment. This was attached to the card with Stampin’ Dimensionals (#104430). The Iridescent Rhinestone Basic Jewels (#158130) were added to the flowers & sentiment.


TIP: Always stamp your image first if you are also dry embossing to give you the best image. The image won’t stamp properly if the surface isn’t smooth.


“Love what you do and share what you love.”

Saturday 8 January 2022

Butterflies & Flowers Layering Decorative Masks

Hi my friends,

Todays card is very easy, using the Butterflies & Flowers Layering Decorative Masks (#158142).


I applied the Pale Papaya ink (#155670) with a Blending Brush (#153611) and using the flower mask with the less detail. Then using the other co-ordinating layer I applied the Pumpkin Pie ink (#147086). There is another mask with the leaves which I coloured with Soft Sea Foam ink (#147102). I then used the Stitched Greenery die (#155451) to achieve the stitching on the Basic White card front (#159228).

The sentiment is from the Friends Are Like Seashells stamp set (#158203) and stamped with Pumpkin Pie ink. I used the Messages Die (#154422) to cut this. The sentiment was attached to the card with Stampin’ Dimensionals (#104430).

The edges of the card front was daubered with Pumpkin Pie ink, then attached to the Basic White base card.

As I said, a very easy card. 


“Love what you do and share what you love.”