Sunday 30 October 2022

Wild & Sweet stamp set

Hi friends,

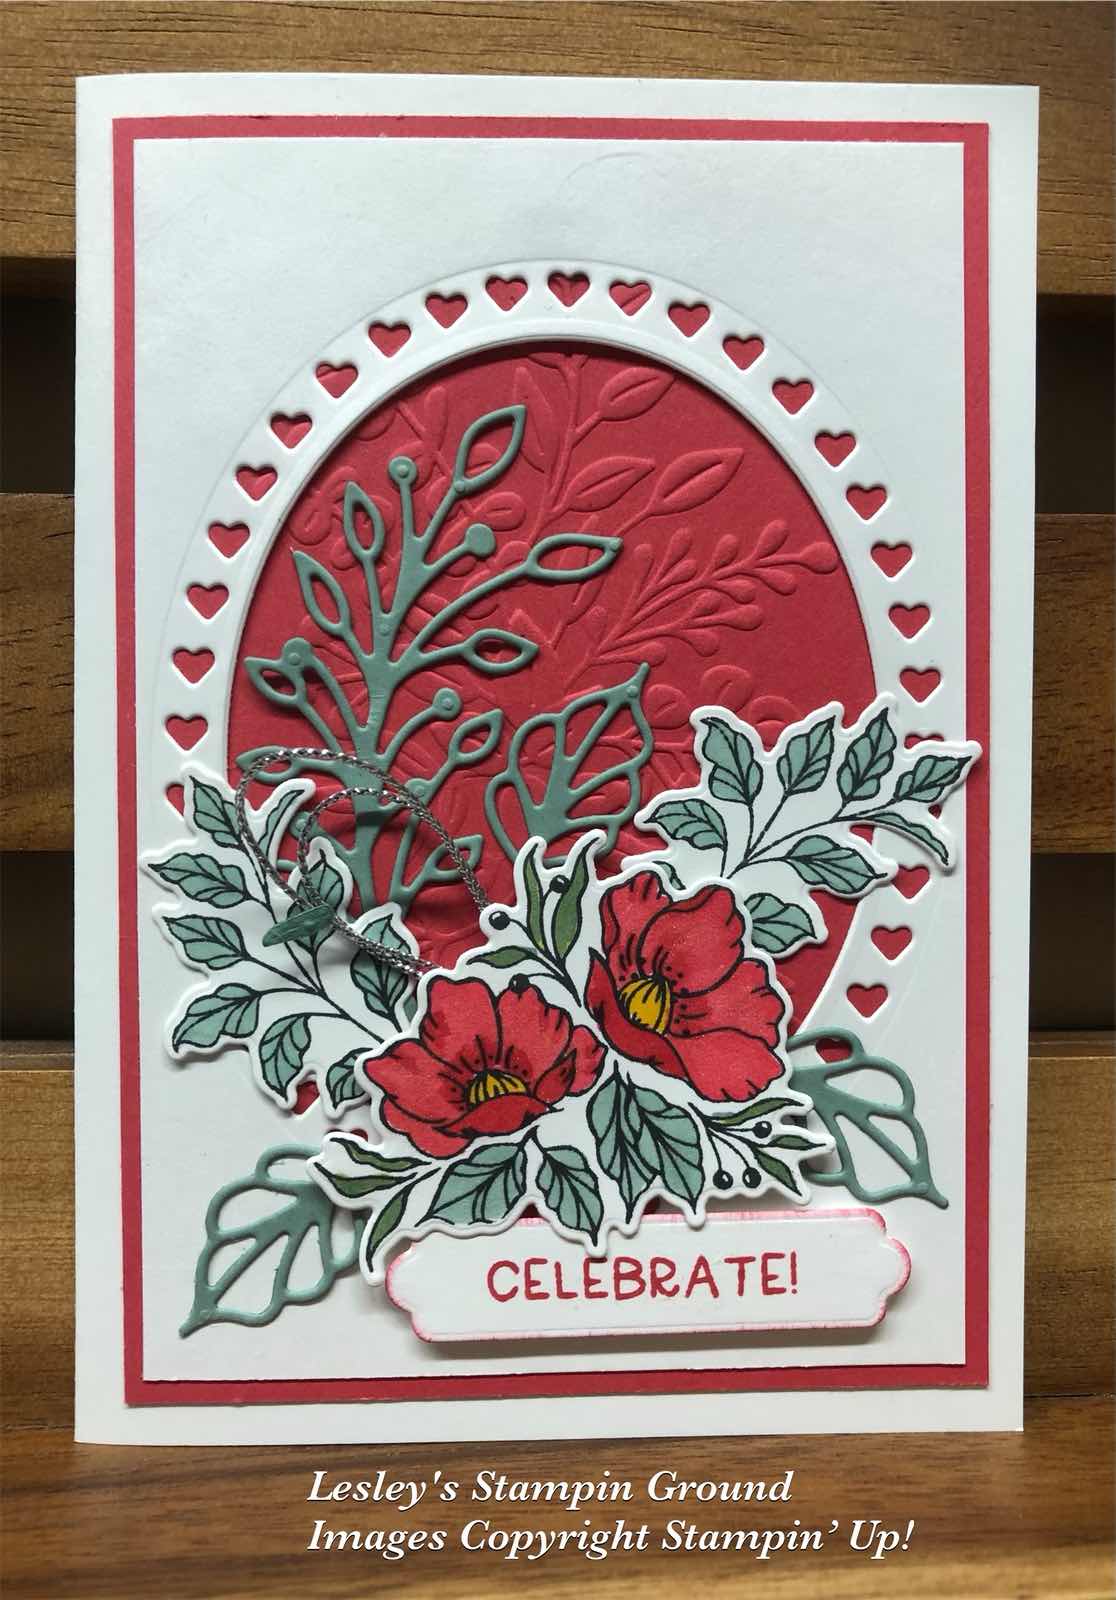
From 1st November the Framed Florets Dies (#160623) & Framed Florets stamp set (#161815) will be available to purchase. These are an early release from the Mini catalogue which will be available from January 2023. I have used the dies for the frames on this card.


I stamped the cute koala image from the Wild & Sweet stamp set (#158775) using Crumb Cake ink (#147116). Using a Blending Brush (#153611) and Balmy Blue ink (#147105) I added some light blue around the koala. The Stampin’ Blends to colour the stamped image are Crumb Cake (#154882), Ivory (#154922), Soft Sea Foam (#154902) and Old Olive (#154892).

I cut the frame from the Brushed Metallic cardstock (#153524) using a Framed Florets die. This card was backed with Adhesive Sheet (#152334). I also cut a piece of Very Vanilla card (#106550) with another die. This was attached to the card front with Mini Glue Dots (#103683), then the frame was placed over this.

“Happy Birthday” from the Go To Greetings stamp set (#158763) was stamped with Soft Suede ink (#147115). This was cut with a Potted Succulents die (#154330). This was attached with Stampin’ Dimensionals (#104430). I added the Classic Matte Dots (#158146) to finish the card.

“Love what you do and share what you love.”


Saturday 29 October 2022

Amazing Silhouettes stamp set

Hello again,

This tree is from the Amazing Silhouettes stamp set (#157814).


This image was stamped with VersaMark (#102283) and embossed with White Stampin’ Emboss Powder (#155554) onto Evening Evergreen card (#155575). The Heat Tool (#129056) was used to set this. I then lightly coloured the embossed image with Soft Succulent ink (#155778) and a Blending Brush (#153611). The corners were punched with the Very Best Trio Punch (#159878). When using this shape on the punch there is a little trick. Punch the first corner then flip the card over to punch the second corner to get a mirror image. Probably best to experiment on scrap card first.

The Stitched Greenery die (#155451) was used to create the “stitched leaves” on the Gold Distressed Specialty Paper (#159237). The Evening Evergreen Open Weave Ribbon (#155573) was wrapped around the card front.

“Thinking Of You” from the Go To Greetings stamp set (#158763) was stamped with Evening Evergreen ink (#155576) and cut with a Potted Succulent die (#154330). This was attached with Stampin’ Dimensionals (#104430).

“Love what you do and share what you love.”


Thursday 27 October 2022

Cottage Rose Bundle

Hello again stamping friends,

I have used the partial die cutting again on this card, like the Christmas tree card I did a few days ago.


I stamped the flower & leaf images onto Basic White card (#159228) with Tuxedo Black Memento ink (#132708). These stamped images are from the Cottage Rose stamp set (#159040). They were coloured with Fresh Freesia Stampin’ Blends (#155518) and Mint Macaron Stampin’ Blends (#154889). I used So Saffron Stampin’ Blends (#154905) for the centre of the flower and the tiny flowers.

I positioned the Fresh Freesia card (#155518) on the stamped card and placed the die around the flower and used a post it note to keep the die in place (as shown below).


Remove the Fresh Freesia card with the die in place and cut the card.


Repeat with the leaf image.

I dry embossed this card with the Timeworn Type 3D Embossing Folder (#156505), then attached this to the white card. 

The sentiment also from the Cottage Rose stamp set was stamped with Fresh Freesia ink (#155611) and I used a die from the Pretty Pillowbox dies (#156321) to cut the sentiment. The sentiment & card front were daubered with Fresh Freesia ink.

Stampin’ Dimensionals (#104430) were used to attach the sentiment. The cute little Heart Pearls (#159190) were added to the card.

“Love what you do and share what you love.”


lesleyjendra.stampinup.net


lesley.j.jendra@gmail.com


Wednesday 26 October 2022

Sun Prints Designer Series Paper

Hello my friends,

The 2 pieces of Designer Series Paper used on this card is from the beautiful Sun Prints (#158790).


I matted the Gray Granite DSP with Starry Sky card (#159264). The Blue DSP was attached on top. With Adhesive Sheet (#152334) on the back of the Silver Foil from the Silver Foil Specialty Pack (#156457), I cut the leaves with a die from the Natural Prints Dies (#158800) and attached them to the card.

The sentiment is from the Nature’s Prints stamp set (#158793) and this was stamped with Starry Sky ink (#159212). The sentiment was cut with another Nature’s Prints die and attached to the card with Stampin’ Dimensionals (#104430). The silver embellishments are from the Festive Pearls (#159963). The base card is Basic White (#159228).

Another easy card!! I have had a very busy schedule over the last couple of months so most of the cards need to be easy.

“Love what you do and share what you love.”


Tuesday 25 October 2022

Candy Cane dies

Hello friends,

A lovely glittery Christmas card using the Gold from the Gold & Rose Gold Specialty Paper (#156844).


I cut the gold paper with a Candy Canes Die (#159569) and attached this to the Shaded Spruce base card (#147006). The candy canes from the Sweetest Christmas Designer Series Paper (#159559) were also cut with the Candy Cane dies.

The label & sentiment are both from the Christmas Banners stamp set (#159570) and cut with the Christmas Banners dies (#159576). The label was stamped with Real Red ink (#147084) and the sentiment with Shaded Spruce ink (#147088).

Stampin’ Dimensionals (#104430) were used to attach the sentiment and the candy cane on the left and the other candy cane was taped to the card. The gold Simply Elegant Trim (#155766) was attached under the sentiment. The leaves were cut with Christmas Banners dies. The Mint Macaron card (#138344) was backed with Adhesive Sheet (#152334) before cutting the leaves.

“Love what you do and share what you love.”


Monday 24 October 2022

Rays Of Light

Hello stamping friends,

A super easy card today using the Rays Of Light stamp (#158925). This stamp is a background stamp so will cover a standard size card.


I stamped this image with VersaMark (#102283) onto a piece of the Boughs Of Holly Designer Series Paper (#159600). This was embossed with Gold Stampin’ Emboss Powder (#155555) and set with the Heat Tool (#129056). I matted this with the Sweet Sorbet card (#159266) and attached it to the Basic White base card (#159228). 

The sentiment from the Brightest Glow stamp set (#159542) was stamped with Sweet Sorbet ink (#159216), then punched with the Handmade Tag Punch (#159690). I also punched a piece of Sweet Sorbet card, cut it in half and attached it to the sentiment. I used Stampin’ Dimensionals (#104430) to attach the sentiment to the card.

As I said, Super easy.


“Love what you do and share what you love.”


Sunday 23 October 2022

Shadow box

Hi friends,

I have made a shadow box for my nephew’s baby. A photo will be added as well as all the relevant birth details. This would also be great for a scrapbook page.


The card for the name, photo and information is Pacific Point (#116202) and Pearlescent Specialty Paper (#154291). I have used the Gold from the Gold & Rose Gold Metallic Specialty Paper (#156844) for the seahorse & large fish. The octopus was stamped with VersaMark (#102283) & heat embossed with Gold Stampin’ Emboss Powder (#155555) and set with the Heat Tool (#129056).

For everything else I have used all retired stamps, dies, foils and designer series paper. The dies are Sea Life, Under The Sea and Stitched Nested Labels. The stamp sets are Seas The Day and Sea Of Textures. The DSP is Waves Of the Ocean.

“Love what you do and share what you love.”


Saturday 22 October 2022

Christmas Lights

Hello stamping friends,

An easy but effective card using the Christmas Lights Bundle (#159961).


I stamped the Christmas tree from the Christmas Lights stamp set (#159538). This was stamped with VersaMark (#102283) and heat embossed with White Stampin’ Emboss Powder (#155554). This was set with the Heat Tool (#129056). 

I then placed the piece of Basic White card (#159228) on the left side of the tree and placed the die in place as shown below.


I carefully removed the white card with the die in place and cut it with the Stampin’ Cut & Emboss Machine (#149653). This removes part of the Christmas tree. I then dry embossed the white card with the Fern 3D Embossing Folder (#158804) and attached it to the card. The card front was attached to the Basic White base card.

The sentiment from Brightest Glow Stamp set (#159542) was stamped with Real Red ink (#147084). This was cut with a die from Labels Aglow (#159551). I cut another circle from the Stylish Shapes dies (#159183) and attached this to the die cut sentiment. This was attached to the card with Stampin’ Dimensionals (#104430). A silver Festive Pearl (#159963) was added to the top of the tree.

This technique could be done with many stamped images with co-ordinating dies.

“Love what you do and share what you love.”


Thursday 20 October 2022

Sending Smiles Bundle

Hi friends,

The background on this card has been achieved using ink refills and Water Painters (#151298). This is a great way to have a background with the colours you want.


The Ink Refills used are Orchid Oasis (#159215), Mango Melody (#147162), Melon Mambo (#115662) & Flirty Flamingo (#141402). I used a Water Painter and randomly added the colours to the Shimmery White card (#121717). After colouring the card I sprayed it with extra water which allows the colours to blend. Put this aside to dry or dry with the Heat Tool (#129056).

I then stamped the flowers from the Dragonfly Garden stamp set (#154411) with Tuxedo Black Memento ink (#132708). This was matted with Orchid Oasis card (#159265) and attached to the Basic White base card (#159228).

“Birthday Wishes” from the Sending Smiles stamp set (#158701) was stamped with Orchid Oasis ink (#159214). The dies to cut the sentiment and “sending” are from the Sending Dies (#159271). “Sending” was cut from Orchid Oasis card which was backed with Adhesive Sheet (#152334). This was attached to the Gold Foil (#132622). Both sentiments were attached with Mini Stampin’ Dimensionals (#104430). Elegant Faceted Gems (#152464) were added to the card.

“Love what you do and share what you love.”


Tuesday 18 October 2022

Natural Prints dies

Hi friends,

I cut this wreath with the Natural Prints dies (#158800) for this Christmas card.


The card stock is Shaded Spruce (#147006) and this was backed with Adhesive Sheet (#152334) before cutting with the die. The poinsettias were fussy cut from the Boughs Of Holly Designer Series Paper (#159600).

The retired Silver & Gold Specialty Paper was used for the card front. I cut the dots along the top of the DSP with a Labels Aglow Die (#159551). This was attached to the Real Red card (#106578). The Real Red ribbon was wrapped around the card. The wreath was attached to the card. 

I cut the Silver Foil (#156457) leaves with Holly Berry Dies (#159607) and attached these to the card. These were also Adhesive Sheet backed. The Poinsettias were attached with Stampin’ Dimensionals (#104430).

Merry Christmas is from the Peaceful Deer stamp set (#156891) and stamped with Shaded Spruce ink (#147088). A Potted Succulent die (#154330) was used to cut the sentiment. This was attached with Mini Stampin’ Dimensionals (#144108).


“Love what you do and share what you love.”


Monday 17 October 2022

Framed Florets

Hello again,

The new early release Fitting Florets Collection (#163129) will be available from the 1st November. This includes stamp sets, dies, Designer Series Paper and embellishments. Some products will be available for a limited time and others will continue to be available in the Mini catalogue in January. More on this to come.


The Framed Florets Dies (#160623) were used to cut the oval of hearts and to cut the inside oval from the Basic White card front (#159228). I dry embossed the Sweet Sorbet card (#159266) with one of the Elegant Eucalyptus 3D Embossing Folder (#159170). This was used to matt the card front and the attached to the Basic White base card.

I stamped the flowers & leaves from the Framed Florets stamp set (#161815) with Tuxedo Black Memento ink (#132708). The flowers were coloured with Sweet Sorbet Stampin’ Blends (#159224) and the leaves with Soft Succulent Stampin’ Blends (#155521). 

I cut the coloured flowers & leaves and the detailed leaves with the Framed Florets dies. I used Soft Succulent card (#155777) which was backed with Adhesive Sheets (#152334) for the detailed cut leaves.

“Celebrate” is also from this stamp set and stamped with Sweet Sorbet ink (#159216). A Seasonal Labels Die (#156299) was used to cut the sentiment. The flowers & sentiment were attached to the card with Stampin’ Dimensionals (#104430). The silver Simply Elegant Trim (#155766) was added.

I am looking forward to playing more with this bundle.

“Love what you do and share what you love.”


Sunday 16 October 2022

Shaded Summer

Hi everyone,

I have had some work done in my craft room recently and had to move most of my “stuff” so haven’t been able to access most it, so that’s why I have been missing some days lately. Hopefully everything will be back on track soon.

The stamp set used for the flower here is the Shaded Summer stamp set (#155783).


This was stamped with VersaMark (#102283) and embossed with Gold Stampin’ Emboss Powder (#155555) and set with the Heat Tool (#129056). This was cut with a Summer Shadows Die (#156618).

The sentiment is from the new early release Framed Florets stamp set (#161815) and stamped with Orchid Oasis ink (#159214). The Handmade Tag Punch (#159690) was used to cut the sentiment. 

I dry embossed the Orchid Oasis card (#159265) with the Timeworn Type Embossing Folder (#156505) and this was matted with the Gold Foil (#132622).

I used one of the Split Card Textures Dies (#159162) to cut the Basic White card front (#159228). Then I added some Orchid Oasis ink with a Blending Brush (#153611) and then stamped the splotches with a stamp from the Quiet Meadow stamp set (#155082) with the same ink.

The Gold Foil leaves were cut with a Forever Flourishing die (#152714). The Gold foil was backed with Adhesive Sheet (#152334). The flowers & sentiment were attached with Stampin’ Dimensionals (#104430). I also added some of the Gold Simply Elegant Trim (#155766).

“Love what you do and share what you love.”


Thursday 13 October 2022

Merriest Moments

Hello friends,

Another card from my Christmas class using the Merriest Moments stamp set (#156353) for the flowers and leaves.


The flowers were stamped with Real Red ink (#147084) and assembled with Mini Glue Dots (#103683).

I used a Labels Aglow Die (#159551) for the circle of dots in the Basic White card front (#159228). The leaves from the Merriest Moments stamp set were stamped with Old Olive ink (#147090). The card front was matted with the Crushed Curry card (#131288) then attached to the Basic White base card.

“Season’s Greetings” is also from the Merriest Moments stamp set and stamped with Real Red ink. This was cut with another Labels Aglow Die. The sentiment & flowers were attached to the card with Stampin’ Dimensionals (#104430).

“Love what you do and share what you love.”


Wednesday 12 October 2022

Sweetest Christmas Designer Series Paper

Hello stamping friends,

These candy canes are cut from the Sweetest Christmas 12”x12” Designer Series Paper (#159559).


The Candy Canes dies (#159569) were used to cut the Candy canes from the DSP. The Red & White spot is also from this DSP and this was attached to the Garden Green card (#108605). The base card is Basic White (#159228).

The banner from the Christmas Banners stamp set (#159570) was stamped with Real Red ink (#147084). “Tis the Season” was stamped with Garden Green ink (#147089), then the banner was cut with a Christmas Banner die (#159576).

The candy cane on the right was taped to the card and I used Stampin’ Dimensionals (#104430) for the other. Dimensionals were also used to attach the banner. I cut the gold leaves using a Christmas Banners die. This Gold Foil (#132622) was backed with Adhesive Sheet (#152334) before cutting with the dies which makes these detailed pieces easy to attach.

“Love what you do and share what you love.”


Tuesday 11 October 2022

Christmas Banners Dies

Hello friends,

Each year I hold full day classes making Christmas cards which is a very popular class. I usually have around 15 cards for the ladies to choose from and they all work on different cards, working at their own pace, so there is no waiting for stamps, inks etc. They end up with a great variety of cards for their days work. 
This card today is one design they had to choose from this year.


The used Evening Evergreen card (#155575) and Soft Succulent card (#155777) to cut the leaves with the Christmas Banner Dies (#159576). The Merry Merlot (#147005) leaves were cut with the dies from the Holly Berry dies (159607). All the  card stock was backed with Adhesive Sheet (#152334) before cutting with the dies making it easy to attach them to the card.

The Basic White card front (#159228) was dry embossed with the Gingham Embossing Folder (#157627), then attached to the Evening Evergreen card.

The sentiment from the Brightest Glow stamp set (#159542) was stamped with Merry Merlot ink (#147112), then cut with a Labels Aglow die (#159551). The Evening Evergreen Open Weave Ribbon (#155573) was threaded through the label and wrapped around the card front. This was then attached to the Basic White base card 

“Love what you do and share what you love.”


Sunday 9 October 2022

Twinkling Lights dies

Hi stamping friends,

A variation of the Christmas card from a couple of days ago using the Lights Aglow Specialty Designer Series Paper (#159535).


The DSP for the card front & the square Soft Succulent are from the Lights Aglow Specialty Designer Series Paper. I wrapped the Gold Shimmer Ribbon (#152156) around the card front and attched this to the Soft Succulent base card (#155777).

I cut the snowflake from the Gold Glimmer Paper which is part of the Glimmer Specialty Paper (#159537). The other 2 colours in the pack are Very Vanilla & Evening Evergreen. The die for this snowflake is from the Twinkling Lights Dies (#159541). I cut the snowflake in half and attached it to the card with Mini Glue Dots (#103683). The square DSP was attached with Stampin’ Dimensionals (#104430).

The sentiment from the Brightest Glow stamp set (#159542) was stamped with VersaMark (#102283) and Embossed with Gold Stampin’ Emboss Powder (#155555). As usual this needs to be set with the Heat Tool (#129056). A Stylish Shapes Die (#159183) was used to cut the sentiment. 

A lovely glittery card.

“Love what you do and share what you love.”


Saturday 8 October 2022

Joyful Flurry

Hello,

Another Christmas card, this time using the Joyful Flurry Bundle (#159812) for these beautiful snowflakes.


The 3 snowflakes from the Joyful Flurry stamp set (#159804) were stamped with VersaMark (102283) and embossed with Silver Stampin’ Emboss Powder (#155555), then set with the Heat Tool (#129056). These snowflakes and the ones from Orchid Oasis card (#159265) were cut using the Frosted Flurry dies (#159811).

The sentiment also from the Joyful Flurry stamp set was stamped with Orchid Oasis ink (#159214) and cut with a die from the Frosted Flurry dies.

The Basic White card front (#159228) was dry embossed with one of the Wintry 3D Embossing Folders (#155433). This was matted with Orchid Oasis card then attached to the Basic White base card.

The snowflakes and sentiment were attached with Mini Glue Dots (#103683) and Stampin’ Dimensionals (#104430). The Rhinestone Basic Jewels (#144220) were added to the Orchid Oasis Snowflakes.                          

“Love what you do and share what you love.”


Friday 7 October 2022

Lights Aglow

Hello stamping friends,

Here’s another beautiful Christmas card using the Lights Aglow Specialty Designer Series Paper (#159535). This paper is 6”x6” with 4 of each 12 double-sided designs including gold foil. One of the designs has 2 square & 2 circle designs (as shown below) and I have used the circle design on this card.


After cutting the DSP in half each way, I punched the corners with the Very Best Trio Punch (#158878). The Gold & Vanilla from the same DSP was attached to the Cherry Cobbler card (#121681). I wrapped the Gold & Vanilla Satin-Edged Ribbon (#159555) around the card front, then attached it to the Very Vanilla base card (#106550).

The sentiment from the Brightest Glow stamp set (#159542) was stamped with VersaMark (#102283) and embossed with Gold Stampin’ Emboss Powder (#155555). This was set with the Heat Tool (#129056). A Stylish Shapes die (#159183) was used to cut the sentiment.

The punched piece of DSP was attached to the card with Stampin’ Dimensionals (#104430).

“Love what you do and share what you love.”


Thursday 6 October 2022

Lights Aglow Specialty Designer Series Paper

Hi again friends,

The beautiful Lights Aglow Specialty Designer Series Paper (#159535) has a lovely range of designs great for Christmas cards. Two of the designs have been used on this card.


The green & gold paper was cut with a Twinkling Lights Die (#159541) for the Christmas tree, I attached the red DSP to the Very Vanilla card (#106550). I dry embossed another piece of Very Vanilla card with one of the Wintry 3D Embossing Folders (#155433) and attached this to the card.

The tree was attached with Stampin’ Dimensionals (#104430). Season’s Greetings is from the Leaves Of Holly stamp set (#159601). This was stamped with Evening Evergreen ink (#155576) then cut with a die from the Natural Prints dies (#158800).

The gold embellishments are the Festive Pearls (#159963) and added to the sentiment and tree.

Another quick and easy card.

“Love what you do and share what you love.”


Wednesday 5 October 2022

Natural Prints Dies

Hello again friends,

I have cut the wreath with a Natural Prints die (#158800) from Gold Foil Sheets (#132622) for this Christmas card.


For the background I used the Soft Succulent from the Festive Foils 12”x12” Specialty Designer Series Paper (#159536). This was matted with Real Red card (#106578) and attached to the Basic White base card (#159228).

The Gold Foil was backed with Adhesive Sheet (#152334) before cutting the wreath with the die then this was attached to the card.

The flowers from the Merriest Moments stamp set (#156353) were stamped with Real Red ink (#147084). The dies which are part of the Merriest Frames Hybrid Embossing Folder (#156385) were used to cut the flowers. The flowers were attached together with Mini Glue Dots (#103683) then attached to the card with Stampin’ Dimensionals (#104430).

The leaves also from the Merriest Moments stamp set were stamped with Evening Evergreen ink (#155575) and also cut with the dies. Mini Glue Dots were used to attach the leaves.

“Merry Christmas” from Peaceful Deer stamp set (#156891) was stamped with Evening Evergreen ink, then cut with a Potted Succulents die (#154330).

The embellishments are the Red Rhinestone Basic Jewels (#146924).

“Love what you do and share what you love.”


Tuesday 4 October 2022

Merriest Moments

Hi,

The Merriest Frames Hybrid Embossing Folder (#156385) cuts & embosses this beautiful “frame”. The dies are included with the Hybrid folder. One of the dies can be placed in the embossing folder to cut and emboss at the same time.

 This is such an easy card but very pretty.


I have used Basic White card (#159228). I stamped the sentiment from the Merriest Moments stamp set (#156353) with Shaded Spruce ink (#147088). This was also cut with a die from the Merriest Frames dies. Stampin’ Dimensionals (#104430) were used to attach this to the die cut “frame”.

I fussy cut the flowers from the Boughs Of Holly Designer Series Paper (#159600). These were also attached with Dimensionals. The 2022-2024 In Color Matt Decorative Dots (#159186) were added to the card.

“Love what you do and share what you love.”


Monday 3 October 2022

Fresh Cut Flowers

Hello stamping Friends.

How often do we use the main image in a stamp set and not use the smaller images. On this card I have used 2 of the smaller images of the Cut Fresh Flowers stamp set (#159018).


The Stamparatus (#148187) is the perfect tool to position multiple images perfectly on the card. I have drawn a 10cm square & diamond onto the grid paper on the Stamparatus as shown below. The diamond wasn’t used for this card.


I positioned and stamped the image onto the card which was placed on the square. This was stamped with Tuxedo Black Memento ink (#132708).


I turned the card and re-stamped on the card


Continue stamping the 4 images and repeat with the 2nd image, which I stamped with Bermuda Bay ink (#147096).

I coloured the flowers & leaves with Fresh Freesia Stampin’ Blends (#155518), Pale Papaya Stampin’ Blends (#155519), Mint Macaron Stampin’ Blends (#154889) and Pool Party Stampin’ Blends (#154894).

Happy Birthday from the Peaceful Moments stamp set (#151595) was stamped with Fresh Freesia ink (#155611). This and the Fresh Freesia card (#155614) were cut with Stylish Shapes dies (#159183).

I used the Stitched Greenery die (#155451) on the Fresh Freesia card for the background. This was attached to the Basic White base card. The base card is 13cmx13cm. The sentiment was attached with Stampin’ Dimensionals (#104430). I added Fresh Freesia Sequins from the Adhesive Backed Sequins & Gems (#159972) to the centre of the flowers & the sentiment.

“Love what you do and share what you love.”