Monday 30 November 2020

Boho Indigo

Hi ladies & guys,

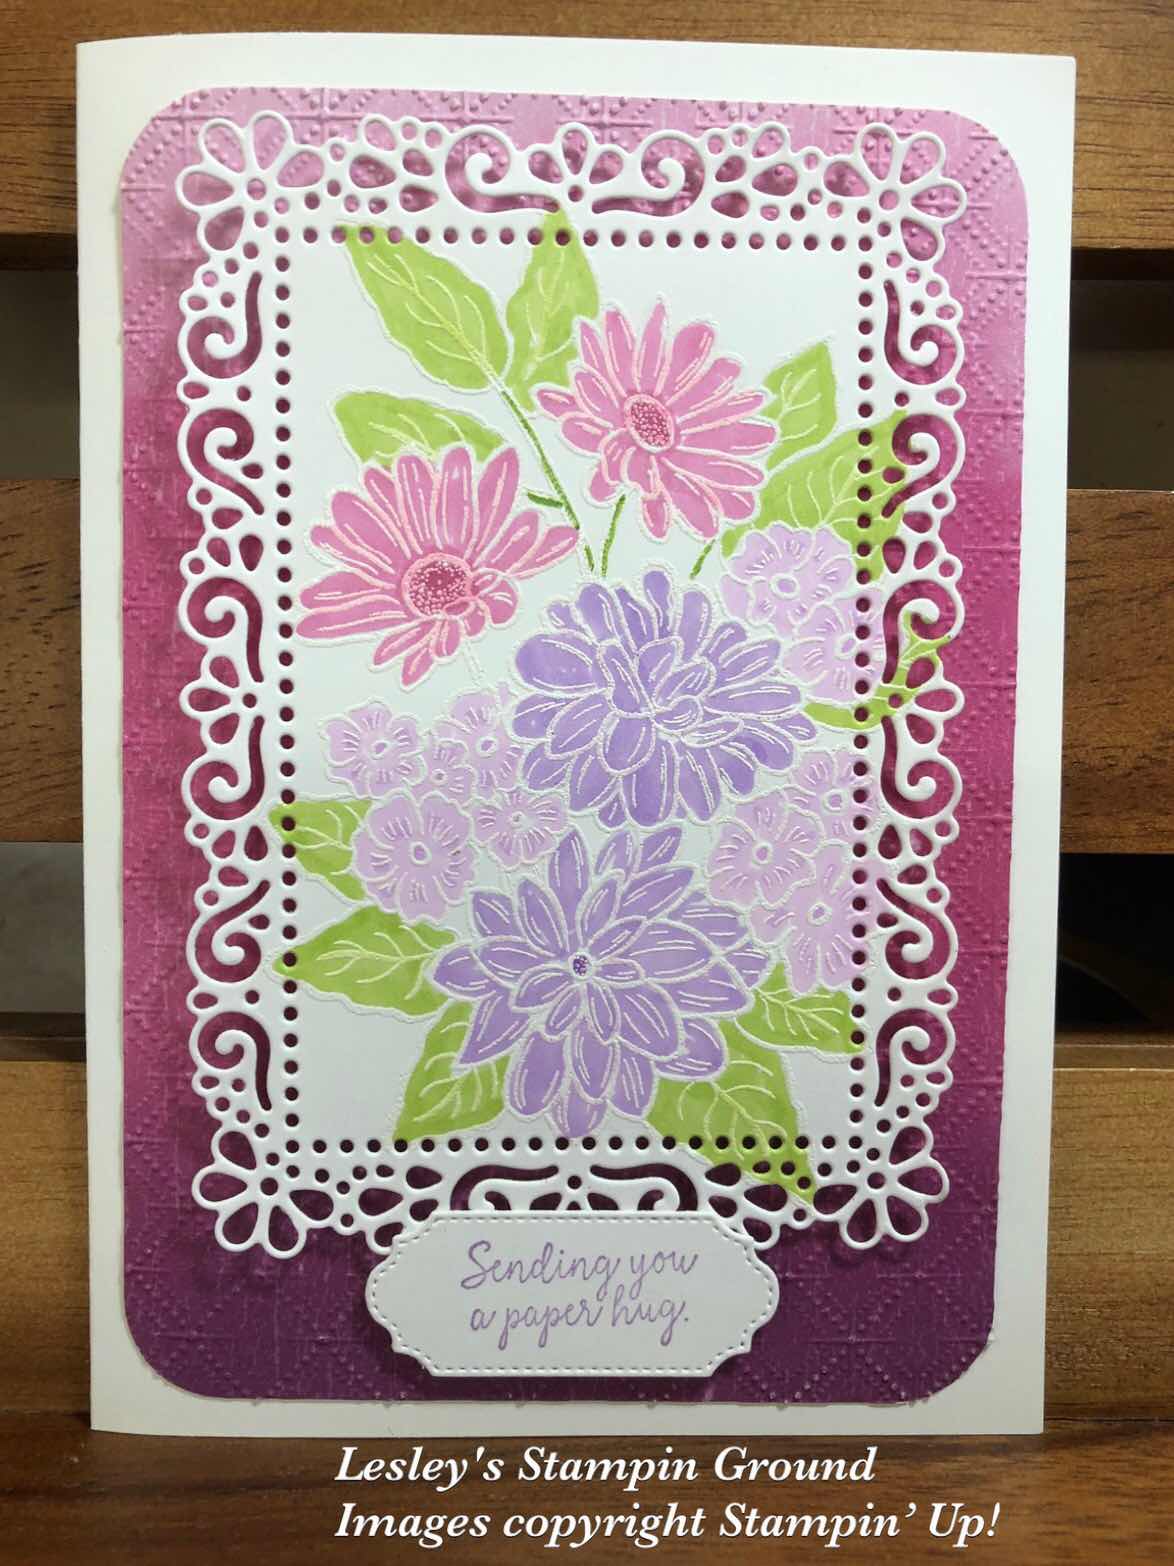
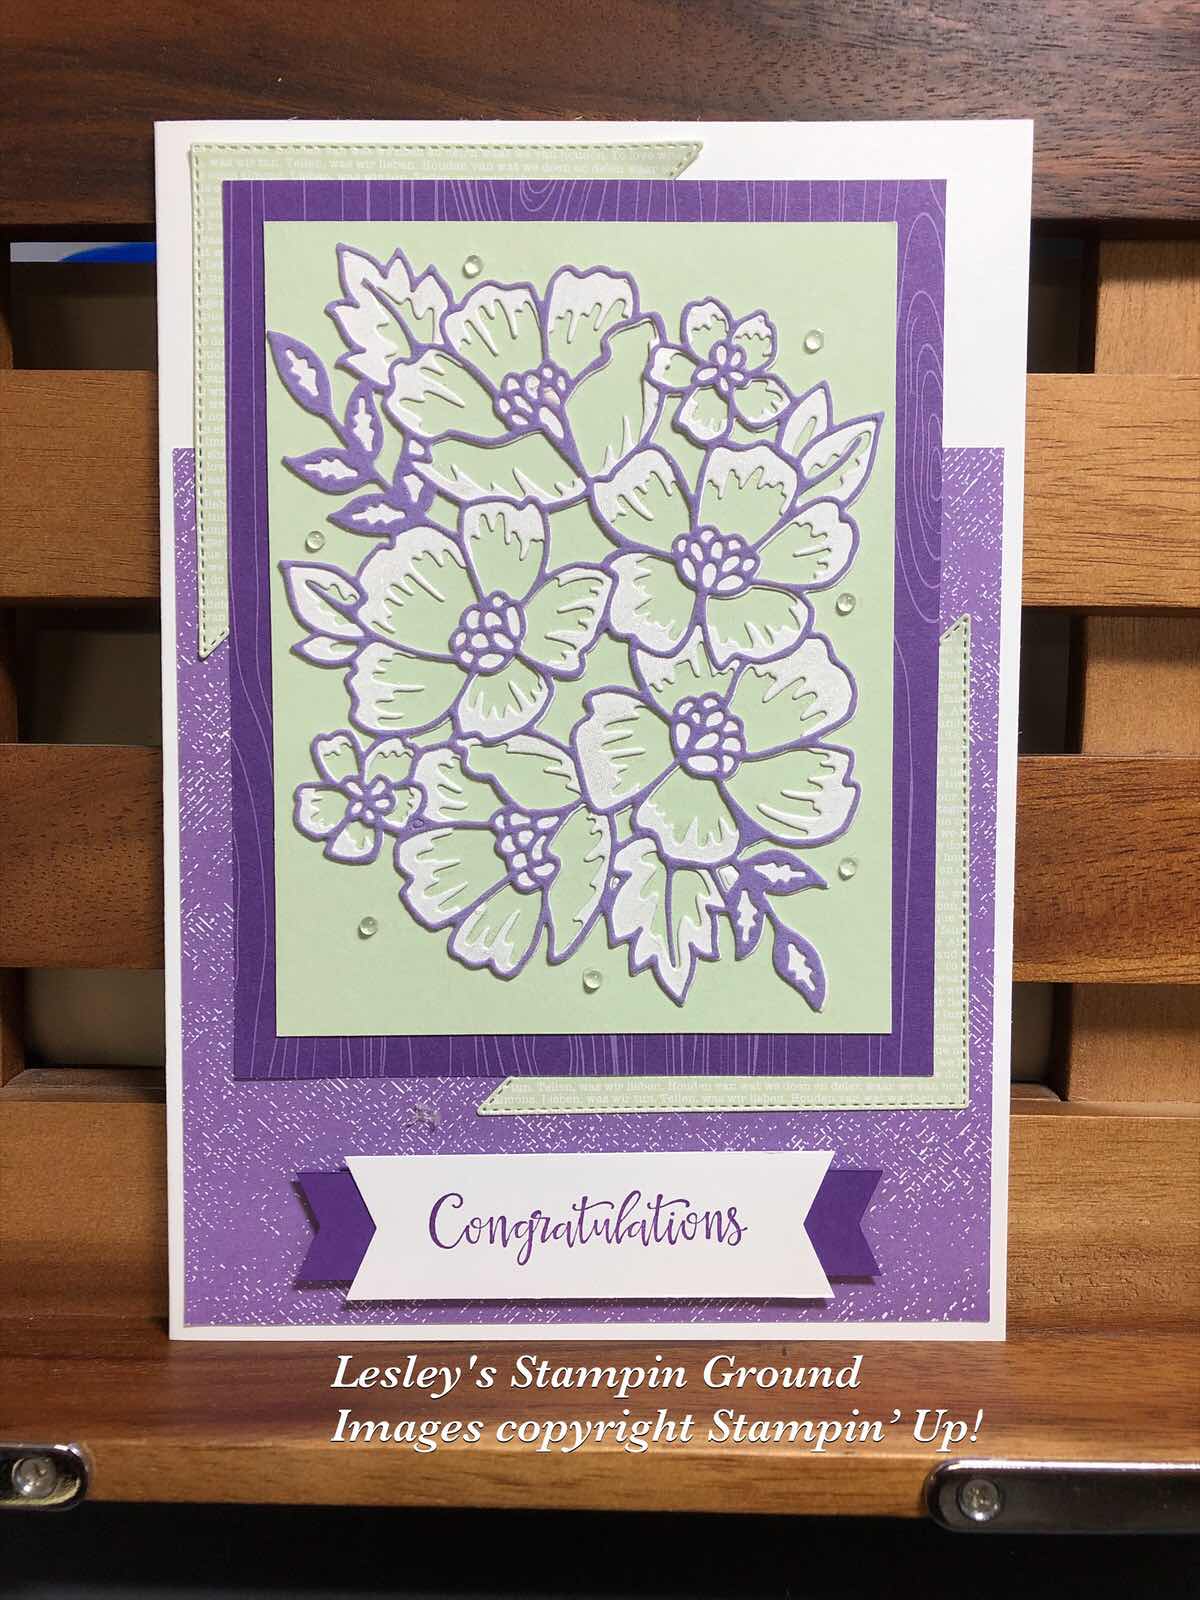
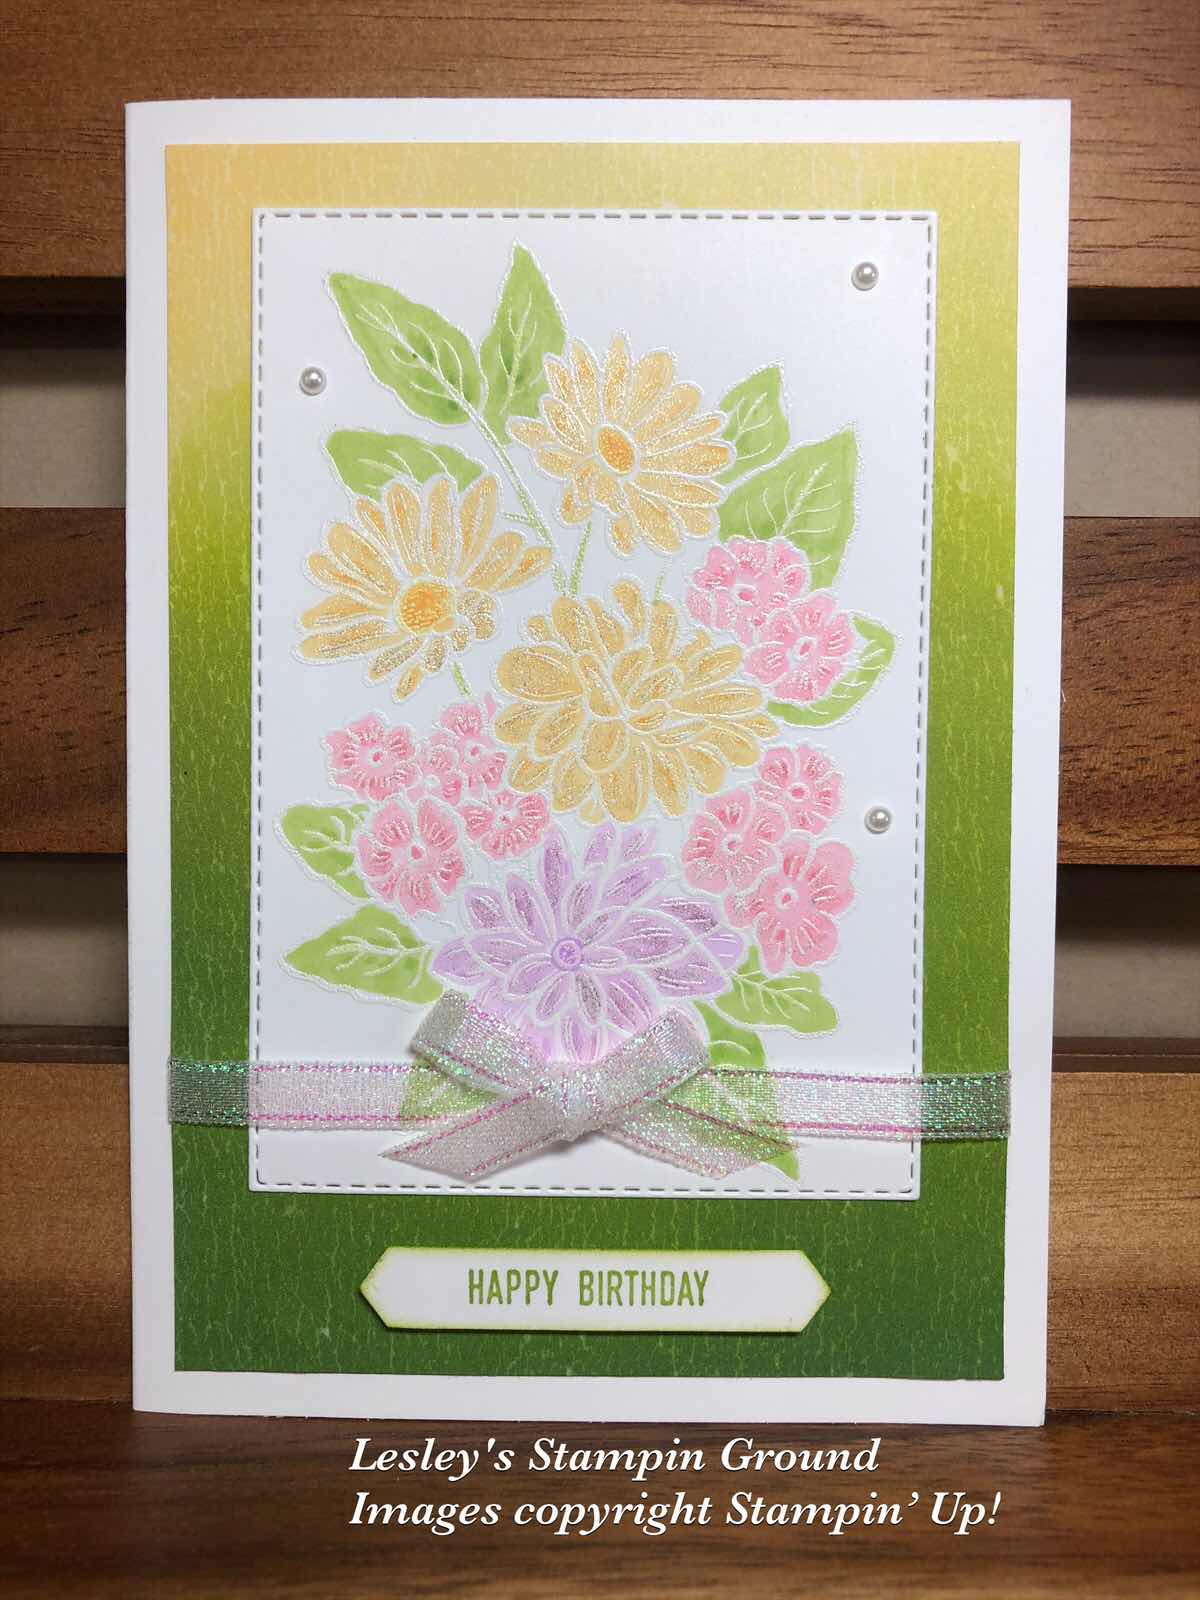
Did you realise that one of  Ornate Border Dies (#152724) matches with the Ornate Layers Dies (#152726)?  I love when so many products co-ordinate. I have used both on this card.


I cut a piece from the right side of the Whisper White card front (#106549) using a die from the Ornate Borders Dies giving the lovely scalloped detail down the edge of the card. Then I cut the Bumblebee card (#153082) and another piece of Whisper White card with the Ornate Layers Dies. These were attached to the card front.
The vase and flowers are stamped with images from the stamp set which is included in the Boho Indigo Product Medley (#153132). The vase was stamped with Bumblebee ink (#153116) and the flowers with Magenta Madness ink (#153117). The leaves, vase and flowers are all cut with the dies from the Boho Indigo Product Medley dies. The leaves are Just Jade card (#153084) which had Adhesive Sheet (#152334) adhered to the back before cutting. 
The sentiment is from the Many Mates stamp set (#152633) and stamped with Bumblebee ink. The die to cut the sentiment is from the Hippo & Friends dies (#153585). The vase, flowers and sentiment were attached with Stampin’ Dimensionals (#104430).
I attached a piece of the Flowers For Every Season 6”x6” Designer Series Paper (#152486) to the card as shown below.


The Pearl Basic Jewels (#144219) were added to the flower centres and also the flowers on the vase.

Have a great day!

“Love what you do and share what you love.”


Saturday 28 November 2020

Wreath Builder Dies

Hello friends,

I haven’t done any stamping on this card which is a little usual for me. I have used the Wreath Builder Dies (#152722) and the Well Written Dies (#151816).


I have used the Brass Foil Sheet (#153057) and Shaded Spruce card (#147006) for the wreaths which were cut with the Wreath Builder Dies. I attached these to the In Good Taste Designer Series Paper (#152494) using Mini Glue Dots (#103683). Under the DSP is Shaded Spruce card and the base card is Very Vanilla (#106550). The flowers, also cut with Wreath Builder dies, were cut from Melon Mambo card (#119980), Mango Melody card (#147013) and Pacific Point card (#116202). I cut 2 of each colour and assembled them using Mini Stampin’ Dimensionals (#144108) and used Mini Glue dots to attach them to the wreath. The flower centres were also cut from the Brass Foil and attached with Mini Glue Dots. Using Adhesive sheets (#152334) on the back of the Brass Foil, I cut “Thanks” using the Well Written Dies. The actual word is “Thanksgiving” but I only wanted “Thanks” so cut off  the rest of the word. I added a trio of Gilded Gems (#152478) under the sentiment.

I hope you are having a relaxing weekend.

“Love what you do and share what you love.”


Thursday 26 November 2020

In The Pines Bundle

Hi everyone,

Have you finished making your Christmas cards yet? Or perhaps haven’t started!! All I have to do is write on all mine so had better get that done soon and get them posted so I don't leave it till the last minute. Here’s another Christmas card for some inspiration if needed and easy to make.


The base card is Real Red (#106578). I attached the Plush Poinsettia Specialty Paper (#153486) to the same size Whisper White card (#106549), then attached this to the Granny Apple Green card (#147014). The Real Red Sheer Ribbon (#153535) was wrapped around the card front. The pine tree from In The Pines stamp set (#p153448) was stamped with VersaMark (#102283) and heat embossed with Gold Stampin’ Emboss Powder (#109129). The Heat Tool (#129056) was used to set the powder. The 2 trees were cut with dies from Pine Woods dies (#153563). The star and unstamped tree were cut from Gold Foil Sheets (#132622). The die for the star is from the Stitched Stars Dies (#150653). I used Adhesive Sheets (#152334) on the back of the Gold Foil before cutting with the dies.
The sentiment is from the Itty Bitty Christmas stamp set (#c150513) and stamped with Real Red ink (#147084), then cut with a Stitched So Sweetly Die (#151690). I coloured the stamped tree using Granny Apple Green Stampin’ Blends (#154885) and attached this and the sentiment to the card with Stampin’ Dimensionals (#104430). The embellishments are from the Wonderful Gems (#153536).


I hope your day has been fantastic!!

“Love what you do and share what you love.”


Wednesday 25 November 2020

Borders Abound

Hi again,

This gorgeous designer series paper is from the Flowers For Every Season 6”x6” DSP (#152486). This pack includes floral images for each of the 4 seasons on one side and more subtle designs on the reverse, so a very versatile pack for the whole year.


I stamped the floral border image from the Borders Abound stamp set (#152627) using VersaMark (#102283) and Gold Stampin’ Emboss Powder (#109129), which needs to be set with the Heat Tool (#129056). This stamp set has 4 border images, again 1 for each season. I coloured these flowers with Poppy Parade Stampin’ Blends (#154958), Daffodil Delight Stampin’ Blends (#154883) and Balmy Blue Stampin’ Blends (#154830).
We all like to save when we can, so when I use some of the specialty papers, like the Gold Foil (#132622) on this card, I remove the middle section (as shown below) and then can use that for another project, so no waste.


I attached the Designer Series Paper to Whisper White card (#106549) with the stamped border. I wrapped the 5/8” Polka Dot Tulle Ribbon (#146912) around this card front. Before attaching the ribbon I coloured this white ribbon by sponging with Poppy Parade ink (#147050). The cardfront was then attached to the Gold Foil, then this was attached to the Poppy Parade base card (#121694).
“Best Wishes” is also from the Borders Abound stamp set and Gold embossed. I cut the ends of the sentiment and the Gold Foil under the sentiment using the Banners Pick A Punch (#153608). I used some of the Gold Trim from the Forever Greenery Trim Combo Pack (#152475) and attached it under the sentiment and the sentiment was attached with Stampin’ Dimensionals (#104430). Wonderful Gems (#153536) were added to the card & sentiment.

Have a fantastic day!!

“Love what you do and share what you love”.


Tuesday 24 November 2020

Poinsettia Dies

Hello my friends,

I have chosen to use subtle colours on this Christmas card using the Poinsettia Dies (#153522) to cut the flower.


As well as the Whisper White card (#106549) I have used the Gold from the Brushed Metallic 12” x 12” cardstock. I cut a piece of the white card using one of the Curvy Dies (#154319), then dry embossed the lower piece with one of the Wrapped In Texture Embossing Folders (#153574). Both pieces were then attached to the Gold Metallic card.
I cut the 4 layers of the poinsettia using the Poinsettia Dies and sponged the edges of the petals with Soft Sea Foam ink (#147102). Clear Wink Of Stella (#141897) was brushed onto the petals giving a lovely glimmer. I assembled the flower with Mini Glue Dots (#103683) and then it was attached to the card with Stampin’ Dimensionals (#104430). 
The “berries” were cut with a die from the Poinsettia Dies and the leaves from the Soft Seafoam card (#147012) were cut with a die from the Curvy Dies. All were attached with Mini Glue Dots.
“Merry Christmas” is from the Curvy Christmas stamp set (#p155364). This was heat embossed with VersaMark (#102283) and Gold Stampin’ Emboss Powder (#109129), then set with the Heat Tool (#129056). A die from the Ornate Frames (#150664) was used to cut the sentiment. Mini Stampin’ Dimensionals (#144108) were used to attach the sentiment to the card. A Gilded Gem (#152478) was attached to the centre of the poinsettia.

Have a fantastic day!!

“Love what you do and share what you love”


Monday 23 November 2020

So Many Snowflakes Dies

Hello everyone,

Here’s an easy card using the So Many Snowflakes Dies (#153560).


The finished size of this card is 13cm x 13cm. I used Whisper White card (#106549) for the base. I cut the Snowflake Splendor Designer Series Paper (#153512) 12cm x 12cm. The snowflakes are cut from the beautiful Balmy Blue Glimmer Paper (#153513) using dies from the So Many Snowflakes Dies (#153560). These were attached to the card with Mini Glue Dots (#103683). The sentiment from the Wrapped In Christmas stamp set (#153481) was stamped with Pacific Point ink (#147098), then cut with a Layering Circles Die (#151770). I attached the sentiment with Stampin’ Dimensionals (#104430). The Blue Adhesive-Backed Gems (#153547) were added to the centre of each of the snowflakes.

Don’t forget the one day only sale is on (today) Tuesday 24th November. Most products in the Annual Catalogue are 10% off. There are a few exceptions which you will find here. Don’t miss out on some great specials. Contact me for further info or order here - lesleyjendra.stampinup.net

Have a great day.

“Love what you do and share what you love!!”


Sunday 22 November 2020

Ornate Style Bundle

Hi and welcome again everyone,

I love the Ornate Style Bundle (#c154119) which includes the Ornate Style stamp set (#c152572) and the Ornate Layers Dies (#152726) and used on todays card.


I stamped the floral image using VersaMark (#102283) and heat embossed with the White Stampin’ Emboss Powder (#109132) onto the Whisper White card (#106549). This was then set with the Heat Tool (#129056). I coloured the image with the following Stampin’ Blends - Granny Apple Green (#154885), Highland Heather (#154887), Purple Posy (#154896) and Rococo Rose (#154900). I then cut this with an Ornate Layering Die.
The Designer Series Paper is from the Artistry Blooms pack (#152495) and I dry embossed this with the Dainty Diamonds 3D Embossing Folder (#152702). Doesn’t the Ombré effect on the DSP look great.
I used Stampin’ Dimensionals (#104430) to attach the die-cut to the DSP. The sentiment is from the Comfort & Hope stamp set (#c152509), stamped with Highland Heather ink (#147103)  and cut with an Ornate Frames Die (#150664). This was attached with Mini Stampin’ Dimensionals (#144108).

I hope your weekend has been a fun one.

“Love what you do and share what you love.”


Saturday 21 November 2020

Comfort & Hope with Positive Thoughts

Hi Ladies & Guys,

I have “dusted off” a couple of stamp sets which I haven’t used for a while. It’s easy to use the most recent products and ignore some of the other great sets.


Stampin’ Up! have a 24 hour sale on November 24th. Most products in the current Annual catalogue are 10% off, so a great chance to get those products you have been wanting. Here is the list of exclusions. All orders must be ordered on that day to receive the discount. If you need more info just contact me.


The cardstock is Very Vanilla (#106550) and Flirty Flamingo (#141421). The background was stamped with images from the Comfort & Hope stamp set (#152509). These were stamped with Crumb Cake ink (#147116), Petal Pink ink (#147108), Granny Apple Green ink (#147095) as well as heat embossing using VersaMark (#102283) and Gold Stampin’ Emboss Powder (#109129).
The fern and flower images are from the Positive Thoughts stamp set (#151490). I used Granny Apple Green ink to stamp the fern and Flirty Flamingo ink (#147052) for the flowers. The fern and flowers were cut with the co-ordinating dies from the Nature’s Thought dies (#153586). The sentiment is also from the Positive Thoughts stamp set, and cut with an Ornate Frames Die (#150664). The sentiment and top flower were attached to the card with Stampin’ Dimensionals (#104430). The sequins from Woven Threads Sequins Assortment (#149498) were glued to the card using the Fine-Tip Glue Pen (#138309).


I hope your weekend is relaxing!!

Love what you do and share what you love.


Friday 20 November 2020

Snowflake Wishes Bundle

Hello again my friends,

I think you all know by now that I like some sparkle on my cards, so of course I love the Balmy Blue Glimmer Paper (#153513) and is perfect for the snowflakes.


I cut a piece of Whisper White card (#106549) as well the Balmy Blue Glimmer Paper (#153513) using the Stitched So Sweetly Dies (#151690). The white card was dry embossed with the Winter Snow Embossing Folder (#153577). I cut the Balmy Blue Glimmer Paper diagonally and attached the pieces to the white card. This was then attached to the Feels Like Frost 6”x6” Specialty Designer Series Paper (#150444). I wrapped the (retired) silver trim around the card front, then attached the card front to Whisper White base card. 
The snowflakes are from the Snowflake Wishes Bundle (#p155172). I stamped one of the snowflakes using VersaMark (#102283) and heat embossed with Silver Stampin’ Emboss Powder (#109131) which was set with the Heat Tool (#129056). I cut this snowflake and the one from the Balmy Blue Glimmer Paper with dies from the So Many Snowflakes Dies (#153560). I attached the silver snowflake to the card using Stampin’ Dimensionals (#104430) and the blue snowflake on top with Mini Glue Dots (#103683).
The sentiment is from the Itty Bitty Christmas stamp set (#c150513) and I stamped this with Balmy Blue ink (#147105). This was also cut with a Stitched So Sweetly die, then it was attached to the card with Mini Stampin’ Dimensionals (#144108). The Rhinestone Basic Jewels (#144220) were added to the card and centre of the snowflakes.

Enjoy your weekend!!

“Love what you do and share what you love.”


Thursday 19 November 2020

So Much Love

Hi again,

Do you find colouring relaxing? I do. And it was just what I needed after a busy morning (doing the housework!!).


These beautiful floral images are from the So Much Love stamp set (#152667). I stamped them with the Tuxedo Black Memento ink (#132708) which is the perfect ink to use with Stampin’ Blends. The blends I have used are Granny Apple Green (#154885), Purple Posy (#154896), Highland Heather (#154887) and Blackberry Bliss (#154877). The images were fussy cut.
I attached 2 Square Vellum Doilies (#152484) to the Whisper White card front (#106549). I only taped the doilies where the taped would be covered with the flowers and sentiment. The white card was matted with the Highland Heather card (#147010). The base card is also Whisper White.
The sentiment from the Comfort & Hope stamp set (#152509) was stamped with Gorgeous Grape ink (#147099) and cut with an Ornate Frames die (#150664). I attached the sentiment and larger flower to the card with Stampin’ Dimensionals (#104430) and Mini Stampin’ Dimensionals (#144108).

“Love what you do and share what you love.”

Have a fantastic day!!


Wednesday 18 November 2020

Feels Like Frost Specialty Designer Series Paper

Hello my friends,

I always say that you don't need to do a lot on a card when using many of the beautiful Stampin’ Up! Designer Paper. The scene on this paper from the Feels Like Frost 6”x6” Specialty Designer Series Paper (#150444) is one of those papers.


I dry embossed the Whisper White card (#106549) using the Wrapped In Texture Embossing Folder (#153574). I cut a circle using a Layering Circles Dies (#151770) from the DSP, then attached this to the White card. The Snowflake Splendor 1/4” Ribbon (#153548) was wrapped around the cardfront, then this was attached to the Whisper White base card.
The sentiment from the Wrapped In Christmas stamp set (#153481) was stamped with VersaMark (#102283), then heat embossed with Gold Stampin’ Emboss Powder (#109129) and set with the Heat Tool (#129056). The sentiment and the scalloped circle from the Gold Foil Sheet (#132622) were also cut with Layering Circles Dies. The sentiment was attached to the card with Stampin’ Dimensionals (#104430).
The star and snowflake embellishments are from the Snowflake Sequins (#150443) and glued to the card with the Fine-Tip Glue Pen (#138309).

“Love what you do and share what you love”.

Enjoy your day!!


Tuesday 17 November 2020

Many Layered Blossoms

Hi again,

I hope you saw the card I posted 2 days ago, as this is a follow on from that card. I had the outline part left over of the purple velveteen card so I used it on this card. It’s great to be able to use all the pieces from the die-cut.


For the previous card I had cut the Highland Heather card from the Color Velveteen Paper Pack (#153557) using the die from the Many Layered Blossoms (#153582). In the previous card I used all the inside pieces, so I was left with the outline of the Highland Heather card. I did have Adhesive Sheets (#152334) adhered to the back of this before cutting to make it easy to attach all the pieces. I cut a piece of Whisper White card (#106549) using the other co-ordinating die, then attached the outline die-cut piece to the white card. This was then attached to the Soft Seafoam card (#147012). I matted this with a piece of the Gorgeous Grape from the Brights 6”x6” Designer Series Paper (#152487). I cut the triangle using a Stitched Triangles Die (#152710) from the Soft Seafoam which is from the Subtles 6”x6” Designer Series Paper (#153072). The Highland Heather Designer Series Paper is also from the Subtles DSP and this was attached to the Whisper White base card. The size of this card is A4 which is folded in half. 
“Congratulations” is from the Peaceful Moments stamp set (#151595) and was stamped with Gorgeous Grape ink (#147099). Each end of this as well as the Gorgeous Grape card were punched with the Banners Pick A Punch (#153608). The sentiment was attached to the card with Stampin’ Dimensionals (#104430).
To complete the card I added glimmer to the white areas of the flowers using the Clear Wink Of Stella Glitter Brush (#141897) and added the clear gems from the Flowers For Every Season Gems (#153645). These were glued using the Fine-Tip Glue Pen (#138309).


“Love what you do and share what you love.”


Have a fantastic day!!

Monday 16 November 2020

Zany Zebras

Hello,

The Zany Zebras stamp set (#152536) includes 3 very cute zebras which are just adorable. Here’s an easy card using 1 of the zebras.


The zebra and sentiment are from the same set and stamped with Tuxedo Black Memento ink (#132708) on Whisper White card (#106549). The circles were cut with the Layering Circles Dies (#151770) and the sentiment with a dies from the Stitched Nested Labels (#149638). Gold Foil Sheet (#132622) was used to matt the zebra and for the small “label” under the sentiment.. The Designer Series Paper is from the World Of Good Specialty Paper (#152491) and attached to the Whisper White base card. I coloured 3 Rhinestone Basic Jewels (#144220) using the Basic Black Stampin’ Blends (#154843) before attaching them to the card.
I used the Clear Wink Of Stella Glitter Brush (#141897) to add shimmer to the Zebra. Not sure how visible it is in this photo.

Have a great day.


Sunday 15 November 2020

Many Layered Blossoms Dies

Hello,

This card is a larger card using a full sheet of A4 Whisper White card (#106549) and folding it in half for the base card. The die I used is almost the full size of a normal sized card and I wanted some extra colour on the card so this was the best way to achieve this.


I adhered the Adhesive Sheets (#152334) to some Whisper White card, and the 3 colours in the Color Velveteen Paper Pack (#153557). I then cut each of these with a die from the Many Layered Blossoms Dies (#153582). I attached the Whisper White outline to a piece of Purple Posy card (#150887), then added each of the coloured pieces into the corresponding spaces. This takes a bit of time but the final results are worth it.
The Designer Series Paper is Gorgeous Grape from the 6”x6” Brights Collection (#152487). I stamped “best wishes” from Borders Abound stamp set (#152627) and this was cut with a Stitched Rectangles Die (#151820). The sentiment and card front were attached with Stampin’ Dimensionals (#104430).

I hope you have a great day.

“Love what you do & share what you love.”


Saturday 14 November 2020

Gift Voucher Christmas card

Hello again everyone,

Gift Vouchers are very popular to give for Christmas so here is a card which you can tuck a gift card inside securely.


I cut the A4 Real Red cardstock (#106578) in half so it measures 10.5cm x 21cm. I scored the card in half and then at 5.5cm at one end. This piece was folded to the inside and a piece of Heartwarming Hugs Designer Series Paper (#153492) was added to this flap. I punched a part of a 2” circle from this flap so it is easy to remove the gift voucher. I used the 2” Circle punch (#133782). I taped the top and bottom of the flap. This is where you will insert the gift voucher.
I added another piece of the Designer Series Paper to the front of the card. I cut a rectangle from Whisper White card (#106549) using the Stitched Rectangles Dies (#151820). Then I cut the tree with a die from the Pine Wood Dies (#153563). I also cut a piece of Pear Pizzaz card (#131290) with the same rectangle die and attached the tree on top of the Pear Pizzaz card using Mini Stampin’ Dimensionals (#104430).
I stamped the sentiment from the Itty Bitty Christmas stamp set (#150513) with Real Red ink (#147084) and cut it with another Stitched Rectangles Die. This was attached to the card.
For the inside, I stamped the trees and the stars from the Curvy Christmas stamp set (#155364). These were stamped with Pear Pizzaz ink (#147104) and So Saffron ink (#147109).

I think I will be making a few of these for Christmas for the family.


I hope you are having a crafty weekend.

“Love what you do and share what you love.”


Friday 13 November 2020

Ornate Style stamp set

Hi my friends,

Don’t you love it when you have something in mind and it turns out just as you imagined, or sometimes even better. This is what happened with this card and as usual looks much better in real life. I love the subtle colours in the floral image with the ombré effect for the background.


I stamped the floral image from the Ornate Style stamp set (#152572) onto Whisper White card (#106549). This was stamped with VersaMark (#102283) and heat embossed with White Stampin’ Emboss Powder (#109132) which of course needs to be set with the Heat Tool (#129056). I coloured the image with the following Stampin’ Blends - Granny Apple Green (#154885), So Saffron (#154905), Mango Melody (#154888), Flirty Flamingo (#154884) and Purple Posy (#154896). When colouring with the stampin’ blends, the white emboss resists the colouring, so you still have the subtle white embossed image.
This white card was cut with a Stitched Rectangles Die (#151820) and attached to the Artistry Blooms Designer Series Paper (#152495).
The Snowflake Splendor 1/4” Ribbon (#153548) was wrapped around the card front and a bow was also made with the ribbon. The bow was attached to the card with Mini Glue Dots (#103683). The card front was attached to the Whisper White base card.
“Happy Birthday” from the Itty Bitty Greetings stamp set (#146667) was stamped with Granny Apple Green ink (#147095) and punched with the Classic Label punch (#141491). Mini Stampin’ Dimensionals (#144108) were used to attach this to the card.
I added some shimmer to the flowers using the Clear Wink Of Stella Glitter Brush (#141897) then finished the card with the Pearl Basic Jewels (#144219).

Have a great weekend.

“Love what you do and share what you love.”


Thursday 12 November 2020

Many Layered Blossoms Dies

Hi friends,

When I make a sympathy card I like to make it simple but elegant, so I have used the beautiful Many Layered Blossoms Dies (#153583) on this card and it is stamp free.


I adhered the Adhesive Sheets (#152334) on the back of the Shimmery White cardstock (#121717) then cut the flowers with a die from the Many Layered Blossoms Dies. I cut the die cut flowers in half and attached the pieces to the Shimmery White card front and trimmed the pieces that extended over the edge.
“Sympathy” is cut with a Well Written Die (#151816) from Brushed Metallic 12”x12” cardstock. This was also backed with Adhesive sheets and attached to the card. The base card is also Shimmery White card.

How easy is that. It could also be used for a wedding or anniversary card just by changing the sentiment.

Have a great day.

“Love what you do and share what you love”.


Wednesday 11 November 2020

Dove Of Hope

Hi again,

I have paired the Dove Of Hope Bundle (#c155158) with the Beautiful World stamp set (#152994) on this card. 


I have used Whisper White card (#106549), Soft Sea Foam (#147012) and Peony Garden Designer Series Paper (#152483). I daubered the DSP with Gray Granite ink (#147118). The map from the Beautiful World stamp set and the sentiment from the Dove Of Hope stamp set (#153406) were stamped with Gray Granite ink. The world map was cut with a Layering Circles Die (#151770) and the sentiment was punched with the Banners Pick A Punch (#153608). This punch has 6 options with 2 banner designs and 3 widths - 1/2”, 3/4” and 1” and you can make your banner any length.
The dove from the Dove Of Hope stamp set was stamped with Gray Granite ink using the Stamparatus (#148187). After cleaning the stamp and leaving the stamp in the same place, I re-inked  it with VersaMark (#102283) and added the Clear Stampin’ Emboss Powder (#109130) and set with the Heat Tool (#129056). This gives you an embossed image in the colour you stamped first. A co-ordinating die from the Detailed Dove Dies (#153526) cut the dove. I adhered the Adhesive Sheets (#152334) to the Soft Seafoam card before cutting with dies from the same set. The sentiment was attached with Stampin’ Dimensionals (#104430) and I attached a frosted gem from the Frosted & Clear Epoxy Droplets (#147801).


I hope you are having a great day.

“Love what you do & Share what you love.”


Sunday 8 November 2020

Peaceful Boughs

Hello & welcome,

The Peaceful Boughs stamp set (#150541) and the Beautiful Boughs Dies (#150661) have been used for this Christmas card.


I stamped the greeting from the Peaceful Boughs stamp set with Real Red ink (#147084) onto Whisper White card (#106549). The leaves from the same stamp set are stamped with Granny Apple Green ink (#147095). I used the Brass Foil Sheets (#153057) for the pine cones which were cut with the Beautiful Boughs Dies and were backed with Adhesive Sheets (#152334) for ease of placement.
The bow from the Gift Wrapped stamp set (#153432) was stamped with Real Red ink and punched with the Gift Bow Builder Punch (#153606). This was attached to the card with Stampin’ Dimensionals (#104430). 
I attached a small strip of the “Tis the Season 6”x6” Designer Series Paper (#153489) to the card front and then the cardfront was attached to the Real Red card (#106578). This was attached to the Whisper White base card.
The Red Rhinestone Basic Jewels (#146924) were added to complete the card.

“Love what you do & Share what you love”.


Enjoy your day!!


Saturday 7 November 2020

Forever Greenery Designer Series Paper

Hello,

“On Stage At Home” online event which I mentioned yesterday is now sadly over but I have learnt so much from all the presenters and looking forward to the new and exciting products which will be available soon.

There are however so many exciting products available in the 2 current catalogues and one of my very favourites is the Forever Greenery Suite (#154143). This suite consists of a Stamp & Die Bundle, Gold Laser-cut Specialty Paper, Designer Series Paper, Ribbon & Trim combo and Gold Hoops Embellishments. All these are also a available separately.


The card base is Whisper White (#106549) and I also stamped the sentiment on Whisper White. The sentiment from the Positive Thoughts stamp set (#151490) was stamped with VersaMark (#102283) and Heat Embossed with Gold Stampin’ Emboss Powder (#109129). I cut this with a Stitched Be Mine Die (#151814).
I cut the leaves with a die from the Forever Flourishing Dies (#152714) from Gold Foil Sheets (#132622) which were backed with Adhesive Sheets (#152334) for ease of placement onto the card. This was attached to the Vellum cardstock (#106584) which I dry embossed with the Tasteful Textile 3D Embossing Folder (#152718). This was then attached to the Forever Greenery Designer Series Paper (#152492), using Mini Glue Dots (#103683). I attached these dots under the leaves so they would not show through the vellum.
I wrapped the Shaded Spruce Ribbon and the Gold Cord, both from the Wonder Of The Season Ribbon Combo Pack (#153537) around the cardfront, then this was attached to the card base. The sentiment was attached to the card with Stampin’ Dimensionals (#104430) and the Gold Sequins from the Sequins For Everything (#153556) were added using the Fine-Tip Glue Pen (#138309).

“Love what you do and Share what you love.”


Have a fantastic day.


Friday 6 November 2020

Poinsettia Dies with Red Velvet Paper Pack

Hi everyone,

Today I have had the opportunity to attend “Stampin’ Up! Onstage At Home” which is instead of the normal get together for demonstrators where we gather together, this one is on line. It is always so inspirational and fun to create cards together and learn heaps of new things. One great thing about being a demonstrator is that you get to see and purchase new products early, so I have already seen the upcoming catalogue that will be released in January and have ordered some new exciting goodies, so can’t wait to share them with you soon. If you would like to be part of the fun and become a demonstrator (and live in Australia), please contact me.

Now to todays card. It is a Christmas card using the gorgeous Red Velvet Paper (#153490) for the poinsettia.


The 3 layers of the poinsettia flower were cut and embossed with the Poinsettia Dies (#153522) from the Red Velvet Paper. The leaf, berries and flower centre were cut from the Brass Foil Sheets (#153057), also using the Poinsettia Dies. The flower was assembled using Mini Glue Dots (#103683). The flower centre and berries had Adhesive Sheets (#152334) adhered to the back before cutting.
The base card and card front are Whisper White (#106549). I dry embossed the card front with the Tasteful Textile 3D Embossing Folder (#152718), then attached the Ornate Garden Specialty Designer Series Paper (#152488) to the card. The Real Red 3/8” Sheer Ribbon (#153535) was wrapped around the cardfront.
The poinsettia was attached to the card with Stampin’ Dimensionals (#104430). The greeting from the Itty Bitty Christmas stamp set (#c150513) was stamped with Real Red ink (#147084) and cut with a Stitched Shapes Die (#152323) and also attached with Stampin’ Dimensionals. The trio of Red Rhinestone Basic Jewels (#146924) were added to finish the card.

“Love what you do and share what you love.”

Have a fantastic day!!


Thursday 5 November 2020

Stitched Stars Dies

Hello friends,

The Stitched Stars Dies (#150653) have been used to cut these stars. There is a great range of stars in this set, so there are many possibilities but I have just chosen 2 different dies for this card.


The card base and card front are Whisper White (#106549). I dry embossed the card front with the Winter Snow Embossing Folder (#153577) and this was attached to the Balmy Blue card (#147007).
The stars are cut from Gold Foil Sheets (#132622) and Balmy Blue Glimmer Paper (#153513). The top star was attached to the larger stars with a Mini Stampin’ Dimensional (#144108).
I stamped the greeting from the Snowflake Wishes stamp set (#p153444) using VersaMark (#102283) and heat embossed with the Gold Stampin’ Emboss Powder (#109129), then set with the Heat Tool (#129056). This greeting and the Balmy Blue Glimmer Paper were cut with the Stitched Nested Labels Dies (#149638). I used Stampin’ Dimensionals (#104430) to attach this to the card then added the Blue Adhesive-Backed Gems (#153547).

Have a great day.

“Love what you do & share what you love.”

Wednesday 4 November 2020

Free As A Bird

Hello & welcome,

These little birds are from the Free As A Bird stamp set (#c149468) and are great to colour with Stampin’ Blends.


I stamped the birds with the Tuxedo Black Memento ink (#132708) onto Very Vanilla card (#106550). The Stampin’ Blends used are Crumb Cake (#154882), Mint Macaron (#154889), Mango Melody (#154888), Daffodil Delight (#154883), Pool Party (#154894), Petal Pink (#154893), Flirty Flamingo (#154884) and Poppy Parade (#154958).
Happy Birthday is from the Zany Zebras stamp set (#c152536) and stamped with Tuxedo Black Memento ink. I cut the centre from The Gilded Autumn Specialty Designer Series Paper (#153520) with a die from the Stitched Rectangles Dies (#151820), then attached this “frame” to the Very Vanilla card. This was then attached to the Very Vanilla base card. The Champagne Rhinestone Basic Jewels (#151193) were added to the card.

Have a great day!!


Tuesday 3 November 2020

Pine Woods Dies

Hi friends,

This lovely tree was cut with dies from the Pine Woods Dies (#153563).


I cut the solid tree from the Rainbow Glimmer Paper (#153056). The detailed tree was cut from Brushed Metallic 12”x12” cardstock (#153524) which I had adhered the Adhesive Sheets (#152334) to the back before cutting.
The base card is Whisper White (#106549), the next layer is Cherry Cobbler (#121681) then Whisper White again. This was dry embossed with the Texture Textile 3D  Embossing Folder (#152718). The Designer Series Paper is from the Classic Christmas DSP (#155969). This paper is now available for purchase, along with the Curvy Celebration stamp sets and dies. “Merry Christmas” is from the Curvy Christmas stamp set (#155364) and stamped with Cherry Cobbler ink (#147083). This sentiment and the Cherry Cobbler card were punched with the Banners Pick A Punch (#153608). And 
I cut a piece of Whisper White card with a Stitched Nested Labels Die (#149638) and dry embossed it with one of the Wrapped In Christmas Embossing Folder (#153574). The tree was attached to this with Stampin’ Dimensionals (#104430), then the card was finished by adding the Cherry Cobbler rhinestones from the Holiday Rhinestone Basic Jewels (#150457). 

You can check out the Curvy Celebrations here

Enjoy your day,

 “Love what you do and share what you love”.