Monday 31 August 2020

Poppy Moments Dies

Hello again,

A bright & glittery card with the Black Glitter Paper (#153518), the Rainbow Glimmer Paper (#153056) and the 3/8” Glittered Organdy Ribbon (#147897).


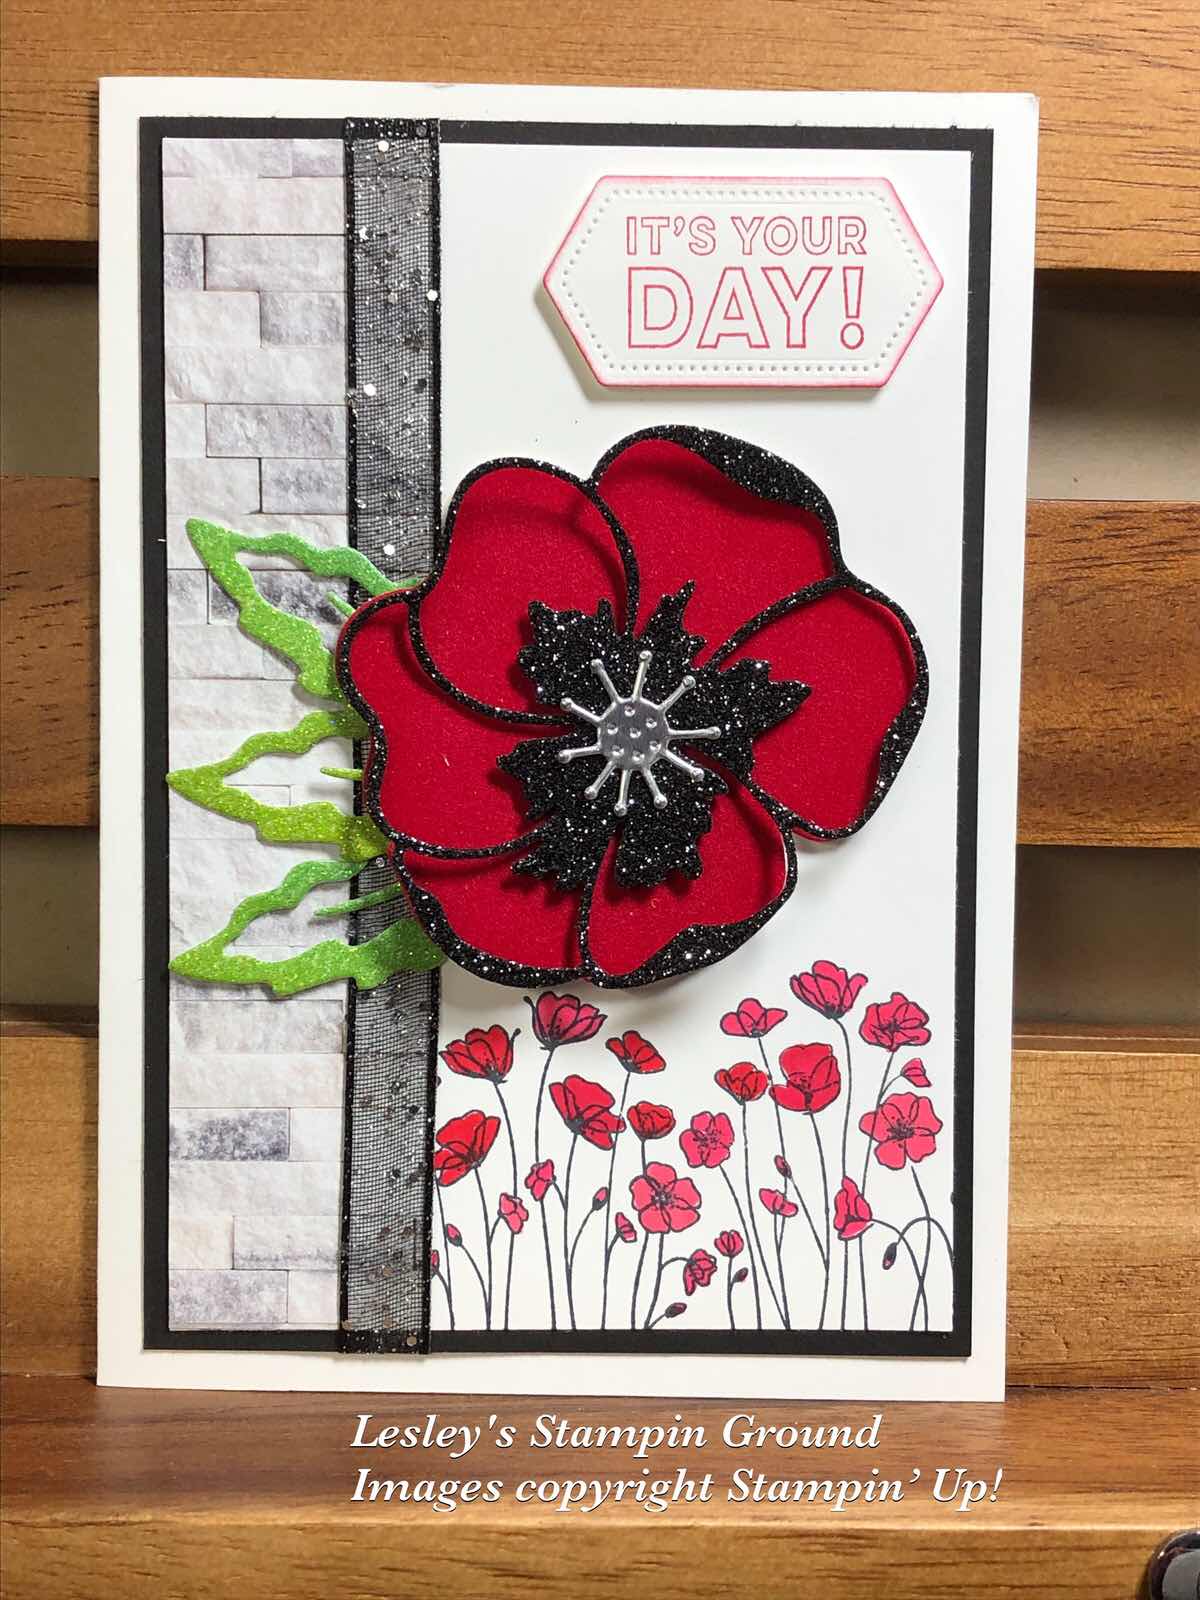
Firstly I stamped the small poppies from the Painted Poppies stamp set (#c151599) using Tuxedo Black Memento ink (#132708). These were coloured with Real Red Stampin’ Blends (#154899) and Poppy Parade Stampin’ Blends (#154958). I attached the piece of In Good Taste Designer Series Paper (#152494) to the Whisper White card (#106549), then this was attached to the Basic Black card (#121688). I wrapped the ribbon around the card before attaching the cardfront the the Whisper White base card. The die cut poppy was cut with the Poppy Moments Dies (#151594). The base was cut from the Red Velvet Paper and the detailed piece was cut from the Black Glitter Paper. These were attached together and onto the card with Stampin’ Dimensionals (#104430). I used Silver Foil Sheet (#132178) for the poppy centre and attached this with Mini Glue Dots (#103683). The leaves were cut from the Rainbow Glimmer Paper and also attached with glue dots. The sentiment is in the Many Mates stamp set (#c152633) and stamped with Real Red ink (#147084). A Stitched Nested Labels die (#149638) was used to cut the sentiment, I sponged the edges with Real Red ink and attached it to the card with Stampin’ Dimensionals. 

Enjoy your day, stay safe and keep crafting!!


Friday 28 August 2020

A Little Lace

Welcome again friends,

The stamped image and sentiment are both from A Little Lace stamp set (#149364).


The image and sentiment were stamped with Night Of Navy ink (#147110). I cut this Whisper White card (#106549) and the Daffodil Delight card (#121680) with Stitched So Sweetly Dies (#151690). I cut the Daffodil Delight card diagonally and attached this to 2 corners of the White die cut card. I embossed the Night of Navy card  (#106577) with the Dainty Diamonds 3D Embossing Folder (#152702) and attached it to the Playing With Patterns 6”x6” Designer Series Paper (#152489).
 I coloured the flowers with Dark & Light Daffodil Delight Stampin’ Blends (#154883). I also coloured the flower embellishment which is from the Boho Indigo Product Medley (#153132), with Dark Daffodil Delight Stampin’ Blends and added some glitter using the Clear Wink Of Stella Glitter Brush (#141897). This was attached to the card with a Mini Glue Dot (#103683). I also attached the embellishments from the Holiday Rhinestone Basic Jewels (#150457) to the card. Stampin Dimensionals (#104430) were used to attach the rectangles and sentiment to the card.

The weekend is here again, so enjoy it and stay safe.


Thursday 27 August 2020

Poinsettia Dies

Hello everyone,

Most of my Christmas cards are in traditional red & green colours, so today decided on something slightly different. I know poinsettias aren’t purple but just wanted to use the Highland Heather & Soft Sea Foam from the Color Velveteen Paper Pack (#153557), and purple is my favourite colour.


The Playing With Patterns 6”x6” Designer Series Paper (#152489) was attached to the Gorgeous Grape card (#147011). I wrapped the 3/8” Tricolor Ribbon (#149708) around the card front. This was attached to the Whisper White base card. The sentiment from the Itty Bitty Christmas stamp set (#150513) was stamped with Gorgeous Grape ink (#147099) and cut with an Ornate Frames Die (#150664). I sponged the edges with Gorgeous Grape ink and attached the sentiment with Stampin’ Dimensionals.
The flowers and leaves were cut and embossed with the Poinsettia Dies (#153522). I sponged the edges of the flowers with Gorgeous Grape ink (#147099) and the leaves with Garden Green ink (#147089). I attached the layers of the flower using Mini Glue Dots (#103683), then the flower was attached to the card with Stampin’ Dimensionals (#104430).  A Frosted Epoxy Droplet (#147801) was added to the centre of the poinsettia.

Have a crafty day!!


Wednesday 26 August 2020

Sweetest Time Bundle

Hello friends,

There are so many beautiful bundles in the new August-December 2020 Mini catalogue, including the Sweetest Time Bundle (#155169). This includes the Sweetest Time stamp set (#p153436) and the Sweetest Borders Dies (#153559).


The holly leaves border was used to cut the Whisper White card (#106549), then attached to a piece of Mint Macaron from the Subtles 6”x6” Designer Series Paper (#153072). The base card is also Whisper White. I stamped the set of 3 candles using VersaMark (#102283) and heat embossed with Gold Stampin’ Emboss Powder (#109129) and set with the Heat Tool (#129056). The flames were stamped with Mango Melody ink (#147093). I fussy cut these candles to separate them, as they are stamped as one image. I attached middle and the candle on the right to the card. Then I wrapped the ribbon (which I just realised is the retired Mint Macaron Textile Ribbon) around the card front. I then added the 3rd candle to the card with Stampin’ Dimensionals (#104430). The sentiment was stamped with Mango Melody ink and cut with a Celebration Labels Die (#153570). The small holly leaves at the left of the sentiment were cut from Mint Macaron card (#138344). The edges of the sentiment, holly leaves and cardfront were sponged with Mint Macaron ink. The sentiment was attached with Stampin’ Dimensionals and the holly leaves with Mini Glue Dots (#103683). A Holiday Rhinestone Basic Jewel (#150457) was added to the sentiment.

Have a great day, stay safe and keep crafting!!


Tuesday 25 August 2020

Dove Of Hope Bundle

Hi & welcome,

This beautiful dove is cut with the Detailed Dove Dies (#153526) and is part of the Dove Of Hope Bundle (#c155158).


The wings and body of the dove were cut from Whisper White card (#106549). I applied some Shimmery White Embossing Paste (#145645) to the wings, giving them a lovely shimmery texture. I assembled the dove using Mini Glue Dots (#103683) and Stampin’ Dimensionals (#104430). I attached the In Good Taste Designer Series Paper (#152494) to the Whisper White base card (#106549). The Bronze card from the Brushed Metallic 12”x12” cardstock (#153524) was cut with an Ornate Layers Die (#152726), then attached to the DSP with Stampin’ Dimensionals. The dove was attached to this also with Dimensionals. I cut the branch from Soft Sea Foam card (#147012) and this was attached to the card with Mini Glue Dots. The sentiment from the Dove Of Hope stamp set (#153406) was stamped with VersaMark (#102283), heat embossed with Gold Stampin’ Emboss Powder (#109129) and set with the Heat Tool (#129056). I used the Banners Pick A Punch (#153608) to cut each end of the banner. An Elegant Faceted Gem (#152464) was added to the card.

Have a great day and stay safe!!

Monday 24 August 2020

Free As A Bird

Hi friends,

Free As A Bird stamp set (#c149468) is where you will find this image of these cute birds on the branch and the singe flower.


I stamped the birds and flower with Tuxedo Black Memento ink (#132708) on Whisper White card (#106549). These were fussy cut then coloured with Stampin’ Blends. The colours I used are So saffron (#154905), Seaside Spray (#154901), Petal Pink (#154893), Purple Posy (#154896), Flirty Flamingo (#154884), Crumb Cake (#14882) and Granny Apple Green (#154885). “Thinking Of You” is from the Good Morning Magnolia stamp set (#c149298) and stamped with Balmy Blue ink (#147105). A die from the Ornate Frames dies (#150664) was used to cut the sentiment. I cut a piece of Balmy Blue card (#147007) with a die from the World Map dies (#152712) to cut a border and this was attached to Whisper White card front. I then attached the DSP from the Subtles 6”x6” Designer Series Paper (#153072) also to the cardfront. I wrapped the Silver 3/8” Metallic-Edge ribbon (#144213) around the cardfront. I used Stampin’ Dimensionals (#104430) to attach the sentiment, flower and birds to the card. The Detailed Trio Punch (#146320)  was used to punch the top corner of the card front then this was attached to the Whisper White base card. I added Pearl Basic Jewels (#144219) to the card and flower centre.

Stay safe!!

Sunday 23 August 2020

Celebration Labels Dies

Hello and welcome everyone,

The Celebration Labels Dies (#153570) have been used on this card today.


Firstly, I embossed the Whisper White base card (#106549) with the Dainty Diamonds 3D Embossing Folder (#152702). I cut a piece of Whisper White card with a Celebration Labels Die, then embossed this with the Evergreen Forest 3D Embossing Folder (#153576). I then daubered the trees with Soft Sea Foam ink (#147102). The “frame” was made by cutting the Seaside Spray card (#150889) with 2 of the Celebration Labels Dies and this was attached to the White card. This was then attached to the base card with Stampin’ Dimensionals (#104430). I stamped the dove from the Dove Of Hope stamp set (#153406) using VersaMark (#102283) and heat embossed with the Silver Stampin’ Emboss Powder (#109131) which was set with the Heat Tool (#129056). This was cut with the co-ordinating Detailed Dove Dies (#153526) and attached to the card with Stampin’ Dimensionals. I used the Clear Wink Of Stella Glitter Brush (#141897) to add Glitter to the dove. The sentiment, also from the Dove Of Hope stamp set was stamped with Seaside Spray ink (#150085) and cut with a Stitched Rectangles Die (#151820). I added the Rhinestone Basic Jewels (#144220) to the sentiment and added the sentiment to the card with Stampin’ Dimensionals.
These dies are also great for making bag toppers. After cutting, just fold in half at the notches and attach to the top of the bag. There are 5 different sizes of these dies, so you can use them for large or small bags and you can use the longer side or shorter side, as well as layering the different sizes. So many options!!

Enjoy whatever it is you are doing today.


Friday 21 August 2020

Gift Wrapped

Hello again friends,

Here’s a simple card which could be used for any occasion just by changing the Designer Series Paper.


I attached the ‘Tis the Season 6”x6” Designer Series Paper (#153489) to Real Red card (#106578). Then I wrapped the beautiful Shaded Spruce Argyle Satin Ribbon from the Wonder Of The Season Ribbon Combo Pack (#153537) around the card like it is gift wrapped. The card front was attached to the Whisper White base card (#106549). I stamped the bow from the Gift Wrapped stamp set (#p153432) using Shaded Spruce ink (#147088) and this was punched with the Gift Bow Builder Punch (#153606). I coloured the bow with Shaded Spruce Stampin’ Blends (#154903) and Real Red Stampin’ Blends  (#154899) and as usual, added some sparkle using the Clear Wink Of Stella Glitter Brush (#147897) on the green colour of the bow. Stampin’ Dimensionals (#104430) were used to attach the bow to the card.
I also stamped the little tag and holly leaves using Real Red ink (#147084) and Shaded Spruce ink. This was also punched with the Gift Bow Builder punch. “Celebrate in Style” was stamped with Real Red ink and I cut this with a Tasteful Labels Die (#152886). I attached the tiny tag with Stampin’ Dimensionals to the larger tag, then attached the Red Rhinestone Basic Jewel (#146924) to the tag.


Have a great weekend and I hope you can find time to do something creative.


Thursday 20 August 2020

Joyful Holly

Welcome friends,

This Christmas card has 2-step stamping for the stamped images using the Joyful Holly stamp set (#p153440).


I stamped the outline of the holly using Mossy Meadow ink (#147111) with the 2 different images onto the Whisper White card front (#106549). Then I stamped the inside of the holly using Pear Pizzaz ink (#147104). The berries were stamped with Real Red ink (#147084). I added the strip of Heartwarming Hugs Designer Series Paper (#153492) to the card. The card front was attached to the Mossy Meadow card (#133683), then attached this to the Whisper White base card. I added sparkle to the holly using the Clear Wink Of Stella Glitter Brush (#141897). The sentiment, also from the Joyful Holly stamp set, was stamped with Real Red ink and cut using a Tasteful Labels Die (#152886). This was attached to the card with Stampin’ Dimensionals (#104430). The trio of Red Rhinestone Basic Jewels (#146924) were added to the card.

Enjoy your day.


Wednesday 19 August 2020

Beauty Abounds

Hi friends,

I love some sparkle and shine on my cards, so was able to achieve this with the glimmer paper, ribbon, embellishments and Wink of Stella.


I stamped the floral image along the bottom of the Whisper White card front (#106549). This is from the Beauty Abounds stamp set (#c148726) and stamped with the Tuxedo Black Memento ink (#132708). The flowers and leaves were coloured with the following Stampin’ Blends - Granny Apple Green (#154885), Mango Melody (#154888), Magenta Madness (#153106), Highland Heather (#154887), Rich Razzleberry (#154898), Purple Posy (#154896) and Flirty Flamingo (#154884). I added the Clear Wink Of Stella (#141897) to the coloured flowers.  “Best Wishes” from the Borders Abound stamp set (#c152627) was also stamped with Tuxedo Black Memento ink. I wrapped the 3/8” Glittered Organdy Ribbon (#147897) around the White card then attached this to the Magenta Madness card (#153085), then onto the Whisper White base card.
 The 2 layers of the butterfly were cut with the Butterfly Beauty die (#151819). There are 5 butterflies attached on the side dies and I just cut one of the butterflies. I used the Rainbow Glimmer Paper (#153056) for the base of the butterfly and Black Glitter Paper (#153518) for the top. I glued these together with the Fine-Tip Glue Pen (#138309) then attached it to the card with Mini Stampin’ Dimensionals (#104430). The flowers were also cut from the Rainbow Glimmer Paper and the centres from the Black Glitter Paper. The dies for the flowers are from the Cherry Blossoms (#151456). These were attached to the card with Mini Glue Dots (#103683). The trio of Rhinestone Basic Jewels (#144220) were added under the sentiment to finish the card.

Have a great crafty day.

Tuesday 18 August 2020

Forever Fern Bundle

Hello & welcome,

Here’s a pretty and elegant card which could be used for any special occasion.


I chose to use white and silver and some of my favourite products. I embossed the Whisper White card front (#106549) with the Dainty Diamonds 3D Embossing Folder (#152702). I cut the Silver Foil Sheet (#132178) with the beautiful Ornate Layers die (#152726). After attaching this silver card to the embossed card I wrapped the Silver 3/8” Metallic Edge Ribbon (#144213) around the card front, then attached this to the Whisper White base card. I stamped the leaves from the Forever Fern stamp set (#152559) onto Vellum card (#106584). I used VersaMark (#102283) and White Stampin’ Emboss powder (#109132) for the leaves and Silver Emboss Powder (#109131) for the berries. These were all cut with the co-ordinating Forever Flourishing dies (#152714). I attached them with Mini Glue Dots (#103683) and Mini Stampin’ Dimensionals (#144108). “Celebrate” from the Many Mates stamp set (#c152633) was also silver embossed, then cut with an Ornate Frames Die (#150664) and attached with Stampin’ Dimensionals (#104430). The Rhinestone Basic Jewels (#144220) were added to the card.

Hope your day has been amazing!!


Monday 17 August 2020

‘Tis The Season Designer Series Paper

Hi,

Here’s a very easy card after a very busy day. You don’t need a lot of stamping when you have designer paper.


I attached the smaller piece of DSP to the larger piece of DSP. Both these papers are from the ‘Tis the Season 6”x6” Designer Series Paper (#153489). The ribbon is from the Boho Indigo Product Medley (#153132) and I wrapped 2 pieces around the Designer Paper, before attaching this to the Whisper White card base (#106549). I stamped the sentiment from the Dove Of Hope stamp set (#153406) onto Whisper White card with Real Red ink (#147084), and cut it with a Painted Labels Die (#151605). The Garden Green card (#108605) was cut with a Stitched So Sweetly die (#151690). I punched a hole with the Detailed Trio punch (#146320) at the top of the green card to thread the Gold trim through. This trim is part of the Forever Greenery Trim Combo pack (#152475). Then I used Stampin’ Dimensionals (#104430) to attach the green die cut piece to the card. The Wonderful Gems (#153536) were added to the sentiment.

Have a great day!!


Sunday 16 August 2020

Poinsettia Place Designer Series Paper

Welcome everyone,

I am loving all the Christmas products in the new August-December 2020 Mini Catalogue. One of my favourite suites is the Poinsettia Place suite and today I am using the beautiful designer paper.


I attached the Poinsettia Place Designer Series Paper (#153487) to the Very Vanilla Card front (#106550). I cut the leafy border using a die from the Birds & More dies (#152721) using the Gold Brushed Metallic 12”x12” Cardstock (#153524). This was glued to the card with the Multipurpose Liquid Glue (#110755). I daubered the edges of the cardfront with Garden Green ink (#147089) before attaching it to the Very Vanilla base card. I stamped the sentiment which can be found in the Wrapped In Christmas stamp set (#c153481) with VersaMark (#102283) and added the Gold Stampin’ emboss Powder (#109129) and set it with the Heat Tool (#129056). This was then cut with a Tasteful Labels Die (#1528860). (I matted this with Garden Green card which I cut with an electronic cutter). The bow from the Gift Wrapped stamp set (#153432) was also Gold heat embossed and fussy cut. I coloured the bow with So Saffron Stampin’ Blends (#154905), then added sparkle using the Clear Wink Of Stella Glitter Brush (#141897). The sentiment and the bow were attached to the card with Stampin’ Dimensionals (#104430). I added the Holiday Rhinestone Basic Jewels (#150457) to the sentiment to finish the card.

I hope your weekend has been a relaxing one.


Saturday 15 August 2020

Dove Of Hope Bundle

Hello friends,

I just love this Dove Of Hope Bundle (#c155158) and how beautiful is this dove cut with the detailed dies.


I dry embossed the Very Vanilla card front (#106550) using the Evergreen Forest 3D Embossing Folder (#153576). Then using the Clear Wink Of Stella Glitter Brush (#141897), I added glitter to the embossed trees. Unfortunately it doesn’t show on the photo. I attached the card front onto a piece of Gold Brushed Metallic 12”x12” cardstock (#153524) and then this was attached to the Mint Macaron base card (#138344). I cut the dove with the Detailed Dove dies (#153526) also from the Gold Brushed Metallic card. I attached the back wing using Mini Glue Dots (#103683) and I used Stampin’ Dimensionals (#104430) and Mini Stampin’ Dimensionals (#144108) to attach the body and the front wing. “Peace”, “Joy” and “Love” is actually on one stamp but I stamped each word individually and cut them with a Tasteful Labels Die (#152886). I used Mint Macaron ink (#147106) to stamp the words and to dauber the edges of the circles. I cut the branch with a Detailed Dove Die from Mint Macaron card and attached this with Mini Glue Dots. The embellishments are from the Holiday Rhinestone Basic Jewels (#150457).

I hope you are enjoying your weekend.


Friday 14 August 2020

Ornate Garden Designer Series Paper

Hello,

This beautiful gold foil designed paper is part of the Ornate Garden Specialty Designer Series Paper (#152488) and would be great for any occasion.


I stamped “Happy Anniversary” from the Many Mates stamp set (#c152633) onto the Whisper White card front (#106549). This stamp set has a variety of sentiments for all occasions so very versatile. I used VersaMark (#102283) with Gold Stampin’ Emboss Powder (#109129) and set this with the Heat Tool (#129056). I cut the Designer Series Paper on an angle and attached this to the die cut Gold Foil sheet (#132622) which was cut with an Ornate Borders Die (#152724). This was attached to the cardfront, then to the Whisper White base card. I stamped the bow from the Gift Wrapped stamp set (#153432) with Mint Macron ink (#147106), then re-stamped it with VersaMark and added Clear Stampin’ Emboss Powder (#109130). The Stamparatus (#148187) is perfect to be able to line up the images when stampin twice. The bow was punched with the co-ordinating Gift Bow Builder Punch (#153606) and attached the the card with Stampin’ Dimensionals (#104430). I used the Clear Wink Of Stella Glitter Brush (#141897) to add some glitter to the bow.

Have a great weekend.


Thursday 13 August 2020

Beautiful World Masculine Card

Hi again,

When a new catalogue arrives with lots of new products, it’s sometimes easy to forget about some of the “old” stamp sets, so I have combined “old” & new stamp sets in this masculine card. These “old” sets are still of course available in the current catalogue.


I stamped the frame from the Swirly Frames stamp set (#p146519) with Misty Moonlight ink (#153118). The Scripty verse is from the Very Versailles stamp set (#c149275) and stamped with Smokey Slate ink (#147113). I cut this Whisper White card with a Stitched Rectangles Die (#151820). Both the world map and the sentiment are from the Beautiful World stamp set (#c152994) and I used Misty Moonlight ink to stamp them. These were then cut with one of the Layering Circles Dies (#151770). The Bronze card from the Brushed Metallic 12”x12” cardstock was dry embossed with the Old World Paper 3D embossing Folder (#152725). The Brushed Metallic card pack includes Bronze, Copper & Gold and all have a beautiful brushed finish.

Have a crafty day!!


Wednesday 12 August 2020

Forever Blossoms

Hi everyone,

These beautiful flowers are from the Forever Blossoms stamp set (#151457) and coloured with Stampin’ Blends.


Firstly I applied the Shimmery White Embossing Paste (#145645) to the Whisper White card front (#106549) using one of the Basic Patterns Decorative Masks (#150697). The paste was applied using a Palette Knife (#142808). This doesn’t take long to dry, but you can speed it up using the Heat Tool (#129056). Ensure that you wash the mask and palette knife as soon as you have used them as the paste will set quickly. The cardfront was attached to Highland Heather card (#147010). The 3/8” Tricolor Ribbon (#149708) was wrapped around the card before attaching this to the Whisper White base card.
I stamped the flower image with Basic Gray ink (#149165). The bow from the Gift Wrapped stamp set (#c153432) was stamped with Highland Heather ink (#147103), then re-stamped with VersaMark (#102283) and heat embossed with Clear Stampin’ Emboss Powder (#109130) and set with the Heat Tool. I coloured the flowers, leaves and bow with Stampin’ Blends - Granny Apple Green (#154885), Purple Posy (#154896) and Highland Heather (#154887). The bow was fussy cut and the floral image was cut with a Cherry Blossoms Die (#151456). I added glitter to the flowers using the Clear Wink Of Stella Glitter Brush (#141897).
 The sentiment from the Many Mates stamp set (#c152633) was stamped with Highland Heather ink and cut with a Stitched Nested Labels Die (#149638). The flowers, bow and sentiment were all attached to the card with Stampin’ Dimensionals (#104430). The Elegant Faceted Gems (#152464) were added to the flowers and sentiment.

Have a fantastic day!!


Tuesday 11 August 2020

Poinsettia Dies

Hi ladies & guys,

Here’s another Christmas card using the Poinsettia dies (#153522).


I have cut 3 layers of petals for the poinsettia from Cherry Cobbler card (#121681) using the Poinsettia Dies. There are dies which emboss the petals and also dies that cut and they can be embossed and cut at the same time. I added some glitter to the petals with the Clear Wink Of Stella Glitter Brush (#141897) and assembled the flower using Mini Glue Dots (#103683). The centre of the flower is Gold Foil sheet (#132622). The Very Vanilla card front (#106550) was dry embossed with the Tin Tile 3D Embossing Folder (#151801) and attached to the Cherry Cobbler base card. I cut the “wreath” from the Birds & More Dies (#152721), then cut it using a Layering Circles Die (#151770). This was attached to the card by using the Adhesive Sheets (#152334) on the back of the Gold Foil Sheet. I cut the “berries” from Mossy Meadow card (#133683) and added the Shimmery Crystal Effects (#150892) to the “berries”. These were then attached to the card with Mini Glue Dots. The sentiment is from the Itty Bitty Christmas stamp set (#150513) and stamped with Cherry Cobbler ink (#147083). I used an Ornate Frames Die (#150664) to cut the sentiment and Stamnpin’ Dimensionals (#104430) were used to attach this to the card. The embellishments are from the Holiday Rhinestone Basic Jewels (#150457).

Have a great day!!

Monday 10 August 2020

Birds & More Dies

Hi & welcome friends,

I have used The Birds & More dies (#152721) on today’s card. These also co-ordinate with the Birds & Branches stamp set (#p152570), however I have only used the dies here.


I cut the bottom edge of the Very Vanilla card (#106550) with a one of the dies. Then I dry embossed this card with one of the Meadow Moments Embossing Folders (#153126). There are 2 smaller folders in this set with different embossed images. I adhered the Adhesive Sheets (#152334) to some Mint Macaron card (#138344), then cut the branches with the Birds & More Dies and attached the branches to the card front. The birds are also cut with the same set of dies. I used the beautiful Rainbow Glimmer Paper (#153056) for these cute birds. Stampin’ Dimensionals (#104430) were used to attach the birds & sentiment. “Celebrate” is from the Itty Bitty Greetings stamp set (#c151331) and I used an Ornate Frames Die (#150664) to cut this. The Gold Trim from the Forever Greenery Trim Combo Pack (#152475) was attached to the label. The embellishments are from the Holiday Rhinestone Basic Jewels (#150457). The card front was attached to Mint Macron card, then this was attached to the Very Vanilla base card.

Hope you can have a crafty day!!


Sunday 9 August 2020

Rainbow Glimmer Paper

Hello,

If you like some sparkle on your cards you will love the Rainbow Glimmer Paper (#153056). This paper has a beautiful ombré effect.


I cut the triangles with the Stitched Triangles Dies (#152710) and I cut 2 strips for the bottom of the card. I attached them to a piece of Whisper White card (#106549) which was also attached to the Whisper White Base card. “Happy Birthday” is from the Many Mates stamp set (#c152633) and stamped with VersaMark (#102283) and heat embossed with Gold Stampin’ Emboss Powder (#109129) and set with the Heat Tool (#129056). The sentiment and the Gold Foil Sheet (#132622) were both cut with Tasteful Labels Dies (#152886). The sentiment was attached to the Gold Foil die cut label with Stampin’ Dimensionals (#104430). Gold Glitter Enamel Dots (#152155) added some more glitter to the card.

Well that was easy!!

Have a great week.

Friday 7 August 2020

Dove Of Hope Bundle

Hello friends,

Another beautiful bundle is the Dove Of Hope bundle (#c155158) which consists of the Dove Of Hope stamp set (#153406) and the Detailed Dove Dies (#153526).


The Drybrush background stamp (#152599) has been used on the background. I stamped this Whisper White card (#106549) with VersaMark (#102283) and added Silver Stampin’ Emboss Powder (#109131) and set with the Heat Tool (#129056). I attached the Silver Foil (#132178) label which was cut with a Tasteful Labels Die (#152886) to the cardfront. I wrapped the Seaside Spray 1/4” Metallic Ribbon (#150446) around the card front, then attached this to the Whisper White base card. The dove and sentiment are both from the Dove Of Hope stamp set (#153406). I silver embossed the dove and used Seaside Spray ink (#150085) for the sentiment. The dove was cut with a Detailed Dove Die. The sentiment was cut with another of the Tasteful Labels dies and attached to the card with Stampin’ Dimensionals (#104430). The world map is cut with a World Map die (#152712) from Seaside Spray card. I had adhered the Adhesive Sheets (#152334) to the back of this card before cutting, making it easy to attach this to the card. I finished the card by adding the Silver Hexagon Sequins from the Sequins For Everything (#153556), then added the Rhinestone Basic Jewels (#144220) on top.

Have a fantastic weekend!!


Thursday 6 August 2020

Mini Coffee Carrier and Mini Coffee Cups

Hi & welcome,

Have you seen the cute little coffee cups and carrier in the August-December 2020 Mini Catalogue? They are great for gifts filled with sweets or whatever other goodies you would like to add. The cups are even suitable for drinks up to 93 degrees Celsius (200 F).


Each Mini Coffee Carrier (#153508) holds 2 of the Mini Coffee Cups (#153493). You could decorate them for any celebration, not just Christmas. I have decorated the carrier using the ‘Tis The Season 6”x6” Designer Series Paper (#153489). I then wrapped the gold ribbon from the Boho Indigo Product Medley (#153132), attaching it with the Mini Glue Dots (#103683). I stamped the bow from the Gift Wrapped stamp set (#153432) with VersaMark (#102283) and added the Gold Stampin’ Emboss Powder (#109129) and it was set with the Heat Tool (#129056). I coloured the bow with Real Red Stampin’ Blends (#154899) and Shaded Spruce Stampin’ Blends (#154903) and punched it with the Gift Bow Builder Punch (#153606). I die cut the little hearts from Gold Foil Sheets (#132622) using a die from the Warm Wraps Dies (#153521).
The Warm Wraps dies were also used to cut the ‘Tis the Season Designer Paper for the cups. You need 2 pieces for the wraps for each cup and 2 pieces for the scalloped pieces for the top and 2 for the bottom for each cup. I used Real Red card (#106578) and Shaded Spruce card (#147006) for the scalloped edges. There is a little tab to be able to join the 2 pieces of the wrap. I used a bone folder (#102300) to help curve the wrap before assembling it. The greetings on the cups and on the carrier are from the Wrapped In Christmas stamp set (#153481) and stamped with Shaded Spruce ink (#147088) and Real Red ink (#147084). These were all cut with another die from the Warm Wrap Dies. The sentiments and bow were attached with StampinDimensionals (#104430) and Mini Stampin’ Dimensionals  (#144108). I used the Gold Metallic Trim which is part of the Forever Greenery Trim Combo Pack (#152475) and this was attached to the label on the carrier.

Have a crafty day!!


Wednesday 5 August 2020

So Many Snowflake Dies

Hello,

Here’s another sparkly Christmas card using the beautiful Balmy Blue Glimmer Paper (#153513).


The base card is Balmy Blue (#147007). I cut the snowflakes in the Whisper White card (#106549) using the So Many Snowflakes Dies (#153560). Then I spritzed the card with Frost White Shimmer Paint (#147046). I also cut 2 of the snowflakes from the Balmy Blue Glimmer Paper and glued them with the Fine-Tip Glue Pen (#138309), where they were cut from the white card. I attached a piece of the Glimmer paper under the large snowflake. The sentiment is from the Gift Wrapped stamp set (#p153432) and stamped with Balmy Blue ink (#147105). This sentiment and the Balmy Blue card underneath were cut with the Banners Pick A Punch (#153608). A Blue Adhesive-Backed Gem (#153547) was attached to the sentiment.

A simple sparkly card ready for Christmas.


Have a great day.

Tuesday 4 August 2020

Snowflake Wishes Bundle

Hi and welcome,

The Snowflake Wishes Bundle (p#155172) consists of the Snowflake Wishes stamp set (#p153444) and the So Many Snowflakes Dies (#153560) and have been used for this card.


I have used Whisper White card (#106549) and Balmy Blue Glimmer Paper (#153513). I dry embossed the card front with the Winter Snow Embossing Folder (#153577) and sponged the edges with Balmy Blue ink (#147105). I cut the Balmy Blue Glimmer Paper with the largest die from the Stitched Nested Labels Dies (#149638). I then cut the inside of the glimmer paper with a die from the So Many Snowflakes Dies. The sentiment from the Snowflake Wishes stamp set was stamped with Balmy Blue ink, then cut with another die from the Stitched Nested Labels Dies. The Glimmer Paper was attached to the card with Mini Stampin’ Dimensionals (#144108). A Blue Adhesive-Backed Gem (#153547) was added to the sentiment.

There is a huge range of products for your Christmas cards in the new 2020 August-December Mini Catalogue which you can now order from. Contact me if you would like to place an order (if you live in Australia), receive a catalogue or if you have any questions.

Enjoy your day and I hope it’s a crafty one!!