Tuesday 30 November 2021

Blessings Of Home Pinwheel Tower card

Hello again,

Recently I made a small pinwheel tower card so this one today is a larger one with the finished size approximately 21cm x 15cm when flattened out. I am using the Blessings Of Home Bundle (#157939) which is a sneak peek from the upcoming Mini catalogue available from 4th January 2022.


The Basic White card (#159228) measurements for the basic card shape are as follows-
1 piece - 20.5 x 14.9cm and scored at 2.5cm, 5cm,7.5cm and 10cm along the long side.
3pieces - 14.9 x 10.5 cm
The other measurements are-
3 pieces Basic White - 13.9 x 9.5cm. These were embossed with the Timeworn Type 3D Embossing Folder (#156505).
4 pieces of Pattern Party Designer Series Paper (#155426) - 7cm x 13.9cm and 1 piece - 5cm x 13.9cm
1 piece of Basic White card 6cm x 13.9 cm


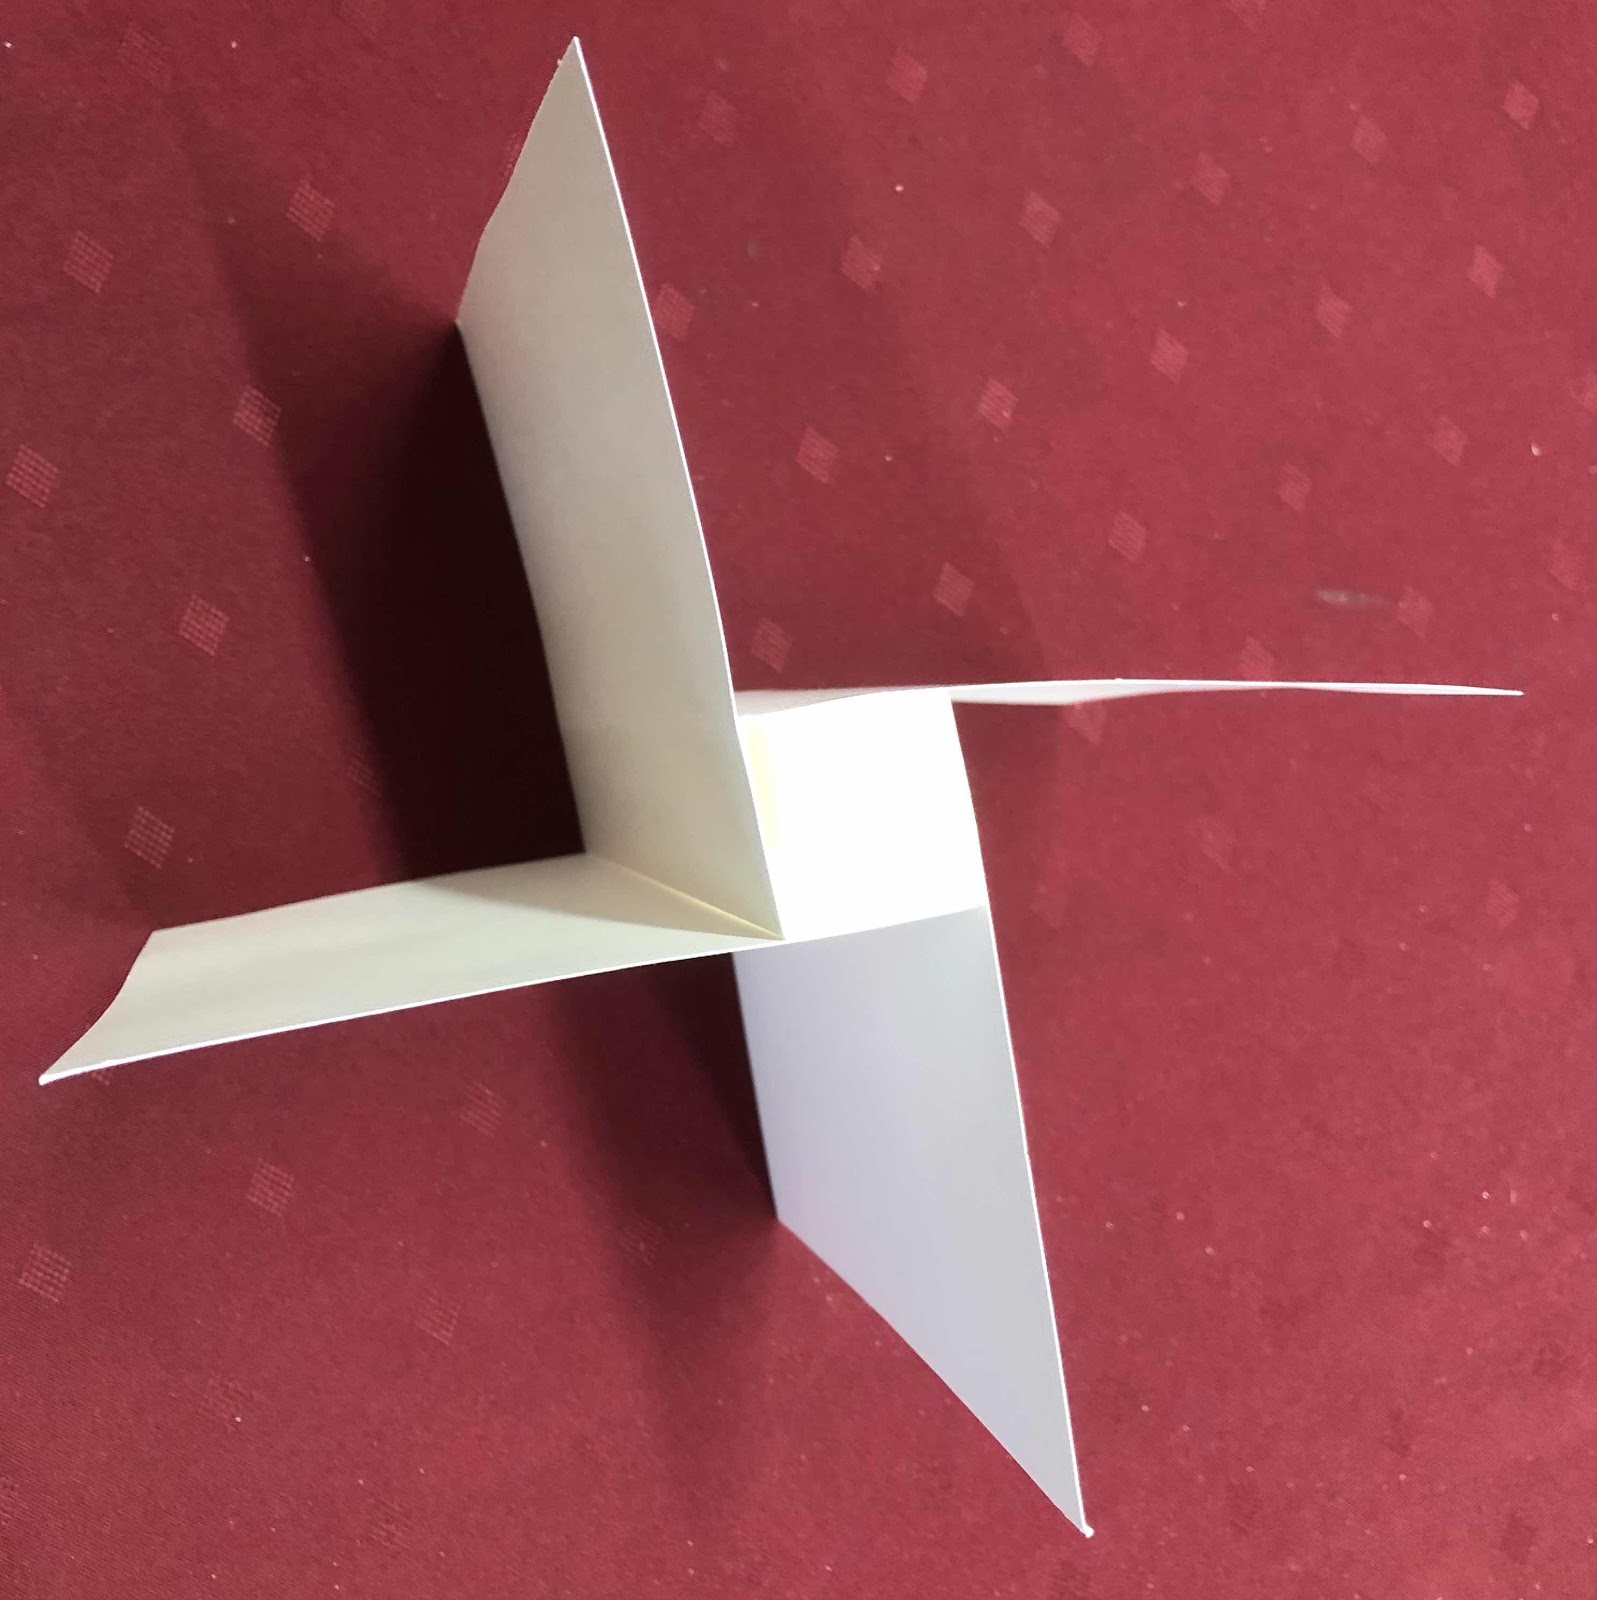
Fold each of the scored lines, to form a square. Apply glue or tape to the end of the “square” as shown below. Fold the left side over to the piece on the right.


You will continue adding glue or tape to one side of the “square”, and place a piece of the 14.9cm x 10.5cm on the right side and fold the left side onto this. (This is very hard to describe so I hope you can understand what to do).


The final base card looks like this from above-


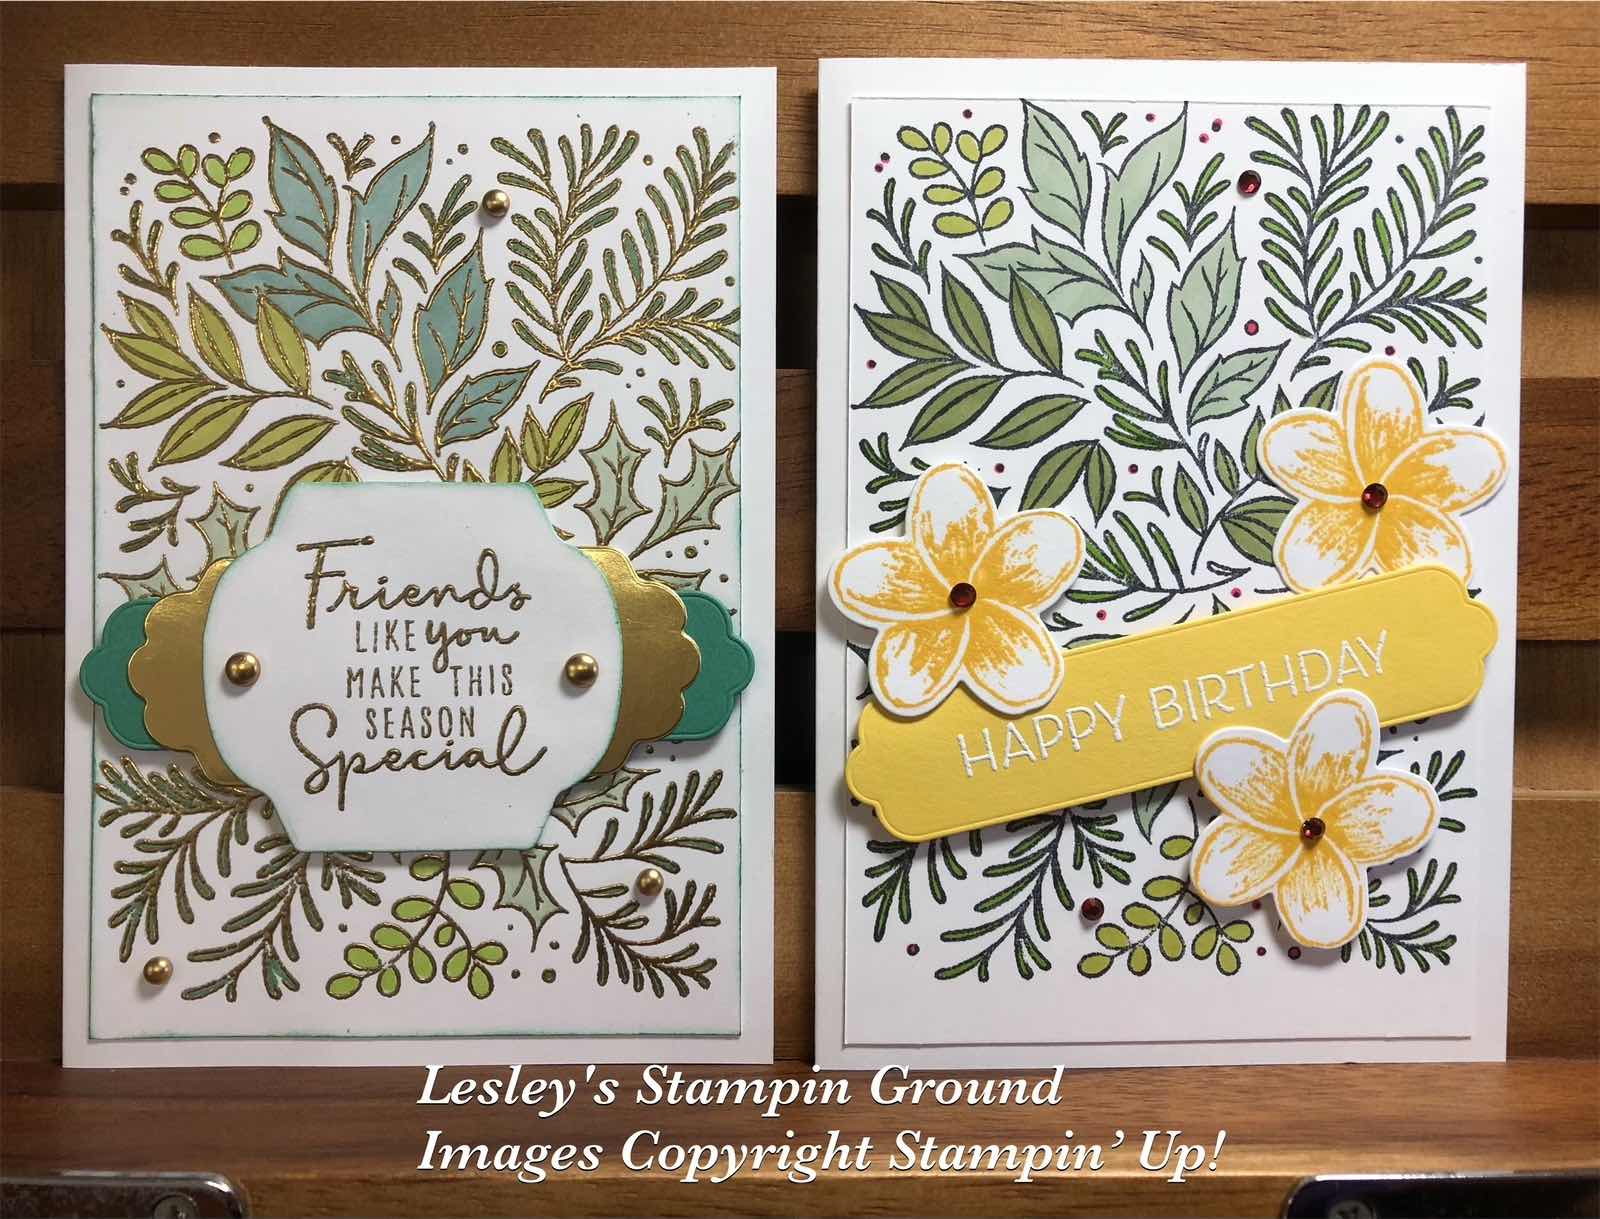
I stamped the larger floral image and I stamped 2 of the smaller floral images from the Blessings Of Home stamp set (#157930) using Tuxedo Black Memento ink (#132708). These were coloured with Stampin’ Blends - Polished Pink (#155520), Flirty Flamingo (#154884), Fresh Freesia (#155518), Granny Apple Green (#154885) & So Saffron (#154905). These were cut with the Flowers Of Home Dies (#157938).


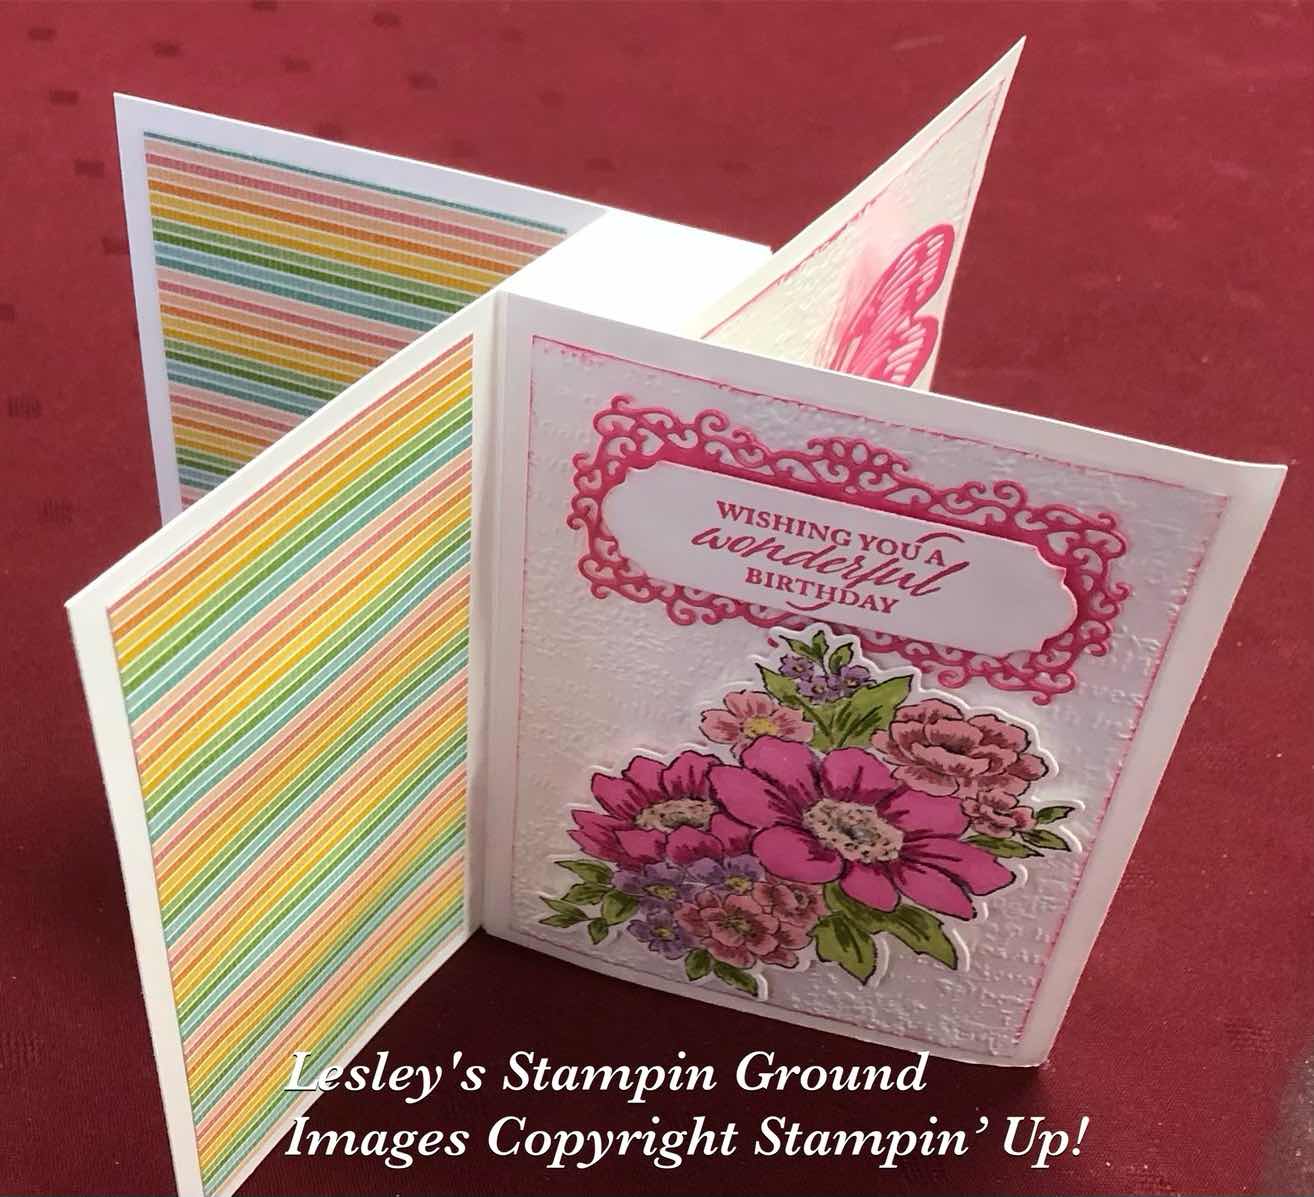
“Wishing You a Wonderful Birthday” from Elegantly Said stamp set (#155095) was stamped with Polished Pink ink (#155712). I used Ornate Frames Dies (#150664) to cut the sentiment and the Polished Pink card (#155711) under the sentiment. This and the larger floral image were attached to one of the dry embossed cards.


Next I cut the butterflies with the Brilliant Wings Dies (#155523) from Polished Pink card and Fresh Freesia card (#155614). The detailed border under the sentiment is cut with a Nature’s Thoughts die (#153586). The Fresh Freesia card was backed with Adhesive Sheet (#152334) before cutting this border. The sentiment on this opening is from the Pansy Patch stamp set (#154999) and also stamped with Polished Pink ink. The butterflies and sentiment were added to another of the dry embossed cards with Stampin’ Dimensionals (#104430).


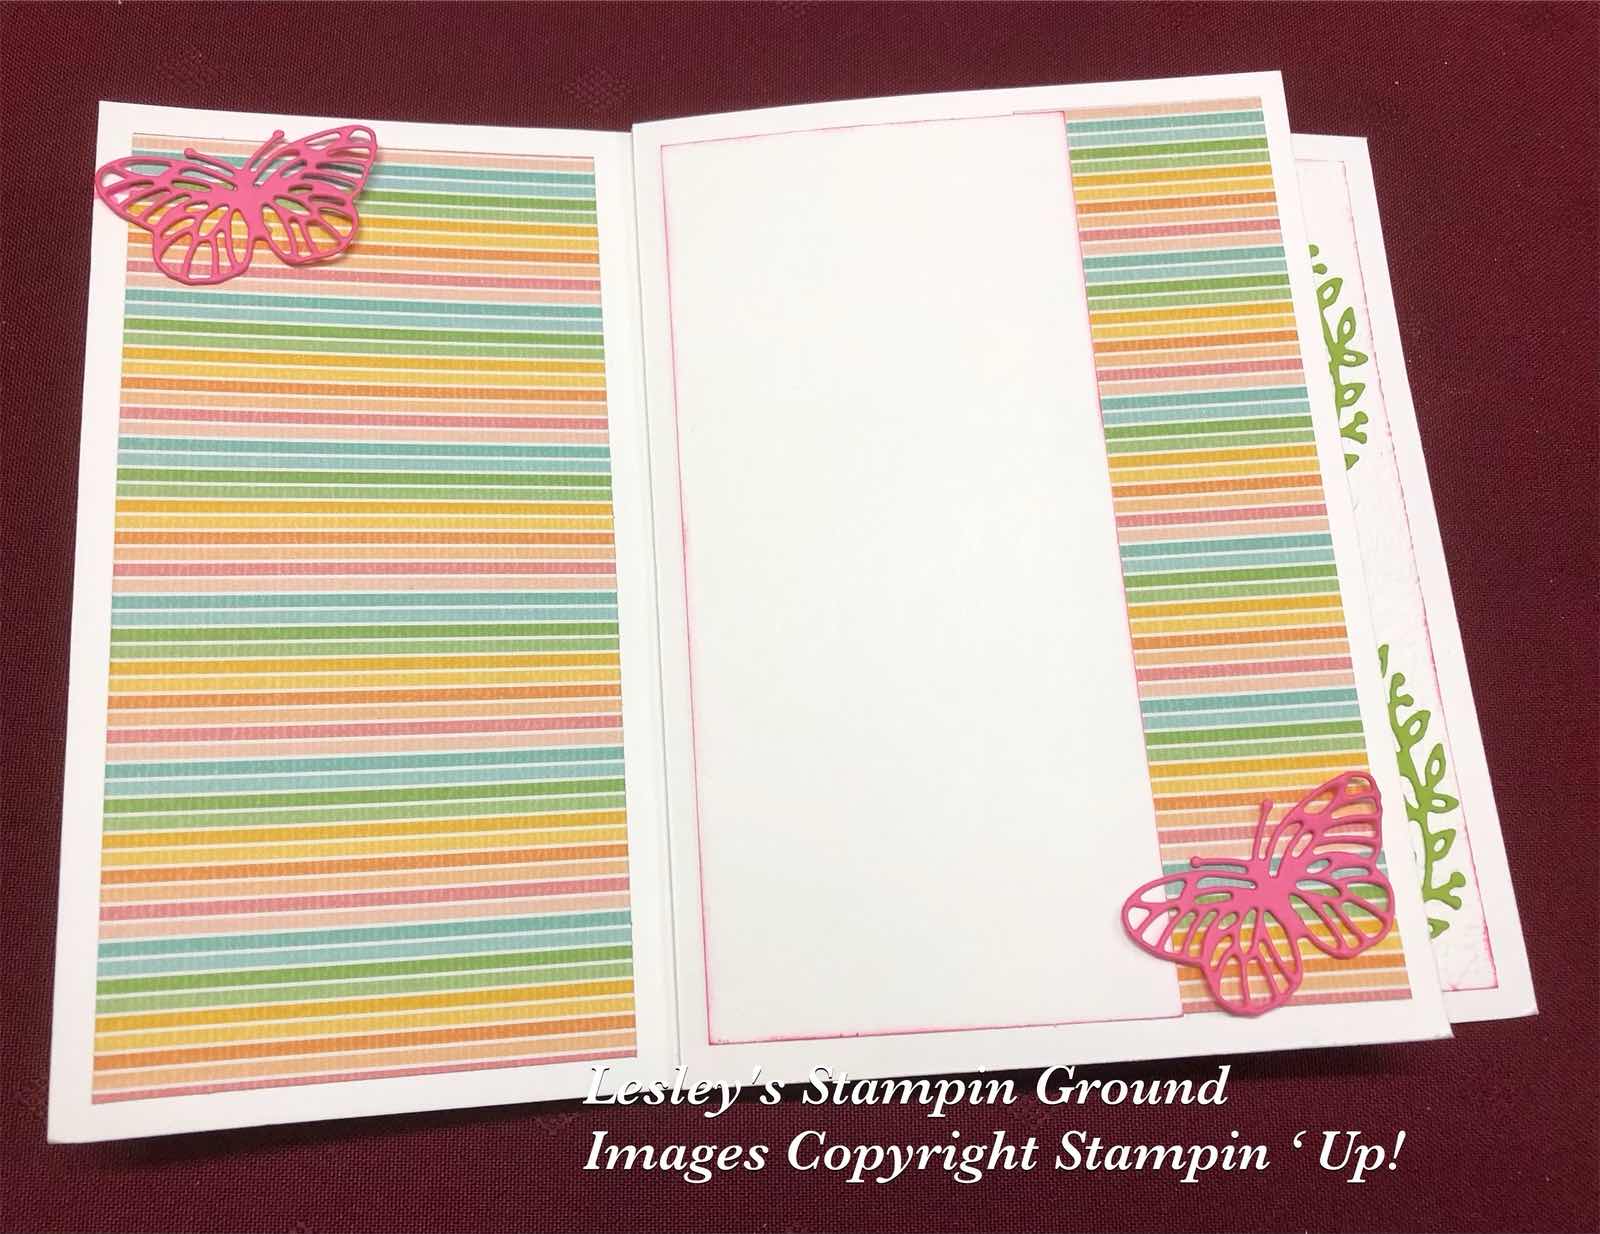
On the next side I attached a larger piece of Designer Series Paper on the left side and the smaller piece on the right side. The smaller Basic White card (6cm x13.9cm) was attached and this is where you will write your personal greeting. I attached 2 more butterflies cut from Polished Pink card. These were attached to the card with Mini Glue Dots (#103683).


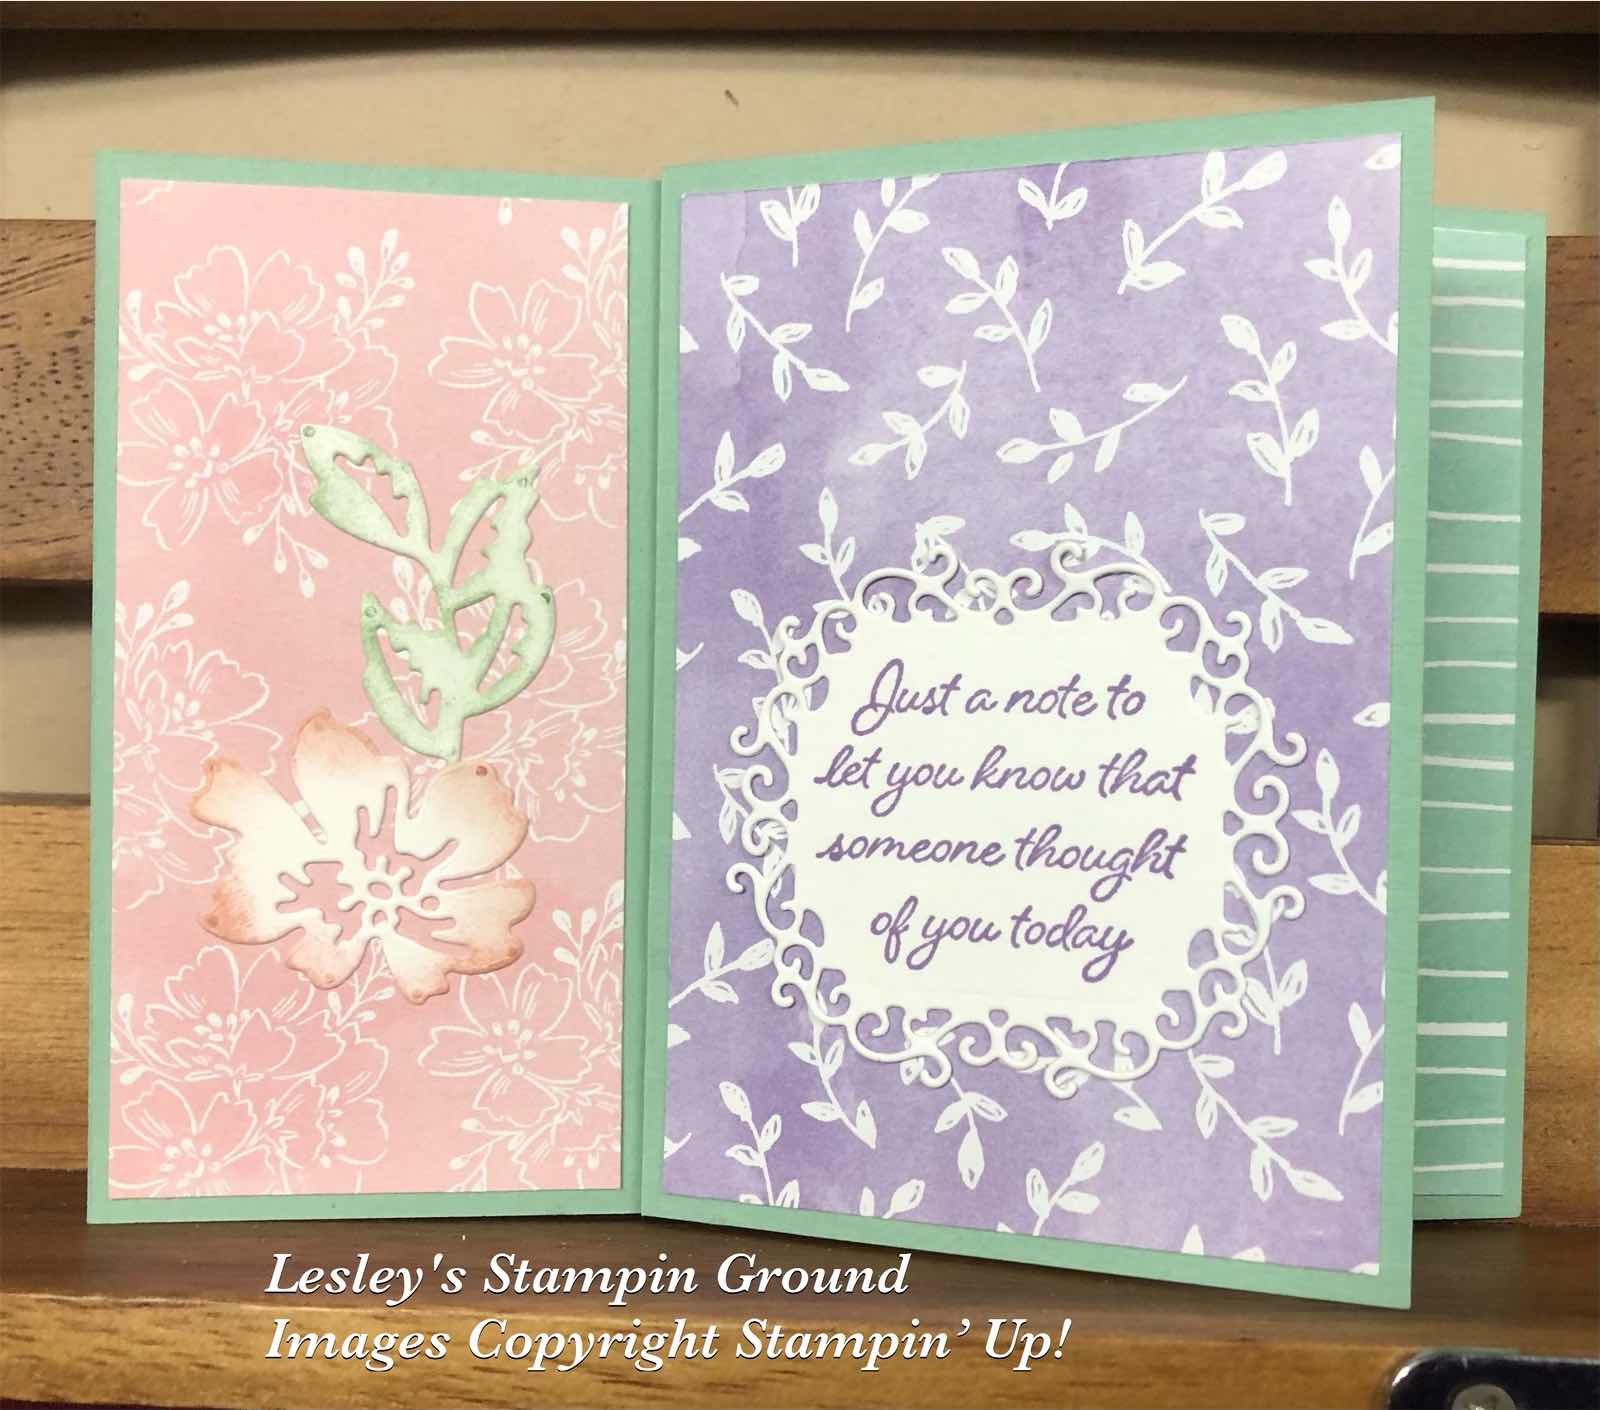
On this side I added the 2 smaller floral images to another of the dry embossed cards. Using Adhesive Sheet on the back of the Granny Apple Green card (#147014), I cut the leaves with a Flowers Of Home die. “Sending Hugs” is from the Eden’s Garden stamp set (#157823), stamped with Polished Pink ink and cut with a Stitched So Sweetly die (#151690).

I attached the DSP to each of the left sides of each “opening”.
 

“Love what you do and share what you love.”


lesleyjendra.stampinup.net


lesley.j.jendra@gmail.com


Monday 29 November 2021

Penguin Playmates Designer Series Paper

Hello dear friends,

I was asked to make a kids Christmas card so thought these cute little characters from the Penguin Playmates Designer Series Paper were just perfect. This pack of DSP was from the recent Sale-a-bration but it also matches with the Penguin Place stamp set (#156410) in the Mini catalogue.


The spotted DSP is also from the same pack. I cut this with the Picture This Dies (#155559). This was attached to the Basic White base card (#159228). I then cut the Just Jade card (#153084), Fresh Freesia card (#155614) and Misty Moonlight card (#153086) with this die and attached these over the corresponding cut-outs of the DSP. I used Stampin’ Dimensionals (#104430) and Mini Stampin’ Dimensionals (#144108) to attach these rectangles to the card.

I fussy cut the cute little animals and attached these to the card. “Merry Christmas” from the Peaceful Deer stamp set (#156891) was stamped with Misty Moonlight ink (#153118) and cut with a Stitched Rectangles Die (#151820) and also attached with Mini Stampin’ Dimensionals. The Elegant Faceted Gems (#152464) were added to the card and I used the Clear Wink Of Stella (#141897) to add glimmer to the characters.

The current Christmas mini catalogue is coming to an end on 3rd January. There is a sale on many of the retiring products so if you would like to take advantage of this sale please click here

There is also some products which will carry over so click here to view those products.

Contact me at  lesley.j.jendra@gmail.com if you would like to place an order or you can order here- lesleyjendra.stampinup.net

“Love what you do and share what you love.”


Saturday 27 November 2021

Encircled In Beauty Dies

Hello my friends,

I have cut the Shaded Spruce card (#147006) with the Encircled In Beauty Dies (#155546) to get this beautiful detailed “doilie”.


The Very Vanilla card front (#106550) was dry embossed with the Timber 3D Embossing Folder (#156406). I attached a piece of the Expressions In Ink 12”x12” Specialty Designer Series Paper (#155464) to the card front, then wrapped the Old Olive/Pretty Peacock Reversible Ribbon (#149496) around. This was attached to the Very Vanilla Base card.

I adhered Adhesive Sheets (#152334) to the back of the Shaded Spruce card before cutting with the detailed die and the outline die to cut the outside. The inside circle cuts at the same time and I cut a small amount from the circle with a Layering Circles Die (#151770) as I wanted it a bit smaller. I find the adhesive sheets so convenient and easy for adhering any detailed cuts outs like this one.

The butterfly was cut with one of the Brilliant Wings Dies (#155523) from Gold Foil Sheet (#132622). I used Mini Stampin’ Dimensionals (#144108) to attach this to the card. The sentiment is from the Art Gallery Stamp Set (#158201) and stamped with Shaded Spruce ink (#147088). A Seasonal Labels Die (#156299) was used to cut the sentiment and it was also attached with Mini Stampin’ Dimensionals. The Genial Gems (#155500) were added to the card, butterfly & sentiment.

“Love what you do and share what you love.”


Thursday 25 November 2021

Adorning Designs Decorative Masks

Hi lovely friends,

Every time I make a Christmas card I think I have probably made enough but then decide I need to use another product, so here is yet another Christmas card. It’s a very easy one to make with lots of sparkle and as usual looks much nicer in reality.


I used the snowflakes mask from the Adorning Designs Decorative Masks (#156328) along with the Shimmery White Embossing Paste (#145645). Using one of Palette Knives (#142808), I wiped the embossing paste over the mask and onto the Balmy Blue card (#147007). This paste dries quickly so ensure you wash the mask & palette knife as soon as possible to remove all paste from the utensils.

After the Embossing Paste dried on the card I wrapped the White Glittered Organdy Ribbon (#156408) around the card front, then attached this to the Basic White base card (#159228).

The sentiment from the Peaceful Deer stamp set (#156891) was stamped with Balmy Blue ink (#147105) and I used a die from the Ornate Frames (#150664) to cut the sentiment. 

The Wonderful Snowflake (#156340) and the sentiment were attached to the card with Stampin’ Dimensionals (#104430) and the embellishments are the Elegant Faceted Gems (#152464).

“Love what you do and share what you love.”


Wednesday 24 November 2021

Blackberry Beauty

Hi again friends,

Another beautiful Designer Series Paper from Stampin’ Up! is the Blackberry Beauty 12”x12” Specialty DSP (#156458) and this sheet has the rich colours of gold & Blackberry Bliss.


I dry embossed the Basic White card front (#159228) with the Star-Crossed Embossing Folder (#156567). I attached the Designer Paper to the card front and the card front was attached to the Basic White base card. 

The sentiment from the Peaceful Moments stamp set (#151595) was stamped with Blackberry Bliss ink (#147092). I used the Stitched Rectangles Dies (#151820) to cut the Blackberry Bliss card (#133682), the Gold Foil (#132622) and the sentiment.

The flowers are pre-cut pieces from the Blackberry Beauty Ephemera Pack (#156469) and attached to the card with Mini Glue Dots (#103683) and I used Stampin’ Dimensionals (#104430) to attach the sentiment. The gold Genial Gems (#155500) were added to the card.

“Love what you do and share what you love.”


Tuesday 23 November 2021

Whimsical Trees Bundle

Hello crafty friends,

The Whimsical Trees Bundle (#156810) consists of the Whimsical Trees stamp set (#156330) and the co-ordinating Christmas Trees Dies (#156339).


I stamped the 3 larger trees with Mossy Meadow ink (#147111), Pear Pizzaz ink (#147104) and Soft Sea Foam ink (#147102). I used Soft Succulent ink (#155778) and Just Jade ink (#153115) for the smaller trees. All the trees are cut with the Christmas Trees Dies.

The Silver Foil from the Silver Foil 12”x12” Specialty Pack (#156457) was dry embossed with the Star-Crossed Embossing Folder (#156567), then attached to the Mossy Meadow card (#133683). I wrapped the Metallic Mesh Ribbon (#153550) around the bottom of the card front, then attached this to the Basic White base card (#159228). 

The sentiment from the Whimsical Trees stamp set was stamped with Mossy Meadow ink then cut with a Scalloped Contours Die (#155560). The trees and sentiment were attached to the card using tape & Stampin’ Dimensionals (#104430). Rhinestone Basic Jewels (#144220) were added to the card. Again I added shimmer to the trees with the Clear Wink Of Stella (#141897), but I don’t think it shows on the photo (as usual). Always look much better in reality.


“Love what you do and share what you love.”


Monday 22 November 2021

Strong Of Heart stamp set

Hi friends,

In the August -December Stampin’ Up! Mini catalogue is the Strong Of Heart stamp set (#156376), which I have used on todays card. For each of these sets sold Stampin’ Up! donates $4.25 to support heart health which is a fantastic cause. So if you want to help “make a difference”, please consider ordering this set.


I stamped the heart & flower image with Real Red ink (#147084) onto Basic White card (#159228). I stamped the sentiment from the Positive Thoughts stamp set (#151490) with VersaMark (#102283) and heat embossed with Gold Stampin’ Emboss Powder (#155555). This was set with the Heat Tool (#129056).

The base card is Real Red (#106578) and the 2 pieces of Designer Series Paper is from the beautiful Simply Elegant Specialty pack (#155761). The strip of gold is from the Brushed Metallic 12”x12” cardstock (#153524).

The stamped card was attached to the card with Stampin’ Dimensionals (#104430) and the trio of Red Rhinestone Basic Jewels (#146924) were attached to the card.

We all have some bits & pieces of DSP & specialty papers, so this is an easy way to use them.

“Love what you do and share what you love.”


Sunday 21 November 2021

Peaceful Place Designer Series Paper

Hello friends,

I decided to add some colour to the Peaceful Place Designer Series Paper (#156394). It didn't require much colour so was easy to do.


I used Old Olive Stampin’ Blends (#154892) to colour the trees, then I used Crumb Cake (#154882) and Bronze & Ivory Stampin’ Blends (#154922) on the buildings. The frame was cut using the Stitched Rectangles Dies (#151820) from Old Olive card (#106576). The frame was attached to the coloured DSP with Mini Stampin’ Dimensionals (#144108). This was then attached to another piece of the Peaceful Place DSP.  

The base card is Basic White (#159228). “Merry Christmas” from the Peaceful Deer stamp set (#156891) was stamped with Old Olive ink (#147090) and also cut with a Stitched Rectangles die. The Silver embellishments are from the Silver & Clear Epoxy Essentials (#155567) and attached to the sentiment.

Well that was easy!!


“Love what you do and share what you love.”


Saturday 20 November 2021

Festive Foliage

Hello friends,

The background stamp used here is the Festive Foliage stamp (#155634) and of course great for Christmas cards. However I have previously used it for a birthday card by covering the holly leaves with flowers, which means it can be used all year round which I love.


I stamped the image with VersaMark (#102283) onto the Night Of Navy card (#106577). This was heat embossed with Silver Stampin’ Emboss Powder (#155555) and set with the Heat Tool (#129056).

The scallops were cut with a die from the Penned Flowers dies (#155557) and attached to a piece of Night Of Navy from the Neutrals 6”x6” Designer Series Paper (#155226). This was attached to the card front. The base card is Basic White card (159228).

“Merry Christmas” from the Perfectly Plaid stamp set (#149418) was stamped with Night Of Navy ink (#147110), then cut with an Ornate Frames Die (#150664). The poinsettia was cut with a Poinsettia Die (#153522) from Basic White card. I daubered the edges with Night Of Navy ink before assembling the flower with a Stampin’ Dimensional (#104430). I attached it to the card with Mini Glue Dots (#103683). The sentiment was attached with Stampin’ Dimensionals then the card was finished by adding the Night Of Navy Holiday Rhinestone Basic Jewels (#150457).


“Love what you do and share what you love.”


Friday 19 November 2021

Blessings Of Home stamp set

Hello my crafty friends,

Being a Stampin’ Up! Demonstrator has many advantages and one is being able to get new products early. The Blessings Of Home stamp set (#157930) will be available from 4th January 2022 but as a demonstrator I have been able to purchase it early and I love it.


I stamped the smaller floral image for this card and it was cut with the Flowers Of Home Dies (#157938). I stamped this with Tuxedo Black Memento ink (#132708) and coloured it with Stampin’ Blends. The colours used are Daffodil Delight (#154883), Fresh Freesia (#155518), Flirty Flamingo (#154884) and Granny Apple Green (#154885). I used the Clear Wink Of Stella (#141897) to add shimmer to the coloured image.

The Gold Foil from the Brushed Metallics 12”x12” cardstock (#153524) was cut with a Hippo & Friends Die (#153585). This gold pack includes 3 colours of gold - light, medium and dark. I have used the medium colour here.

I dry embossed the Basic White card front (#159228) with the Timber 3D Embossing Folder (#156406), then daubered the edges with Daffoldil Delight ink (#147094). The Pattern Party 12”x12” Designer Series Paper (#155426) was attached to the card front. The gold foil was attached to the card with Stampin’ Dimensionals (#104430).

The sentiment from the Elegantly Said stamp set (#155095) was stamped with VersaMark (#102283) and heat embossed with Gold Stampin’ Emboss Powder (#155555) and set with the Heat Tool (#129056). This was also cut with the Hippo & Friends dies and attached with Stampin’ Dimensionals.

I made a bow using the Gold Shimmer Ribbon (#152156) and used a Mini Glue Dot (#103683) to attach it to the card. The cute little bee from the Bumblebee Trinkets (#155568) was also attached with a Mini Glue Dot.

 If you would like to find out some of the perks of being a demonstrator please contact me. lesley.j.jendra@gmail.com I would love to hear from you.


“Love what you do and share what you love.”


Thursday 18 November 2021

Pinwheel Tower card

Hello my friends,

I do love a fancy fold card and I have seen many of these pinwheel tower cards recently so just had to make one.


Although this card may seem difficult it is really quite easy. 
I used Mint Macaron card (#138344) for the base.
The measurements for Mint Macaron cardstock  are 1 at 15.5cm x 10.5cm and scored at 2cm, 4cm, 6cm and 8cm along the long side, and 3 at 7.5cmx10.5cm.
Fold the score lines and form a square as shown below. I glued this with Multipurpose Liquid Glue (#110755).


Then add each of the other pieces on each face of the square as shown-


The Hand-Penned Designer Series Paper (#155499) was cut in the following sizes -3 at 7cm x 10cm, 3 at 5cm x 10cm and 1 at 2.5cm x 10cm.  On the side with the Basic White card (#159228) which I cut at 5.3cm x 10cm, I added the piece of DSP on the side however if you want more area to write your message use a white card 7cm x 10cm. Attach each of the pieces of Designer Series Paper to the card.

I added sentiments to 3 of the larger sides. I used Encircled In Friendship stamp set (#155408) and Elegantly Said stamp set (#155095) and they were all stamped with Highland Heather ink (#147103). The dies to cut these are from the Ornate Frames Dies (#150664) and the Potted Succulents Dies (#154330). 

The flower images were cut using the Meadow dies (#155852) and the Penned Flowers Dies (#155557). I coloured the cut-outs with Highland Heather ink, Mint Macaron ink (#147106), Blushing Bride ink (#147100) and Granny Apple Green ink (#147095). 

I glued each of the elements and sentiments using the Multipurpose Liquid Glue. I chose not to use dimensionals as I didn't want to have too much extra thickness to the card.

The sizes used here give a finished card 15cm x10.5cm, so is the same size as a normal size card and it folds flat for postage.

“Love what you do and share what you love.”


Wednesday 17 November 2021

Meadow Dies

Hello everyone,

I used the Linen 12”x12” Specialty Paper (#155681) for these flowers & leaves. This already has adhesive on the back, so makes it easy to adhere it to the card.


Before cutting the flowers & leaves I coloured the linen using Blending Brushes (#153611) with Daffodil Delight ink (#147094), Highland Heather ink (#147103), Granny Apple Green ink (#147095) and Balmy Blue ink (#147105). After cutting these with the Meadow Dies (#155852), I added some extra colour around the edges using Sponge Daubers (#133773). These were then adhered to the Basic White card front (#159228) which was dry embossed with the Timber 3D Embossing Folder (#156406).  The edges of the cardfront were daubered with Highland Heather ink. The base card is also Basic White.

The sentiment from Peaceful Moments stamp set (#151595) was stamped with Highland Heather ink. This was cut with an Ornate Frames Die (#150664) and attached to the card with Stampin’ Dimensionals (#104430). The Elegant Faceted Gems (#152464) were attached to the sentiment and flowers.

Don’t forget about the Seasonal Sale which ends tomorrow (18th November) with 10% off card stock, 15% off inks and 20% off dies. All products are in the Annual catalogue.

For all details click here

You can place your order by emailing me at lesley.j.jendra@gmail.com


“Love what you do and share what you love.”


Tuesday 16 November 2021

Peaceful Deer with Peaceful Place DSP

Hi friends,


I have never experienced a white Christmas (and probably never will) but I am sure it would be beautiful. This beautiful winter scene and the background DSP is from the Peaceful Place 12”x12” Specialty Designer Series Paper (#156394).


I cut the DSP and the Silver from the Silver Foil 12”x12” Specialty Pack (#156457) using the Layering Diorama Dies (#155565). This was attached to the cardfront with Stampin’ Dimensionals (#104430). The base card is Basic White (#159228).

I added a pop of colour to the card by stamping the sentiments and the deer with Cherry Cobbler ink (#147083). These are from the Peaceful Deer stamp set (#156891). The deer was punched with the Deer Builder Punch (#156390) and the sentiments were cut with a Potted Succulents Die (#154330). When I attached these to the card I used tape where they were attached to the Diorama area which is already lifted and Stampin’ Dimensionals outside of the diorama which is lower.

From 16th - 18th November Stampin’ Up! has a Seasonal sale with 10% off cardstock, 15% off ink pads and 20% off dies, all from the Annual Catalogue. Please check out all the info on the link below-

Just email if you would like to place an order (in Australia) or shop here - lesleyjendra.stampinup.net

“Love what you do and share what you love.”


Monday 15 November 2021

Peaceful Place Designer Series Paper

Hello my crafty friends,

Here’s another easy Christmas card and again using some beautiful Designer Series Paper. This one is from the Peaceful Place Specialty DSP (#156394). All the designs in this pack are in grey, white & silver.


I wrapped the Metallic Mesh Ribbon (#153550) around the DSP then I attached the DSP to the Garden Green card (#108605), showing just 2 sides of the green card. This was attached to the Basic White base card (#159228).

I cut the trees using a die from the Christmas Trees Dies (#156339) from Garden Green card & Soft Sea Foam card (#147012) which has Adhesive Sheet (#152334) adhered to the back. I then applied glue with the Fine-Tip Glue Pen (#138309) to the trees and then sprinkled Dazzling Diamond Glitter over them. Put aside to dry and then you have a lovely glitter on the trees. Unfortunately Dazzling Diamonds are retired but hopefully you have some in your stash. 

Adhere the trees to the DSP. I stamped the sentiment from the Whimsical Trees stamp set (#156330) using VersaMark 102283) and heat embossed with Silver Stampin’ Emboss Powder (#155555). Set this with the Heat Tool (#129056). I used a die from the Ornate Frames Dies (#150664) to cut the sentiment and attached this to the card with Stampin’ Dimensionals (#104430). The Rhinestone Basic Jewels (#144220) were added to the card for some extra shine.

“Love what you do and share what you love.”


Sunday 14 November 2021

Blessings Of Home

Hello friends,

I have just enjoyed 3 days of fun with the Stampin’ Up community (online) and having the chance of playing with new products which will be available in the January-June Mini catalogue. One of the bundles which will be available is the Blessings Of Home (#157939) and I love this gorgeous set. Here is the first of many cards using this product.


There are 2 floral images in the Blessings Of Home stamp set (#157930) and I stamped the smaller one onto Shimmery White card stock (#121717) which is used for the card front. I stamped the larger one on another piece of Shimmery White card and this was cut with a die from the Flowers Of Home Dies (#157938). Both images were stamped with Tuxedo Black Memento ink (#132708).

I used a variety of Stampin’ Blends to colour the images including Granny Apple Green (#154885), Daffodil Delight (#154883), Flirty Flamingo (#154884), Petal Pink (#154893), Pool Party (#154894), Fresh Freesia (#155518), Pale Papaya (#155519), Ivory (#154922) & Pumpkin Pie (#154897). 

After colouring the flowers on the card front, I dry embossed the card with the Timeworn Type 3D Embossing Folder (#156505). I daubered the edges with Daffodil Delight ink.

I attached some Adhesive Sheet (#152334) to Granny Apple Green card (#147014) before cutting the small leaves from the Flowers Of Home Dies. I attached the  leaves and Gold Trim from the Simply Elegant Trim (#155766) the the card, then attached the large die cut floral image with Stampin’ Dimensionals (#104430). As usual I used the Clear Wink Of Stella (#141897) on the flowers, but it never seems to show in the photo.

“Thinking Of You” from the Blossoms In Bloom stamp set (#158283) was stamped with Daffodil Delight ink (#147094), then cut with a die from the Ornate Frames (#150664). The Gold Trim was threaded through the tag and attached with Mini Dimensionals (#144108). The Genial Gems (#155500) finishes off this beautiful card.

“Love what you do and share what you love”


Saturday 13 November 2021

Festive Foliage

Hi everyone,

I love when you can use a stamp or other product for a variety of occasions. The Festive Foliage stamp set (#155634) is basically a Christmas stamp, I guess mainly because it has holly leaves but it also has a lovely range of leaves. So I have made 2 cards today, one for Christmas and the other a birthday card using this background stamp. On the birthday card I covered the holly leaves with flowers so there is nothing on there to indicate Christmas, so it’s now a stamp you can use all year round so don’t you love that!!


I stamped the first card with VersaMark (#102283) and heat embossed with Gold Stampin’ Emboss Powder (#155555) then set with the Heat Tool (#129056). I used Tuxedo Black Memento ink (#132708) for the birthday card. I coloured the leaves with a variety of green Stampin’ Blends - Granny Apple Green (#154885), Soft Succulent (#155521), Soft Sea Foam (#154902), Old Olive (#154892), Mossy Meadow (#154890) and Just Jade (#153107). I used the Poppy Parade Stampin’ Blends (#154958) to add some colour to the dots on the Birthday card.

For the Christmas card, I gold embossed the sentiment from the Christmas To Remember stamp set (#156300). The labels from the Seasonal Labels Dies (#156299) were used the cut the sentiment as well as the Gold Foil (#132622) and the Just Jade card (#153084) under the sentiment. The gold label was cut in half and attached to the sentiment showing more of the label on each side than if it was 1 piece. The labels were then attached to the card with Stampin’ Dimensionals (#104430). The beautiful Brushed Metallic Adhesive Backed Dots (#156506) adds some bling to the card.

For the Birthday card I stamped the flowers from Timeless Tropical stamp set (#151497) using Daffodil Delight ink (#147094), then cut these with the In The Tropics Dies (#151495). Happy Birthday from Artistically Inked stamp set (#154542) was stamped with VersaMark onto Daffodil Delight card (#121680) and heat embossed with White Stampin’ Emboss Powder (#155554). The die from the Seasonal Labels was used to cut the sentiment. 2 of the flowers and the sentiment were attached with Mini Stampin’ Dimensionals (#144108). These were arranged to cover the holly leaves. The Cherry Cobbler gems from the Holiday Rhinestone Basic Jewels (#150457) were used for the bling on this card.

I hope this has given you an idea on how to get more use from some of your stamps.


“Love what you do and share what you love.”

Stay safe & keep crafting!!


Friday 12 November 2021

Angels Of Peace

Hello,

It’s amazing were inspiration comes from sometimes. Yesterday I said it was very difficult to photograph the card as the silver DSP was picking up other colours, so that gave me idea to colour it using ink & the Blending Brushes (#153611). The inks colour the white areas and the silver resists the colour, but again on the photo it shows other colours. I hope you get the idea though.


I coloured the DSP from the Whimsy & Wonder Specialty Designer Series Paper (#156329) using Balmy Blue ink (#147105), Granny Apple Green ink (#147095), Polished Pink ink (#155712), Fresh Freesia ink (#155611) and Pale Papaya ink (#155670).

The Metallic Mesh Ribbon (#153550) was wrapped around the card front, then I attached this to the Basic White base card (#159228).

The Angel from the Angels Of Peace stamp set (#156365) was stamped with VersaMark (#102283) and heat embossed with Silver Stampin’ Emboss Powder (#155555) and set with the Heat Tool (#129056). I used an Ornate Layers Die (#152726) to cut the angel. This die cuts a longer rectangle so after cutting the angel, I repositioned the die to cut the bottom and make the rectangle cut out a bit smaller.

“Joy” is from the Merriest Moments stamp set (#156353) and also Silver Embossed. This was cut with an Ornate Frames Die (#150664). The angel and sentiment were attached to the card with Stampin’ Dimensionals (#104430). The gems are from the Silver & Clear Epoxy Essentials (#155567).

“Love what you do and share what you love.”

Stay safe & keep crafting!!


Thursday 11 November 2021

Whimsy & Wonder Specialty Designer Series Paper

Hi & welcome again,

A quick and easy Christmas card using the gorgeous Whimsy & Wonder 12”x12” Specialty Designer Series Paper (#156329). This was very hard to photograph as the silver stripes picked up other colours, so the blue you see at the bottom of the card is just reflections.


The 3 pieces of Designer Paper are all from the Whimsy & Wonder DSP and attached to the Basic White base card (#159228). The tree and sentiment were stamped with Mint Macaron ink (#147106). These are from the Perfectly Plaid stamp set (#158335). The tree was cut with the Pine Tree Punch (#149521) and the sentiment was cut with an Ornate Frames Die (#150664). The tree and sentiment were attached to the card with Stampin’ Dimensionals (#104430).

Clear Wink Of Stella (#141897) was used to add some glitter to the tree. Then I added the Rhinestone Basic Jewels (#144220) to the tree and sentiment.

 An easy card when you don’t have a lot of time.

“Love what you do and share what you love.”

Stay safe & keep crafting!!


Wednesday 10 November 2021

Ever Eden Specialty Designer Series Paper

Hi friends,

I have made a Christmas card using the beautiful new Ever Eden Specialty Designer Series Paper (#159996) which is available till 3rd January or while stocks last.


I attached the DSP to a piece of the gold paper from the Gold & Rose Gold 6”x6” Metallic Specialty Paper (#156844). I cut a piece of Basic White card (#159228) with a Hippo & Friends Die (#153585) and attached this to the DSP.

The flowers from the Merriest Moments stamp set (#156353) were stamped with VersaMark (#102283) and heat embossed with Gold Stampin’ Emboss Powder (#155555). This was set with the Heat Tool (#129056), then cut with the Merriest Moments dies which are part of the Merriest Frames Hybrid Embossing Folder (#156385). The flowers were assembled using Stampin’ Dimensionals (#104430)

The Gold Metallic Specialty Paper was backed with Adhesive Sheets (#152334) then gold leaves were cut with dies from the Eden Dies (#157831).

“Merry Christmas” from the Peaceful Deer stamp set (#156891) was stamped with Soft Succulent ink (#155778) and cut with a Stitched Rectangles die (#151820). This was attached to the label cut from Soft Succulent card (#155777) using another die from the Eden dies. Stampin’ Dimensionals were used to attach this to the card. The embellishments are from the Garden Gems (#159277) which are also available for a limited time.

Don’t delay ordering the Designer Series Paper and Gems as you wouldn’t want to miss out on these gorgeous products.

“Love what you do and share what you love.”

Stay safe & keep crafting!!