Showing posts with label #linkedtogetherdies. Show all posts

Sunday, 27 April 2025

Sketched Butterflies

 Hello friends,

I love butterflies, so I’m sad to see the Sketched Butterflies Bundle (#163492) retiring.


I stamped the butterfly from the Sketched Butterflies stamp set  (#163490) with Berry Bust ink (#147143). The butterflies were cut with the Sketched Butterflies dies (#163491). For the smaller butterflies I used Bubble Bath card (#161727). The die to cut these cut 3 butterflies all joined together, so I cut them for single butterflies.

I used a die from the Linked Together dies (#164808) to cut the lattice, then randomly cut pieces off so it wasn't a rectangle. This Country Woods Designer Series Paper (#163393) used for the lattice was backed with Adhesive Sheet (#152334).

The Basic White card front (#166781) was dry embossed with the Timber 3D Embossing Folder (#156406) and matted with the Berry Burst card (#144249).

The sentiment is from the Sketched Butterflies stamp set and also using Berry Burst ink. This was cut with an Autumn Leaves die (#162185).

The leaves are also cut with dies from the Linked Together dies, using Lost Lagoon card (#133686) and Pool Party card (#124391). Both of these cards were backed with Adhesive Sheet.

The lattice & leaves were attached to the card front by removing the backing of the adhesive sheet. The butterflies and sentiment were attached with Mini Stampin’ Dimensionals (#104430). I added Clear Wink Of Stella (#141897) to the stamped butterfly. Some inks will “bleed” when using the Clear Wink Of Stella which it has slightly on this butterfly but gives a lovely soft pink colour.

The embellishments are from the Strawberry Slush & Pretty In Pink Gems (#165615).

The other retiring products used are Autumn Leaves dies, Linked Together dies and the Timber embossing folder.

“Love what you do and share what you love.”

INSPIRE. CREATE. SHARE. 


https://www.stampinup.com.au


Thursday, 24 April 2025

Flowers Of Beauty

 Hello again friends,

Again I am using retiring products - Flowers Of Beauty Bundle (#163376) and the Linked Together dies (#164808)

Check all the retiring products in the Last Chance productshttps://www.stampinup.com.au with some great discounts on many of the products. Just a little tip, sometimes it may be better value to buy a stamp set & die separately rather than the bundle in the Last Chance Products.


The card front was dry embossed with the Birch Wood Embossing Folder (#164069) and matted with Flirty Flamingo card (#141421), then attached to the Basic White base card (#166781).

I stamped the flowers from the Flowers Of Beauty stamp set (#163374) with Flirty Flamingo ink (#147052) and the leaves were stamped with Granny Apple Green ink (#147095). The flowers, stamped leaves and the Lemon Lime Twist (#144250) leaves were cut with the Flowers Of Beauty dies (#163375).

A die from Linked Together was used to cut the Silver Foil (#163387). This was backed with Adhesive Sheet (#152334). After cutting with the die, just peel off the backing and attach it to the card.

The die cut leaves and flowers were attached with Mini Glue Dots (#103683) and the stamped leaves with Mini Stampin’ Dimensionals (#144108).

“Happy Birthday” from Simply Said stamp set (#163756) was stamped with Flirty Flamingo ink and cut with a Delicate Forest die (#162679). This die set is also retiring. The sentiment was attached with Stampin’ Dimensionals (#104430). The embellishments are from the Adhesive-Backed Pearl Trio (#163319). Clear Wink Of Stella (#141897) was used to add glimmer to the flowers.

“Love what you do and share what you love.”

INSPIRE.  CREATE.  SHARE.


https://www.stampinup.com.au


Sunday, 2 March 2025

You Are Remarkable stamp set

 Hello again friends,

I have used the flower from the You Are Remarkable stamp set (#165445) again on today’s card. This stamp set doesn't include dies but there are many dies which can be used to cut various shapes like I have done here.


I stamped the floral image with Tuxedo Black Memento ink (#132708) onto Basic White card (#159228). As this stamp set is a 2 Step stamping stamp set, I then stamped the leaves with Lost Lagoon ink (#161678). I cut this with the diamond shaped die from the Linked Together dies (#164808).

With another die from Linked Together, I cut the Silver Foil Sheet (#163387) which was backed with Adhesive Sheet (#152334). This was attached to the Country Woods Designer Series Paper (#163393) and the DSP was matted with Real Red card (#106578). The base card is Basic White.

I then stamped the flower again and fussy cut this. I coloured it with Real Red Stampin’ Blends (#154899) and Daffodil Delight Stampin’ Blends (#154883), then attached it on top of the flower using Mini Stampin’ Dimensionals (#144108) to add dimension. The diamond shape was attached with Stampin’ Dimensionals (#104430).

“Happy Birthday” from the Simply Said stamp set (#163756) was stamped with VersaMark (#102283) and I used the Silver Powder from the Metallics Wow! Embossing Powder (#165678) and set it with the Heat Tool (#129056). A die from the Heart Shaped dies from Sale-a-bration  was used to cut the sentiment. (Unfortunately Sale-a-bration is now over). The sentiment was also attached with Stampin’ Dimensionals.

To finish the card I used Clear Wink Of Stella (#141897) on the flower and added the dragonflies from the Adhesive-Backed Dragonflies & Birds (#162743).

“Love what you do and share what you love.”

INSPIRE. CREATE. SHARE. 


Sunday, 9 February 2025

Happy Hibiscus Bundle

 Hi friends,

A lovely bright card using the Happy Hibiscus Bundle (#164880).


The Happy Hibiscus stamp set (#164877) has a trio of flowers on one stamp. There are 3 different sized flowers. I stamped these on different coloured card but only used the middle size flower for this card. I stamped Crushed Curry ink (#147087) onto Daffodil Delight card (#121680), Blueberry Bushel ink (#147138) onto Azure Afternoon card (#161728) and Calypso Coral ink (#147101) onto Peach Pie card (#163800).

The Happy Hibiscus Hybrid Embossing Folder (#164879) includes the dies. These can be used together or separately as normal. I set the die into the embossing folder, lined up the stamped image, then ran it through the Stampin’ Cut & Embossing Machine (#149653). The leaves were cut from Granny Apple Green card (#147014) using dies from the same set.

“Sending Hugs” from the Layering Leaves stamp set (#161277) was stamped with VersaMark (#102283) and I used the Gold from the Wow! Metallics Embossing Powder (#165678). This was set with the Heat Tool (#129056). A die from the Linked Together dies (#164808) was used to cut the sentiment.

The Basic White card front (#159228) was embossed with the Happy Hibiscus embossing folder and matted with Azure Afternoon card. I wrapped the Glittered Organdy Ribbon (#156408) around the card front, then attached it to the Basic White base card.

The flowers & sentiment were attached with Stampin’ Dimensionals (#104430) and I used Mini Glue Dots (#103683) to attach the leaves. Clear Wink Of Stella (#141897) added glimmer to the flowers.


“Love what you do and share what you love.”

INSPIRE. CREATE. SHARE. 


Thursday, 23 January 2025

Memorable Blooms Bundle

 Hi everyone,

The flowers & leaves on this card are from the Memorable Blooms Bundle (#164826). This bundle consists of the Memorable Blooms stamp set (#164816) and Memorable Blooms dies (#164825).


I stamped the leaves & flowers with Tuxedo Black Memento ink (#132708) onto Basic White card (#159228). These were coloured with Daffodil Delight Stampin’ Blends (#154883) and Summer Splash Stampin’ Blends (#163826). These stamped images and the other leaves were cut with the co-ordinating dies. I used Summer Splash card (163798) backed with Adhesive Sheet (#152334) for the die cut leaves.

I cut the diamonds with a die from the Linked Together dies (#164808), using Gold Foil Sheet (#132622) and Basic Black card (#121688).

The Fruit Salad 6”x6” Designer Series Paper (#164943) from Sale-a-bration was matted with Basic Black card and attached to the Basic White base card.

The diamonds were taped together, offsetting 2 sides, and attached to the card front. The stamped flowers & leaves were attached with Mini Stampin’ Dimensionals (#144108).

The sentiment from the Loveliest Tree stamp set (#163714) was stamped with Crushed Curry ink (#147087) and cut with a die from the Changing Leaves dies (#164138). This die is longer than the sentiment so I cut it twice by repositioning the die to get the correct size. I used Stampin’ Dimensionals (#104430) to attach this to the card.

The Antique Pearls (#164679) were added to finish the card as well as using Clear Wink of Stella (#141897) to add glimmer t the flowers.

“Love what you do and share what you love.”

INSPIRE. CREATE. SHARE. 


Sunday, 19 January 2025

Happy Hibiscus Bundle

 Hi friends,

I have used a mix of products to make today’s card, including the Happy Hibiscus Bundle (#164880). This bundle includes the Happy Hibiscus stamp set (#164877) and the Happy Hibiscus Hybrid Embossing Folder (#164897). This hybrid folder also includes the set of dies where the larger die with the 3 flowers will fit into the folder and cut and embossed at the same time. This folder & dies can also be used separately as normal, making them very versatile.


I stamped the trio of flowers with Poppy Parade ink (#147050) onto Poppy Parade card (#121694). Then I placed the die into the folder, lined up the stamped image and put it through the Stamp & Embossed machine using the embossing plates. I have only used the larger flower for this card.

Using Gold Foil Sheet (#132622), backed with Adhesive Sheet (#152334), I cut the lattice from the Linked Together Dies (#164808). I also cut the arch from the Gold Foil sheet and the Country Woods Designer Series Paper (#163393) with the Everyday Arches Dies (#164629).

The gold arch was attached to the DSP with Mini Glue Dots (#103683). The lattice was attached to a piece of Basic White card (#159228), making sure you have it placed where the arch is. I taped the DSP with the arch onto the Basic White card then matted this with Poppy Parade card.

The leaves were cut with dies from the Happy Hibiscus dies using Season Of Elegance Specialty Designer Series Paper (#164144).

The flower was attached with Mini Stampin’ Dimensionals (#144108) and the leaves with Mini Glue Dots.

The sentiment is from Sentimental Park stamp set (#160561. This sentiment is actually “Let’s Celebrate” but I only wanted “celebrate” for this card. When I inked this, I covered “Let's” with a post it note, inked “celebrate”, with Poppy Parade ink, removed the post it note and stamped the sentiment. This is an easy way to stamp part of a stamp. I cut this with a Delicate Forest die (#162679). This die is too large so I cut the sentiment close to one end of the word, then turned the die around and cut close to the other end of the word. The sentiment was then attached with a Mini Stampin’ Dimensional and Mini Glue Dots.

Clear Wink Of Stella (#141897) was used on the flower and the Antique Pearls 164679) were added to finish the card.


“Love what you do and share what you love.”

Saturday, 18 January 2025

Serene Love Designer Series Paper

Hi again friends,

These fussy cut flowers are from the beautiful Serene Love Designer Series Paper (#166261).


The Mediterranean Blooms Designer Series Paper (#163284) for the card front was matted with Night Of Navy card (#106577) then attached to the Basic White base card (#159228).

The lattice was cut with a die from the Linked Together Dies (#164808), using Silver Foil Sheets (#163387) which was backed with Adhesive Sheet (#152334), making it easy to attach to the card, just by removing the backing.

I cut the Silver Foil leaves with a die from the Happy Hibiscus dies (#164879). These were attached to the card with Mini Glue Dots (#103683). One flower was taped and the other I used Stampin’ Dimensionals (#104430).

The sentiment from Loveliest Tree stamp set (#163714) was stamped with Night Of Navy ink (#147110) and cut with a Mixed Labels die (#164652). This was also attached with Stampin’ Dimensionals. I added glimmer to the flowers using the Clear Wink Of Stella (#141897).


“Love what you do and share what you love.”

INSPIRE. CREATE. SHARE. 


Friday, 10 January 2025

Linked Together

 Welcome everyone,

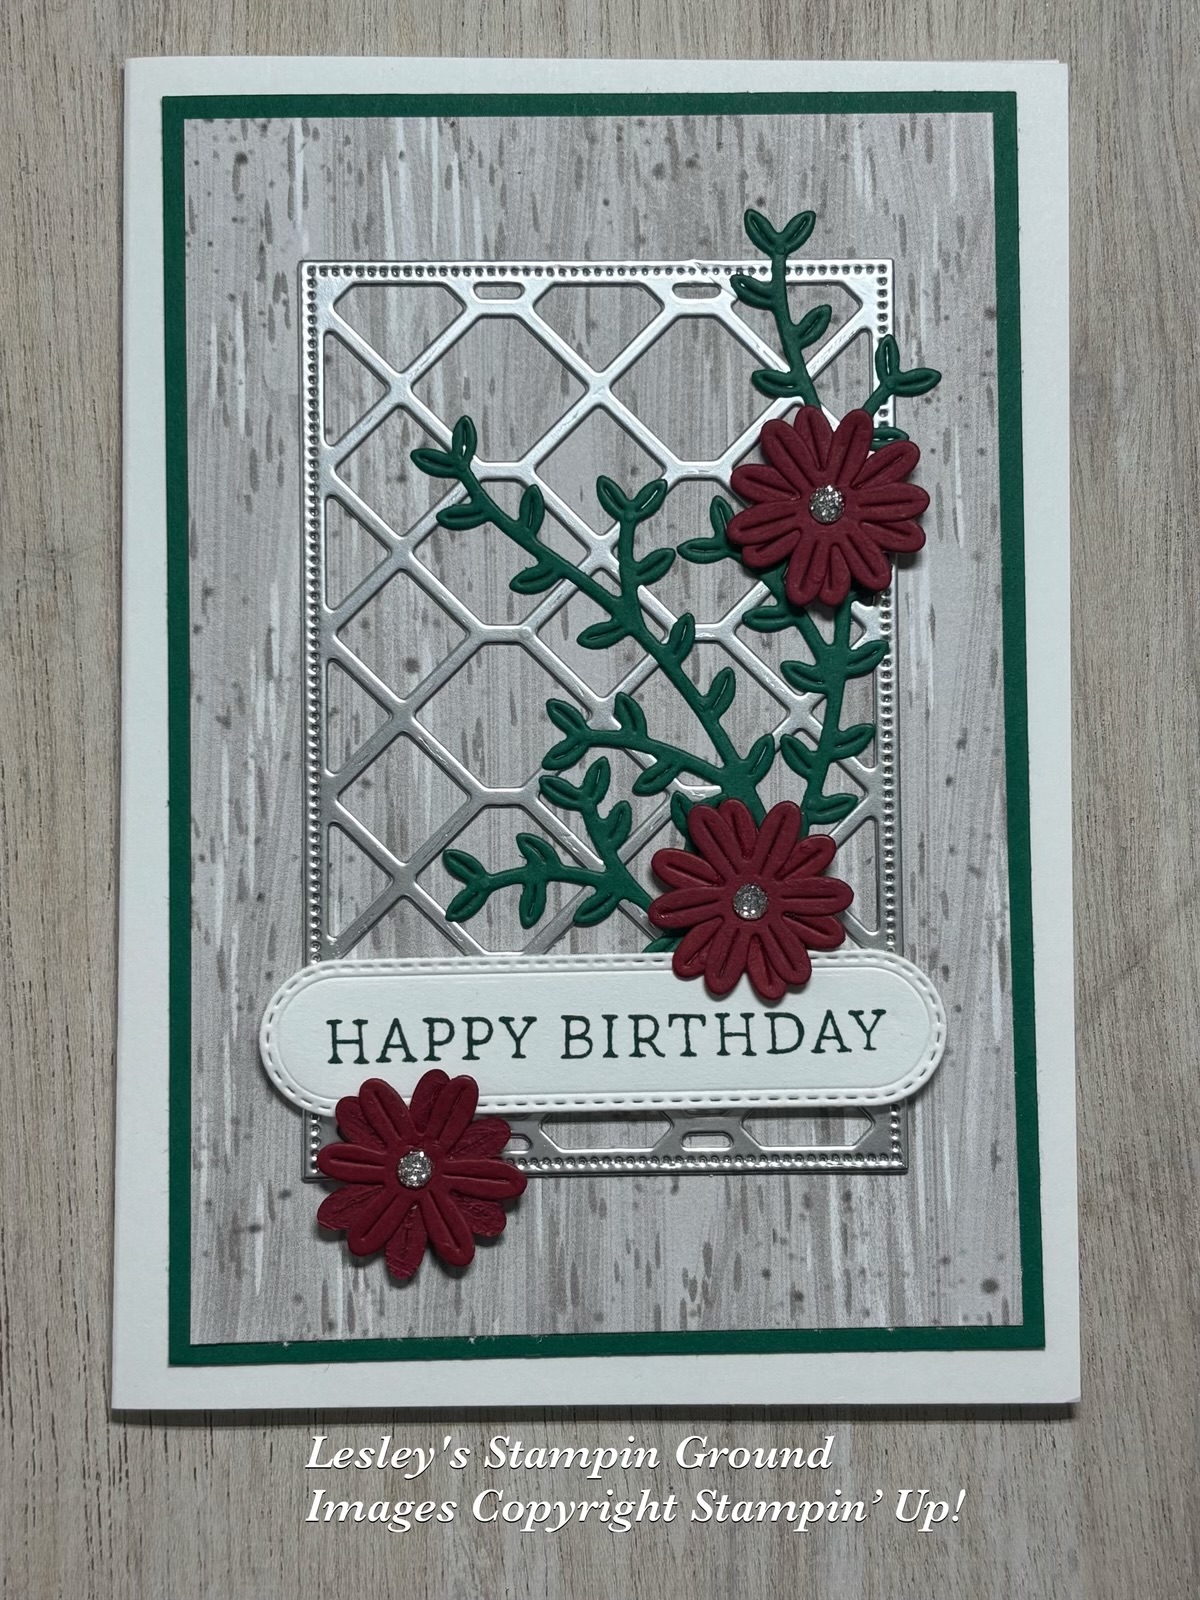
I have used the Linked Together Dies (#164808) on this card for the lattice, flowers & leaves.


The lattice has been cut from Silver Foil Sheets (#163387) backed with Adhesive Sheet (#152334). I used Shaded Spruce card (#147006), for the leaves & also backed with Adhesive Sheet, and Cherry Cobbler Card (#121681) for the flowers.

The DSP from the Toadstool Gardens 6”x6” Designer Series Paper (#164942) was matted with Shaded Spruce card, then attached to the Basic White base card (#159228).

“Happy Birthday” is from the Simply Said stamp set (#163756) and stamped with Shaded Spruce ink (#147088). This was cut with a Changing Leaves die (#164138).

The lattice & leaves were attached to the card. I used Mini Glue Dots (#103683) to attach two flowers together, then attached these to the card with Stampin’ Dimensionals (#104430). The sentiment was also attached with Stampin’ Dimensionals. The Adhesive-Backed Sparkle Gems (#161288) were added to the flower centres.

“Love what you do and share what you love.”

INSPIRE. CREATE. SHARE. 


Friday, 27 December 2024

Linked Together Dies

 Hello again friends,

I hope you all had a lovely Christmas. I enjoyed this very special time with family.

I’m back after a very busy week leading up to Christmas and all the Christmas festivities. I have almost completed my craft room, just waiting on some more shelving to have everything organised. It is looking great. I was really eager to get back to crafting so here is my card today using the Linked Together dies (#164808). These will be available in the new Mini Catalogue from the 7th January 2025.


The lattice, leaves, flowers & oval are all cut from these dies. The small diamonds are pieces that came out of the lattice. I used Pretty Peacock card (#150886) backed with Adhesive Sheet (#152334) to cut the lattice. The lattice & diamonds was attached to the Very Vanilla card (#106550) which was dry embossed with the Birch Wood 3D Embossing Folder (#164069). I matted this with Pretty Peacock card and attached it to the Very Vanilla base card.

“Happy Birthday” from Unbounded Love stamp set (#163378) was stamped with Pretty Peacock ink (#150083) and cut with the oval die. The leaves were cut from Lost Lagoon card (#133686) also backed with Adhesive Sheet. I used Peach Pie card (#163800) for the flowers. I attached 2 flowers together with Multipurpose Liquid Glue (#110755). 

The sentiment was attached to the card with Stampin’ Dimensionals (#104430). The flowers were attached  with Mini Stampin’ Dimensionals (#144108) and Mini Glue Dots (#103683). The Low Profile Dots (#164658) were added to the centre of the flowers.

“Love what you do and share what you love.”

INSPIRE. CREATE. SHARE.