Showing posts with label #timber3dembossingfolder. Show all posts

Sunday, 27 April 2025

Sketched Butterflies

 Hello friends,

I love butterflies, so I’m sad to see the Sketched Butterflies Bundle (#163492) retiring.


I stamped the butterfly from the Sketched Butterflies stamp set  (#163490) with Berry Bust ink (#147143). The butterflies were cut with the Sketched Butterflies dies (#163491). For the smaller butterflies I used Bubble Bath card (#161727). The die to cut these cut 3 butterflies all joined together, so I cut them for single butterflies.

I used a die from the Linked Together dies (#164808) to cut the lattice, then randomly cut pieces off so it wasn't a rectangle. This Country Woods Designer Series Paper (#163393) used for the lattice was backed with Adhesive Sheet (#152334).

The Basic White card front (#166781) was dry embossed with the Timber 3D Embossing Folder (#156406) and matted with the Berry Burst card (#144249).

The sentiment is from the Sketched Butterflies stamp set and also using Berry Burst ink. This was cut with an Autumn Leaves die (#162185).

The leaves are also cut with dies from the Linked Together dies, using Lost Lagoon card (#133686) and Pool Party card (#124391). Both of these cards were backed with Adhesive Sheet.

The lattice & leaves were attached to the card front by removing the backing of the adhesive sheet. The butterflies and sentiment were attached with Mini Stampin’ Dimensionals (#104430). I added Clear Wink Of Stella (#141897) to the stamped butterfly. Some inks will “bleed” when using the Clear Wink Of Stella which it has slightly on this butterfly but gives a lovely soft pink colour.

The embellishments are from the Strawberry Slush & Pretty In Pink Gems (#165615).

The other retiring products used are Autumn Leaves dies, Linked Together dies and the Timber embossing folder.

“Love what you do and share what you love.”

INSPIRE. CREATE. SHARE. 


https://www.stampinup.com.au


Thursday, 20 February 2025

Natural Botanicals stamp set

 Hello everyone,

The Natural Botanicals stamp set (#164831) is a reversible set which means you can stamp using both sides of the stamp. This set is available in the current mini catalogue and till the end of February is a free product with Sale-a-bration (with a $100 order in Australia).


I stamped the 2 background images with the reverse side of one of the stamps, then stamped the leaves & flowers as normal.

The inks used are Soft Sea Foam (#147102), Crumb Cake (#147116), Mossy Meadow (#147111), Wild Wheat (#161651), Lost Lagoon (#161678) and Moody Mauve (#161649). After stamping, I dry embossed the card front with the Timber 3D Embossing Folder (#156406), then matted it with Mossy Meadow card (#133683). The flower was fussy cut and attached to the card with Stampin’ Dimensionals (#104430).

The DSP is from the Woven Textures Designer Series Paper (#165560). This pack features a variety of woven materials & designs in different natural hues. These will be great for both cards & scrapbooking.

“Best Wishes” from Layering Leaves stamp set (#161277) was stamped with Mossy Meadow ink and cut with an Around It All die (#164725). This was attached with Stampin’ Dimensionals.


“Love what you do and share what you love.”

INSPIRE. CREATE. SHARE. 


Thursday, 18 July 2024

Stylish Shapes dies

 Hi crafty friends,

I was needing a masculine card so here is what I made, using a variety of dies.


The Basic White card front (#159228) was dry embossed with the Timber 3D Embossing Folder (#156406). This was matted with Garden Green card (#108605) and attached to the Basic White base card.

The 2 pieces of DSP are from the Country Woods 12”x12” Designer Series Paper (#163393). The vertical piece on the left side of the card was punched each end with the retired Banners Pick A Punch. The other piece was cut with a die from the Stylish Shapes dies (#158183). These were taped to the card front.

I cut the leaves from various die sets - Layers Of Beauty (#163518), Delicate Forest (#162679 and Encircled In Nature (#162628). The card used for these are Old Olive (#106576), Garden Green & Pecan Pie (#161726).

I cut the Basic Black (#121688) and Basic Gray (#121689) squares with the Stylish Shapes dies. The black square was attached to the card with Stampin’ Dimensionals (#104430). 

“Happy Birthday” from the Translucent Florals stamp set (#162243) was stamped with Basic Gray ink (#149165) and also cut with the Stylish Shapes dies.

The leaves were attached with Mini Glue Dots (#103683), Adhesive Sheets (#152334) and Mini Stampin’ Dimensionals (#144108).


“Love what you do and share what you love.”

INSPIRE. CREATE. SHARE. 


Saturday, 17 February 2024

Trusty Tools

 Hello & welcome again,

I decided to use the same design for this card as I did yesterday, but using different products to show how you can “case” a card but change it to suit what products you have, or change from a female card to a male card.


The Basic White card front (#159228) was dry embossed with the Timber 3D Embossing folder (#156406) and matted with Poppy Parade card (#121694), then attached to the Basic White base card.

The tools from the Trusty Tools stamp set (#163274) were stamped with Poppy Parade ink (#147050), Crushed Curry ink (#147087) and Gray Granite ink (#147118). These were cut with the co-ordinating Trusty Tools dies (#162722).

The Trusty Toolbox Designer Series Paper (#162978) is a Sale-a-bration product, and attached to the card.
I dry embossed the Gray Granite card (#147008) with the Exposed Brick 3D Embossing Folder (#161600) and cut the bottom with the Banners Pick A Punch (#153608).

“Happy Birthday” from the So Sincere stamp set 162283) was stamped with Poppy Parade ink and cut with a Sending die (#159271). The pencil was attached with Mini Glue Dots (#103683). The sentiment and other tools were attached with Mini Stampin’ Dimensionals (#144108).

The trio of embellishments are the Classic Matte Dots (#158146).

“Love what you do and share what you love.

INSPIRE. CREATE. SHARE. 


Monday, 19 September 2022

Fresh Cut Flowers stamp set

Hello again,

For today’s card I have used the same stamp set as yesterday - Fresh Cut Flowers (#159018) but this time without the dies for a simple stamped card. Remember the dies to co-ordinate with this stamp set are only available till the end of September.


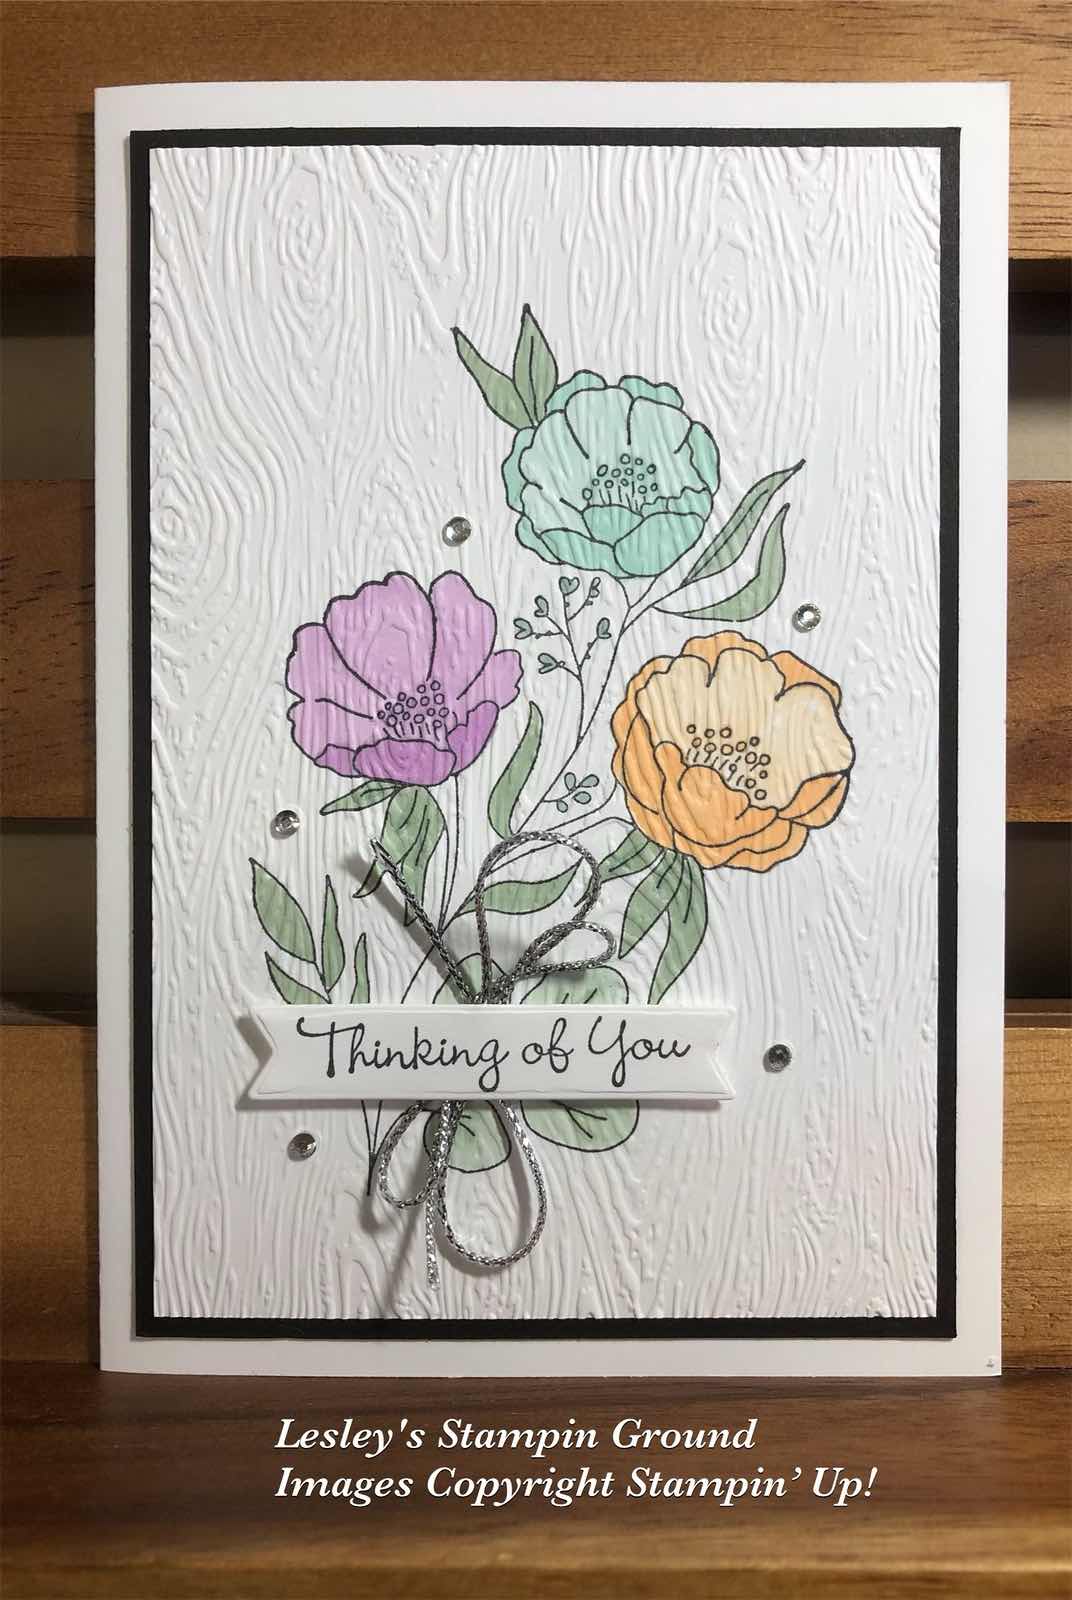
I stamped the floral image with Tuxedo Black Memento ink (#132708) onto Basic White card (#159228). This was coloured with Fresh Freesia Stampin’ Blends (#155518), Pool Party Stampin’ Blends (#154894), Pale Papaya Stampin’ Blends (#155519) and Mint Macaron (#154889). I then dry embossed the card front with the Timber 3D Embossing Folder (#156406). This was matted with Basic Black card (#121688) and attached to the Basic White base card.

“Thinking Of You” from the Go To Greetings stamp set (#158763) was stamped with Tuxedo Black Memento ink, then cut with a Give It A Whirl Die (#154336). The Silver Simply Elegant Trim (#155766) was attached to the card with the sentiment attached on top with Mini Stampin’ Dimensionals (#144108). The Rhinestones Basic Jewels (#144220) were added to the card.

Check out the “Perfect Partners” dies available only during September-

Saturday, 18 June 2022

Vintage Tools

Hi again,

The Vintage Tools stamp set (#159098) is perfect for the handyman in your life.


The tools and the sentiment, all from the Vintage tools stamp set, were stamped with Soft Suede ink (#147115). The tools were fussy cut and I used a Stitched Rectangles Die (#151820) for the sentiment. There are no dies with this stamp set but these images are very easy to cut by hand.

The base card is Very Vanilla (#106550). I attached 2 pieces of the He’s The Man Specialty Designer Series Paper (#159068) to the card. I cut a piece of Very Vanilla card with the largest square from the Stylish Shapes Dies (#159183), then dry embossed this with the Timber 3D Embossing Folder (#156406). I coloured the small white brads from the Square & Round Brads (#155570) with the Dark Soft Suede Stampin’ Blends (#154906). I used the paper piercer from the Take Your Pick Tool (#144107) to make a hole in each corner of the diamond, then attached the coloured brads. This was then attached to the card with Stampin’ Dimensionals (#104430). 

The tools were attached with tape & Stampin’ Dimensionals, and the sentiment with Dimensionals. 


“Love what you do and share what you love.”


Tuesday, 10 May 2022

Abigail Rose Designer Series Paper

Hi and welcome friends,

When I first saw the new Annual catalogue I just fell in love with the Abigail Rose Suite Collection (#159052) so couldn’t wait to get it. Here is my first (of many) cards which I will make with this gorgeous set.


One of the designs in the Abigail Rose 12”x12” Designer Series Paper (#159037) co-ordinates with one of the dies and that is what has been used on this card. I cut the Very Vanilla card (#106550) with the Cottage Flowers Die (#159047), then dry embossed this with the Timber 3D Embossing Folder (#156406).

I coloured the flowers & leaves with Stampin’ Blends - Soft Succulent (#155521), Soft Sea Foam (#154902), Pale Papaya (#155519), Daffodil Delight (#154883), Flirty Flamingo (#154884) and Highland Heather (#154887). I attached Mini Stampin’ Dimensionals (#144108) and Stampin’ Dimensionals (#104430) to the Very vanilla card and attached this on top of the DSP which I coloured, lining up the image and the cut outs. This was then matted with Basic Black card (#121688) and attached to the very Vanilla base card.

The sentiment from the Cottage Rose stamp set (#159040) was stamped with Highland Heather ink (#147103). The sentiment & Basic Black card behind the sentiment were cut with dies from the Stylish Shapes Dies (#159183). The 2021-2023 In Color Opal Rounds (#159185) were added to the card.

“Love what you do and share what you love.”


Thursday, 28 October 2021

Hand-Drawn Blooms

Welcome my friends,

I find colouring quite relaxing & it was fun colouring this floral image from the Hand-Drawn Blooms (#152565).


The flowers and stems are separate images. I stamped both images using Tuxedo Black Memento ink (#132708) onto Basic Black card (#159228). I used a variety of Stampin’ Blends - Daffodil Delight (#154883), Highland Heather (#154887), Pool Party (#154894), Real Red (#154899), Granny Apple Green (#154885), Cherry Cobbler (#154880), Pumpkin Pie (#154897) and Polished Pink (#155520).

I then dry embossed the card front using the Timber 3D Embossing Folder (#156406) and punched the corners with the Detailed Trio Punch (#146320). This card was then matted with Daffodil Delight card (#121680) and attached to the Basic White base card.

Congratulations is also from the Hand-Drawn Blooms stamp set and stamped with Tuxedo Black Memento ink. A die from the Ornate Frames (#150664) was used to cut the sentiment. I attached this to the card with Stampin’ Dimensionals (#104430). The Gold Shimmer Ribbon (#152156) was used to make the bow and then attached with Mini Glue Dots (#103683). The embellishments are from the Silver & Clear Epoxy Essentials (#155567).

“Love what you do and share what you love.”

Stay safe & keep crafting!!


Saturday, 2 October 2021

Merriest Moments stamp set

Hello stamping friends,

I wanted to make this card to show the versatility of some stamp sets. The leaves have been stamped from the Merriest Moments stamp set (#156353) which is a Christmas set but I have made a non Christmas card. Of course if you used the poinsettias in the set you could make it a Christmas card.


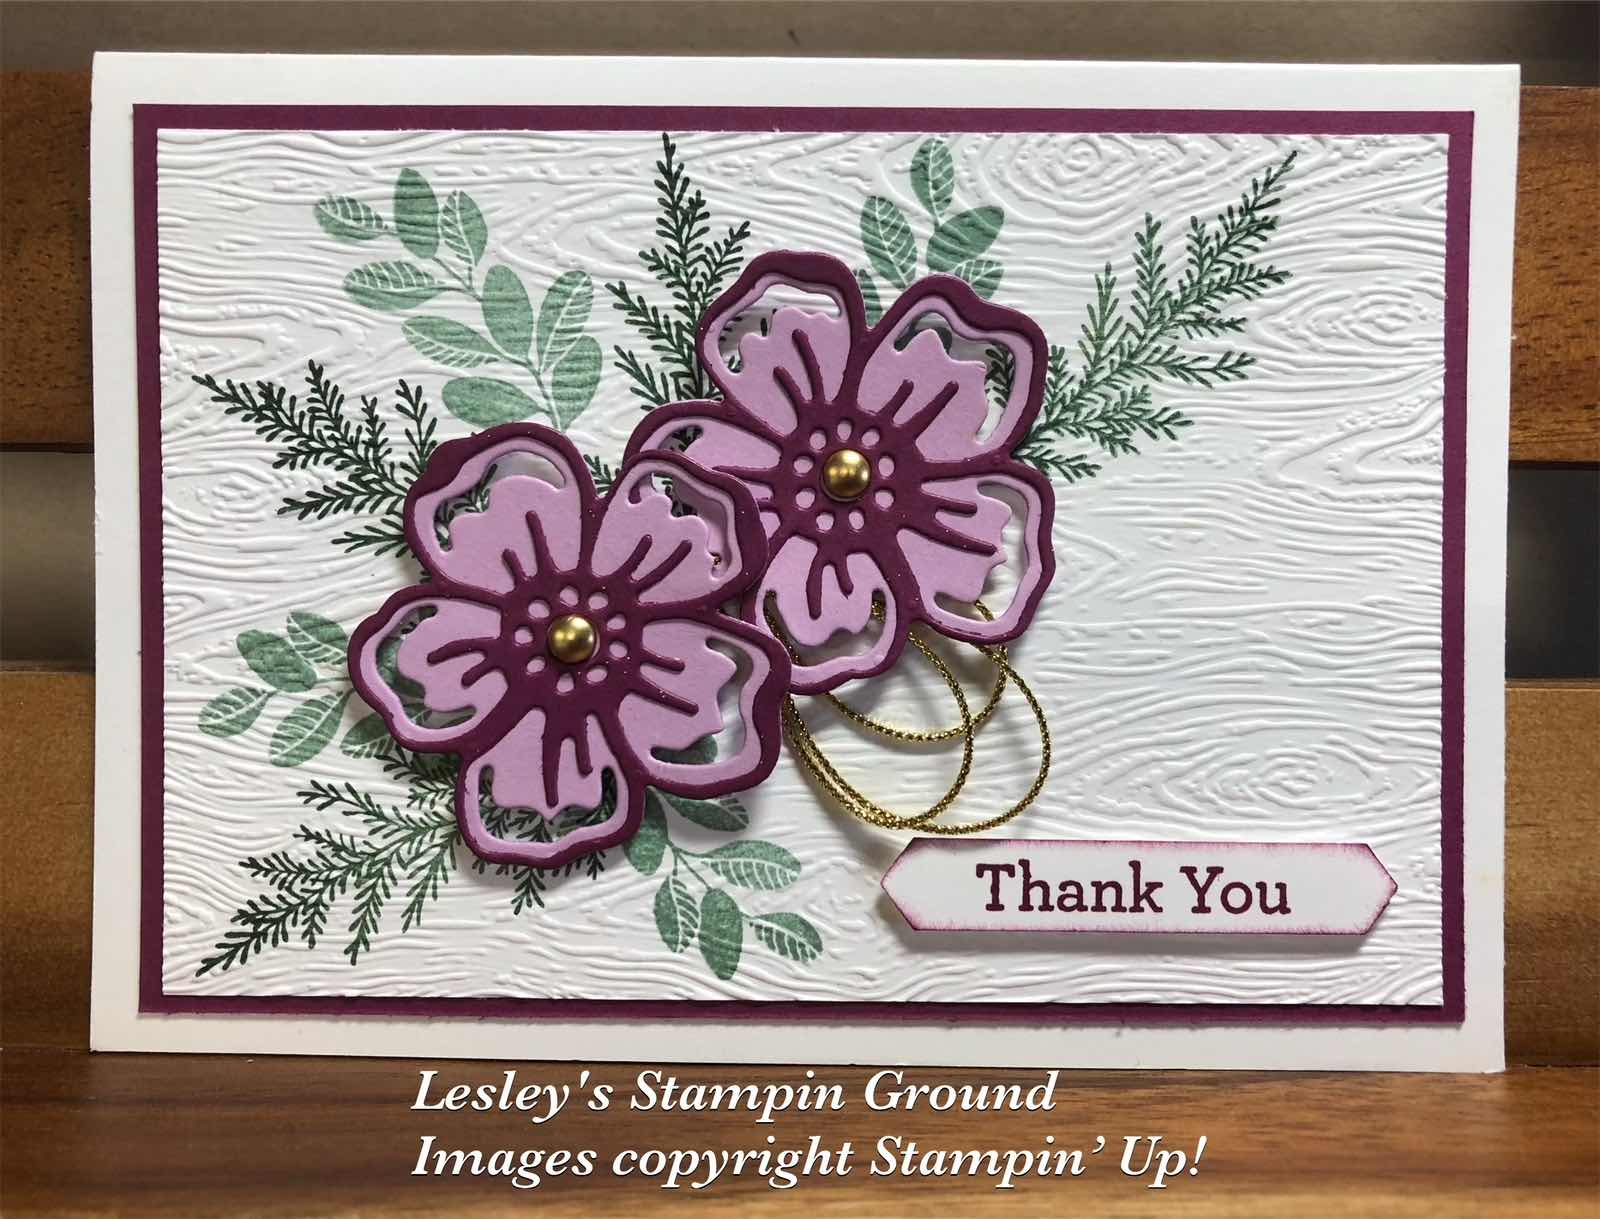
I stamped the finer leaves with Evening Evergreen ink (#155576) and the other leaves with Soft Succulent ink (#155778). After stamping, I dry embossed the Basic White card (#159228) with the Timber 3D Embossing Folder (#156406). This card was matted with the Rich Razzleberry card (#119981), then attached to the Basic White base card.

The flowers were cut with the Summer Shadows Dies (#156618). The base of the flower is Fresh Freesia card (#155614) and the detailed outline is Rich Razzleberry card. I had adhered Adhesive Sheet (#152334) to the back of the Rich Razzleberry card before cutting with the dies, making it easy to attach to the base flower. The Brushed Metallic Adhesive-Backed Dots (#156506) were attached to the centre of the flowers.

The Gold Trim from the Simply Elegant Trim (#155766) was attached to the card and the flowers were attached with Stampin’ Dimensionals (#104430).

“Thank You” is from the Beauty Of Friendship stamp set (#154984) and stamped with Rich Razzleberry ink (#147091). This was punched with a retired punch and attached with Mini Stampin’ Dimensionals (#144108).


“Love what you do and share what you love.”

Stay safe & keep crafting!!


Thursday, 30 September 2021

Beautiful Trees Dies

Hi my lovely friends,

I have used the Beautiful Trees dies (#155840) for the tree on todays card. I know that the branches probably should be behind the cut-out leaves but I liked to see more of the branches as the leaves covered most of the branches. On the 2nd photo, I added some extra pieces of the detailed cut-out leaves and put on top of the branches.


I cut the solid part of the leaves from Garden Green card (#108605) and the detailed cut-out of the leaves from the Beauty Of The Earth Designer Series Paper (#155841). For the 2nd card I cut another piece of the detailed leaves and cut small pieces from this and randomly added on top of the branches so you can still see some of the branches. The trunk and branches were cut from Soft Suede card (#119982). These were assembled with the Fine Tip- Glue Pen (#138309).

I cut the Very Vanilla rectangle with a die from Natures Thoughts (#153586), then dry embossed with the Timber 3D Embossing Folder (#156406). This was attached to a piece of the Beauty Of The Earth DSP which was attached to the Very Vanilla base card.

“Thank You” from the Beauty Of Friendship stamp set (#154983) was stamped with Merry Merlot ink (#147112) and cut with a die from the Beautiful Trees Dies and attached to the card with Mini Stampin’ Dimensionals (#144108). The birds were also cut from the same die set from Merry Merlot card (#147005) and also attached with Mini Dimensionals. I added the Clear Wink Of Stella (#141897) to the birds. The embellishment is from the Holiday Rhinestone Basic Jewels (#150457). 

Today (30th September) is the last day to get any of the free products from Sale-a-bration, so contact me if you want anything or go to lesleyjendra.stampinup.net

“Love what you do and share what you love.”

Stay safe & keep crafting!!


Tuesday, 17 August 2021

Happy Holly-Days

Hi,

These beautiful birds are from the Happy Holly-Days stamp set (#156342).


I stamped the birds with Real Red ink (#147084) and Pacific Point ink (#147098), then they were fussy cut. The Basic White card front (#159228) was embossed with the Timber 3D Embossing Folder (#156406). Before embossing, I inked the embossing folder with Crumb Cake ink (#147116), so when the card is embossed it adds colour to the debossed parts. The edges were daubered with Crumb Cake ink before attaching it to the Basic White base card. 

The Cork 12”x12” Specialty Designer Series Paper (#156393) was cut with a die from the Beautiful Leaves Dies (#156468). These were attached to the card with Mini Glue Dots (#103683). The fine branches were cut with a die from the Gorgeous Leaves Dies (#158609) using Brushed Metallic 12”x12” cardstock (#153524) with Adhesive Sheet (#152334) on the back. This was attached on top of the die cut cork.

The sentiment from Artistically Inked stamp set (#154542) was stamped with Real Red ink and cut with a Bloom Die (#155989). The sentiment and birds were attached to the card with Stampin’ Dimensionals (#104430).

I love how you can mix and match different sets as I have done on this card.


“Love what you do and share what you love.”


Stay safe and keep crafting!!

Sunday, 15 August 2021

Beauty Of Tomorrow

Hello friends,

Here’s another card using the Beauty Of Tomorrow Bundle (#156819) and very different to yesterday’s card using this bundle. I love this set.


The Basic White card front (#159228) was dry embossed with the Timber 3D Embossing Folder (#156406) and I daubered the edges with Evening Evergreen ink (#155576). This was attached to the Basic White base card. The labels are cut with dies from the Seasonal Labels Dies (#156299). I used Evening Evergreen card (#155575) and Blackberry Bliss card (#133682). I stamped “Happy Birthday” from the Blossoms In Bloom stamp set (#158283) with Evening Evergreen ink.

The flowers and leaves were stamped with Evening Evergreen & Blackberry Bliss (#147092) inks and cut with the Beautiful Leaves Dies (#156468). I used Stampin’ Dimensionals (#104430) to attach the Blackberry Bliss images, the middle Green image and the sentiment to the card.

“Love what you do and share what you love.”

Stay safe & keep crafting!


Saturday, 14 August 2021

Beauty Of Tomorrow Bundle

Welcome everyone,

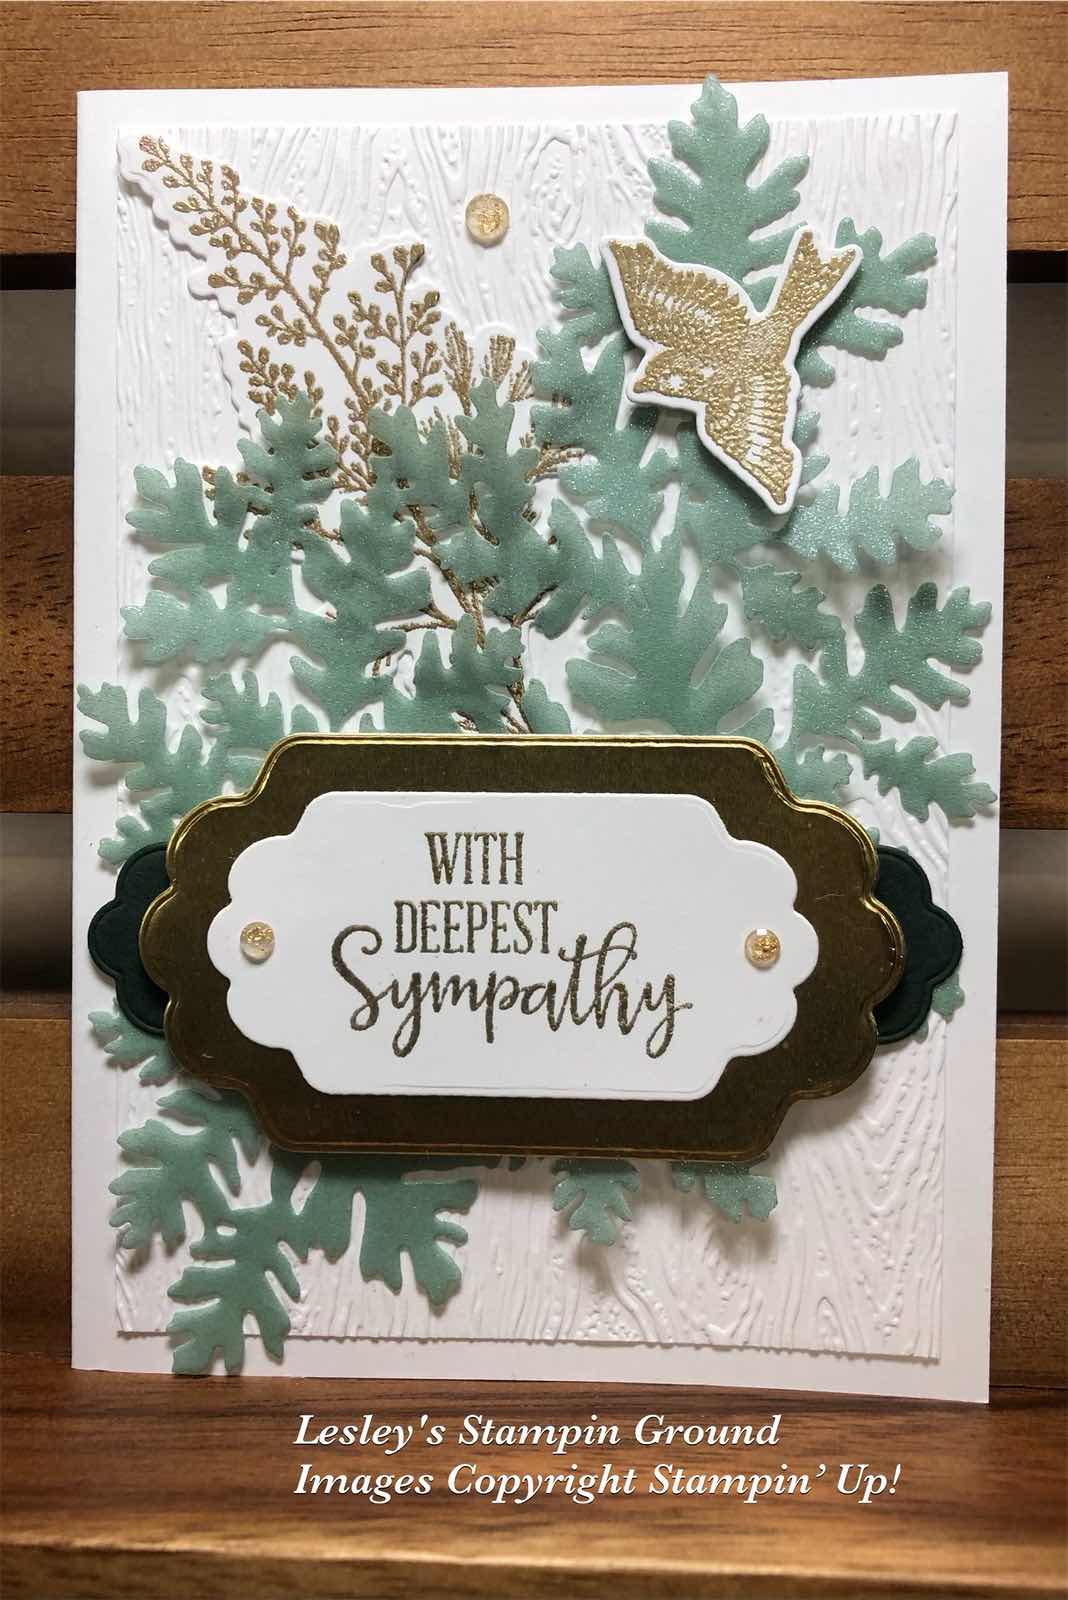
I have made a Sympathy card with the Beauty Of Tomorrow Bundle (#156819).


The Basic White card front (#159228) was embossed with the Timber 3D Embossing Folder (#156406), then attached to the Basic White base card. I stamped the leafy image from the Beauty Of Tomorrow stamp set (#156459) with VersaMark (#102283) and embossed with Gold Stampin’ Emboss Powder (#155555) and set with the Heat Tool (#129056). This was cut with a Beautiful Leaves Die (#156468). Another of these dies was used to cut the Soft Succulent from the 2021-2023 In Color Shimmer Vellum (#155616). The stamped leaves and die cut leaves were attached to the card with Mini Glue Dots (#103683).

The sentiment from the Peaceful Moments stamp set (#151595) was also gold embossed. The sentiment, the Gold Foil (#132622) and the Evening Evergreen card (#155575) were cut with dies from the Seasonal Labels Dies (#156299).

The bird from the Beauty Of Tomorrow stamp set was also Gold Embossed and attached to the card with Mini Stampin’ Dimensionals (#144108). The Gold embellishments are from the Wonder Gems (#153536)

Love what you do and share what you love.”

Stay safe & keep crafting!!