Showing posts with label #slimcarddies. Show all posts

Thursday, 7 April 2022

Slim Card Dies

Welcome everyone,

I love making slimline cards and I have used the Slim Card dies (#157965) for the scalloped edge on this card.
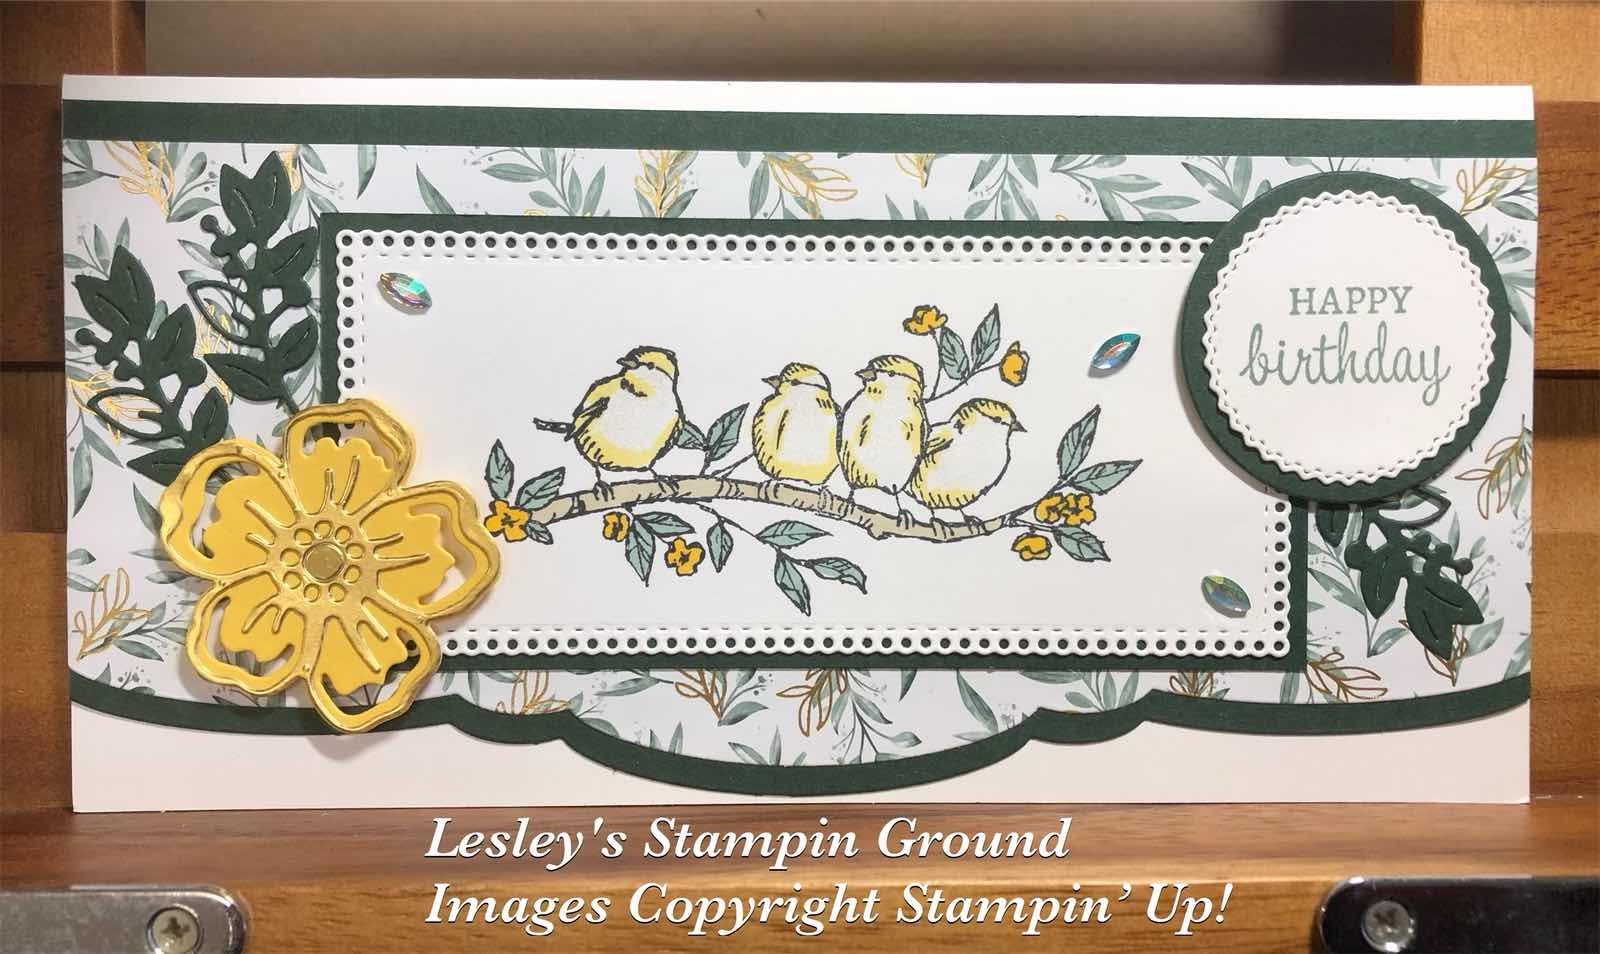


I cut the Evening Evergreen card (#155575) and the Ever Eden Specialty Designer Series Paper (retired) with the scalloped die. I matted the top & bottom of the DSP with the Evening Evergreen card and attached it to the Basic White base card (#159228).

The birds from Free As A Bird stamp set (#149468) were stamped with Tuxedo Black Memento ink (#132708). The Stampin’ Blends to colour this image are Daffodil Delight (#154883), Soft Succulent (#155521) and Crumb Cake (#154882). I added Clear Wink Of Stella (#141897) to give some sparkle to the birds. This was then cut with an Ornate Layers Die (#152726) and attached to a slightly larger piece of Evening Evergreen card.

The sentiment is from the Expressions Of Friendship stamp set (#158460) and stamped with Soft Succulent ink (#155778). The die to cut this is from the Tasteful Labels dies (#152886) and the Evening Evergreen card under the sentiment was cut with a Layering Circles Die (#151770). The flower was cut with the Summer Shadows Dies (#156618) using Daffodil Delight card (#121680) and Gold Foil Sheet (#132622). The gold foil was backed with Adhesive Sheet (#152334) so it was easy to attach to the base flower. The sentiment and flower were attached to the card with Stampin’ Dimensionals (#104430).

I cut the 3 leaves from Evening Evergreen card, backed with Adhesive Sheet, with a die from the Eden Dies (#157831). The (retired) Garden Gems were added to the card for some bling.

TIP: The Summer Shadows Dies were available during a previous Sale-a-bration so you may already have these,  but if not there is great news, they will be available again in the next Annual catalogue. They also co-ordinate with the Shaded Summer stamp set (#155783).


“Love what you do and share what you love.”


Monday, 21 March 2022

Slim Card Dies

Hello ladies & guys,

Here’s a fairly easy card using the Slim Card Dies (#157965).


I cut the Flowering Fields 12”x12” Designer Series Paper (#157670) with one of the Slim Card dies. I then placed the DSP that is ‘all connected” onto a piece of Gorgeous Grape card, measuring 7.6cm x 20.2cm (3”x8”) as shown below.


I used a post it note to keep this in place, then I glued each of the separate pieces back into it’s original position using the Multipurpose Liquid Glue (#110755). I then removed the “template” piece leaving the glued pieces on the Gorgeous Grape card.

I attached the completed piece to the Very Vanilla Base card (#106550).The sentiment is from the Positive Thoughts stamp set (#151490) and stamped with  Gorgeous Grape ink (#147099). A die from the Ornate Layers Dies (#152726) was used to cut the sentiment, then matted with Gorgeous Grape card. Stampin’ Dimensionals (#104430) were used to attach this to the card. I chose the Brushed Brass Butterflies (#158136) for the embellishments.

 TIP: The piece of Designer Paper which was used as a template and not used on this card can be used for another card.

“Love what you do and share what you love.”


Thursday, 27 January 2022

Daffodil Daydream Bundle

Hi friends,

The Slim Card Dies (#157965) has 4 dies which can be used for a slim line card and I have used one for the background of this card.


Before cutting the Basic White card (#159228) with the die, I adhered the Adhesive Sheet (#152334) to the back. This makes it so much easier to attach it to the base card. This was then attached to the Basic White base card which was cut at 22cm x 18cm and scored in half at 9cm. This fits perfectly into the Slimline Envelopes (#157981).

The daffodils from the Daffodil Daydream stamp set (#157786) were stamped with Tuxedo Black Memento ink (#132708). These were cut with the Daffodil Dies (#157794). The Stampin’ Blends to colour the images are Daffodil Delight (#154883) and Granny Apple Green (#154885).

“Happy Birthday” is from the Biggest Wish stamp set (#155952). “Birthday” was stamped with Daffodil Delight ink (#147094) and “Happy” with Granny Apple Green ink (#147095). I used a Hippo & Friends Die (#153585) to cut the sentiment. Stampin’ Dimensionals (#104430) were used to attach the sentiment and the daffodils with the 3 flowers to the card. I used the Clear Wink Of Stella Brush (#141897) for some glitter on the flowers and the embellishment are from the Playing With Patterns Resin Dots (#152467).


“Love what you do and share what you love.”


Monday, 17 January 2022

Friendly Hello Slimline card

Hi,

Here is another slim line card, this time using the Slim Card Dies (#157965) to cut the fancy curve at the bottom of the card.


I cut the Friendly Hello Designer Series Paper (#159990) and the Shaded Spruce card (#147006) with one of the Slim Card dies. I attached the DSP which is part of the Friendly Hello stamp set & Designer Series Paper from Sale-a-bration to the Shaded Spruce card.

I stamped the flowers with Tuxedo Black Memento ink (#132708), the small bunches of leaves with Granny Apple Green ink (#147095) and the single leaves with Shaded Spruce ink (#147088).  These leaves were coloured with Soft Sea Foam Stampin’ Blends (#154902). I added colour to the flowers with Fresh Freesia Stampin’ Blends (#155518) .  All these images are from the Friendly Hello stamp set and I fussy cut all these stamped images.

“Happy Birthday” is from Biggest Wish stamp set (#155052) and stamped on Basic White card (#159228). This was stamped with Granny Apple Green ink and Shaded Spruce ink. I used a die from the Tailor Made Tags (#155563) to cut the sentiment.

The base card is Basic White and the finished size is 21cm x 9.5cm. This fits the Slimline Envelopes (#157981). The flowers were attached with Stampin’ Dimensionals (104430). The embellishments are Iridescent Basic Jewels (#158130).

TIP: You can use smaller pieces of the Shaded Spruce card by cutting a narrow strip, approximately 1cm, to attach to the top of the DSP and another strip, approximately 3cm, to attach to the bottom of the DSP, rather than one full piece. 


“Love what you do and share what you love.”