Showing posts with label #poinsettiadies. Show all posts

Saturday, 20 November 2021

Festive Foliage

Hello friends,

The background stamp used here is the Festive Foliage stamp (#155634) and of course great for Christmas cards. However I have previously used it for a birthday card by covering the holly leaves with flowers, which means it can be used all year round which I love.
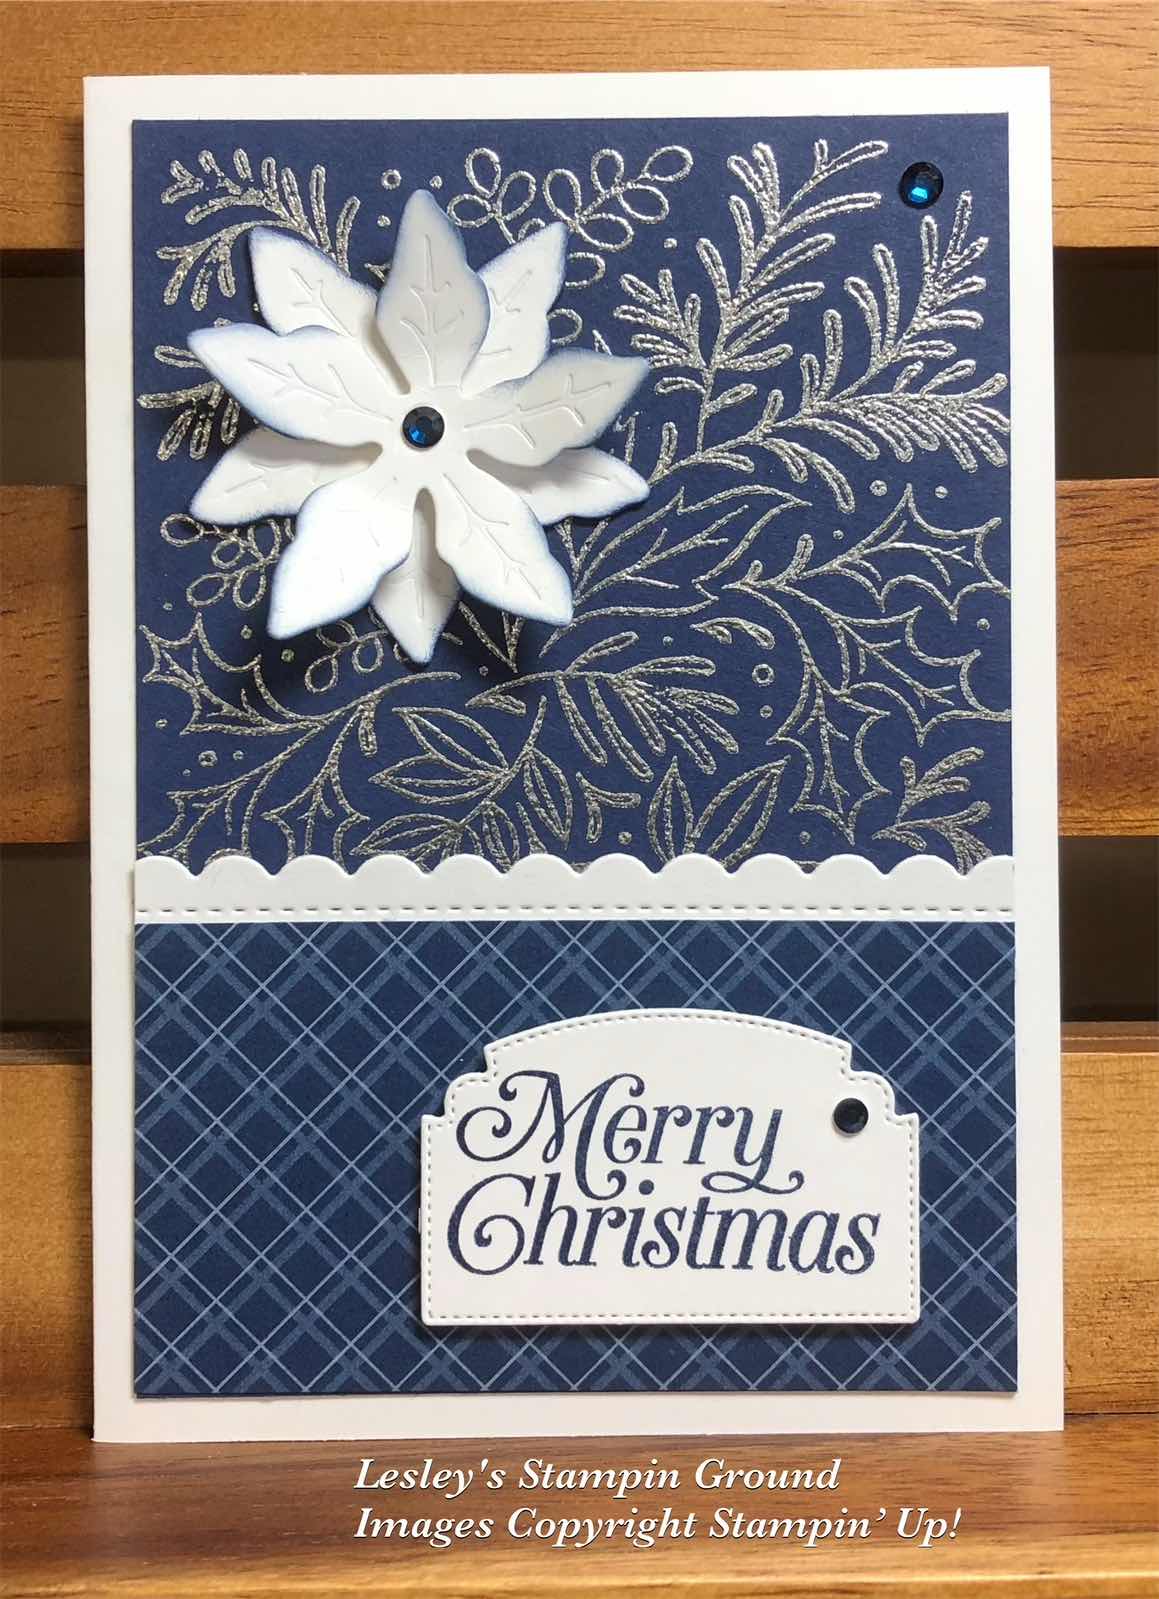


I stamped the image with VersaMark (#102283) onto the Night Of Navy card (#106577). This was heat embossed with Silver Stampin’ Emboss Powder (#155555) and set with the Heat Tool (#129056).

The scallops were cut with a die from the Penned Flowers dies (#155557) and attached to a piece of Night Of Navy from the Neutrals 6”x6” Designer Series Paper (#155226). This was attached to the card front. The base card is Basic White card (159228).

“Merry Christmas” from the Perfectly Plaid stamp set (#149418) was stamped with Night Of Navy ink (#147110), then cut with an Ornate Frames Die (#150664). The poinsettia was cut with a Poinsettia Die (#153522) from Basic White card. I daubered the edges with Night Of Navy ink before assembling the flower with a Stampin’ Dimensional (#104430). I attached it to the card with Mini Glue Dots (#103683). The sentiment was attached with Stampin’ Dimensionals then the card was finished by adding the Night Of Navy Holiday Rhinestone Basic Jewels (#150457).


“Love what you do and share what you love.”


Monday, 25 October 2021

Poinsettia Petals

Hi again friends,

I have used the traditional red & green for this Christmas card using the beautiful poinsettia.


I used the Stitched Greenery Die (#155451) for the “stitching” on the Basic White card front (#159228). I attached the Real Red card (#106578) to the back of the cardfront. I wrapped the Metallic Mesh Ribbon (#153550) around the card front, then attached this to the Basic White base card.

The poinsettias from the Poinsettia Petals stamp set (#158251) were stamped with Real Red ink (#147084) and cut with the Poinsettia Dies (#153522). The leaves and flower centre were cut and embossed also with these dies using Garden Green card (#108605) and Real Red card. The flower was assembled with Stampin’ Dimensionals (#104430). I taped the leaves to the flowers and also used Dimensionals to attach the whole flower to the card.

The sentiment from the Poinsettia Petals stamp set was stamped with Real Red ink and a die from the Potted Succulents (#154330) was used to cut the sentiment. This was attached with Stampin’ Dimensionals.

Some sparkle was added to the poinsettia using the Clear Wink Of Stella Brush (#141897).


“Love what you do and share what you love.”

Stay safe & keep crafting!!


Tuesday, 24 November 2020

Poinsettia Dies

Hello my friends,

I have chosen to use subtle colours on this Christmas card using the Poinsettia Dies (#153522) to cut the flower.


As well as the Whisper White card (#106549) I have used the Gold from the Brushed Metallic 12” x 12” cardstock. I cut a piece of the white card using one of the Curvy Dies (#154319), then dry embossed the lower piece with one of the Wrapped In Texture Embossing Folders (#153574). Both pieces were then attached to the Gold Metallic card.
I cut the 4 layers of the poinsettia using the Poinsettia Dies and sponged the edges of the petals with Soft Sea Foam ink (#147102). Clear Wink Of Stella (#141897) was brushed onto the petals giving a lovely glimmer. I assembled the flower with Mini Glue Dots (#103683) and then it was attached to the card with Stampin’ Dimensionals (#104430). 
The “berries” were cut with a die from the Poinsettia Dies and the leaves from the Soft Seafoam card (#147012) were cut with a die from the Curvy Dies. All were attached with Mini Glue Dots.
“Merry Christmas” is from the Curvy Christmas stamp set (#p155364). This was heat embossed with VersaMark (#102283) and Gold Stampin’ Emboss Powder (#109129), then set with the Heat Tool (#129056). A die from the Ornate Frames (#150664) was used to cut the sentiment. Mini Stampin’ Dimensionals (#144108) were used to attach the sentiment to the card. A Gilded Gem (#152478) was attached to the centre of the poinsettia.

Have a fantastic day!!

“Love what you do and share what you love”


Friday, 6 November 2020

Poinsettia Dies with Red Velvet Paper Pack

Hi everyone,

Today I have had the opportunity to attend “Stampin’ Up! Onstage At Home” which is instead of the normal get together for demonstrators where we gather together, this one is on line. It is always so inspirational and fun to create cards together and learn heaps of new things. One great thing about being a demonstrator is that you get to see and purchase new products early, so I have already seen the upcoming catalogue that will be released in January and have ordered some new exciting goodies, so can’t wait to share them with you soon. If you would like to be part of the fun and become a demonstrator (and live in Australia), please contact me.

Now to todays card. It is a Christmas card using the gorgeous Red Velvet Paper (#153490) for the poinsettia.


The 3 layers of the poinsettia flower were cut and embossed with the Poinsettia Dies (#153522) from the Red Velvet Paper. The leaf, berries and flower centre were cut from the Brass Foil Sheets (#153057), also using the Poinsettia Dies. The flower was assembled using Mini Glue Dots (#103683). The flower centre and berries had Adhesive Sheets (#152334) adhered to the back before cutting.
The base card and card front are Whisper White (#106549). I dry embossed the card front with the Tasteful Textile 3D Embossing Folder (#152718), then attached the Ornate Garden Specialty Designer Series Paper (#152488) to the card. The Real Red 3/8” Sheer Ribbon (#153535) was wrapped around the cardfront.
The poinsettia was attached to the card with Stampin’ Dimensionals (#104430). The greeting from the Itty Bitty Christmas stamp set (#c150513) was stamped with Real Red ink (#147084) and cut with a Stitched Shapes Die (#152323) and also attached with Stampin’ Dimensionals. The trio of Red Rhinestone Basic Jewels (#146924) were added to finish the card.

“Love what you do and share what you love.”

Have a fantastic day!!


Wednesday, 28 October 2020

Poinsettia Dies

Hi everyone,

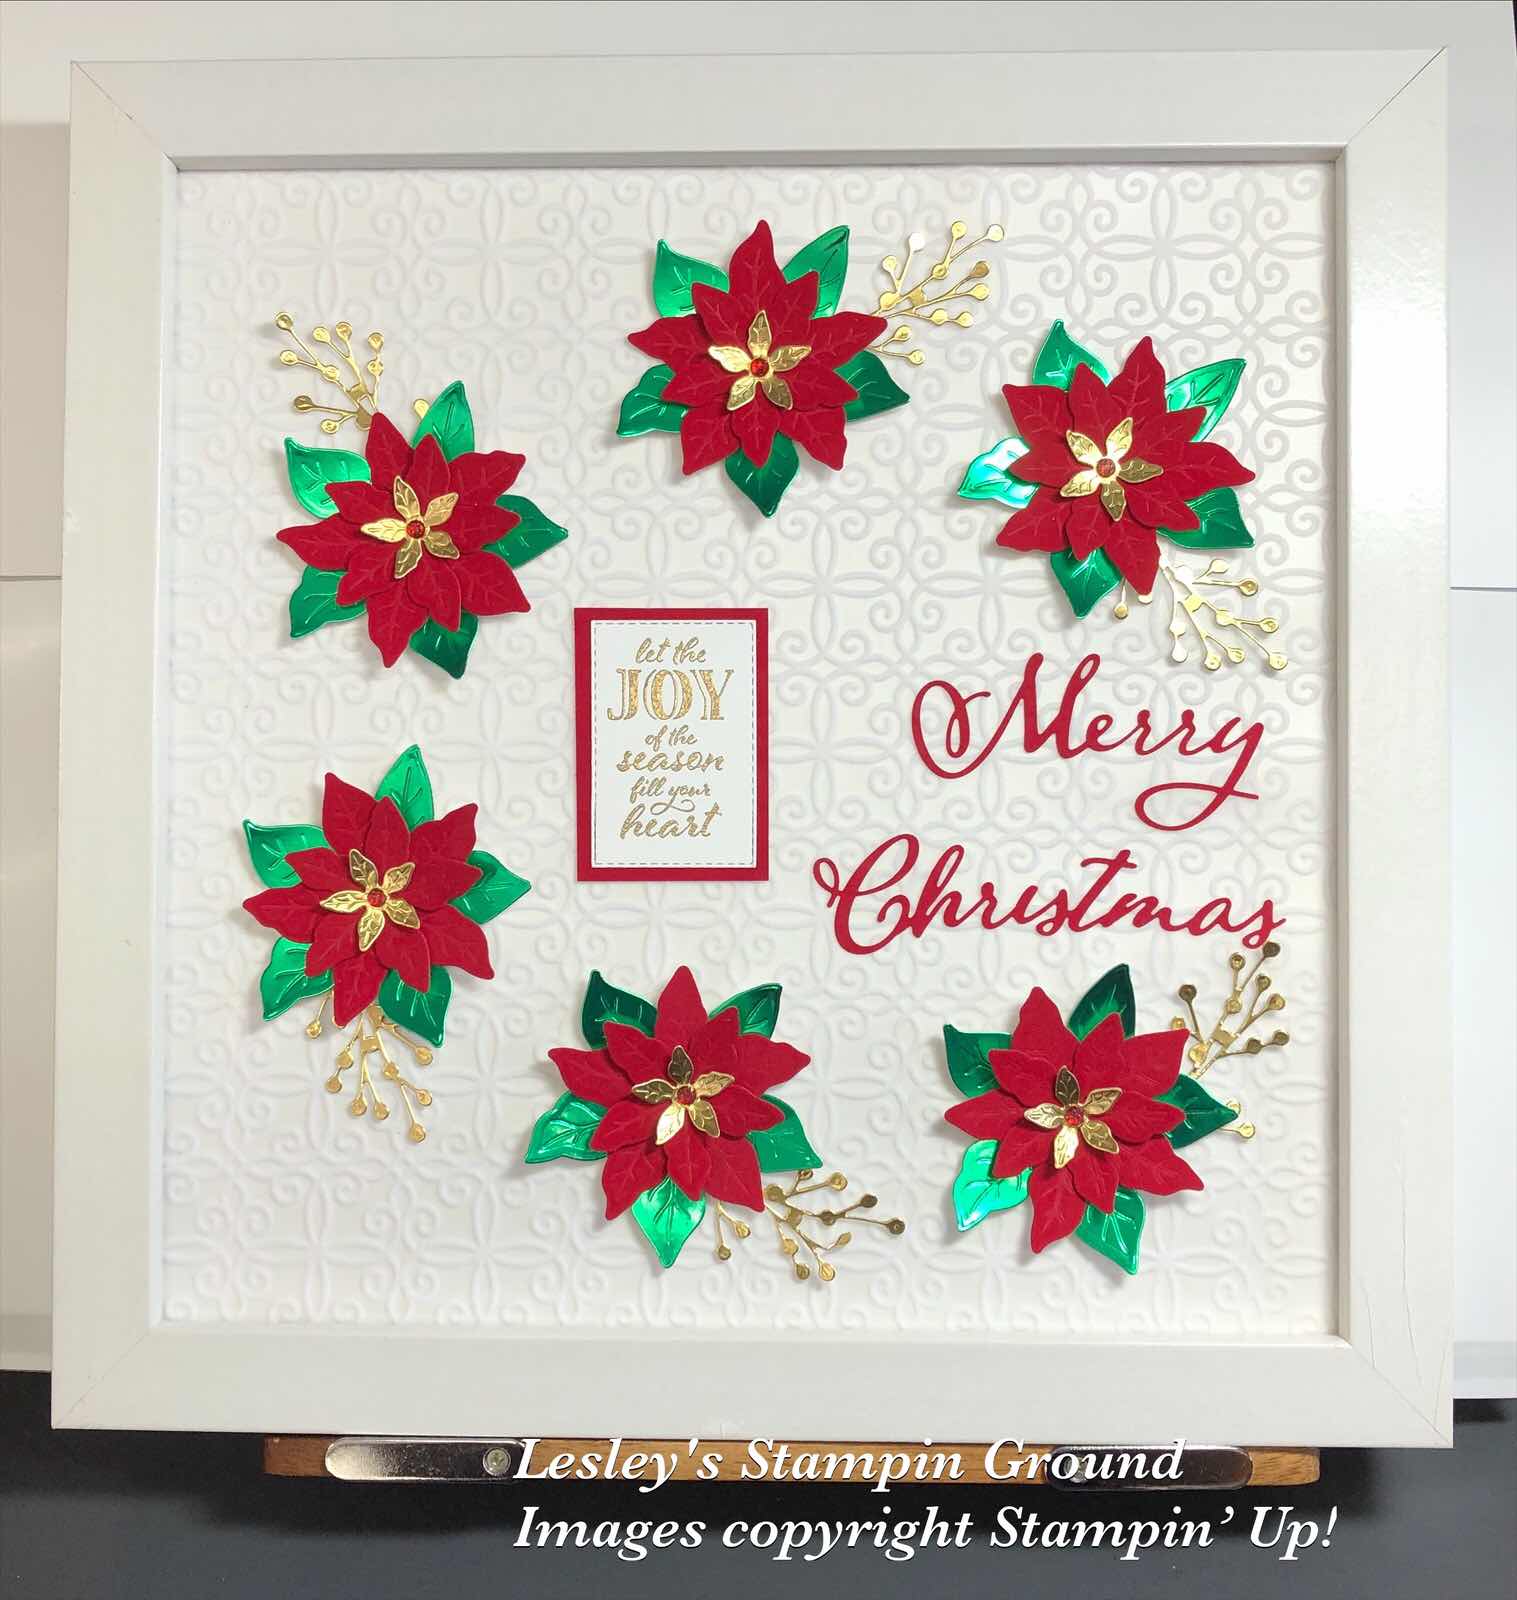
I love the Poinsettias from the Poinsettia Place Suite and was wanting to make a Christmas Frame so I have finally had a chance to make one and this was quite easy to make.


The background paper is from the Plush Poinsettia Specialty Paper (#153486) and I attached this to a piece of 12”x12” Whisper White cardstock (#124302).
The flowers and berries were all cut from the Poinsettia Dies (#153522).  I used the Green Foil from the Red & Green Foil Sheets (#153510) for the base of the flowers. The red layers were cut from the Red Velvet Paper Pack (#153490). I used Gold Foil Sheets (#132622) for the top layer of the flowers and for the berries. The flowers were assembled using Mini Glue Dots (#103683) and attached to the base with Stampin’ Dimensionals (#104430). The berries were attached with Mini Glue dots.
I used a retired die for Merry Christmas and this was also cut with the Red Velvet and glued using the Fine-Tip Glue Pen (#138309).
The greeting from Wrapped In Christmas stamp set (#153481) was stamped with VersaMark (#102283) and heat embossed with Gold Stampin’ Emboss Powder (#109129), then set with the Heat Tool (#129056). This was cut with a Stitched Rectangle die (#151820), then attached to a piece of Red Velvet. 
The red gems from the Wonderful Gems (#153536) were attached to the centre of the poinsettias.

Have a great day.

Thursday, 1 October 2020

Many Medallions

Hi everyone,

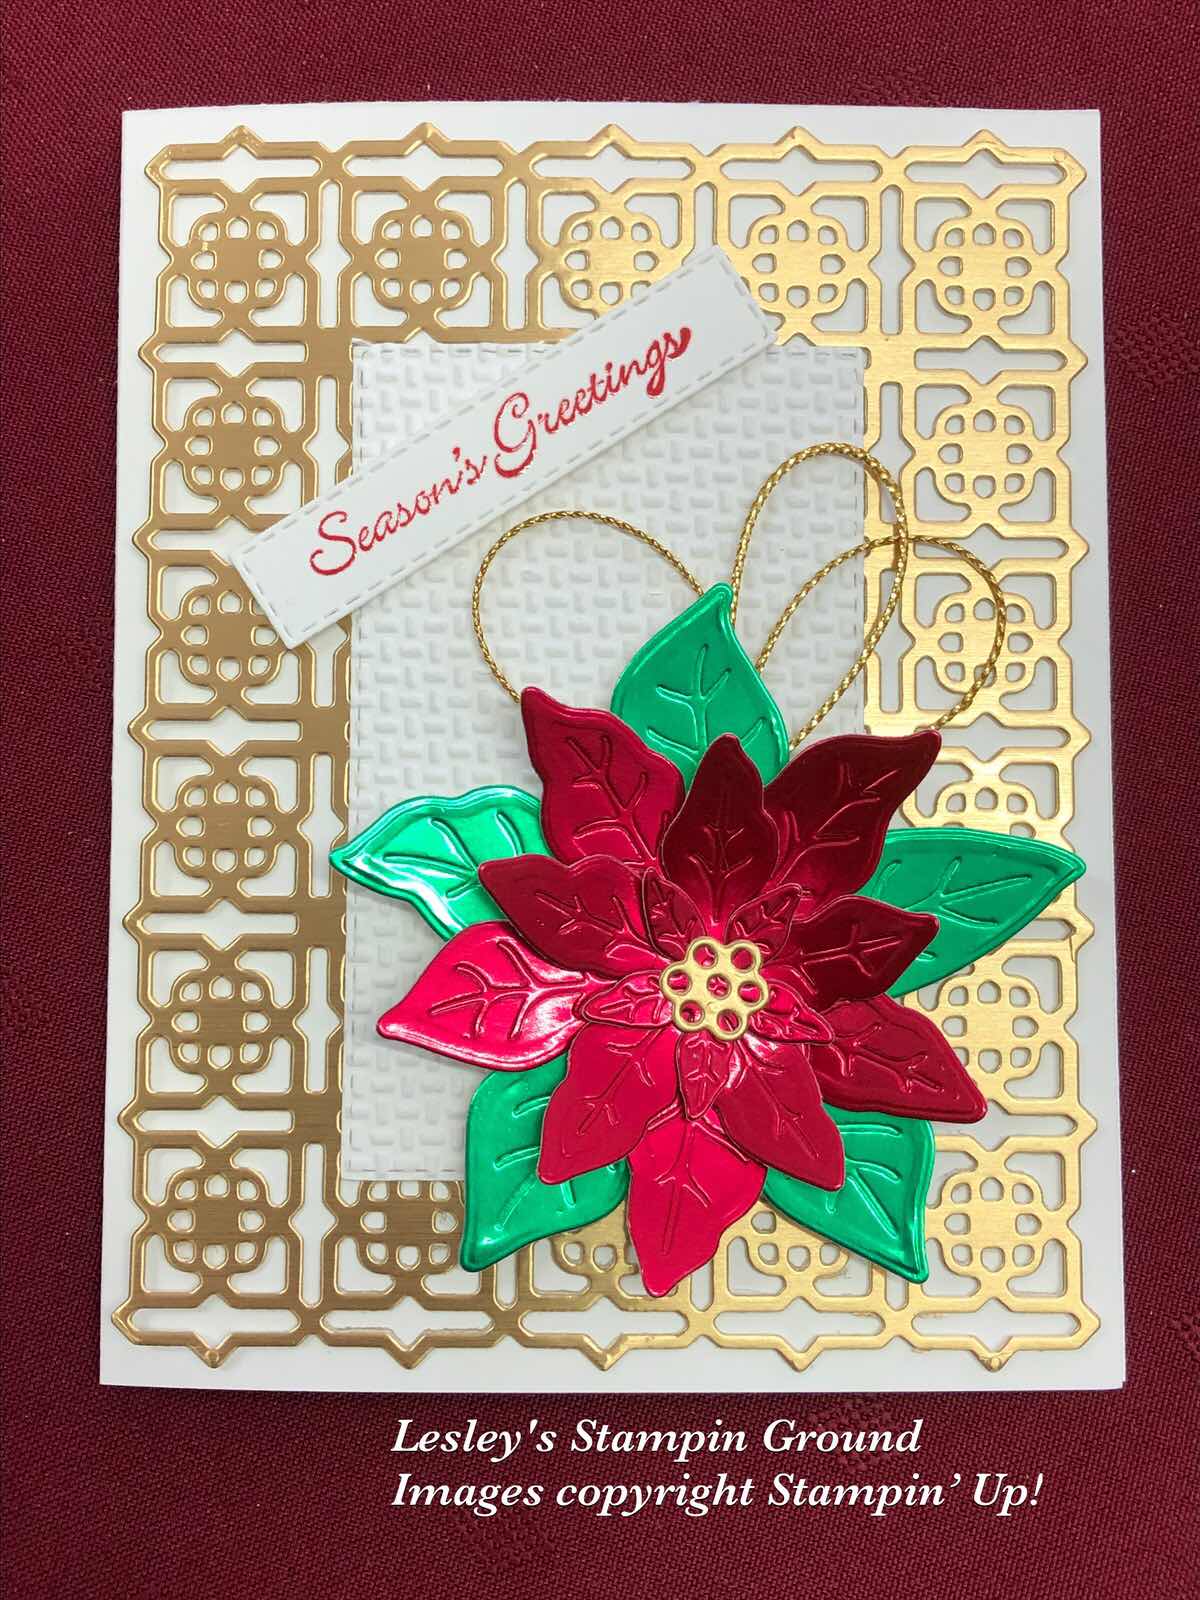
These poinsettias were cut from the Red & Green Foil Sheets (#153510) so gives a beautiful shine to these flowers.


Using the Poinsettia Dies (#153522), I cut the largest petals from the Green Foil and the other 3 layers from the Red Foil. The flower centre was cut from  the Gold from the Brushed Metallic 12”x12” cardstock. This was also used for the background which was cut using the Many Medallions Dies (#153584). I used Mini Glue Dots (#103683) to attach this to the Whisper White card base (#106549). As this die-cut piece is slightly different in size to a normal card, I cut the card 14cm x 22cm and scored at 11cm on the long side. This gives a more uniform border around the card.
The Whisper White rectangle was cut with a Stitched Rectangles Die (#151820), then dry embossed with one of the Wrapped In Christmas Embossing Folders (#153574). This was attached to the die cut piece. The poinsettia was assembled using Mini Glue Dots and attached to the card with Stampin’ Dimensionals (#104430). “Seasons Greetings” is from the Itty Bitty Christmas stamp set (#c150513). I stamped this with Real Red ink (#147084), then re-stamped again with VersaMark (#102283) and heat embossed with Clear Stampin’ Emboss Powder (# 109130) and set with the Heat Tool (#129056). I cut the sentiment with a Stitched Rectangles Die and attached it to the card with Stampin’ Dimensionals. The Gold Trim is part of the Wonder Of The Season Ribbon Combo Pack (#153537).

For the month of October, Stampin’ Up! have 15% off selected variety of Designer Series Paper, so check them out here and stock up and save.

Have a great day!!

Tuesday, 1 September 2020

Beautiful Boughs Dies

Hi friends,

A Christmas card using a variety of dies and embossing folders to create texture and layers.


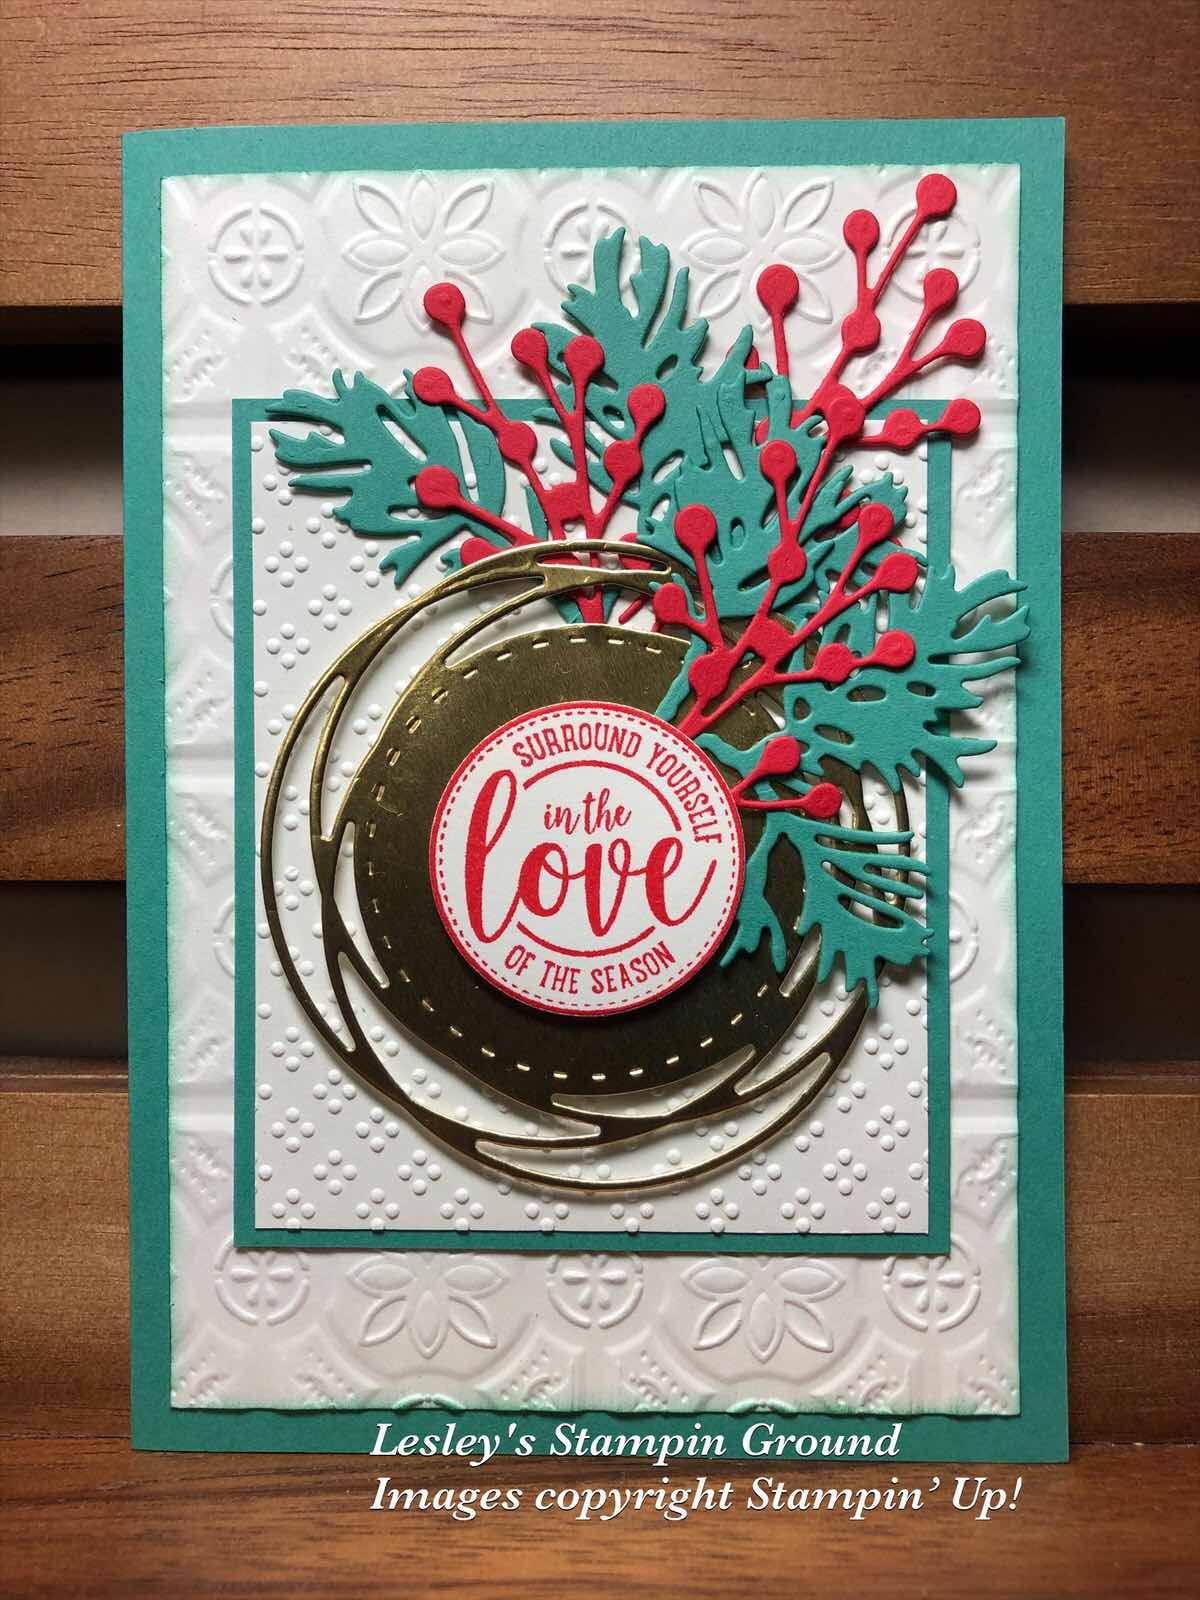
I dry embossed the larger Very Vanilla Card (#106550) using the Tin Tile 3D Embossing Folder (#151801) and the smaller Very Vanilla card with one of the Wrapped In Texture Embossing Folder (#153574). Just Jade card (#153084) is used for the base and to mat the smaller Very Vanilla card. The leaves from the Beautiful Boughs dies (#150661) were also cut from Just Jade card. I used Poppy Parade card (#121694) for the berries from the Poinsettia Dies (#153522). The Gold Foil Sheet (#132622) was used for the detailed circle which you will find in the Painted Poppies Dies (#151605). The sentiment from Wrapped In Christmas stamp set (#c153481) was stamped with Poppy Parade ink (#147050) and cut with a Layering Circles Die (#151770). I attached this and the Gold Foil die cut with Stampin’ Dimensionals (#104430). Mini Glue Dots (#103683) were used to attach the leaves and berries.

Enjoy your day!!


Tuesday, 11 August 2020

Poinsettia Dies

Hi ladies & guys,

Here’s another Christmas card using the Poinsettia dies (#153522).


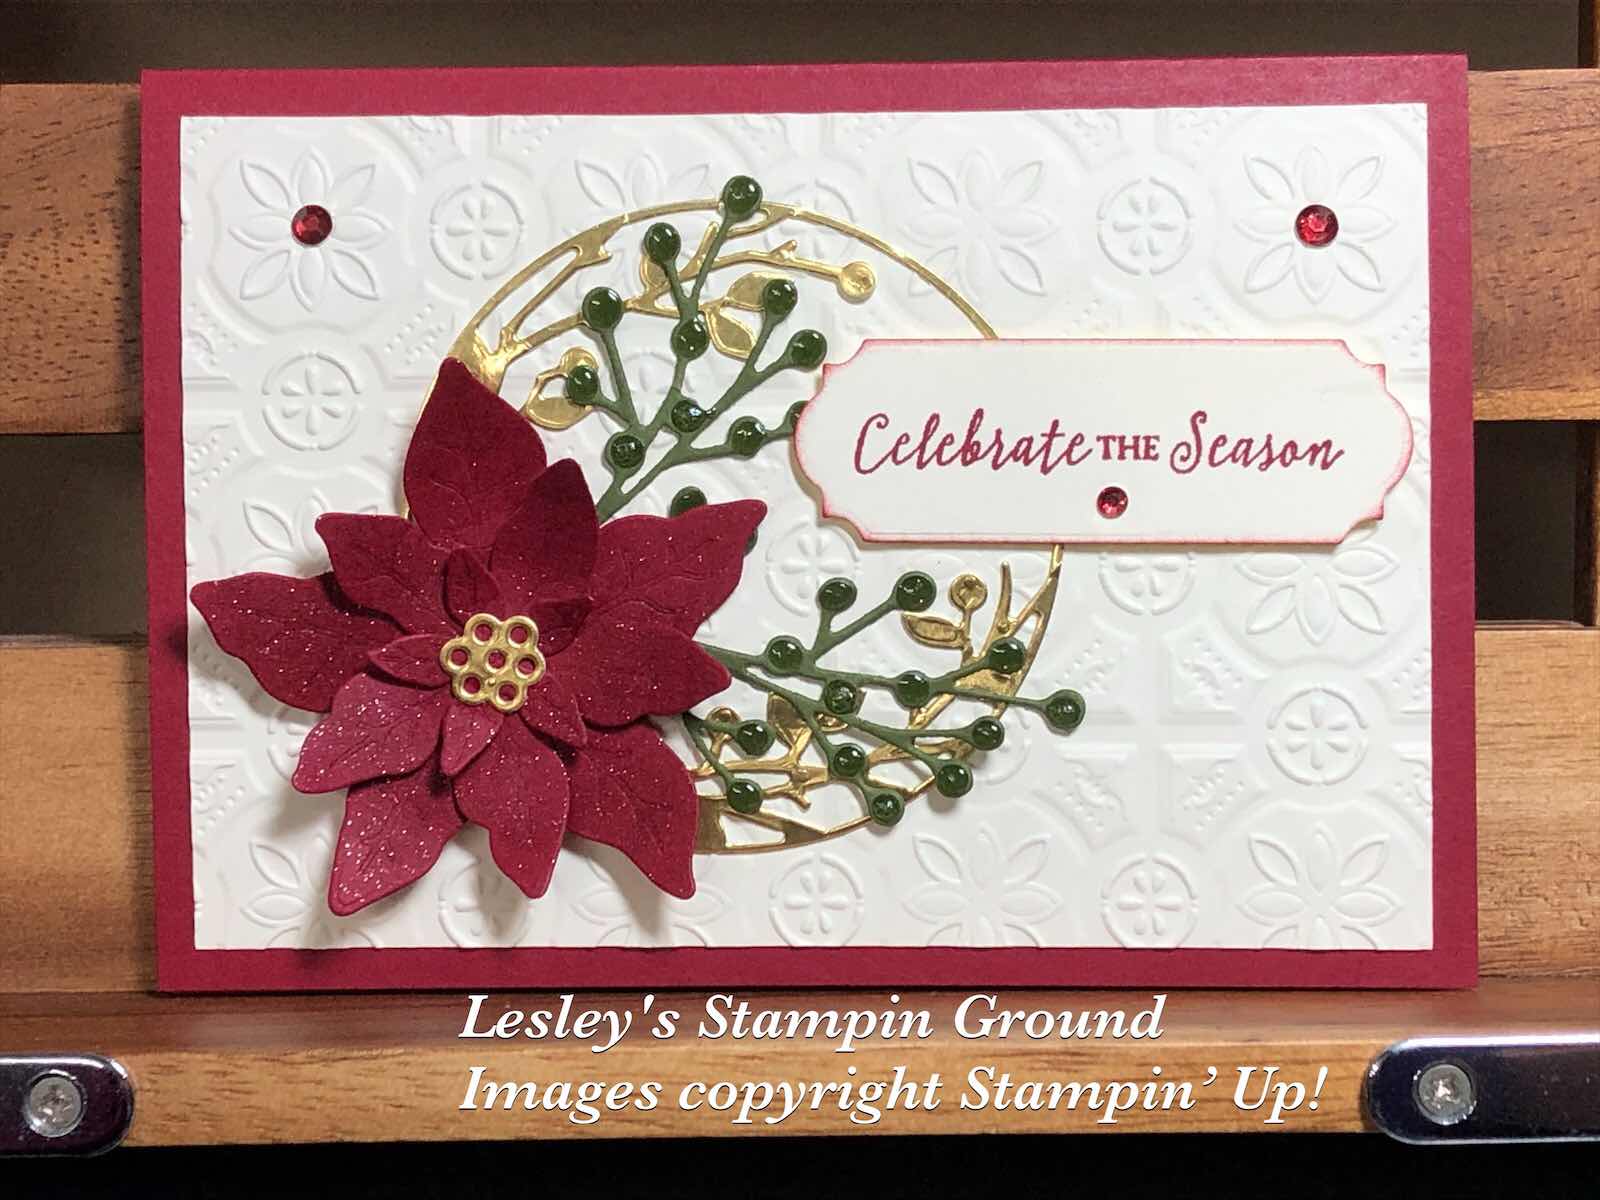
I have cut 3 layers of petals for the poinsettia from Cherry Cobbler card (#121681) using the Poinsettia Dies. There are dies which emboss the petals and also dies that cut and they can be embossed and cut at the same time. I added some glitter to the petals with the Clear Wink Of Stella Glitter Brush (#141897) and assembled the flower using Mini Glue Dots (#103683). The centre of the flower is Gold Foil sheet (#132622). The Very Vanilla card front (#106550) was dry embossed with the Tin Tile 3D Embossing Folder (#151801) and attached to the Cherry Cobbler base card. I cut the “wreath” from the Birds & More Dies (#152721), then cut it using a Layering Circles Die (#151770). This was attached to the card by using the Adhesive Sheets (#152334) on the back of the Gold Foil Sheet. I cut the “berries” from Mossy Meadow card (#133683) and added the Shimmery Crystal Effects (#150892) to the “berries”. These were then attached to the card with Mini Glue Dots. The sentiment is from the Itty Bitty Christmas stamp set (#150513) and stamped with Cherry Cobbler ink (#147083). I used an Ornate Frames Die (#150664) to cut the sentiment and Stamnpin’ Dimensionals (#104430) were used to attach this to the card. The embellishments are from the Holiday Rhinestone Basic Jewels (#150457).

Have a great day!!

Saturday, 25 July 2020

Poinsettia Petals Bundle

Hello,

Here’s another sneak peek using the Poinsettia Petals Bundle (#p155148) from the upcoming August-December 2020 Mini Catalogue. Products will be available to order from 4th August.


The basecard and card front are Whisper White (#106549). I dry embossed the card front with the Tasteful Textile 3D Embossing Folder (#152718). The Designer Series Paper is from the Ornate Garden Specialty DSP (#152488). I wrapped the Real Red 3/8” Sheer Ribbon (#153535) around the card front. I cut the 3 layers of the flower from Red Velvet Paper (#153490) using the Poinsettia Dies (#153522). I used Brass Foil Sheet (#153057) for the flower centre, the leaf and berries. The dies to cut these are also from the Poinsettia Dies. I used Mini Glue Dots (#103683) to assemble the flower. The flower was attached to the card with Stampin’ Dimensionals (#104430) and the brass foil pieces were glued with the Fine-Tip Glue Pen (#138309). The sentiment is from the Itty Bitty Christmas stamp set (#c150513) and I stamped this with Real Red ink (#147084) then cut it with a Stitched Shapes Die (#152323). Stampin Dimensionals were used to attach the sentiment and I finished the card by adding the trio of Red Rhinestone Basic Jewels (#146924).

Enjoy the rest of your weekend.

Thursday, 16 July 2020

Poinsettia Petals Bundle sneak peek

Hello friends,

Here’s a sneak peek of some of the beautiful products from the August-December 2020 Mini Catalogue. I just love the Poinsettia Place Suite (#p155109). The suite consists of stamps, dies, embellishments, designer paper and ribbon.


The Poinsettia Place Designer Series Paper (#153487) was attached to the Real Red card (#106578), then to the Very Vanilla base card (#106550). I dry embossed a piece of the Red Velvet Paper (#153490) using the Ornate Floral 3D Embossing Folder (#152725) and attached that to the bottom of the card. I wrapped the Real Red 3/8” Double-Stitched Satin Ribbon (#151155) around the card. The sentiment and poinsettias are stamped with images from the Poinsettia Petals stamp set (#153475). The sentiment is stamped with Real Red ink (#147084) and cut with a Stitched So Sweetly Die (#151820). I stamped the poinsettia images using VersaMark (#102283) onto the Red Velvet Paper (#153490) and added White Stampin’ Emboss Powder (#109132) and set with the Heat Tool (#129056). I wasn’t sure if this would work on the Velvet paper. The embossing powder became lighter as I heated it but I was very happy with the results. The flowers were cut with the Poinsettia Dies (#153522) and the layers were assembled using Mini Glue Dots (#103683). The Beaded Pearls (#153534) were added to the flower centre, also using glue dots. Stampin’ Dimensionals (#104430) were used to attach the poinsettia and sentiment.

Stay safe & keep crafting!!