Showing posts with label #maskingtechnique. Show all posts

Saturday, 1 March 2025

Masking Technique

 Hello crafty friends,

I have used the Masking Technique to stamp the flowers on this card. This allows you to stamp several images without stamping over them and creating a layered effect.


Firstly I stamped the image from the You Are Remarkable stamp set (#165445) onto a piece of photocopy paper and fussy cut around the image, cutting right on the line and not leaving a margin as I would normally do when fussy cutting. This is used for the mask.

Next I stamped the image onto the Basic White card front (#159228) with Tuxedo Black Memento Ink (#132708). I stamped this in the middle of the card. Then I covered this with the mask and stamped another flower. I continued this till the card front was stamped. You may need a second mask, depending on the image. I needed 2 for this. When you have 2 or more images stamped you may require more masks to cover the stamped images.

This stamp set is a 2 Step stamp which allows you to stamp the outline then stamp to colour the flowers & leaves in the colours you desire. Because of the masking I found it easier for this card to colour with Stampin’ Blends. The colours used are Lost Lagoon (#161680), Lemon Lolly (#161673), Bubble Bath (#161675), Fresh Freesia (#155518), Balmy Blue (#154830), Flirty Flamingo (#154884) and Ivory (#154922),

I added Glimmer to the flowers with the Clear Wink Of Stella (#141897).

The card front was matted with Basic Black card (#121688). I wrapped the Silver & White Sheer Ribbon (#162149) around the card front then attached it to the Basic White base card.

The sentiment is from the Cheerful Daisies stamp set (#161290), stamped with Highland Heather ink (#147103) and cut with a Happy Hibiscus die (#164879). This was attached to the card with Stampin’ Dimensionals (#104430).

The cute Tiny Bee Trinkets (#164714) were attached to the card with Mini Glue Dots (#103683).


“Love what you do and share what you love.”

INSPIRE. CREATE. SHARE. 


Saturday, 15 February 2025

Inspirational Sketches

 Hello stamping friends,

Toadstools seem to be very popular at the moment, and these ones are from the Inspirational Sketches stamp set (#162684).


I stamped the toadstools using the masking and stampin off techniques. To do this I stamped the image onto a post it note and cut around the image. It is best to cut on the lines rather than leaving a slight border when cutting. I then stamped the image onto Basic White card (#159228). I place the “mask” from the post it note over the stamped image and stamped again, overlapping the images slightly. I did this without re-inking for a lighter image. Remove the mask and you can see that the first stamped image looks like it is in front of the other image, and you haven’t stamped on top of the first image.

I used a die from the Everyday Arches dies (#164629) to cut the stamped card and the gold from the Textured Metallic Specialty Paper (#163772). I dry embossed the gold with the Exposed Brick Embossing Folder (#161600).

The Season Of Elegance Specialty Designer Series Paper (#164144) was matted with Pecan Pie card (#161726) then attached to the Basic White base card.

“Celebrate” from the Unbounded Love stamp set (163378) was stamped with Pecan Pie ink (#161665). This was cut with the smallest die from the Everyday Arches dies.

The gold arch was taped to the card and the toadstools & sentiment were attached with Stampin’ Dimensionals (#104430). The Earth Tones Shimmer Gems (#164070) were added to the card.

“Love what you do and share what you love.”

INSPIRE. CREATE.  SHARE. 


Wednesday, 3 January 2024

Detailed Dogwood stamp set

Hello again my friends,

The flowers on this card are from the Detailed Dogwood stamp set (#162953) and I have used the Masking technique. This stamp set is a free Sale-a-bration product with a $180 order. One of the small flowers in the set also co-ordinates with the Petal Park Builder Punch (#160576), but I haven’t used it on this card.


I stamped the larger floral image onto the Basic White card (#159228) using Tuxedo Black Memento ink (#132708). I then stamped this onto Masking Paper (#155480) and fussy cut the image. I placed this over the stamped image on the card and stamped the image with the buds 4 times. I also used a mask for the buds. This allows you to stamp the image but it doesn't overlap the previous images.

The Stampin’ Blends to colour these are Flirty Flamingo (#154884), Bubble Bath (#161675) and Granny Apple Green (#154885). I matted the card front with Flirty Flamingo card (#141421) and attached it to the Basic White base card.

“Happy Birthday” from the Go To Greetings stamp set (#158763) was stamped with Flirty Flamingo ink (#147052) and cut with a retired Stitched Rectangles die.

The Gold ribbon is from the Silver & Gold Trim Combo (#161633) and this was attached with Mini Glue Dots (#103683). The sentiment was attached with Stampin’ Dimensionals (#104430).

The dragonflies are from the Adhesive-Backed Dragonflies & Birds (#162743). Clear Wink Of Stella (#141897) was used to add glimmer to the larger flowers.

“Love what you do and share what you love.”

INSPIRE. CREATE. SHARE. 


Saturday, 9 December 2023

Biggest Wish

Hello friends,

I love using dies and embossing folders for my cards and find it very hard to do just stamping, so here is a card which looks like it is just stamping. However I have used some dies to cut masks and then I used an embossing folder once the stamping was done.


I cut a rectangle from a piece of scrap paper using a die from the Deckled Rectangles (#159173). I placed the outside piece of the mask on the Basic White card (#159228) and applied the Daffodil Delight ink (#147094) with a Blending Brush (#153611). I also cut another rectangle with the next size Deckled Rectangles die. I attached this to the card and covered the yellow with the piece cut from inside of the first mask. This left a border area which I used Starry Sky ink (#159212) and this was also done using a Blending Brush.

“Happy” from the Biggest Wish stamp set (#155052) was stamped with Crumb Cake ink (#147116) and “Birthday” was stamped with Starry Sky ink. I used the Stamparatus to stamp the words making it easy to get the words straight.

I used the Timber 3D Embossing Folder (#156406) to dry emboss the Basic White card front, then this was matted with Starry Sky card (#159264). The base card is Basic White.


“Love what you do and share what you love.”

INSPIRE. CREATE. SHARE. 

Monday, 30 October 2023

Darling Details Bundle

Hello friends,

I have used the Darling Details Bundle (#161371) for this birthday card. The bundle includes the Darling Details stamp set (#161368) and the Darling Details dies (#161371).


I used the smaller frame from the dies and cut a scrap piece of paper. I then used this as a mask to add the Lemon Lime Twist ink (#147145) to the Basic White card (#159228). I used a Blending Brush (#153611) to add the ink. I then used the larger frame to cut the card which cuts the outside frame and the middle of the card. I glued the outside frame to the Poppy Parade card (#121694) using the Multipurpose Liquid Glue (#110755). The inside piece of card was attached with Stampin’ Dimensionals (#104430).

The flowers were stamped with Poppy Parade ink (#147050). This is a Two-step stamp set, so I stamped the outline first then with the 2nd image for the background of the flower, I stamped off before stamping, again using Poppy Parade ink.

These flowers and the flowers from the Afternoon Azure card (#161728) were cut with dies also from the Darling Details dies. The Azure Afernoon card was backed with Adhesive Sheet (#152334) making these detailed flowers easy to adhere to the card. The stamped flowers were attached with Mini Glue Dots (#103683).

“Happy Birthday” is from the Darling Details stamp set and stamped with Poppy Parade ink. A die from the Meadow dies (#155852) was used to cut the sentiment. The embellishments are from the Iridescent Adhesive-Backed Discs (#161954).

“Love what you do and share what you love.”

INSPIRE. CREATE. SHARE. 


Sunday, 15 May 2022

Masking technique with Cottage Rose

Hi friends,

Firstly I am just taking a break over the next 7-10 days but I will be back before the end of the month.

On todays card the masking technique has been used when stamping the flowers and leaves from the Cottage Rose stamp set (#159040). I was trying to make a card with just stamping but couldn’t resist adding some extra elements.


I used the medium size single flower and stamped this with Polished Pink ink (#155712). Then using masks I stamped the other 2 flowers. Then masking 2 of the flowers I stamped the leaves with Granny Apple Green ink (#147095).

“Happy Birthday” is from the Go To Greetings stamp set (#158763) and also stamped with Polished Pink ink. I cut the scallops with a die from the Penned Flowers dies (#155557) using Polished Pink card (#155711). I cut the corner from the Basic White card front (#159228) and attached the scallops. This was then attached to the Vellum Layering Designs (157764), then attached to the Polished Pink card base.

TIP: When attaching vellum I like to only tape where it can’t be seen, so I used tape under the white card. I also added a Mini Glue Dot (#103683) in the bottom left corner, then added an embellishment on top from the 2021-2023 In Color Opal Rounds (#159185).

To make a mask, I stamp the image on a piece of Post it Notes and cut out the image. Cut on the line rather than leaving a border so the next stamped image is close to the previous stamped image. Place the mask over the stamped image so the next image doesn’t overlap the first image. (There is now a Masking Paper (#155480) which you can use for masking. Just waiting for mine to arrive.) 

“Love what you do and share what you love.”


Friday, 4 March 2022

Very Versailles & masking technique

Hi stamping friends,

I have been using the masking technique again on this card.


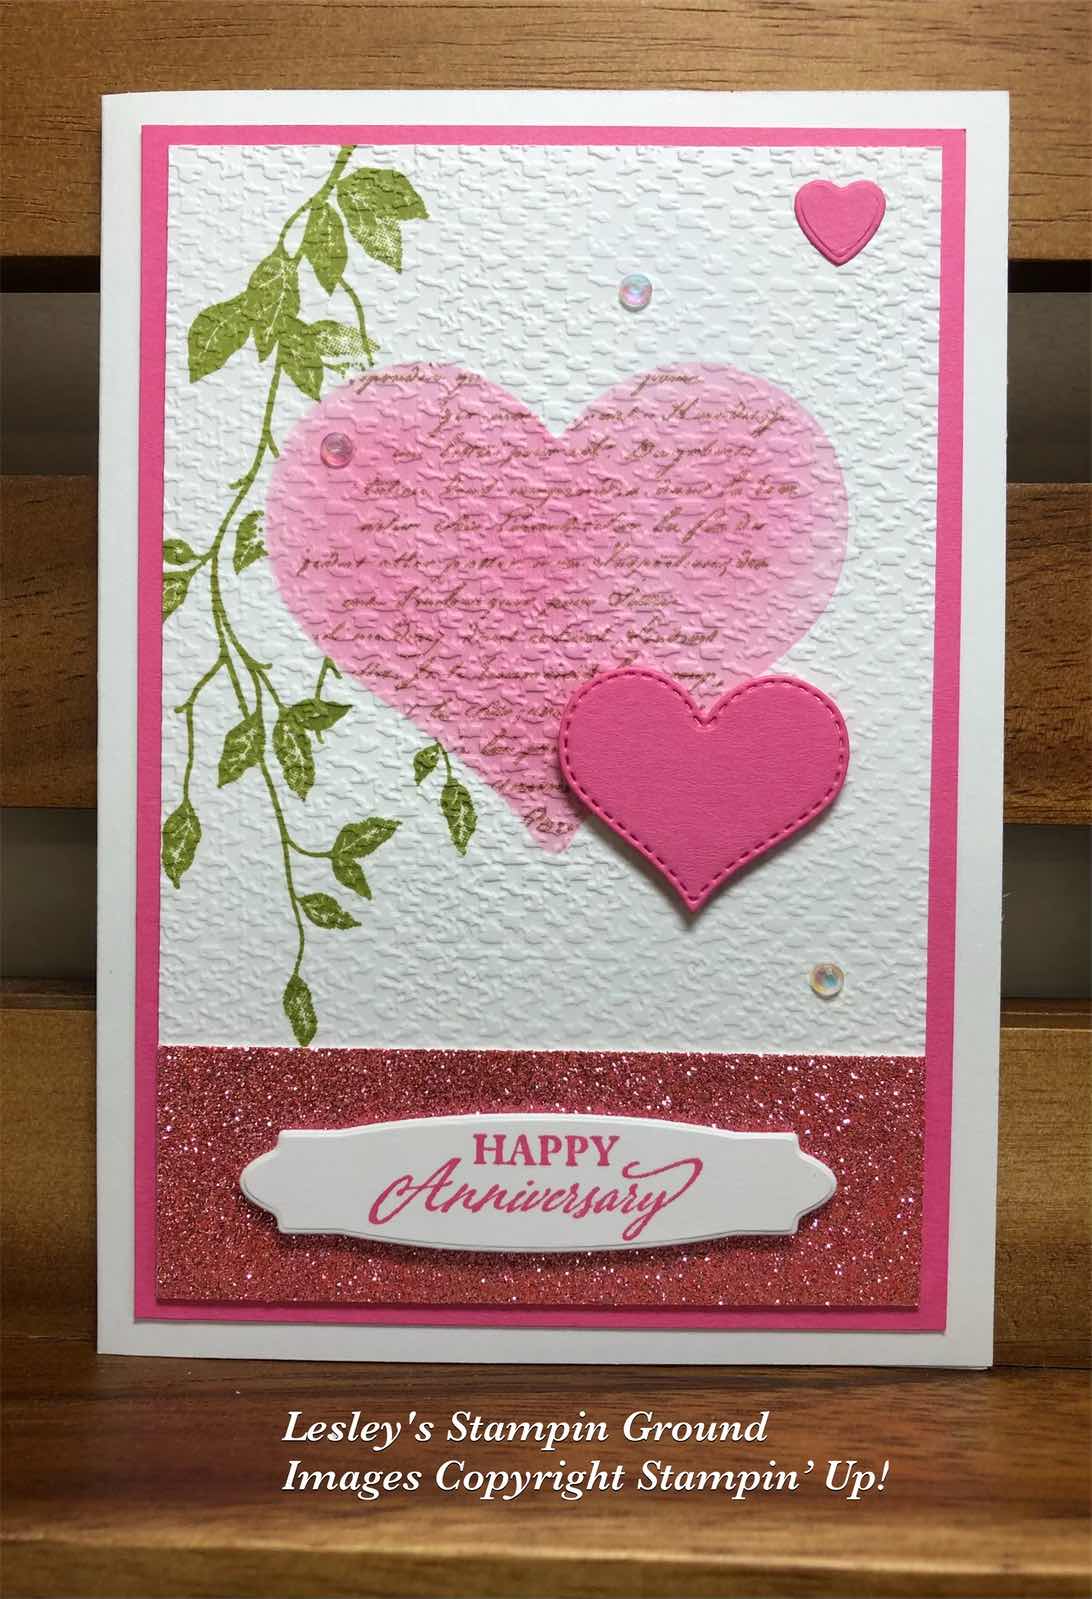
I used the larger heart from the Bouquet Of Love Dies (#157641) to cut a piece of scrap card and a piece of photocopy paper. This can be done at the same time. These were used for the masks. I placed the piece of scrap card with the heart cut out onto the Basic White card front (#159228). I used Polished Pink ink (#155712) and a Blending Brush (#153611) to create the heart. I removed the scrap card and replaced it with the photocopy paper as this is thinner and is a better mask when stamping. (See below).  I stamped the verse from the Very Versailles stamp set (#149275) with Crumb Cake ink (#147116) on top of the heart.


Then I placed the heart from the photocopy paper over the pink heart and stamped the foliage also from the Very Versailles stamp set onto the card with Pear Pizzaz ink (#147104).


Next I dry embossed the card front with the Tasteful Textile 3D Embossing Folder (#152718), then matted it with Polished Pink card (#155711) and attached it to the Basic White base card.

The smallest heart was cut with a Sweet Heart die (#157623) and the other heart with a die from Bouquet Of Love. I used Polished Pink card for both these hearts. Mini Stampin’ Dimensionals (#144108) were used to attach the larger heart to the card and a Mini Glue Dot (#103683) for the small heart.  The Supple Shimmer Specialty Paper (#158068) was attached to the card front. “Happy Anniversary” from Elegantly Said stamp set (#155095) was stamped with Polished Pink ink and cut with another die from Bouquet Of Love, then attached to the card with Stampin’ Dimensionals (#104430).

The embellishments are the Iridescent Rhinestone Basic Jewels (#158130).

TIP: When stamping & dry embossing the card front, stamp first then emboss. If you emboss first you won’t get a good stamped image because of the uneven surface.


“Love what you do and share what you love.”


Friday, 14 January 2022

Flowing Flowers stamp set

Hello my crafty friends,

These flowers are from the Flowing Flowers Stamp Set (#157880) and I have used the Masking Technique when stamping the flowers.


I stamped the flower on the right with Flirty Flamingo ink (#147052). I made a mask by stamping this flower on a post-it note and cut out the flower then this was placed on top of the stamped image on the Basic White card (#159228). Then I stamped the second flower with Fresh Freesia ink (#155611) overlapping the images.

I dry embossed the stamped card front with the Tasteful Textures 3D embossing Folder (#152718) and attached it to a triangle of the Flirty Flaming card (#141421). The base card is Basic White.

“Thank You” is also from the Flowing Flowers stamp set and stamped with Flirty Flamingo ink. This was cut with a die from the Sweet Hearts Dies (#157623). I threaded the Silver Simply Elegant Trim (#155766) through the tag. The row of hearts were also cut with the Sweet Hearts Dies. I used Flirty Flamingo card which was backed with Adhesive Sheets (#152334). One of the hearts from the middle of the row of hearts was attached to the tag. The tag was attached to the card with Stampin’ Dimensionals (#104430).

“Love what you do and share what you love.”


Thursday, 6 January 2022

Dahlia Days

Hi again my friends,

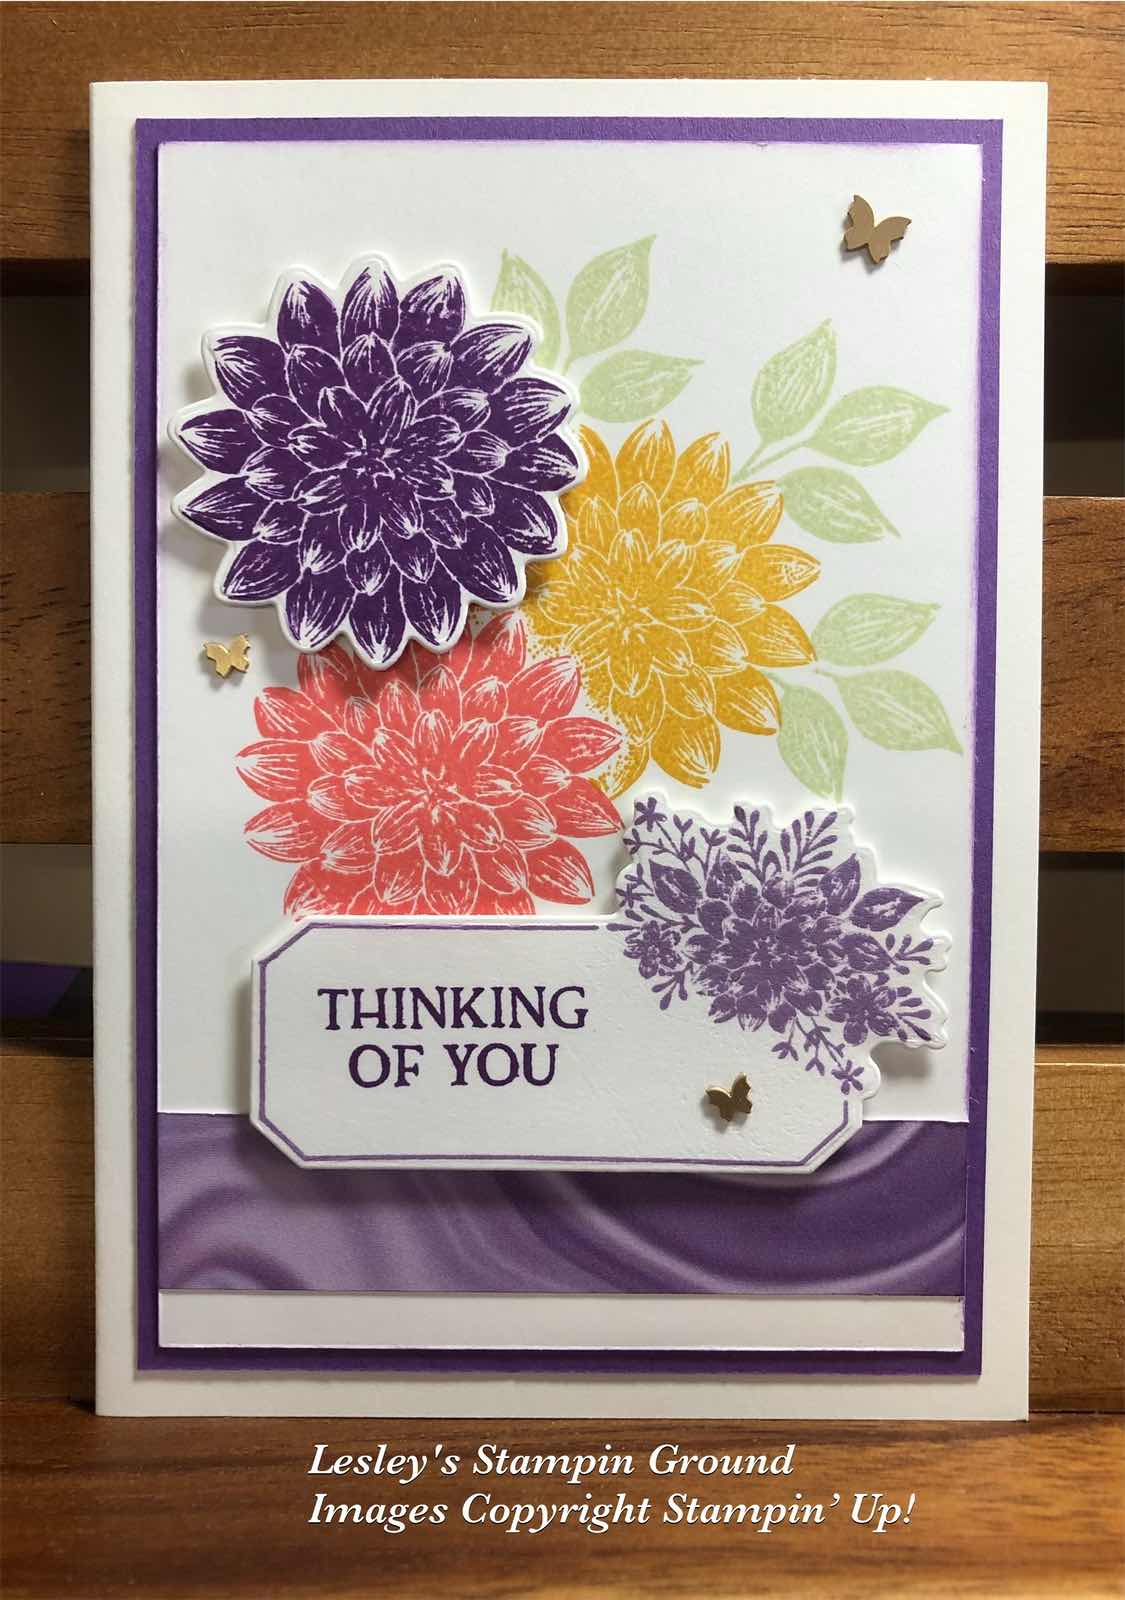
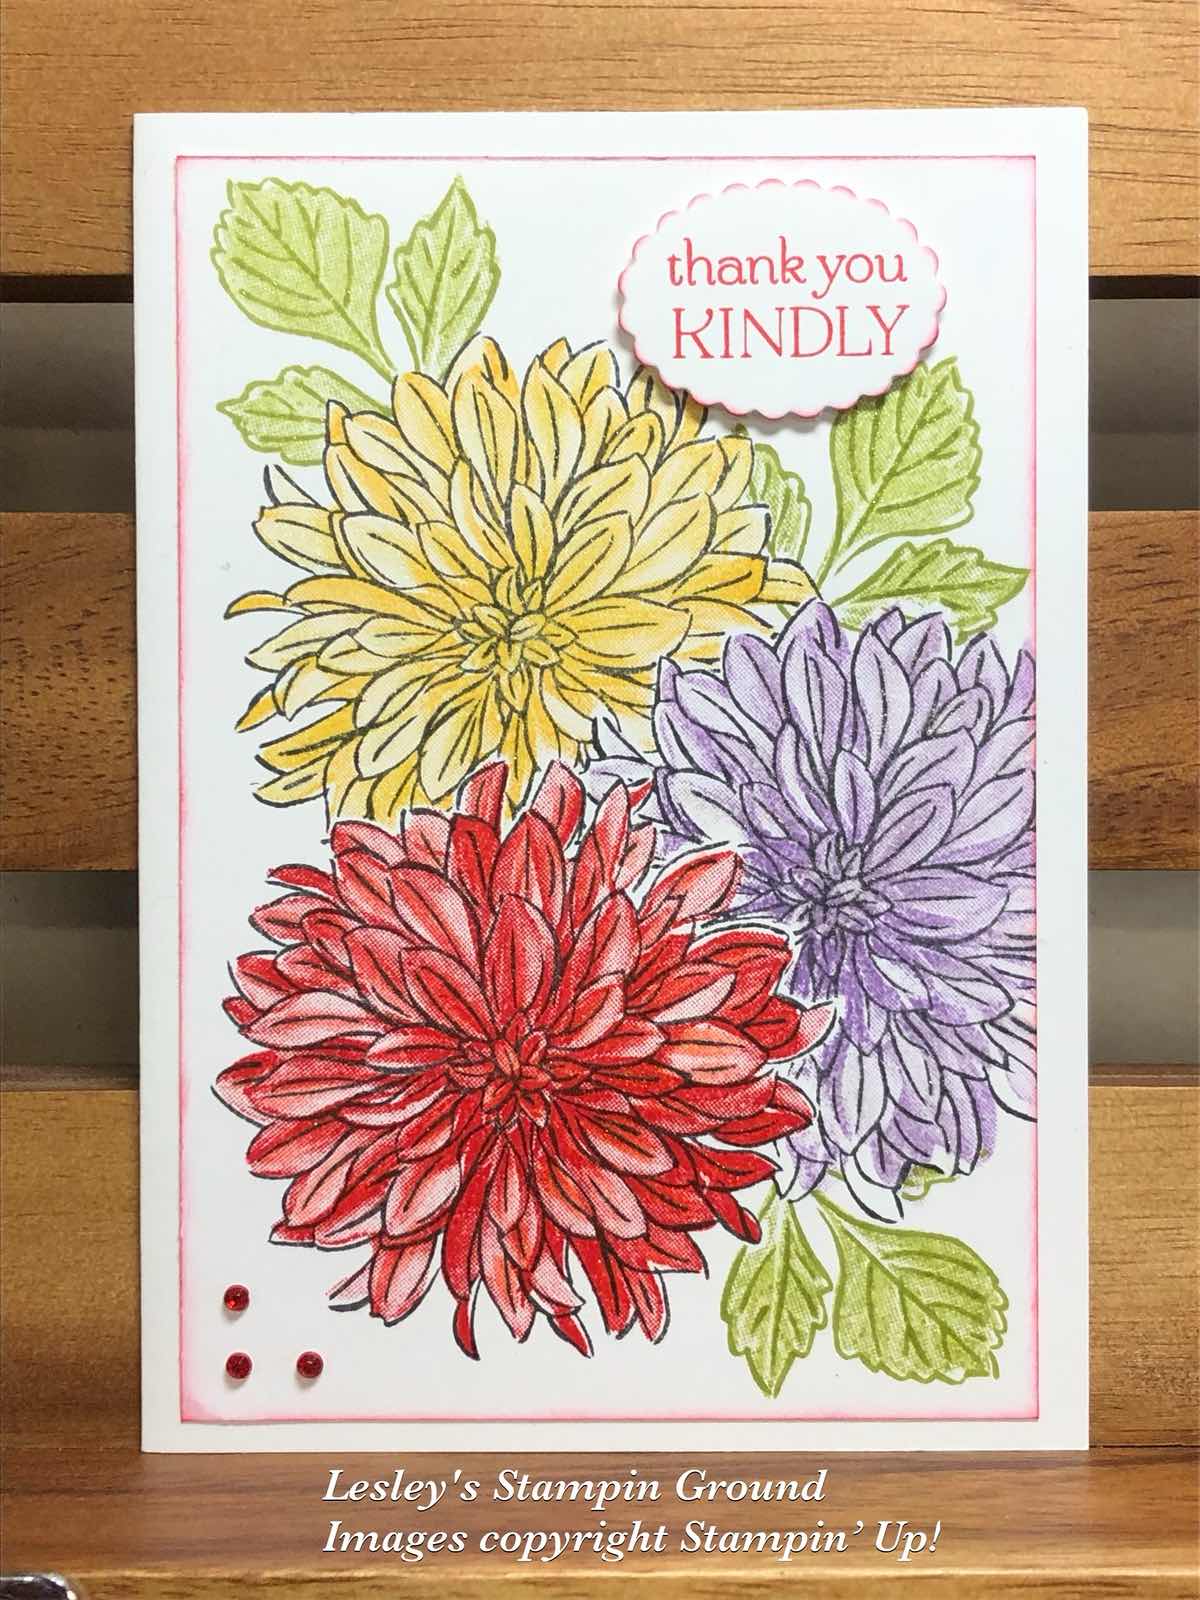
I love the Dahlia Days Bundle (#157802) which consists of the Dahlia Days stamp set (#157799) and the Detailed Dahlias Dies (#157801). I have stamped the images using the masking technique.


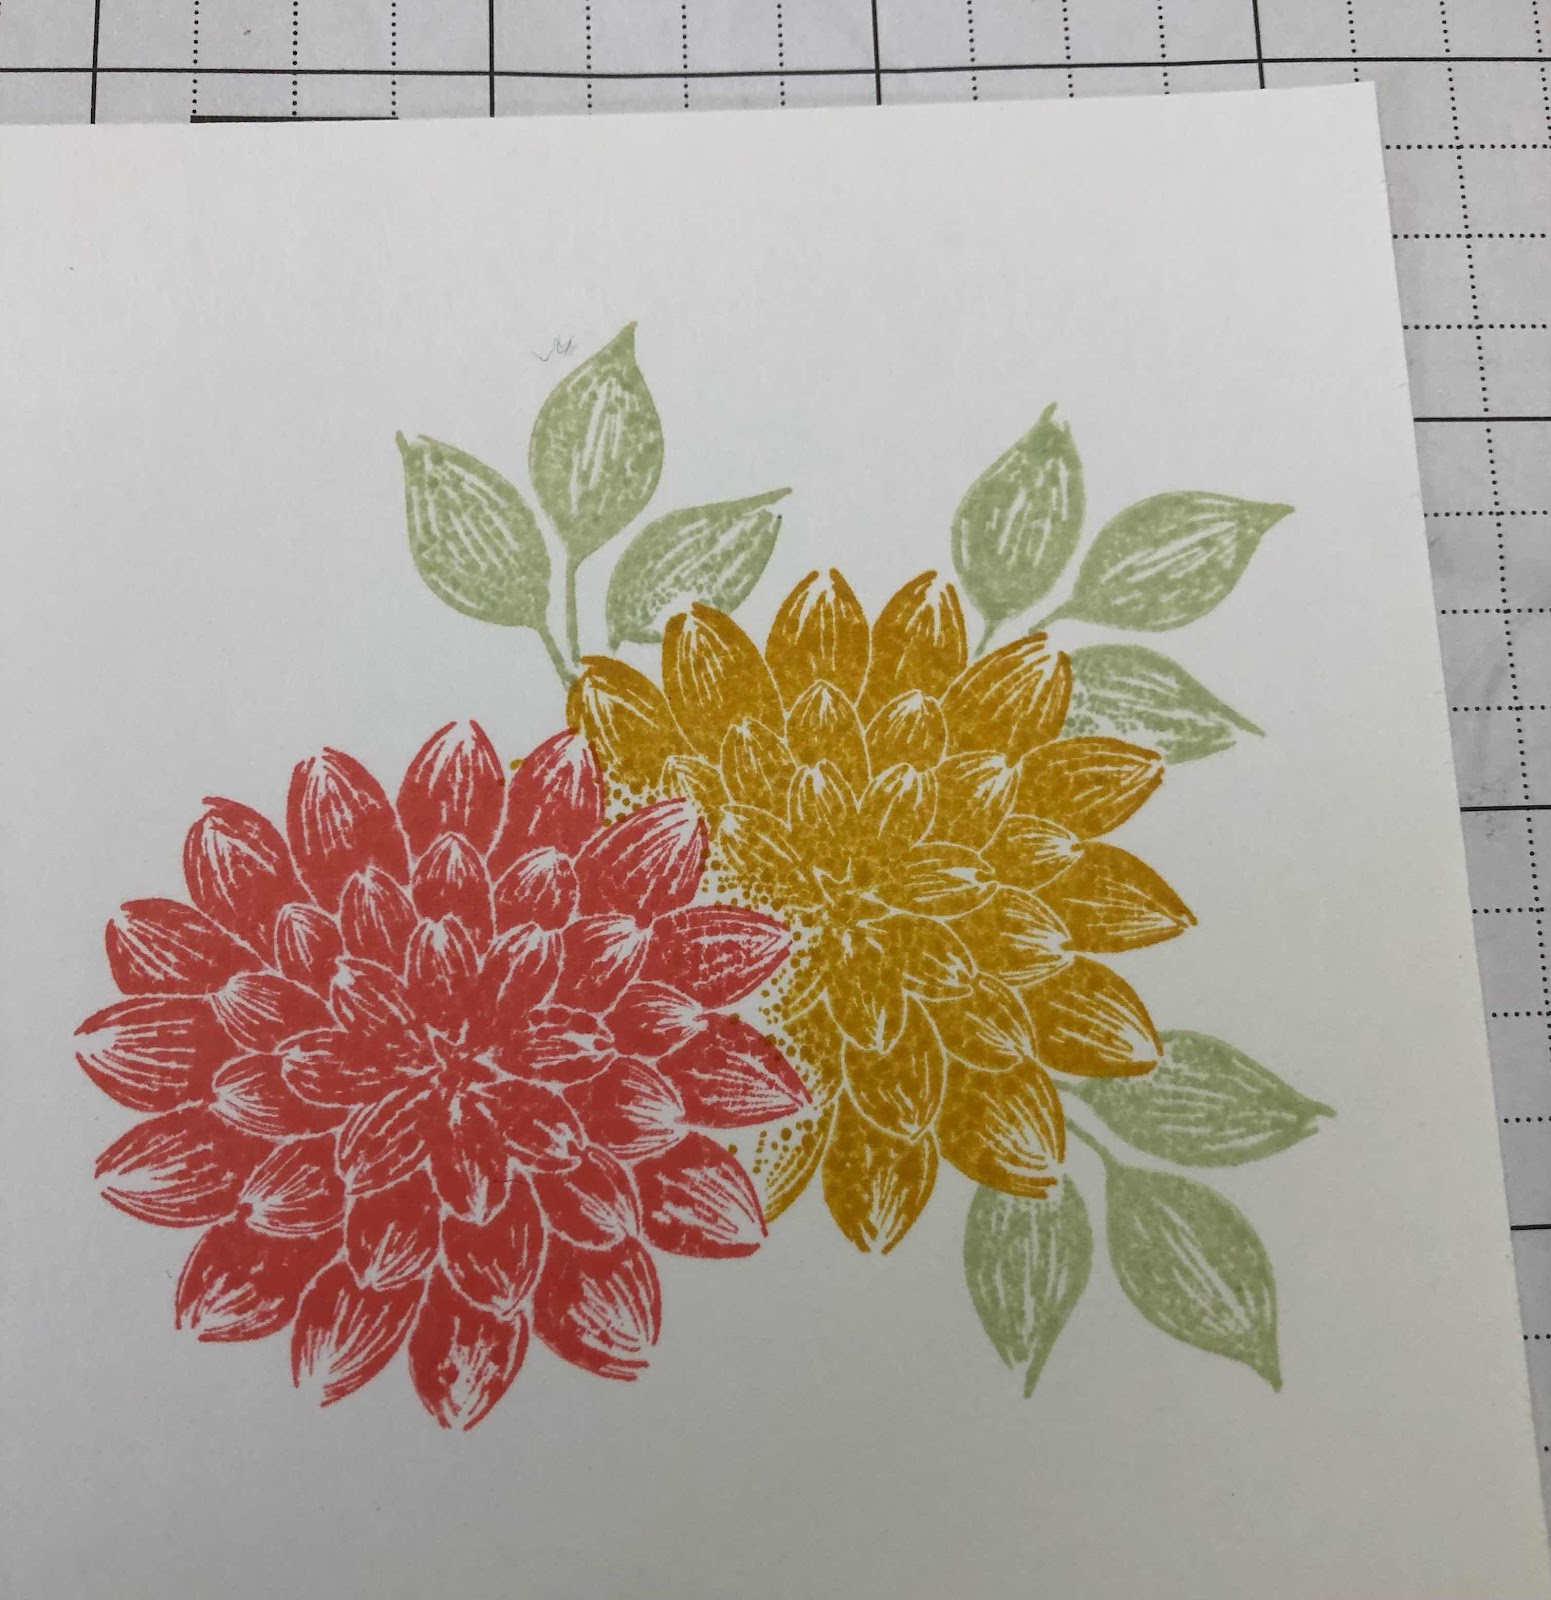
I stamped one dahlia with Gorgeous Grape ink (#147099) on Basic White card (#159228), then cut it with a die from the Detailed Dahlias. I then stamped another  dahlia with Flirty Flamingo ink (#147052) onto the Basic White card front. Using the masking technique (see below) I then stamped the next dahlia with Bumble Bee ink (#153116). Again I masked the Bumble Bee dahlia and stamped the leaves with Soft Sea Foam ink (#147102). I attached the Gorgeous Grape dahlia with Stampin’ Dimensionals (#104430).

I stamped the “label” with Highland Heather ink (#147103), then cut this with the co-ordinating die from the Detailed Dahlias. “Thinking Of You” is from Blossoms In Bloom stamp set (#152684) and stamped with Gorgeous Grape ink.

I cut a strip of the Simply Marbleous 6”x6” Designer Series Paper (#158128), from Sale-a-bration, and attached this to the cardfront. The sentiment was then attached with Stampin’ Dimensionals. I matted the cardfront with Gorgeous Grape card (#147011). The base card is Basic White. The Brushed Brass Butterflies (#158136) were added to the card. How cute are these butterflies.

TIP: To do the masking technique, stamp the image onto a piece of Post-it notes, ensuring you have the sticky part included at the back. Then cut around the image very close to the image. Don’t leave any margin like you would normally do when fussy cutting. 

Stamp your image on your card. 


Then place this mask on top of your stamped image on your card. 


Stamp your next image


Add another mask before stamping the leaves


Remove all masks


You can re-use the mask many times. I keep mine in with the stamp set. Also if you want 2 or more masks of the same image, I stamp one image on the post-it notes and placing 2 or 3 post it notes together, cut all at the same time.


“Love what you do and share what you love.”


Saturday, 21 August 2021

Delicate Dahlias Sale-a-bration

Hi again my friends,

There is a range of free products (with a qualifying order) from Sale-a-bration and one of my favourites is the Delicate Dahlias stamp set (#156601).


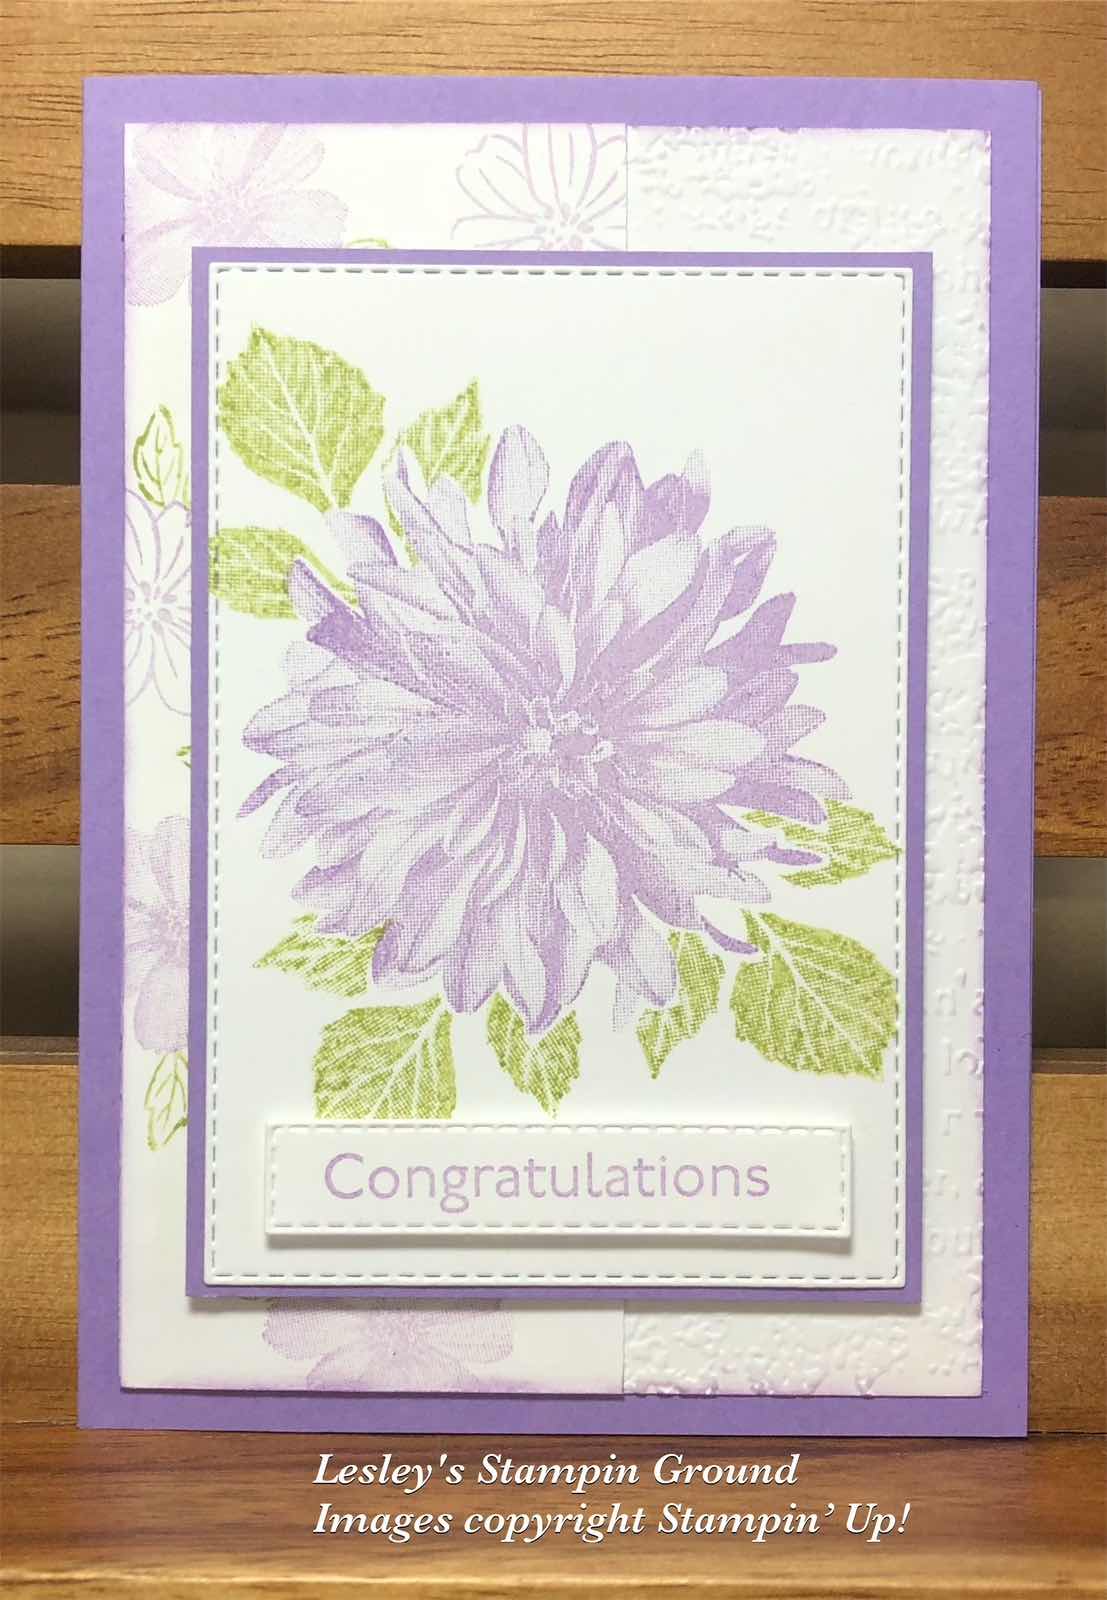
I stamped the dahlia with Highland Heather ink (#147103). I had a mask which I had made previously by stamping on a post-it note and cut around the image. This was the placed over the stamped image on the Basic White card (#159228). I then stamped the leaves with Pear Pizzaz ink (#147104) after stamping off on scrap paper for a lighter colour. Masking allows you to stamp two or more images and gives a layered look. I cut this with a Stitched Rectangles Die (#151820) and matted this with Highland Heather card (#147010).

I then stamped the smaller flowers and leaves from the Delicate Dahlias stamp set on a strip of Basic White card. This was attached to the card front which had been dry embossed with the Timeworn Type 3D Embossing Folder (#156505). The base card is Highland Heather.

The matted dahlia image was attached to the card with Stampin’ Dimensionals (#104430). Congratulations is from the Art Gallery stamp set (#158201) and stamped with Highland Heather ink then cut with a Stitched Rectangles Die.

“Love what you do and share what you love.”


Stay safe & keep crafting!!


Wednesday, 21 July 2021

Delicate Dahlias

Hello friends,

I have a sneak peek today of one the Sale-a-bration products which will be available from 3rd August, free with a $90 order. This stamp set is Delicate Dahlias (#156601) and is a 2 step stamping set.


I stamped the first flower in the bottom left corner. I stamped the outline image with Tuxedo Black Memento ink (#132708), then stamped the coloured image with Poppy Parade ink (#147050). The other 2 flowers are stamped using the masking method. To do this I stamped the outline image on 2 pieces of post-it notes and cut the image very close to the line. I then placed one of these cut images over the Poppy Parade dahlia and stamped the flower with Memento ink and Highland Heather ink (#147103). This was repeated with the Daffodil Delight (#154883) dahlia, this time covering both the Poppy Parade and Highland Heather flowers. I then stamped the leaves also using the masking technique. The outline leaves were stamped with Pear Pizzaz ink (#147104) and the inside colour was also stamped with Pear Pizzaz but I “stamped off” first to give a lighter colour.

The sentiment is from the same stamp set and stamped with Poppy Parade ink. This was cut with the Messages Die (#154422) and attached to the Basic White card front (#159228). I daubered the edges of the card front with Poppy Parade ink and this was attached to the Basic White base card. The Red Rhinestone Basic Jewels (#146924) were attached to finish the card.

The masking technique is a great way to have 2 or more images but not stamping over the other images and giving more dimension to the card.

“Love what you do and share what you love.”


Monday, 15 March 2021

Masking Technique

Hi friends,

Here’s a technique which is easy to do but looks effective. It’s called the Masking Technique.


This technique allows you to stamp a variety of images which look like they overlap and not stamping over each other. On this card I stamped the smaller flower with Melon Mambo ink (#147051) onto the Basic White card (#1591228). I then stamped this flower onto a Post-it-note and cut the image very close to the lines. I then placed this over the stamped image on the card. I stamped the larger flower using Gorgeous Grape ink (#147099) as shown below.


When the post-it-note is removed you get the image of the 2 flowers, one in front of the other.


I also stamped 2 of the larger flowers on the post-it-notes and continued stamping on the card with Daffodil Delight ink (#147094) and Real Red ink (#147084), covering each stamped image to prevent stamping over the flowers on the card. These flowers are from the Forever & Always stamp set (#154343). The leaves are from the Forever Fern stamp set (#152559) and stamped with Pear Pizzaz ink (#147104), also using the masking technique.

I added some colour to the flowers with Purple Posy Stampin’ Blends (#154896), Petal Pink Stampin’ Blends (#154893), Poppy Parade Stampin’ Blends (#154958) and So Saffron Stampin’ Blends (#154905). Then I used the Clear Wink Of Stella Brush (#141897) to add glitter to the flowers.

The stitching on the card front was achieved with the Stitched With Whimsey Dies (#155314). The sentiment from the Friends Are Like Seashells stamp set (#154368) was stamped with Gorgeous Grape ink, then cut with a Stitched Rectangles Die (#151820). The edges of the card front and sentiment were also daubered with Gorgeous Grape ink. Stampin’ Dimensionals (#104430) were used to attached the sentiment to the card.
The trio of embellishments are from the Pastel Pearls (#154571).


Have a great day!!

“Love what you do and share what you love.”